


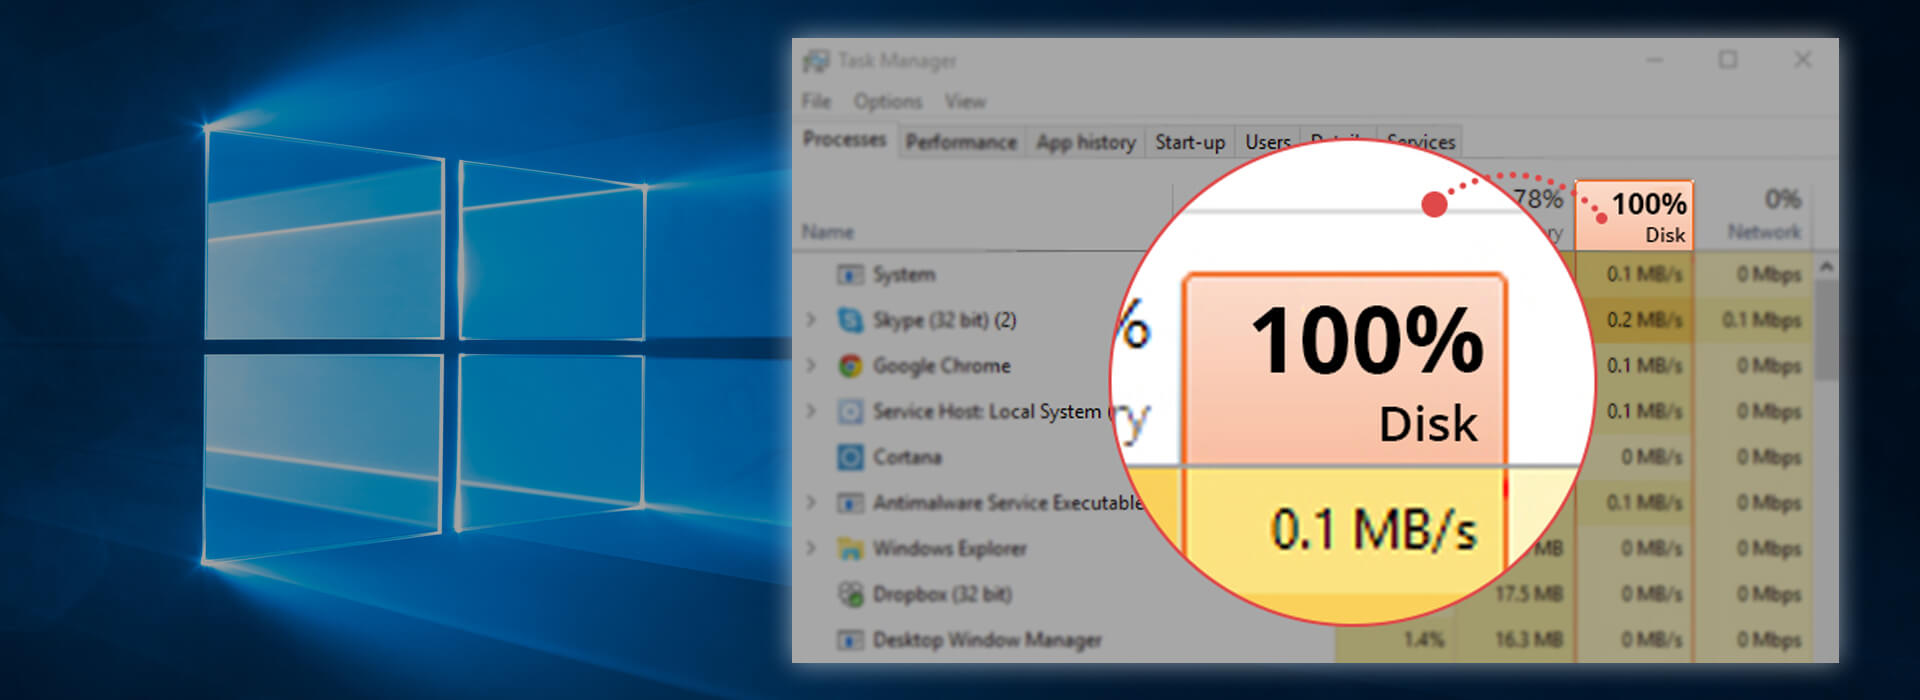
Is your PC struggling? Browser crawls, opening a folder takes ages, and even switching tabs feels like a chore. You check Task Manager, and there it is—100% disk usage. So, what’s eating up your disk? It could be anything from background processes to a faulty drive slowing things down.
But don’t worry. In this article, we will show you the 8 most effective methods to fix the 100% disk usage issue and get your PC up to speed again. Read on…
8 fixes for 100% disk usage on Windows 10 & Windows 11
Before diving into anything complicated, try a quick restart to rule out a temporary glitch. If that doesn’t help, just work your way through the list until you find the one that works for you.
- Fix 1: Disable SuperFetch
- Fix 2: Update your device drivers
- Fix 3: Perform a disk check
- Fix 4: Reset Virtual Memory
- Fix 5: Disable Antivirus Software temporarily
- Fix 6: Update StorAHCI.sys Driver in Registry
- Fix 7: Check the health of your disk
- Fix 8: Change energy options
- Wrapping up
Fix 1: Disable SuperFetch
SuperFetch helps reduce boot time and optimize the loading of frequently used programs. However, it has been identified as a potential cause of disk performance issues in Windows 8 and later versions of Windows, including Windows 10 and 11.
Here’s how to stop this service:
- On your keyboard, press Windows logo key, type command prompt, then select Run as administrator.
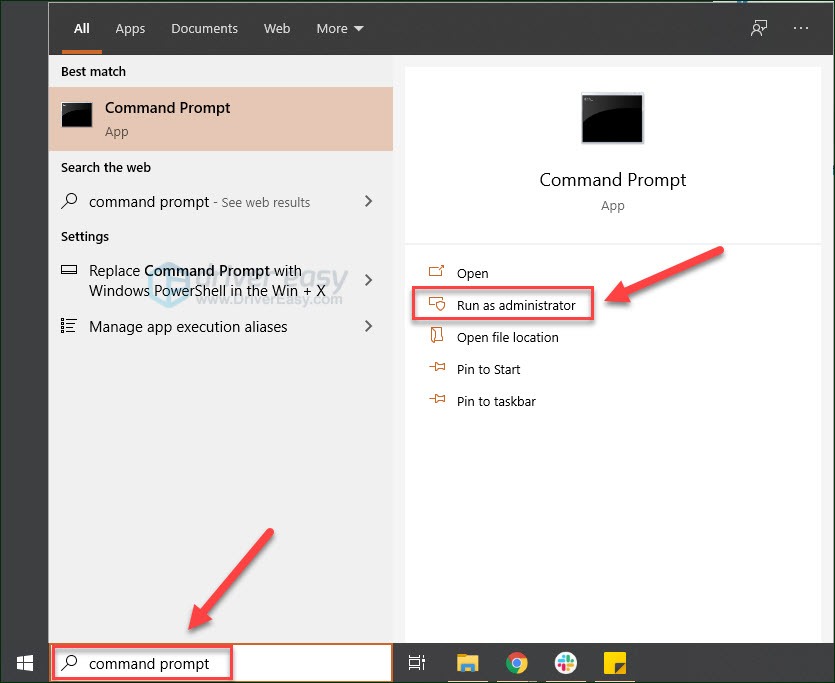
- Click Yes at the User Account Control prompt.

- In the command prompt window, type
net.exe stop superfetchand hit Enter on your keyboard. If the command is successful, you should see a message that says “The Superfetch service was stopped successfully.”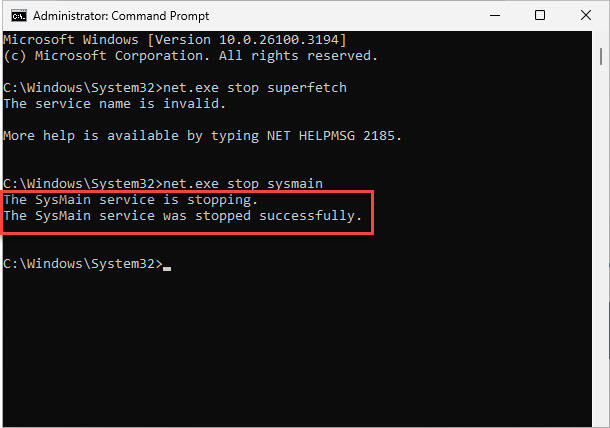
- If the command above doesn’t work and you see a message like “The service name is invalid,” try
net.exe stop sysmaininstead and press Enter. - Wait for a few minutes to see if your computer starts performing better.
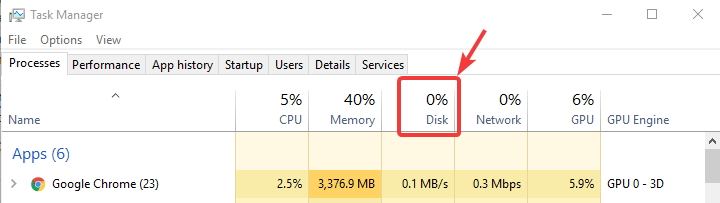
Alternatively, you can check your computer’s disk usage: On your keyboard, press Ctrl, Shift, and Esc at the same time to open Task Manager. Then in the Processes tab, look at the % at the top of the Disk column.- If it’s no longer at 100%, or has significantly dropped, then great! You’ve likely resolved the issue!
- If the 100% disk usage problem persists, please move on to Fix 2, below.
- If it’s no longer at 100%, or has significantly dropped, then great! You’ve likely resolved the issue!
Fix 2: Update your device drivers
Drivers are the essential software that handles the communication between your hardware (like your hard drive, graphics card, and motherboard) and your operating system. However, if they’re outdated or faulty, they can cause your hard drive to work overtime, which pushes the disk usage to 100% and brings your system to a halt. To see if this is the culprit, you should update your drivers.
You can update the drivers manually from the manufacturer’s website, but if you’d rather skip the hassle, you can do it automatically with Driver Easy. Driver Easy is a trusted driver updater that scans your system, finds the correct drivers, and updates them automatically. With Driver Easy, you can rest assured that all drivers are official, safe, and reliable. You don’t have to worry about making mistakes or downloading the wrong drivers.
All it takes is a few clicks:
- Download and install Driver Easy.
- Run Driver Easy and click Scan Now button. Driver Easy will then scan your computer and detect any outdated or faulty drivers.

- You may see a list of drivers that are missing or out-of-date. To update these drivers, you can start a 7-day free trial or upgrade to Driver Easy Pro. Either option will automatically download and install the latest device drivers for you.
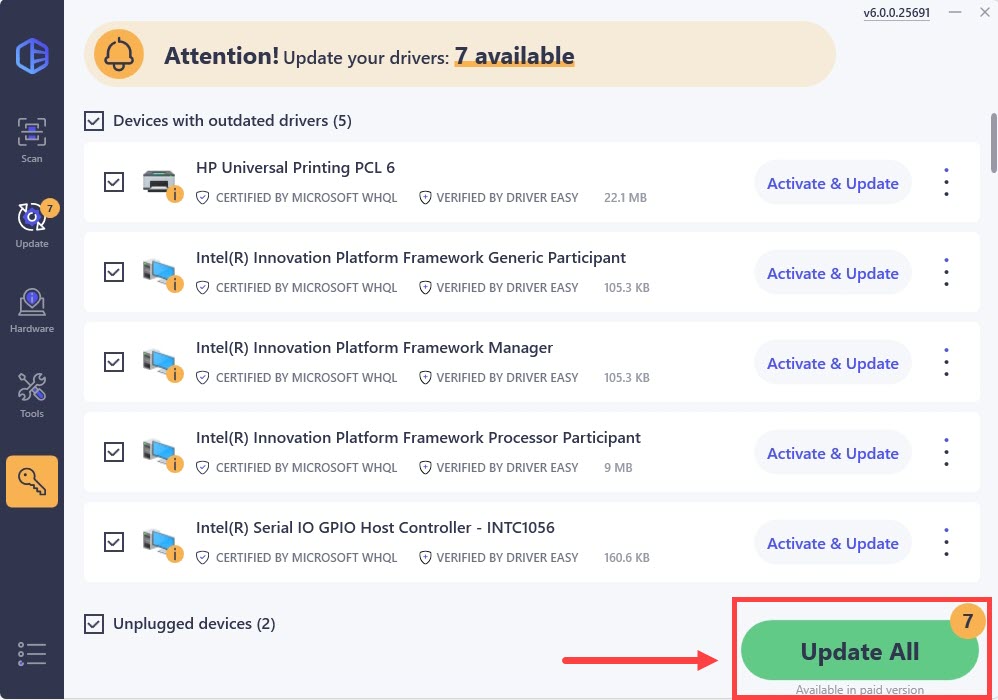
- Once done, open Task Manager and check the Disk column to see if it shows a lower percentage. If yes, then congrats – you’ve fixed the high disk usage issue! If it’s still pegged at 100%, please proceed to Fix 3, below.
Fix 3: Perform a disk check
As many Windows users have discovered, running a disk check can often fix the 100% disk usage problem. This is because it systematically identifies and repairs file system errors or bad sectors on your hard drive that directly contribute to excessive disk activity.
Here’s how to perform the check:
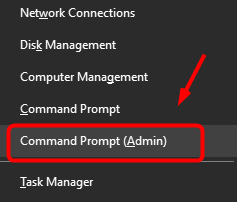
- On your keyboard, press the Windows logo key and X at the same time, then choose Command Prompt (Admin).
- Click Yes at the User Account Control prompt.

- The command prompt will once again display. Type chkdsk.exe /f /r, hit Enter, then type Y to confirm that you’d like to perform the disk check the next time you restart your computer. Please make sure you have closed all of your applications first.
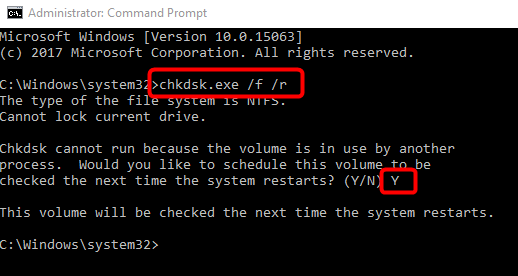
IMPORTANT: Disk check will start the next time you boot your PC and it might take some time to complete (could be a day for some). If, when you restart, you don’t have time to wait for the disk check to complete, you can skip it. You’ll need to reschedule it again, as described above, though. - Once the disk check is complete, reopen Task Manager to review your disk usage. If it has returned to a normal level, then you’re in the clear. If it’s still no joy, please continue with Fix 4, below.
Fix 4: Reset Virtual Memory
Virtual memory can be considered an extension of your computer’s physical memory. It’s a combination of RAM and a portion of your hard drive. When the RAM isn’t enough to perform a task, Windows will temporarily store files in virtual memory, then swap them back to RAM when required.
To reset virtual memory:
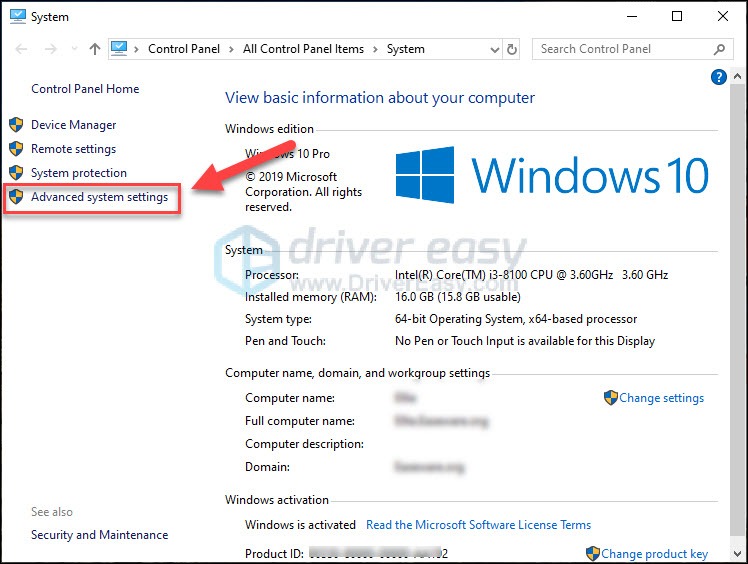
- On your keyboard, press the Windows key and the Pause/ Break key at the same time. Then choose Advanced System Settings on the left panel.
- Go to the Advanced tab, then click Settings.
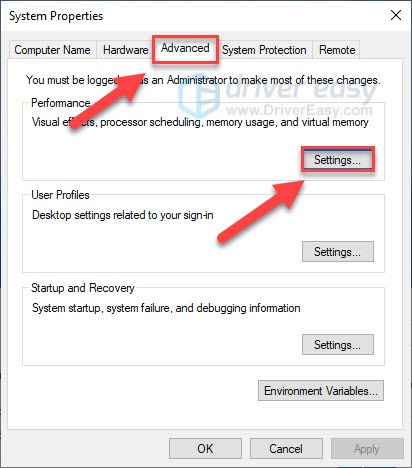
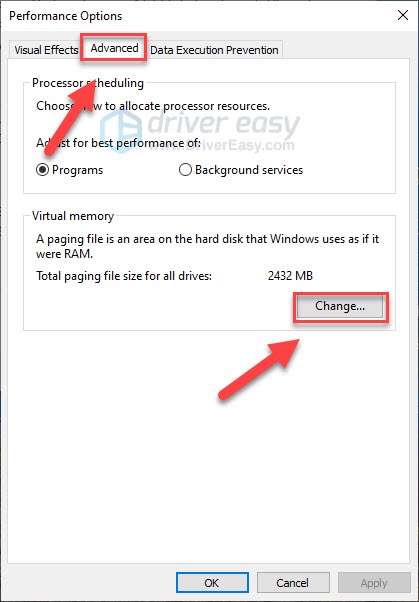
- Go to the Advanced tab again, and choose Change… in the Virtual memory section.
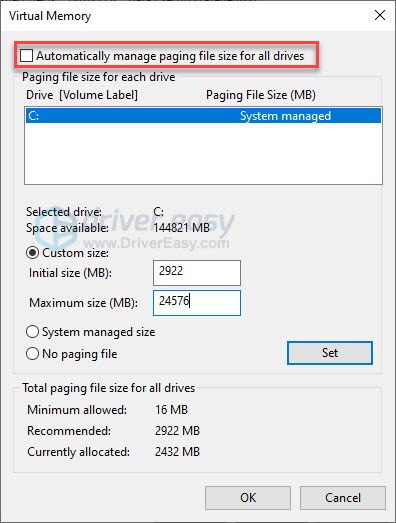
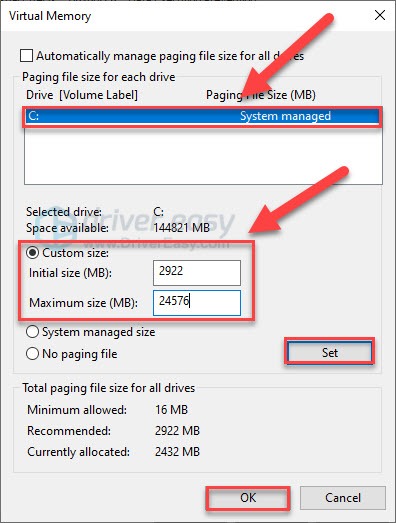
- Ensure the Automatically manage paging file size for all drives checkbox is NOT ticked.
- Select your windows drive (the hard drive or partition that has Windows installed on it – usually C:), and enter an Initial size and Maximum size for your virtual memory:
- Initial size – This value varies, depending on your computer. If you’re not sure what value to use, just enter whatever the number is in the Recommended category.
- Maximum size – Don’t set this value too high. It should be about 1.5 times the size of your physical RAM. e.g. A PC with 4 GB (4096 MB) of RAM should have no more than about 6,144 MB virtual memory (4096 MB x 1.5).
- Once you’ve entered your virtual memory values, click Set, then click OK to continue.
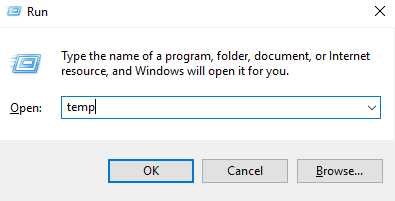
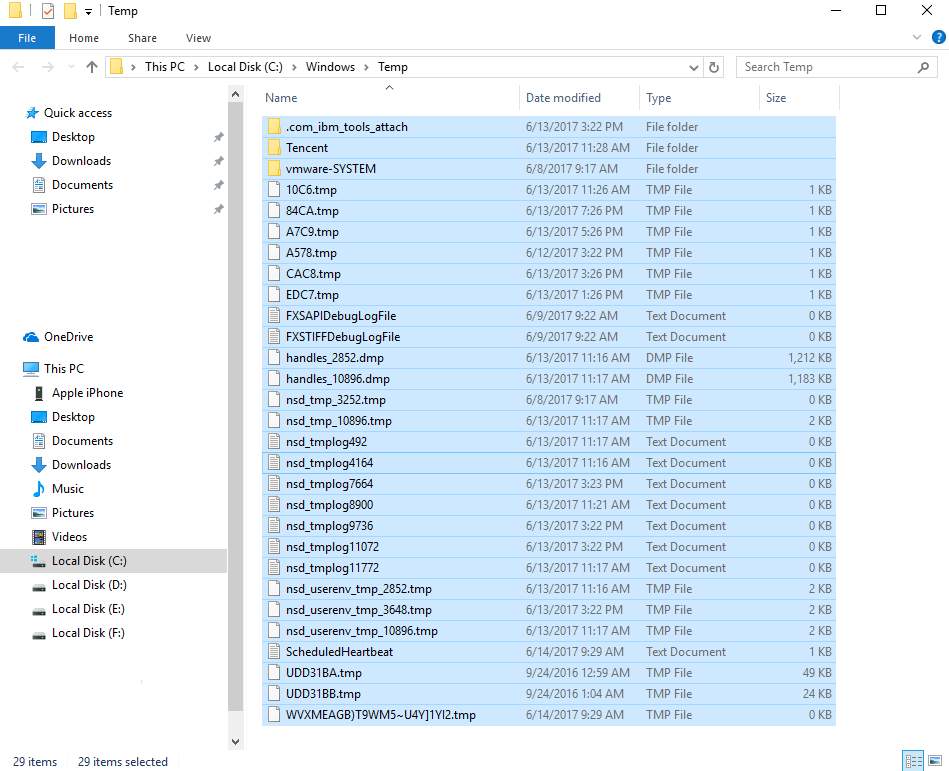
- Clear all your computer’s ‘temp’ files. On your keyboard, press Windows key and R at the same time, then in the Run form, type temp and hit Enter. This will invoke Windows Explorer with your Temp folder open, showing you all the temp files on your computer.
- Select all the files in the Temp folder and delete them.
- Launch Task Manager and review the Disk column under the Processes tab. If the usage has gone down, your issue is likely resolved. If disk usage remains unusually high, please move on to the next fix.
Fix 5: Disable Antivirus Software temporarily
If you’ve installed antivirus or anti-malware programs such as Norton, Kaspersky, AVG, Avast Behavior Shield or Malwarebytes, you should temporarily turn them off or disable them to see if they’re causing your disk usage problem.
Please see your antivirus software’s documentation to learn how to disable it. You might also find these links useful:
- How to temporarily turn off Norton Antivirus program?
- How to stop AVG temporarily?
- How to disable Avast temporarily?
Note that Microsoft has its own default anti-malware, Windows Defender. It’s automatically enabled even if you also have other antivirus applications installed. Even if you disable your other antivirus programs, Windows Defender is always there for you during that certain time range. So, no need to worry too much about temporarily turning your antivirus off.
Once you’ve disabled your antivirus, check your computer’s disk usage again. If the percentage is no longer maxed out, you’ve found the culprit, and you should contact the vendor of your antivirus software to see if they can provide some help.

If your disk usage is still high, please continue with Fix 6.
Fix 6: Update StorAHCI.sys Driver in Registry
Some Advanced Host Controller Interface PCI-Express (AHCI PCIe) models running the inbox StorAHCI.sys driver may experience 100% disk usage due to a firmware bug. If this applies to your system, updating the driver settings can resolve the issue.
Here’s how to determine if this is the cause and fix it:
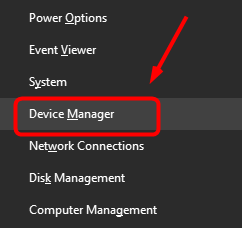
- Open Device Manager by pressing Windows logo key and X at the same time to choose Device Manager.
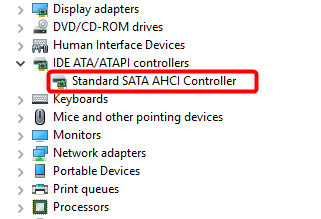
- Expand the IDE ATA/ATAPI Controllers category, and double-click the AHCI controller.
- Go to the Driver tab and click Driver Details. If you can see storahci.sys stored in a path of system32 folder, then you are running the inbox AHCI driver.
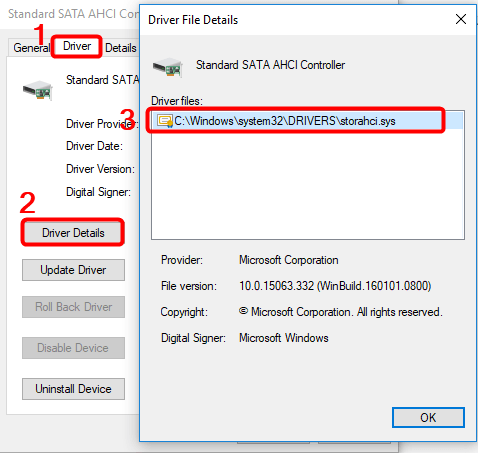
- Close the Driver Details window and go to Details tab. From the drop-down menu, select Device Instance Path. Make note of the path, starting from VEN_.

- Type regedit in the search box of Start panel, then hit Enter on your keyboard to run Registry Editor. Then go to:
HKEY_LOCAL_MACHINE\System\CurrentControlSet\Enum\PCI\ <AHCI Controller>\<Random Number>\Device Parameters\Interrupt Management\MessageSignaledInterruptProperties
The <AHCI Controller> here refers to the name you see from step 2.
The <Random Number> differs on different machines.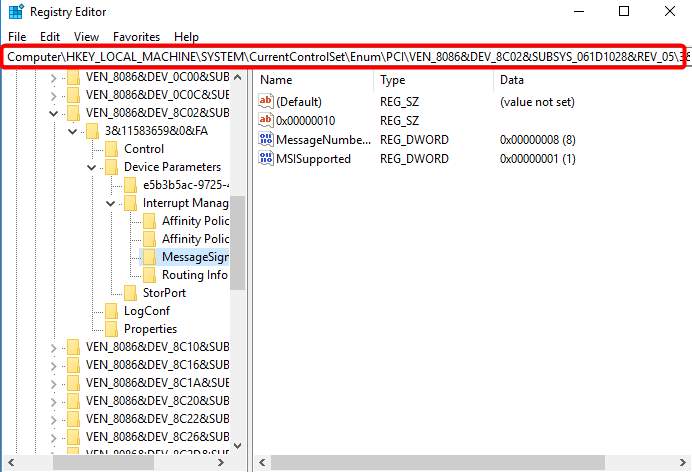
- Double-click the MSISupported key and change the value to 0.
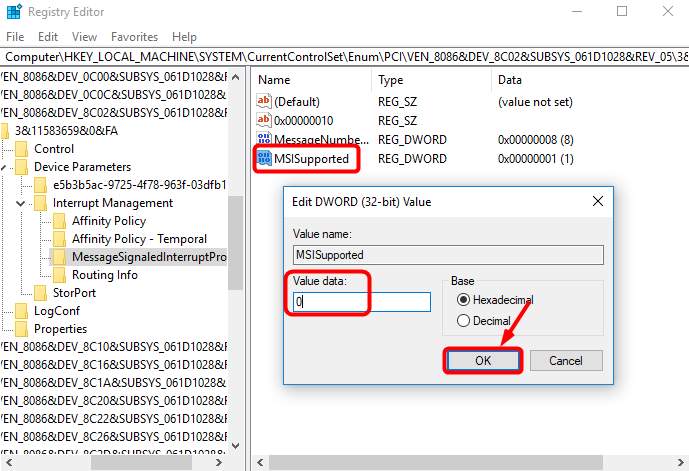
- Restart your computer to apply the change.
- Open Task Manager and check out your disk usage. If it has dropped from 100%, you’ve likely resolved the issue. If it’s still high, please proceed to Fix 7, below.
Fix 7: Check the health of your disk
If you’re still facing issues, it’s a good idea to check whether a hardware problem might be to blame. Thankfully, you don’t need to be a professional to check your disk’s health. Tools like HD Tune and CrystalDiskInfo make it easy to assess the condition of your drive.
Here’s how you can quickly check your disk’s health with HD Tune
- Download and install the latest version of HD Tune.
(The trial version is enough for troubleshooting. You can get a license if you want to learn more about the disk’s performance.)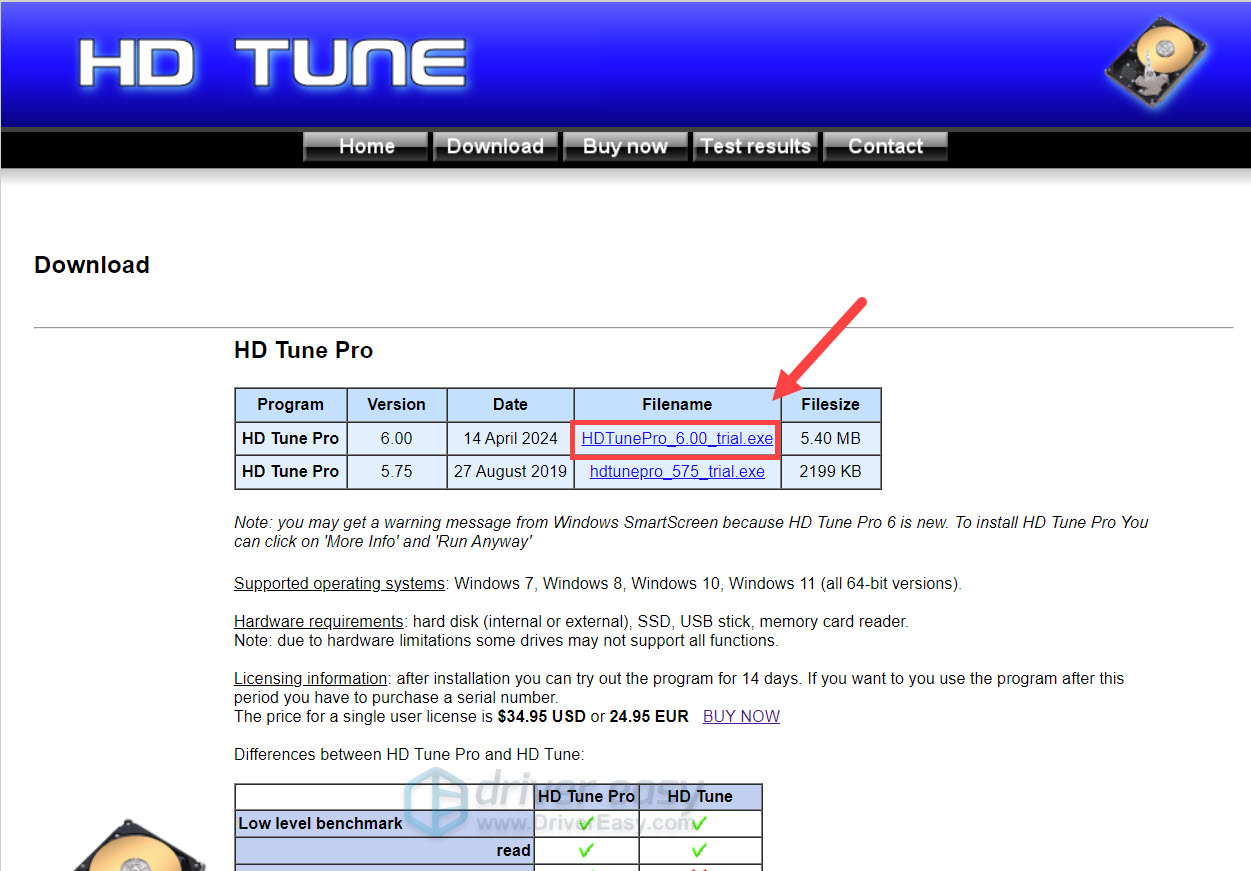
- Launch HD Tune. Select the Health tab.
Here you can see the S.M.A.R.T info of your disk. (S.M.A.R.T is a monitoring system providing a series of attributes or diagnostics for each disk model.) At this moment, you don’t need to figure out each entry’s meaning — simply check if there’s any one of them has a Status that is not “Ok“. If you see a warning, you may need to google the entry label and determine your next step.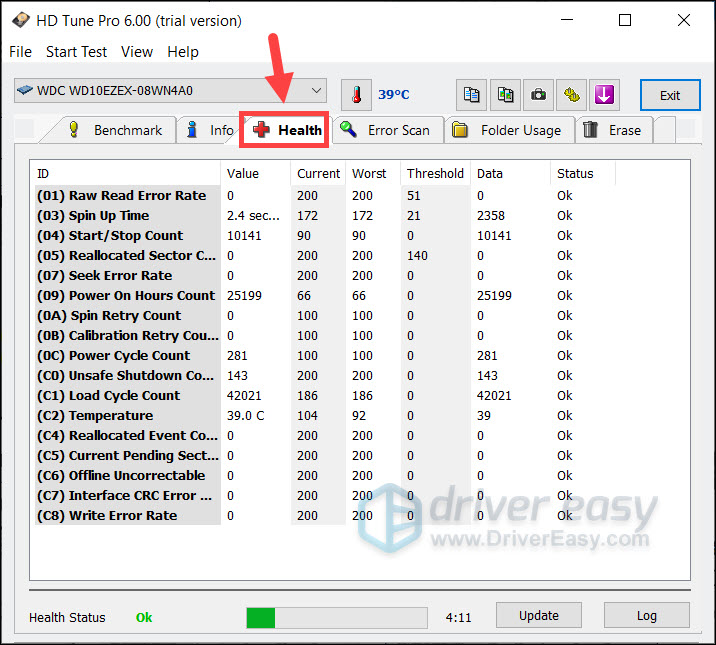
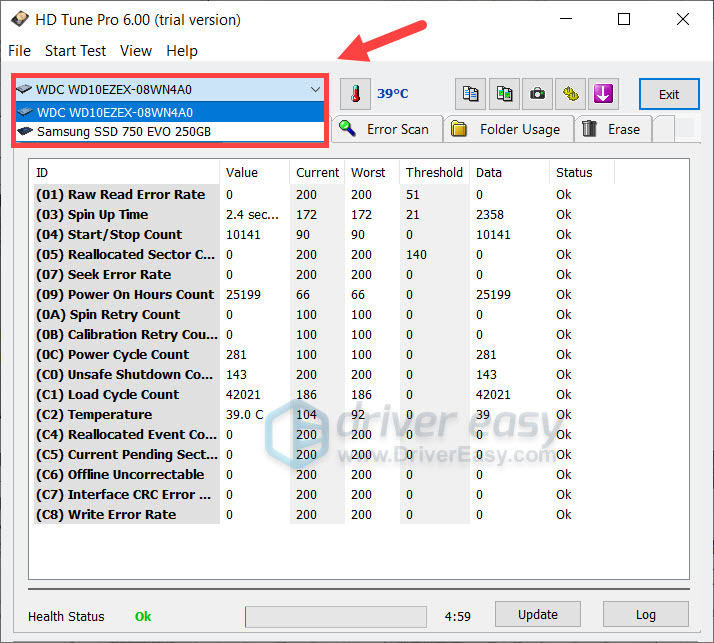
- On the top left corner, you can toggle the drop down menu to select the disk (if you have multiple). This will allow you to check the health of each disk.
You’d also need to check if the disk has bad blocks. Before you start, note that this process could take hours to complete. You may want to try other fixes before this one.
- In HD Tune, select the Error Scan tab. First make sure the Quick Scan checkbox is unchecked. Then click Start.
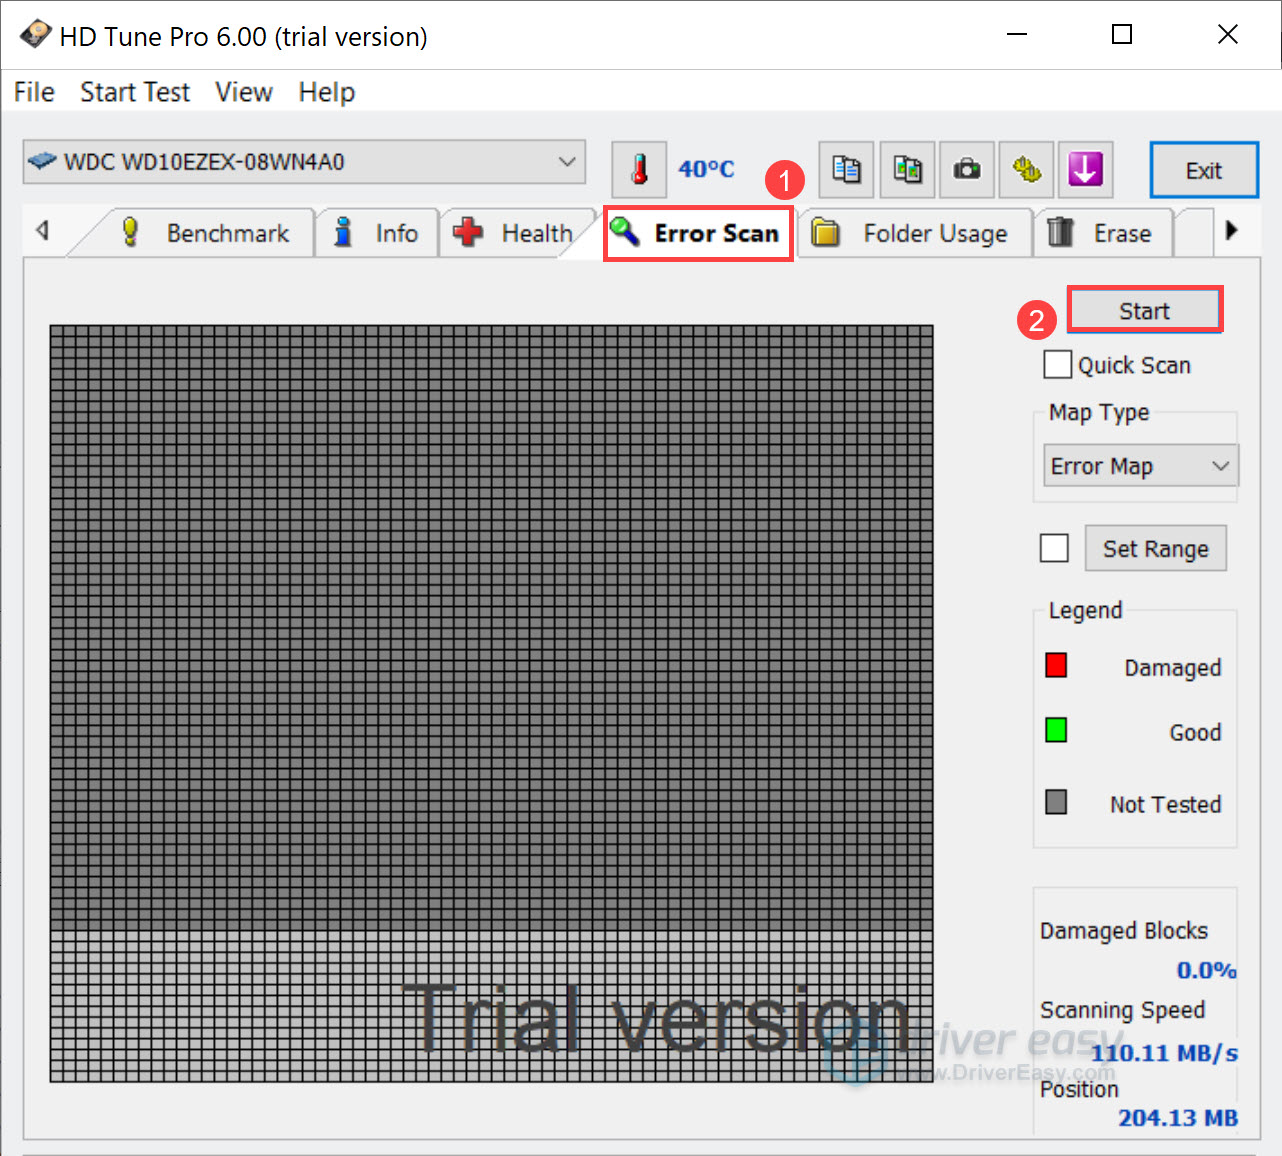
- Once it completes, check the graph and look for yellow or red blocks. If there’re any red (damaged) blocks, you should consider backing up your data and replace the faulty disk.
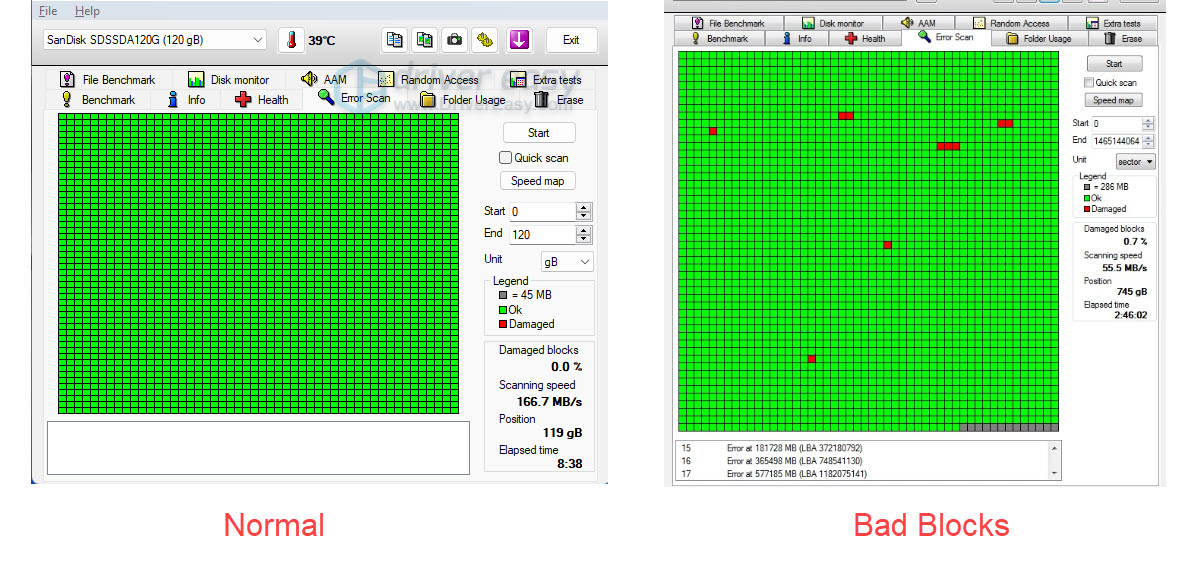
- Again, you can use the drop down menu on the top left corner to scan different disk. It’s recommended you scan all the disk to make sure all your hard drives are in good condition.
Once complete, re-visit Task Manager and check if the disk usage level has dropped to a normal range. If yes, then great! If it still hits 100%, please continue with Fix 8, below.
Fix 8: Change energy options
If you’re dealing with 100% disk usage, switching to the High Performance power plan is a proven fix that can make a difference. The High Performance power plan makes sure your PC runs at full capacity and potentially stops energy-saving settings that might slow down your hard drive.
Here is how to do it:
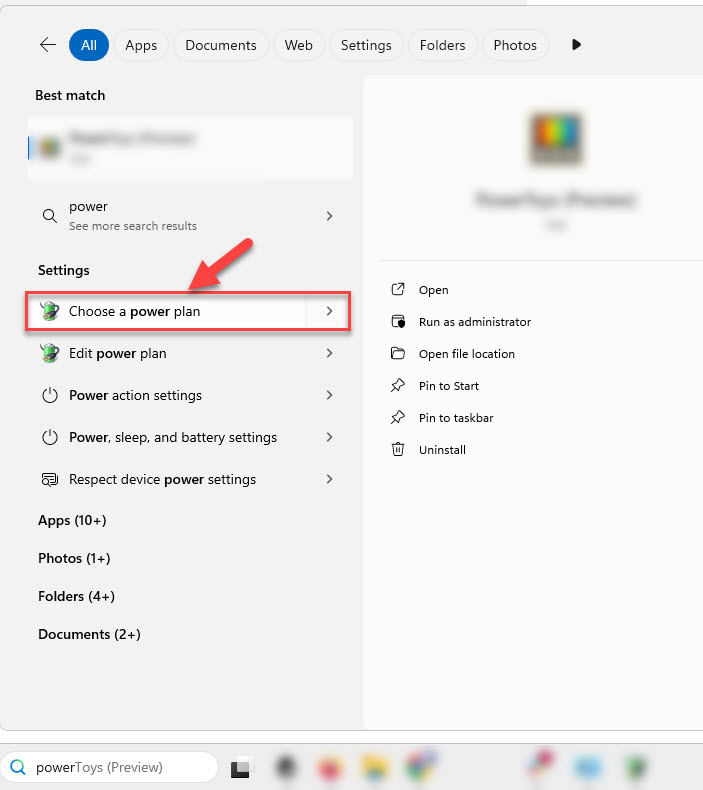
- On your keyboard, press the Windows logo key and type power. Then click on Choose a power plan when it pops up as a result.
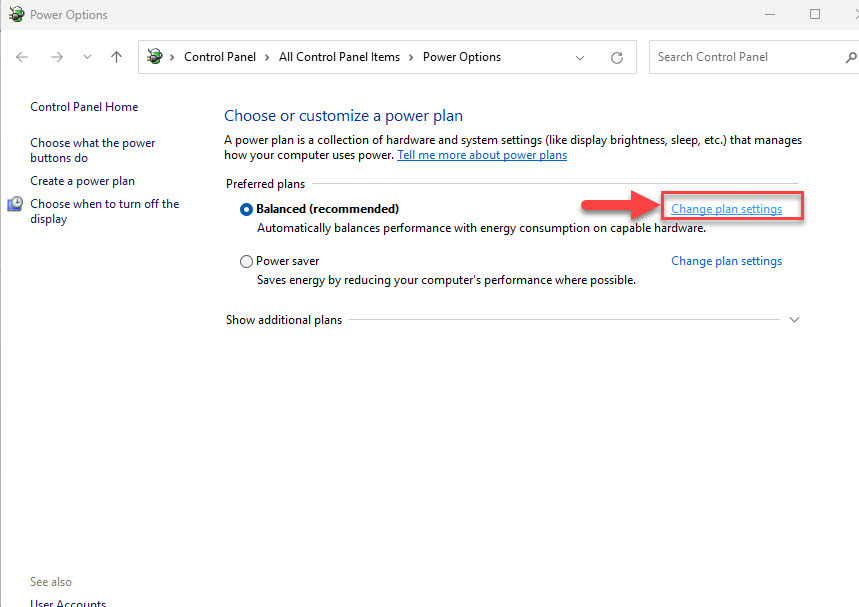
- In the Power Options window, click Change plan settings.
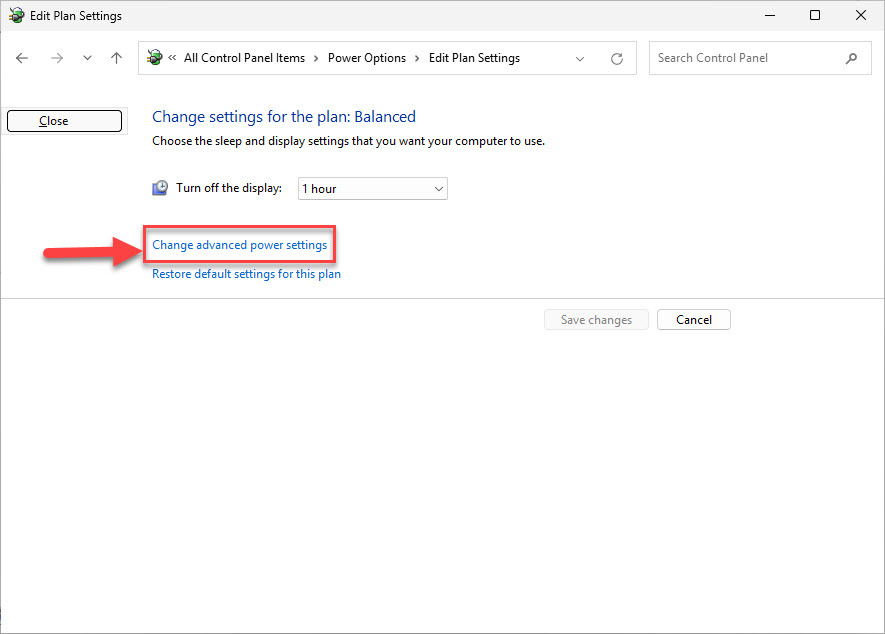
- Click Change advanced power settings.
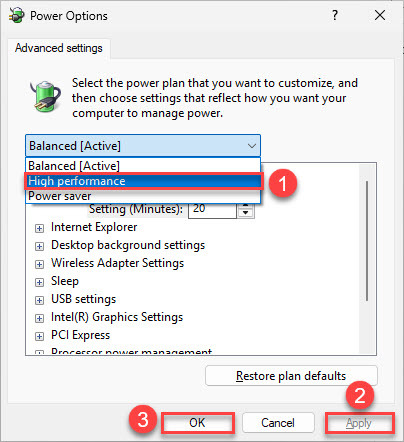
- In the Power Options window that pops up, select the High Performance power plan and then click Apply > OK.
- Check Task Manager to see if the disk usage has returned to normal.
Wrapping up
100% disk usage can slow your PC to a crawl, but with the right fixes, you can resolve the issue and get your system running smoothly again.
If you’re still stuck, consider reinstalling Windows or upgrading to an SSD for a serious speed boost. Also, regular maintenance—like clearing temp files and keeping drivers updated—can help keep disk issues from coming back.
Hope this guide helped! If you found any new fix that worked, please share it with us in the comments. We’d love to hear from you!

