It can be a frustrating issue that the sound or audio on your Windows 11 computer intermittently stops or becomes distorted. To troubleshoot the issue, you may need to check various settings and potential causes. In this tutorial, we’ve got you covered!
Before delving into any advanced settings
First, you should restart your computer. Sometimes, a simple restart can resolve temporary glitches or conflicts that may be causing the audio to cut out.
If your audio still cuts out after a restart, try these fixes:
- Check the basics
- Install all Windows updates
- Update audio drivers
- Run the audio troubleshooter
- Disable audio enhancements
- Restart audio services
1. Check the basics
To efficiently identify the source of the problem, you need to confirm that your audio device is functioning properly. If you’re using external speakers, check the power source and connections. Check if they’re working properly on other devices.
If you’re pretty sure that your speakers or headphones are in good condition, try the fixes below.
2. Install all Windows updates
Windows updates often address software bugs and compatibility issues that may contribute to the audio problem. To take advantage of bug fixes and system improvements that come with Windows updates, you can verify if you install all the available Windows updates. Below are the steps you take:
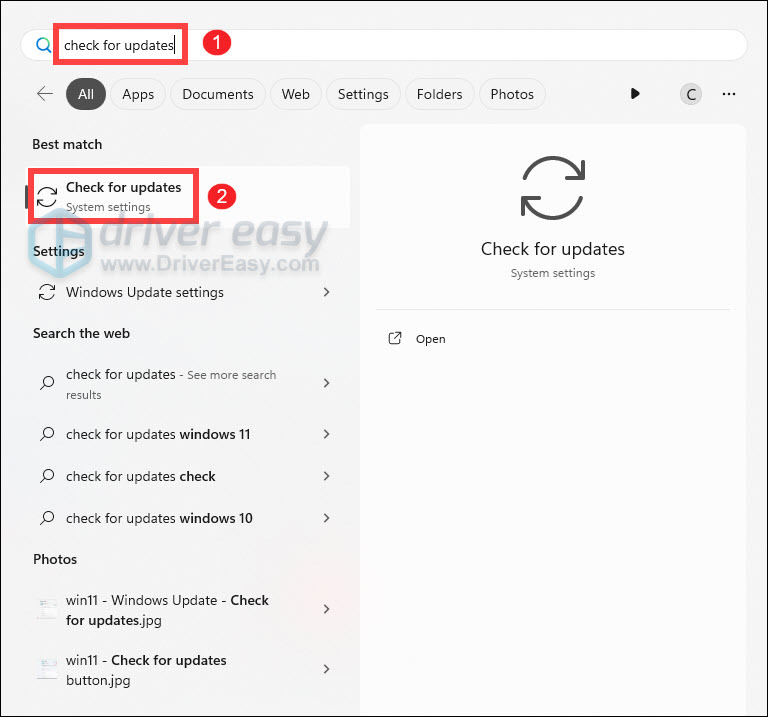
- On your keyboard, press the Windows logo key. Type check for updates and click Check for updates from the list of results.
- Click on the button Check for updates. When available, follow the on-screen instructions to download and install the Windows updates.
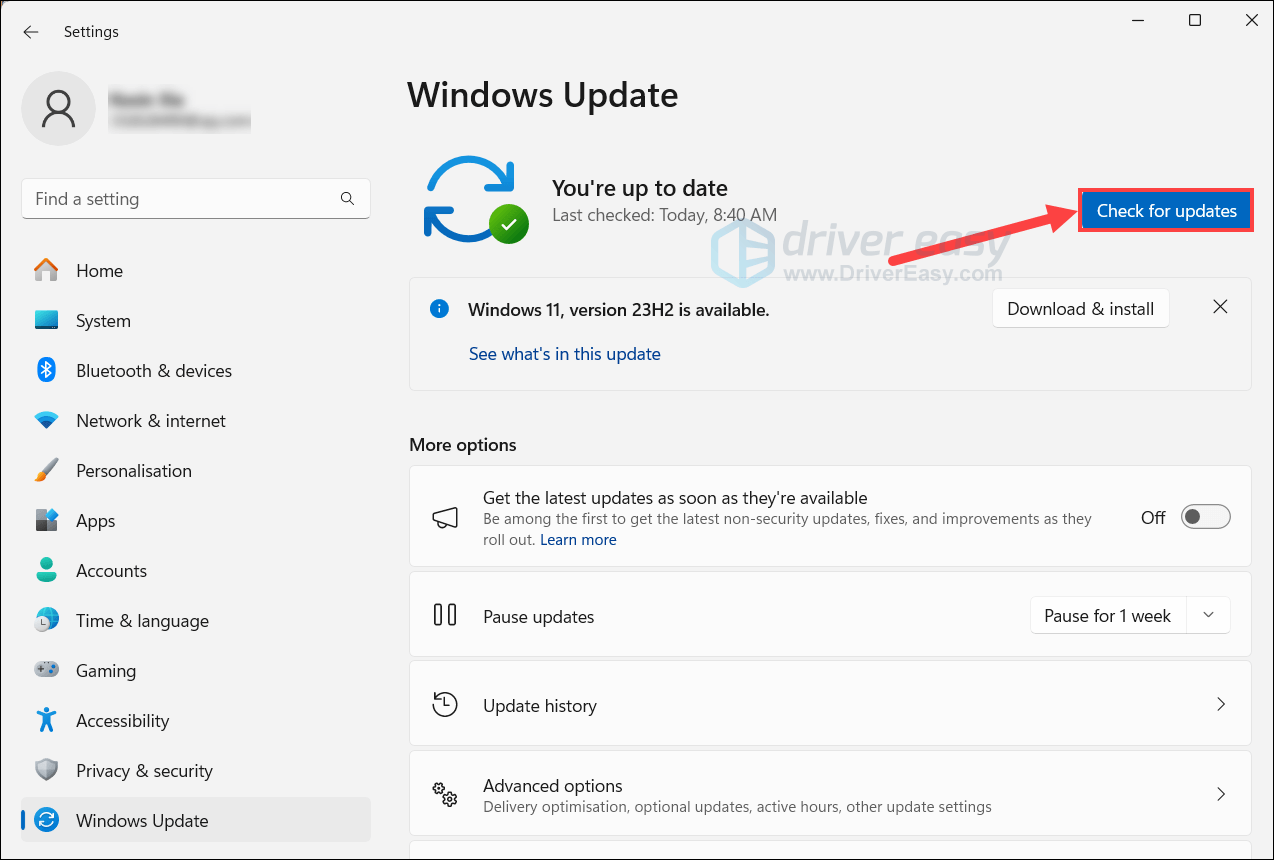
Reboot your device and play the audio to see if your problem persists.
3. Update audio drivers
Outdated or incompatible audio drivers can cause audio issues. If you can’t remember when was the last time you updated your drivers, do it right now. Driver updates often tackle bugs, enhance compatibility, and improve performance.
There are mainly two ways you can update your audio drivers: manually and automatically.
Option 1: Get driver updates from the manufacturer’s websites or via the Device Manager
You can visit the manufacturer’s website for your sound card, find the driver version that corresponds with your system, and follow the on-screen instructions to download and install the latest driver.
Have no idea which sound card you have? Take these steps:
- On your keyboard, press the Windows logo + R keys simultaneously to open the Run box.
- Type dxdiag and hit Enter.
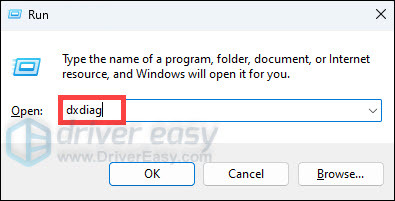
- Select the Sound tab and you should see the details of your sound card.
Or you can update your audio drivers through the Device Manager:
- On your keyboard, press the Windows logo + R keys simultaneously to open the Run box.
- Type devmgmt.msc and hit Enter.
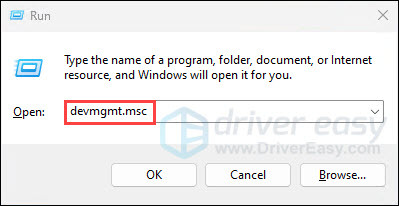
- In the Device Manager window, find and double-click the Sound, video and game controllers category to expand it. Right-click on the audio device for which you want to update the driver. This could be your sound card or integrated audio device.
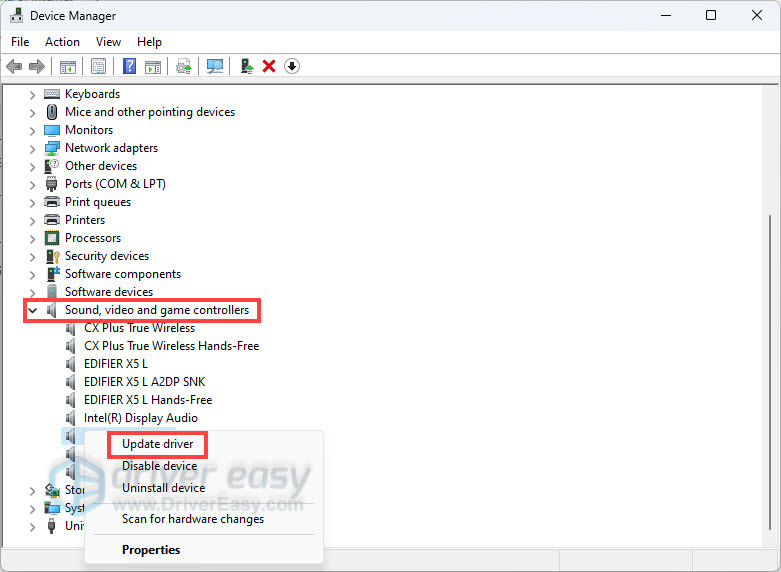
Then follow the on-screen instructions to search for and install the latest drivers.
Option 2: Automatically update drivers with Driver Easy
If you don’t have the time or patience to update drivers manually, you can do it automatically with Driver Easy. Driver Easy is a driver updater tool designed to simplify the process of updating device drivers. It is user-friendly and convenient. You don’t need to know the make and model of your audio device, Driver Easy handles it all. Driver Easy can help you identify missing and outdated drivers, and download and install the latest ones for your system, direct from the manufacturer’s websites.
Below is the simple three-step guide to update drivers with Driver Easy:
- Download and install Driver Easy.
- Run Driver Easy and click the Scan Now button. Driver Easy will then scan your computer and detect any problem drivers.

- Click Update All to automatically download and install the correct version of all the drivers that are missing or out of date on your system. (This requires the Pro version – you’ll be prompted to upgrade when you click Update All. If you don’t want to pay for the Pro version, you can still download and install all the drivers you need with the free version; you just have to download them one at a time, and manually install them, the normal Windows way.)
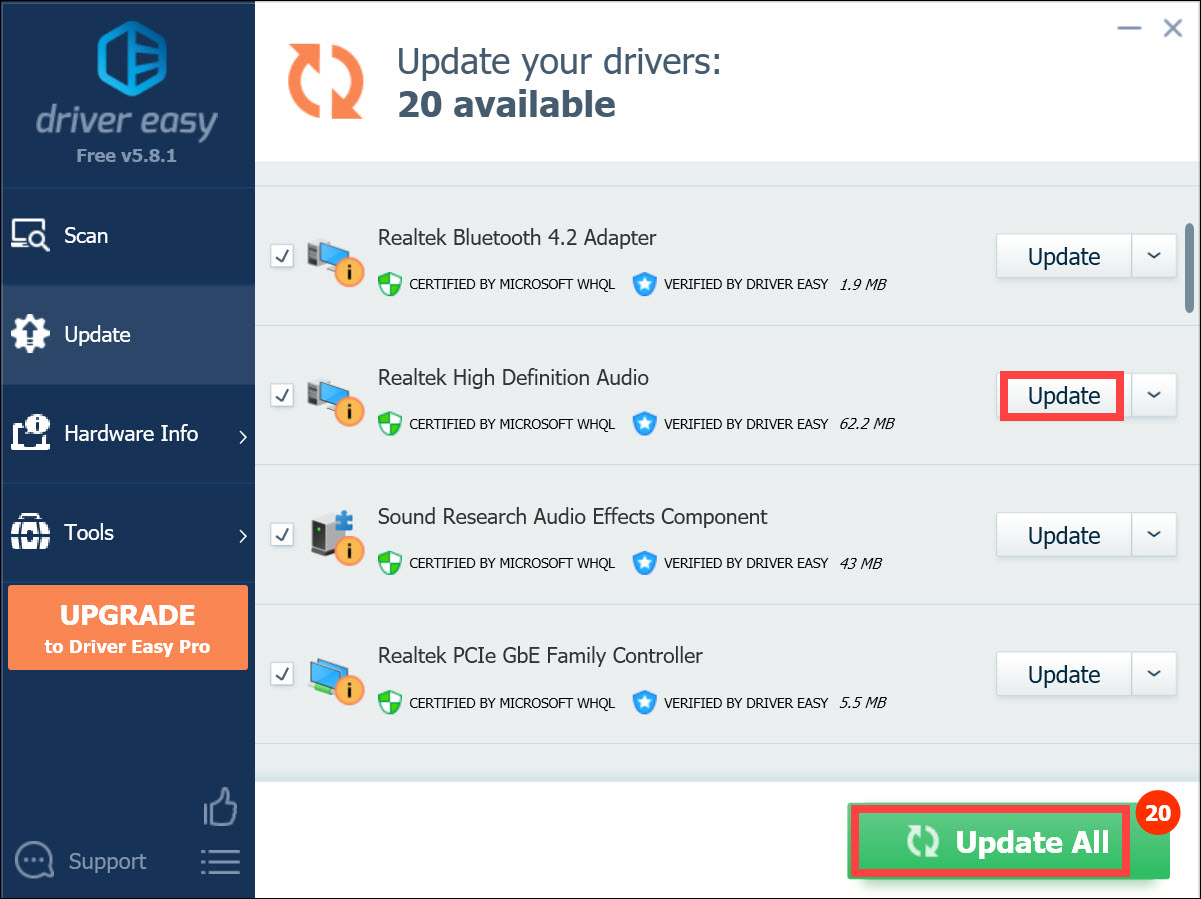
After updating your drivers, restart your computer. If your audio is still cutting out, proceed to the next fix.
4. Run the audio troubleshooter
The Windows audio troubleshooter is a built-in tool in the Windows operating system designed to automatically diagnose and resolve common audio-related issues. It provides a guided process to identify problems and apply solutions to restore proper audio functionality. If you’re experiencing issues like audio cutting out, using the Windows audio troubleshooter can be a helpful step in troubleshooting the problem.
- On your keyboard, press the Windows logo + I keys simultaneously to open Settings.
- From the left navigation panel, select System. Scroll down and Click Troubleshoot.
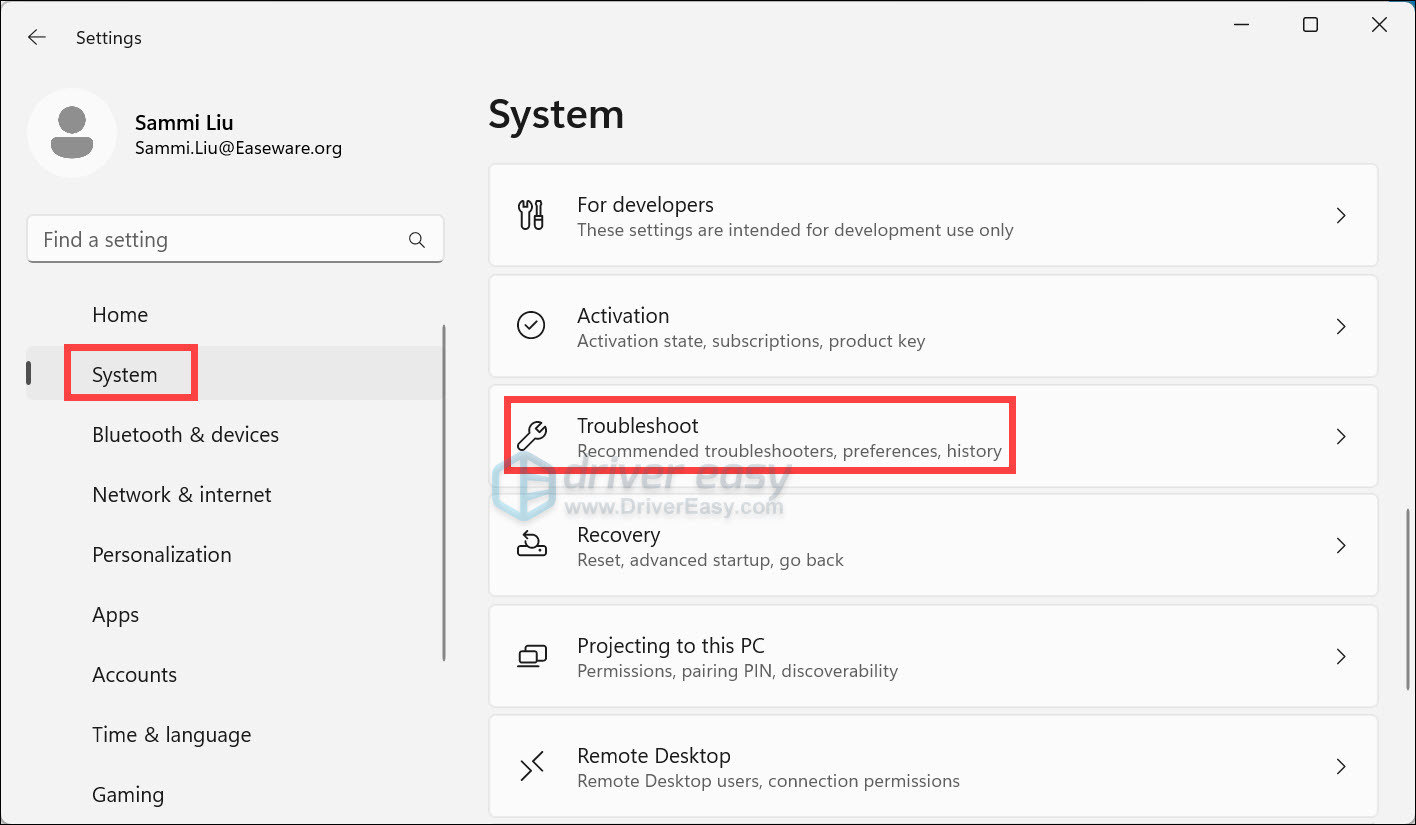
- Click Other troubleshooters.
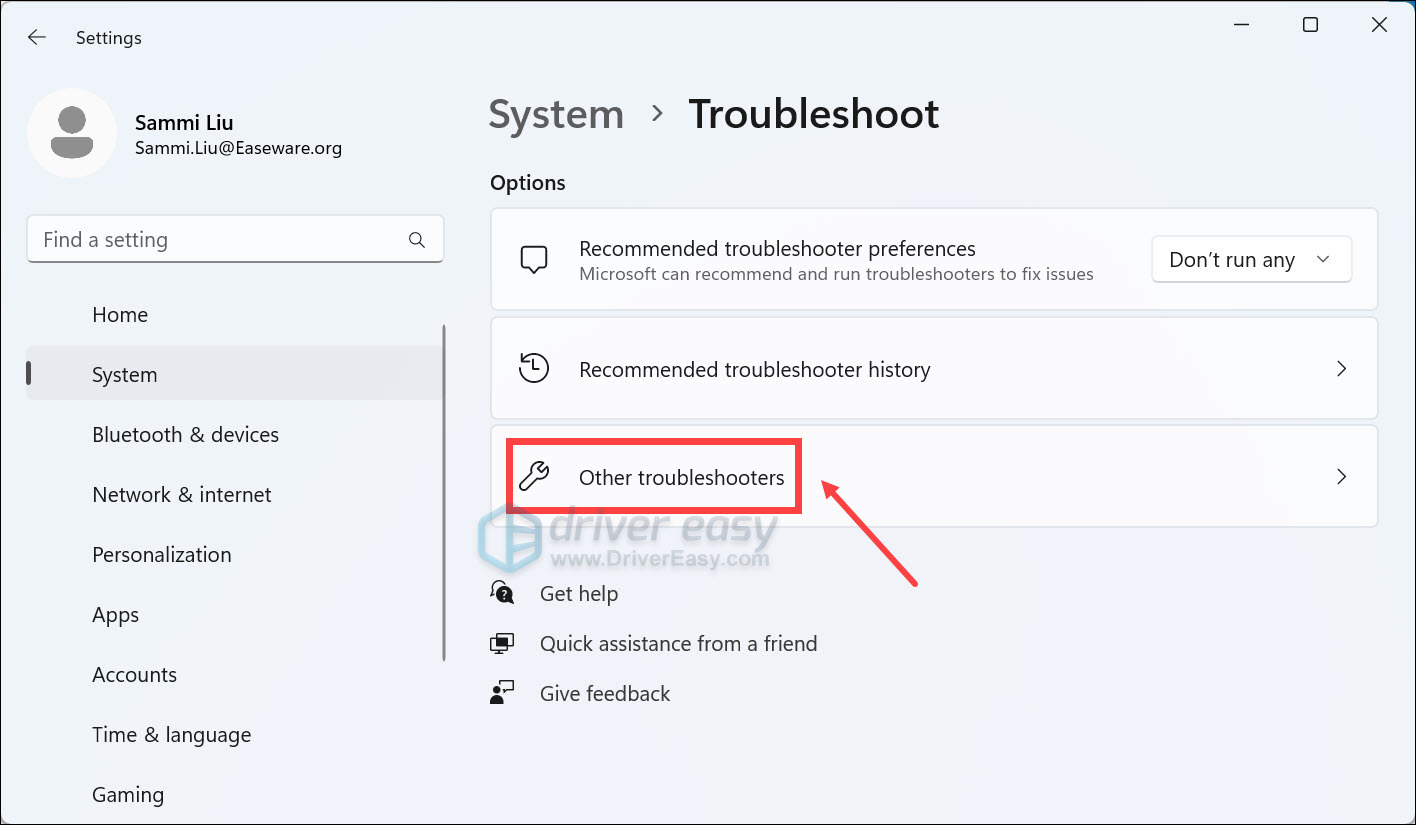
- Click on the Run button next to Audio.
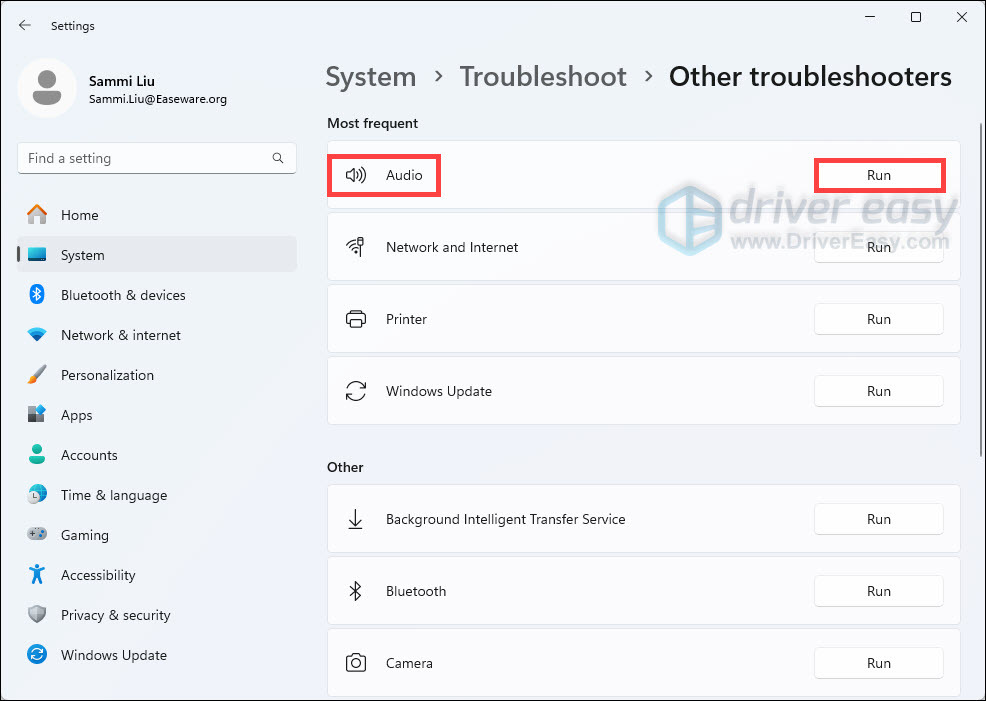
Then follow the on-screen instructions to detect and solve your issues. If it fails to do so, no worries! Below are some other fixes for you to try.
5. Disable audio enhancements
Audio enhancements are additional audio processing features and effects that are applied to the sound output on your Windows system. These enhancements are designed to improve audio quality, provide special effects, or enhance the overall listening experience. However, they may sometimes lead to compatibility issues or conflicts with certain hardware configurations. To resolve audio-related problems such as audio cutting out, disabling audio enhancements can be a troubleshooting step that helps.
- On your keyboard, press the Windows logo + I keys simultaneously to open Settings.
- Select System and click Sound.
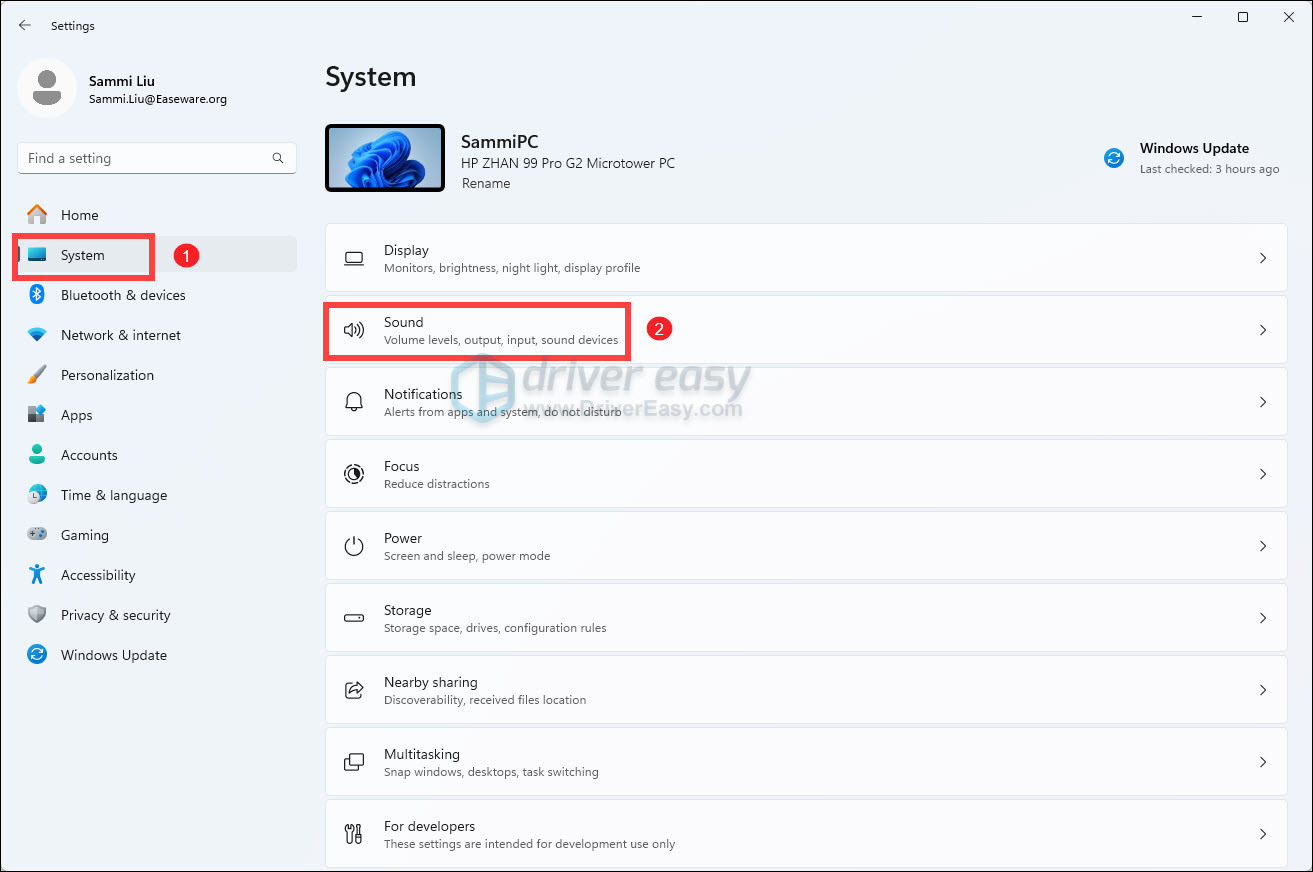
- Scroll down to the Advanced section and click All sound devices.
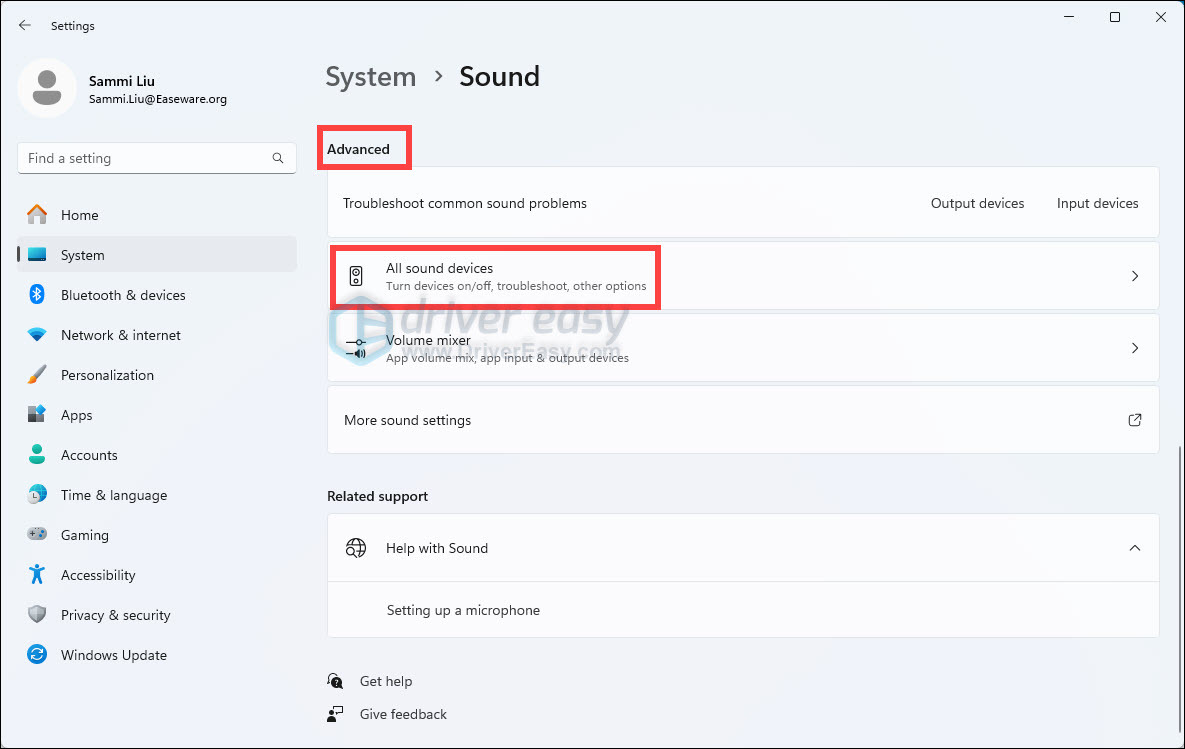
- Under the Output devices section, click Speakers.
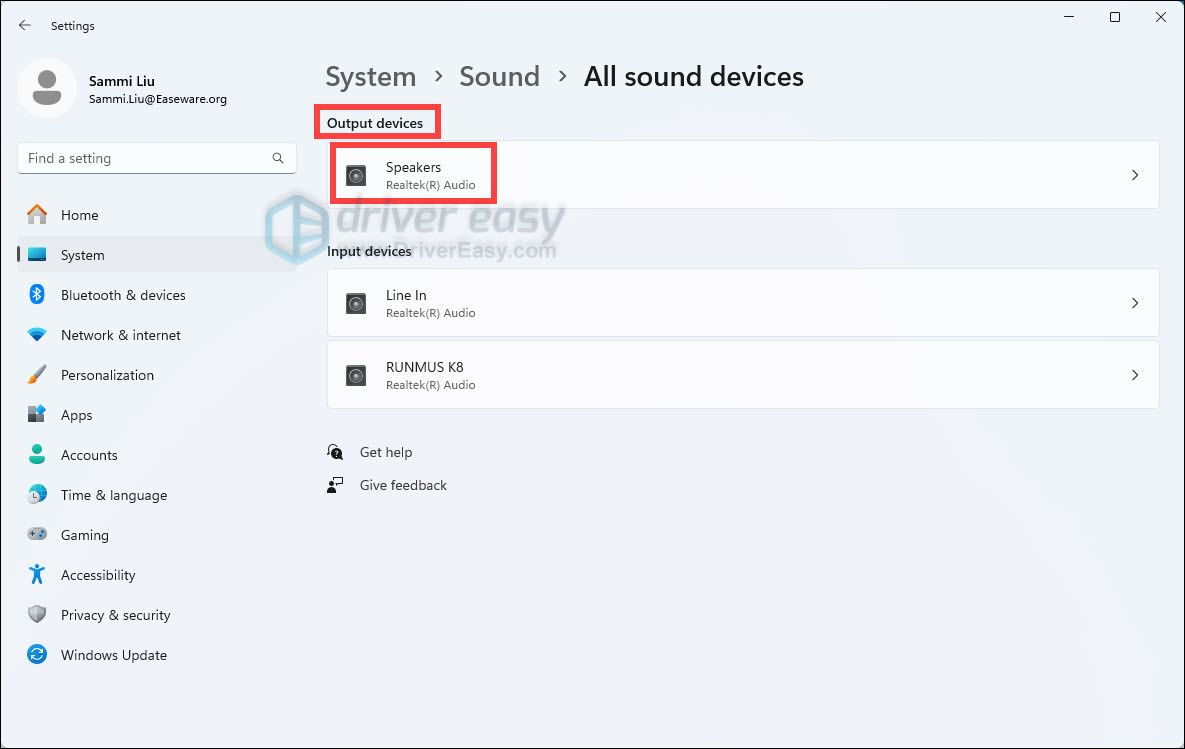
- Click on the Audio enhancements drop-down menu and select Off.
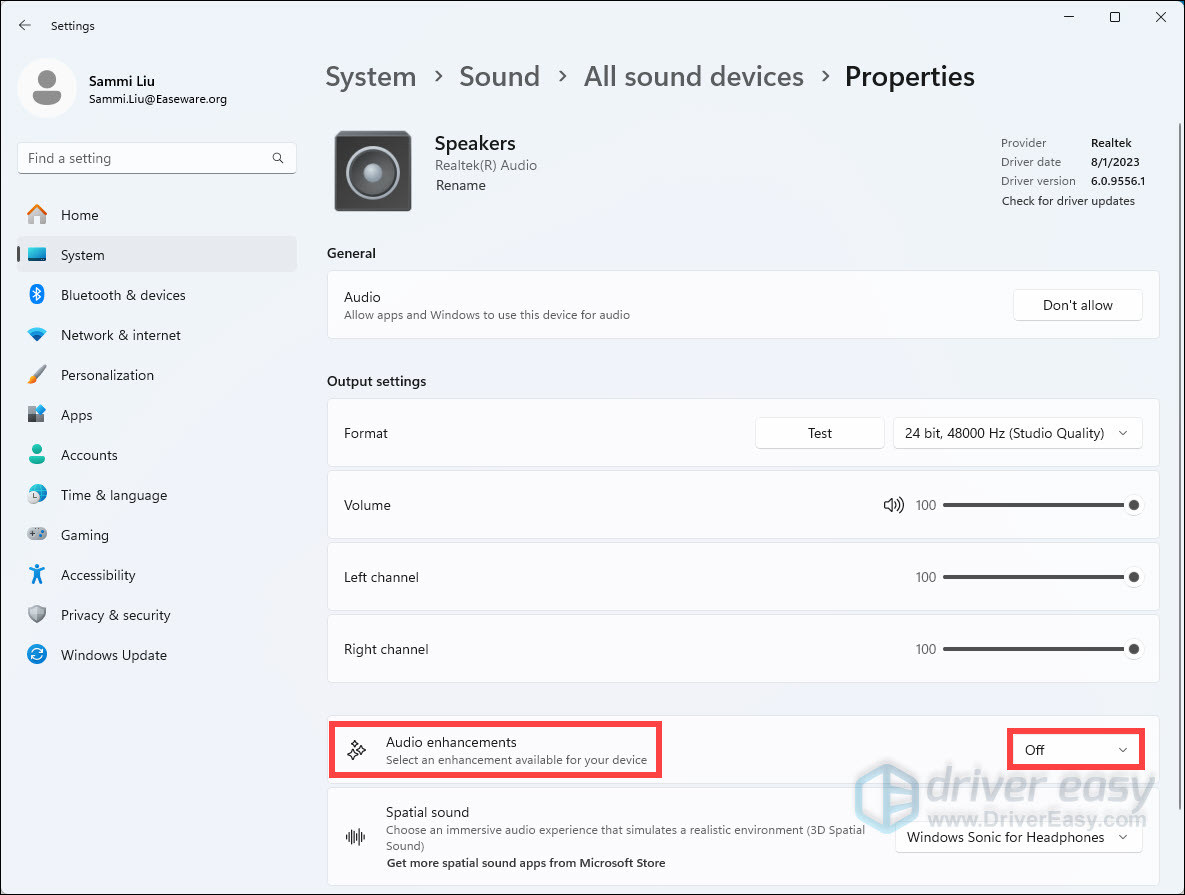
If disabling audio enhancements doesn’t resolve your issue, see the next fix.
6. Restart audio services
Windows audio services are essential services in the Windows operating system responsible for handling audio-related tasks. Restarting these services can be a troubleshooting step to resolve issues such as audio cutting out.
- On your keyboard, press the Windows logo + R keys simultaneously to open the Run box.
- Type services.msc and hit Enter.
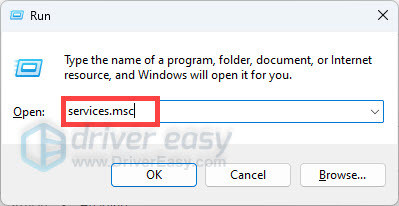
- Right-click each of the following services and select Restart.
Windows Audio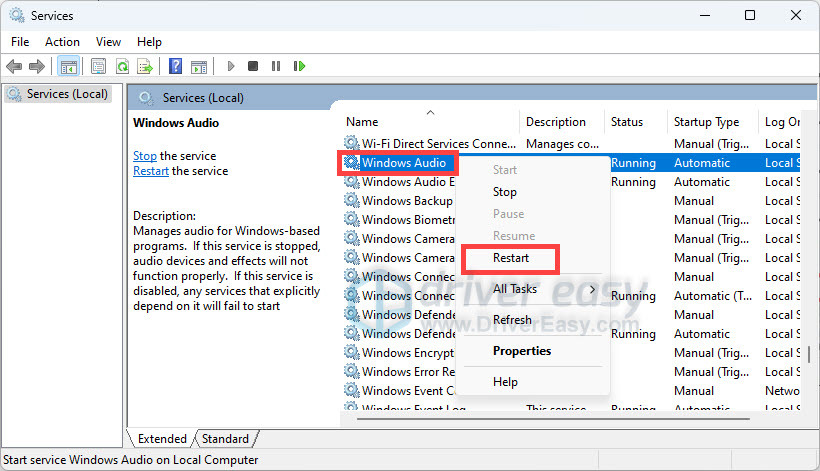
Windows Audio Endpoint Builder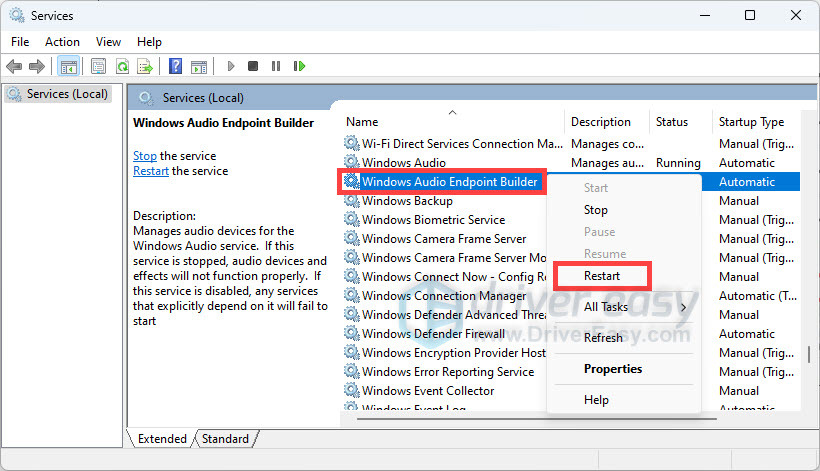
Hope you find this helps! If you have any ideas or questions, feel free to drop us a line in the comment section below.
*featured image by GraphiqaStock on Freepik


