Looking for a tutorial to dramatically boost your FPS and fix the lag issue in Enlisted? Look no further! In this post, we’ll show you how to do that.
How to boost FPS in Enlisted
There are several factors that can contribute to poor game performance including:
- Other programs running in the background
- Outdated graphics driver
- In-game settings being turned up too high
To keep your Enlisted running smoothly and quickly on your PC, try these methods:
- Download and install Windows updates
- Close unnecessary programs
- Update your graphics driver
- Optimize in-game settings
- Enable high performance mode
- Disable Windows 10 gaming features
1. Download and install Windows updates
Every now and then, Microsoft releases Windows updates that come with bug fixes and new features. To take advantage of them, you’re supposed to check for updates. This is more necessary when you’re playing a new title such as Enlisted.
Here’s how you can install all Windows updates:
1) In the Search box, type in check for updates. Click Check for updates from results.
2) Click on the Check for updates tab. If there are any updates available, it’ll automatically start to download and install it. Simply wait for it to complete and you should be asked to restart your computer.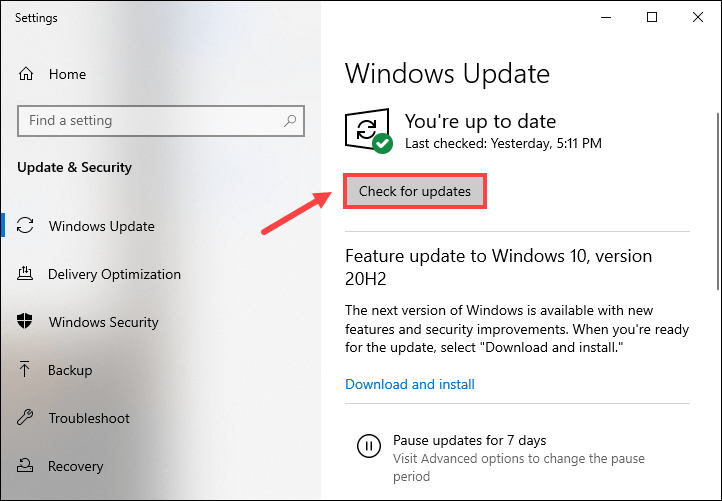
After the reboot, launch Enlisted and check if your game looks better. If this didn’t mitigate your problems, read on for further troubleshooting.
2. Close unnecessary programs
Low FPS indicates that your game slows down because your computer doesn’t have enough power or memory to run it properly. To free up some space, close those programs that you don’t necessarily use when playing Enlisted:
1) On your keyboard, press the Windows logo key and R at the same time to invoke the Run box.
2) Type taskmgr, then press Enter on your keyboard.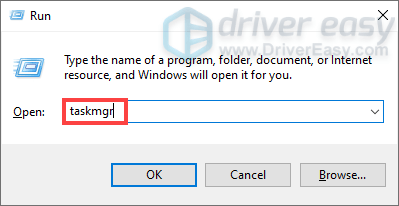
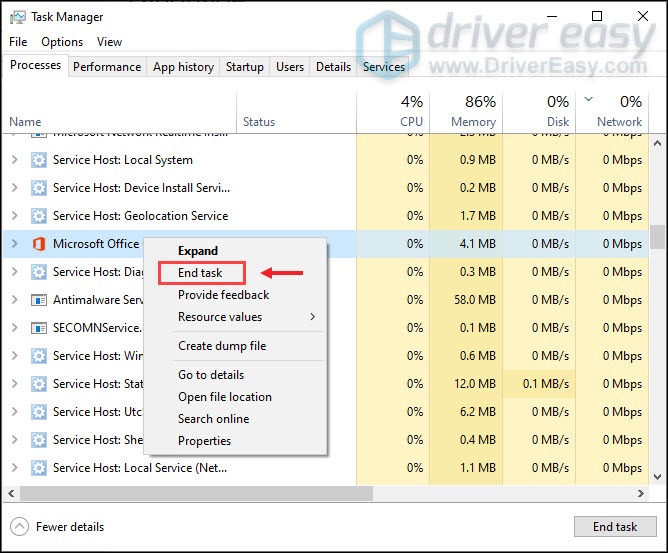
3) Under the Processes tab, right-click on the programs that you don’t necessarily use when playing The Division 2 and select End task.
Also, too many startup apps can be a drag on your computer’s performance. In this case, you can prevent some apps from automatically starting when you sign into Windows:
1) Select the Startup tab. Right-click the apps that you want to stop from running automatically at startup and select Disable.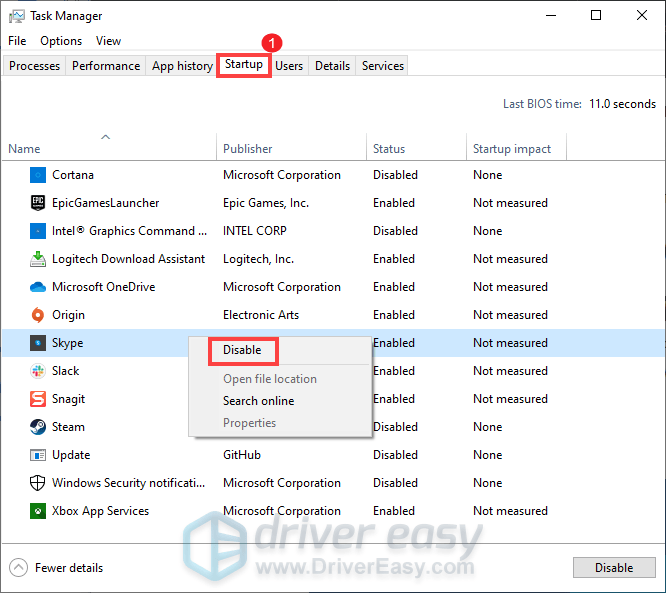
Now play your game and you should be able to get better experience.
3. Update your graphics driver
Your graphics card is one of the core components of your computer. And your graphics driver is essential for getting top performance from your GPU. When you have performance issues such as extremely low FPS with your game, your outdated or faulty graphics driver can be the culprit. If you can’t remember when was the last you updated your drivers, definitely do it this time as it makes a whole lot of difference.
There are mainly two ways to update your graphics driver: manually and automatically.
Option 1: Manually update your graphics driver
If you’re tech-savvy, you can manually update the graphics driver by going to the official website:
Then find the driver corresponding with your Windows version and download it manually. Once you’ve downloaded the correct driver for your system, double-click on the downloaded file and follow the on-screen instructions to install it.
Option 2: Automatically update your graphics driver (recommended)
If you don’t have the time, patience or computer skills to update your audio driver manually, you can, instead, do it automatically with Driver Easy. Driver Easy will automatically recognize your system and find the correct drivers for your exact device, and your Windows version, and it will download and install them correctly:
1) Download and install Driver Easy.
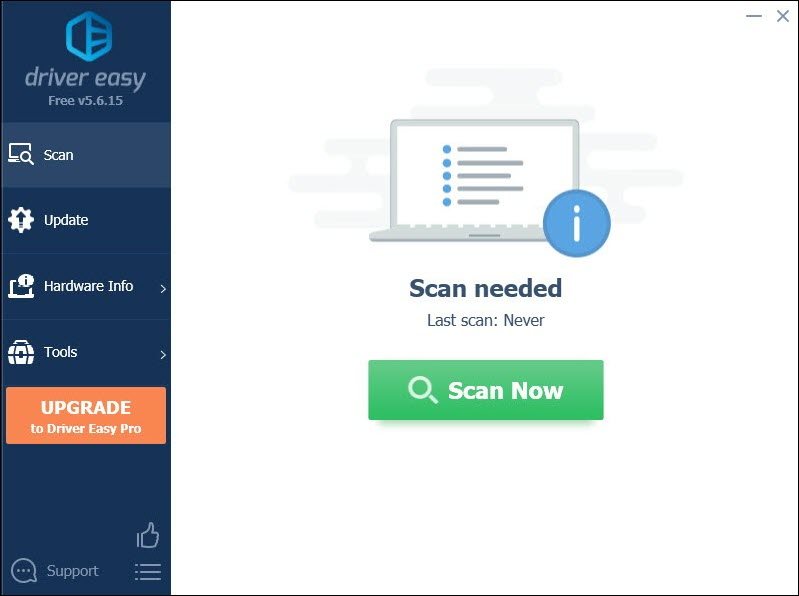
2) Run Driver Easy and click the Scan Now button. Driver Easy will then scan your computer and detect any problem drivers.
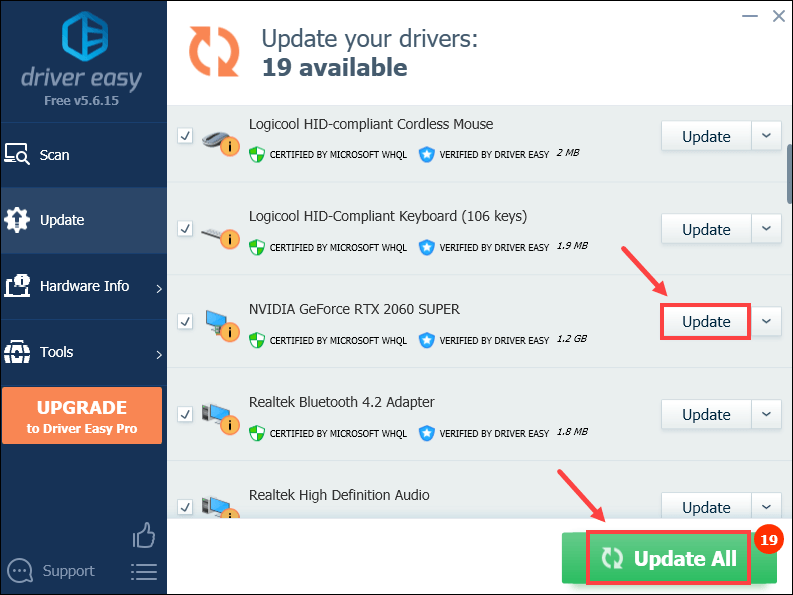
3) Click Update All to automatically download and install the correct version of all the drivers that are missing or out of date on your system.
(This requires the Pro version which comes with full support and a 30-day money-back guarantee. You’ll be prompted to upgrade when you click Update All. If you don’t want to upgrade to the Pro version, you can also update your drivers with the FREE version. All you need to do is to download them one at a time and manually install them.)
Once you’ve installed the latest drivers, restart your PC and check if the problem persists.
4. Optimize in-game settings
To improve gaming performance on your PC, you can actually tweak your new game’s graphical settings instead of keeping the default ones. Below are the settings you can reset to possibly boost your FPS:
1) Open your game. Click on the three lines.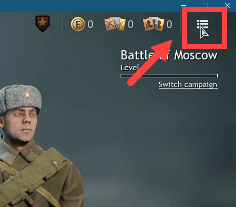
2) Select Options from the drop-down menu. 
3) Now reset these settings:
Resolution: set it to your native monitor resolution (To check your native resolution, refer to this article. )
Mode: Fullscreen Window
NVIDIA DLSS: Off
Temporal Resolution Scale: 100%
Temporal Antialiasing Quality: Low
NVIDIA Reflex Low Latency: Off
V-Sync: Disabled
Texture Quality: Low
Atmospheric Scattering Quality: Low
Ambient Occlusion Quality: Low
Water Quality: Low
Terrain Tessellation Quality: Low
Dynamic Terrain Deformations: Off
High Resolution Visual Effects: Disabled
Raindrops On Screen: Disabled
Scope Image Quality: Low
Now play your Enlisted to test if you can get higher FPS.
5. Enable high performance mode
Windows 10 allows you to enable high performance mode for your programs to possibly achieve your goals. Specifically, when you enable high performance for your game, you can get a slight increase on your FPS. Here’s how you can do this:
1) In the Search box, type graphics settings. Then click Graphics settings from the results.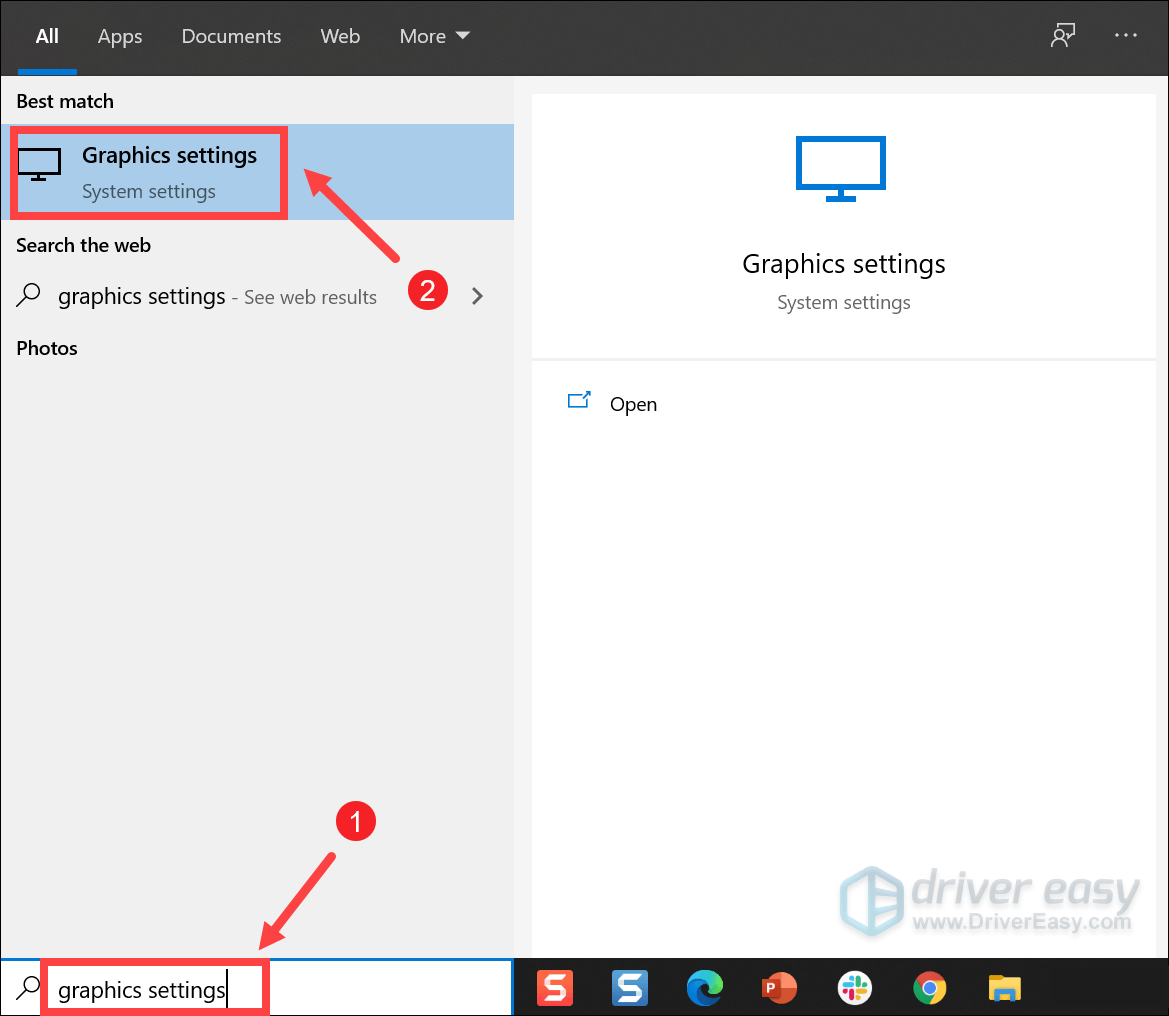
2) Scroll down and click Browse.
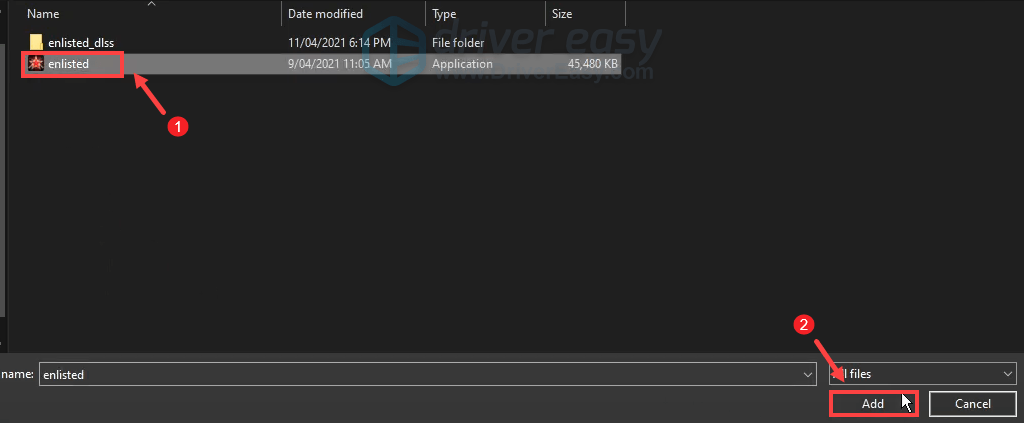
3) Navigate to your game’s installation folder. (Usually C:Program Files (x86)Enlistedwin64). Then click enlisted.exe and click Add.
4) Click Options.

5) Select High performance and then click Save. 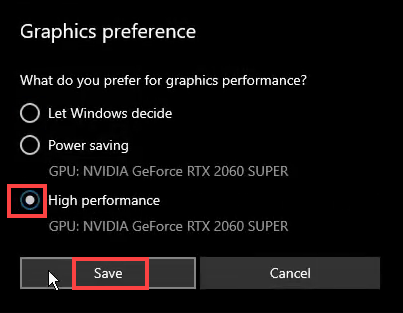
After applying the changes, test your gameplay to see if it looks better.
6. Disable Windows 10 gaming features
Windows 10 gaming features including the game mode, are designed to allow users to have the best possible gaming experience. But it seems the situation is the opposite. More and more gamers found that when they had those features enabled, issues such as the stutters and low FPS would occur. To prevent these from happening, you should disable Windows 10 gaming features by following the steps listed below:
To increase the overall performance, follow the steps below to disable Windows 10 gaming features:
1) On your keyboard, press the Windows logo key and I to open Settings.
2) Click Gaming.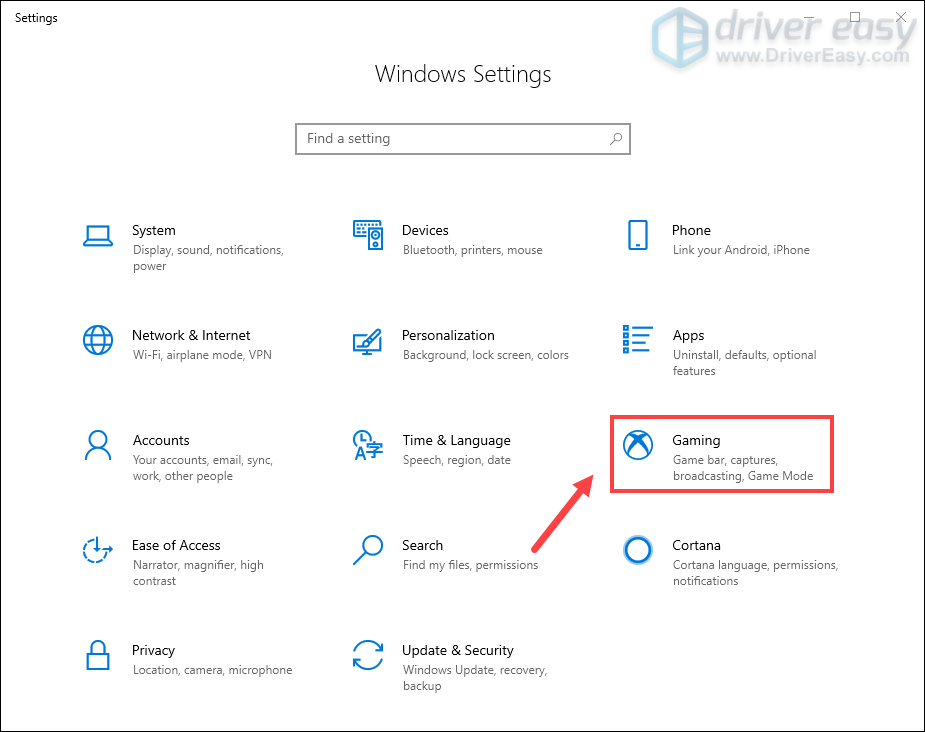
3) From the left sidebar, select Game bar and toggle off Record game clips, screenshots, and broadcast using Game bar.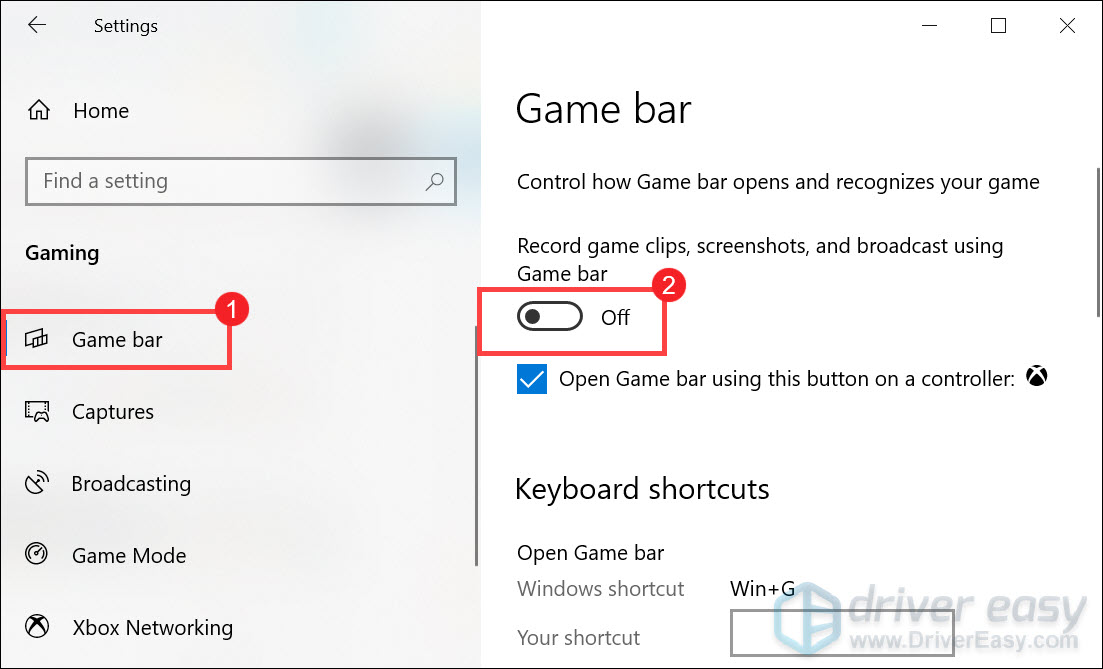
4) From the left sidebar, select Captures. In the Background recording section, toggle off Record in the background while I’m playing a game.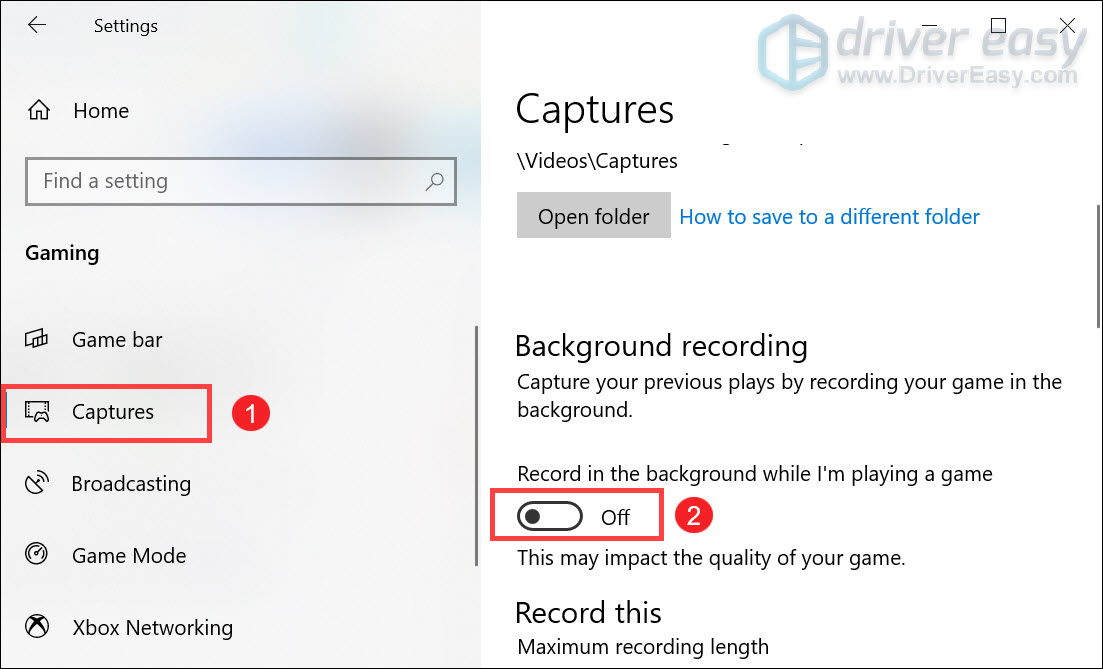
5) From the left sidebar, toggle off Game Mode and set Use Game Mode.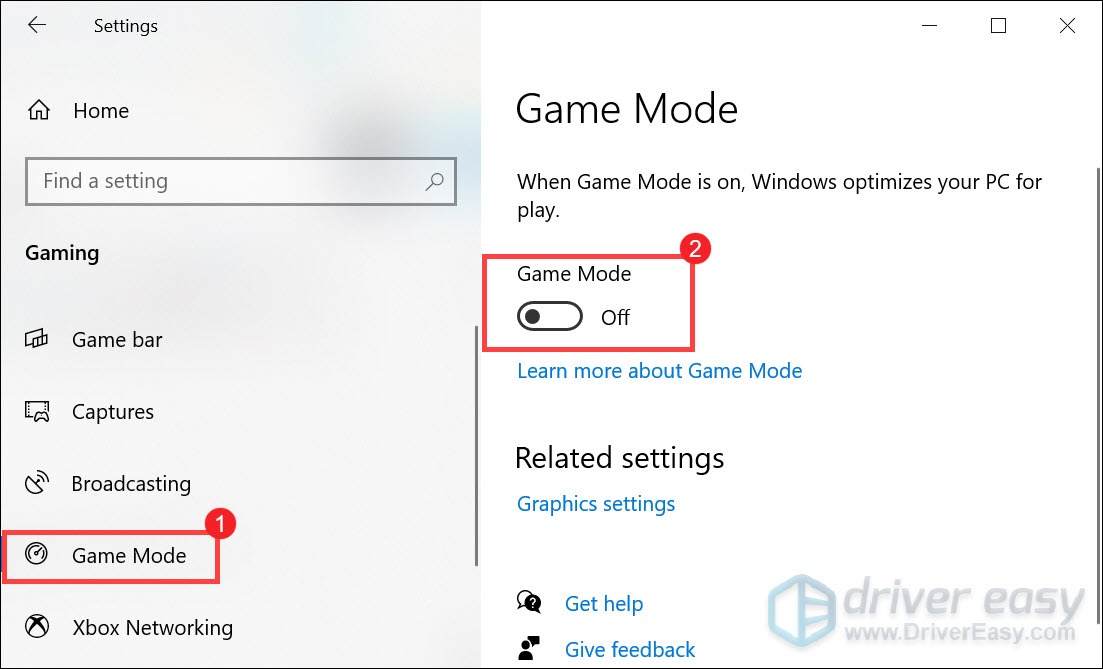
After applying the changes, launch Enlisted and you should be able to get a noticeable performance boost.
How to fix lag in Enlisted
Lags are pretty common in video games. But there are definitely ways to get rid of lags or at least reduce lags when you’re playing Enlisted.
Try these fixes
You may not need to try them all. But we suggest you take these steps in order until you are able to notice drastic improvements on your game.
- Verify integrity of game files
- Update your network adapter driver
- Improve your network connection
- Flush your DNS cache
- Change your DNS server address
1. Verify integrity of game files
When you notice that something’s going wrong with your game, you’re supposed to utilize the tool of verifying game files. This can help ensure that the installation of your game is up-to-date and if necessary, repair any bad or corrupted game data. To verify the files for your Enlisted, take these steps:
1) Open your launcher. Click on the tool icon located on the top-right corner of the screen to open Launcher settings.
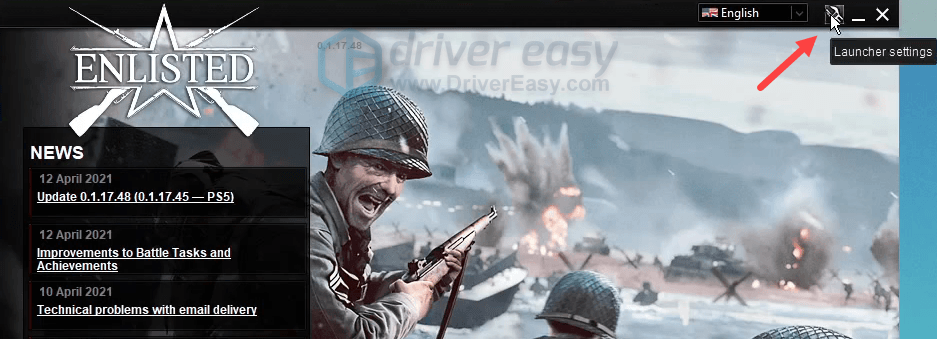
2) Click Check files. 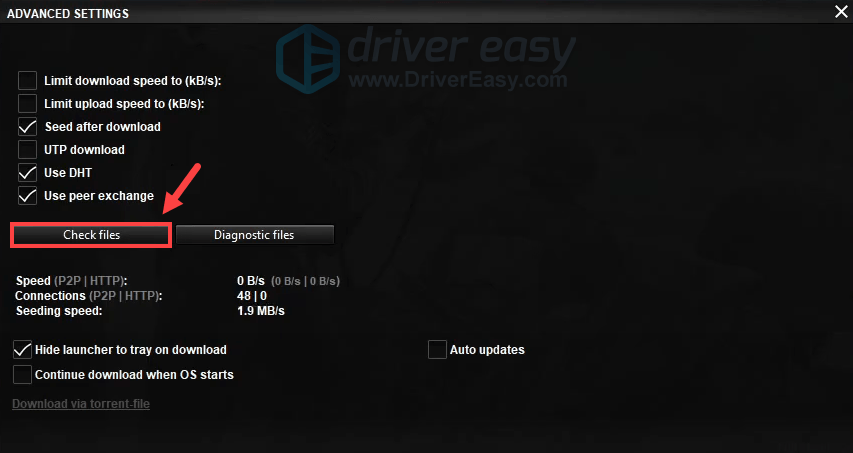
This will take around one minute to redownload and reinstall any missing or corrupted game files. Once the process is complete, launch Enlisted to check if it’s still so laggy.
2. Update your network adapter driver
Whenever you run into connectivity issues, you should check whether you’re using an outdated or corrupted network adapter driver. This is pretty important as your driver is like an interpreter between Windows and your device. And there’s a good chance that updating drivers can fix any problems you’re having.
You can manually update your network adapter driver by going to the manufacturer’s official website to download and install the correct network driver for your system.
OR
If you don’t have the time, patience or computer skills to update your drivers manually, you can instead do it automatically with Driver Easy. Driver Easy will automatically recognize your system and find the correct drivers for your exact device, and your Windows version, and it will download and install them correctly:
1) Download and install Driver Easy.
2) Run Driver Easy and click the Scan Now button. Driver Easy will then scan your computer and detect any problem drivers.

3) Click Update All to automatically download and install the correct version of all the drivers that are missing or out of date on your system.
(This requires the Pro version which comes with full support and a 30-day money-back guarantee. You’ll be prompted to upgrade when you click Update All. If you don’t want to upgrade to the Pro version, you can also update your drivers with the FREE version. All you need to do is to download them one at a time and manually install them.)
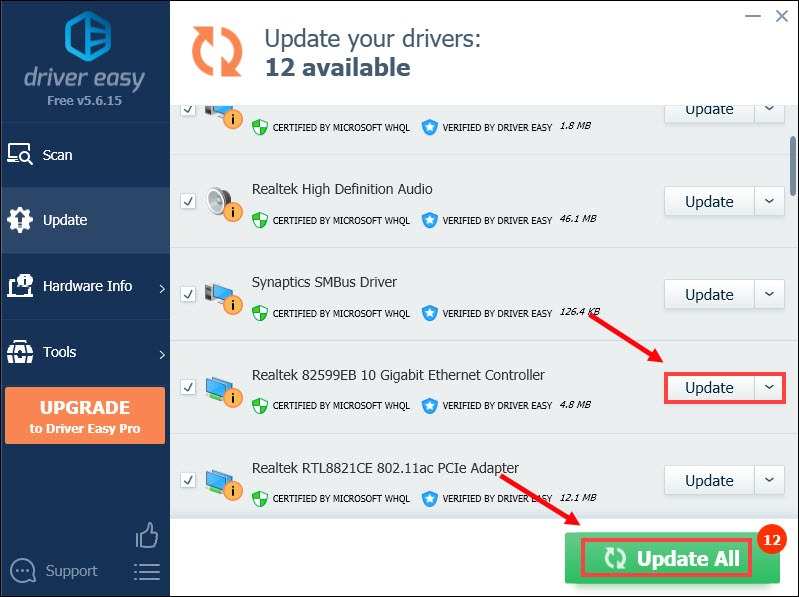
After updating your drivers, restart your PC for the changes to take full effect. Then you can launch Enlisted to check if updating drivers help minimize the game lags.
3. Improve your network connection
When your game is lagging, it may be an issue related to your network connection. Before attempting to improve your connection, do a speed test to have a better understanding of your network speed.
To test your internet speed, you can:
1) Go to Google.com.
2) Search for internet speed test.
3) Tap on click Run Speed Test.
Or you can use some of the popular speed test services including Speedtest.net or Fast.com.
If the test result shows that the internet is not performing as you think it should, follow the tips below to improve your connection:
1) Use an ethernet cable to ensure the best possible connection.
2) If you have to use a wifi connection, then make sure to restart your router or modem if you haven’t done this in a while.
3) Reduce the amount of devices connected to the same network.
To significantly improve your network connection, you should close those bandwidth hogging applications by following the instructions below:
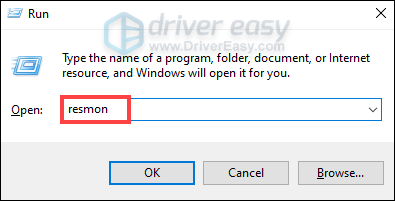
1) On your keyboard, press the Windows logo key + R at the same time to open the Run dialog box.
2) Type resmon and press Enter to open the Resource Monitor.
3) Select the Network tab, which will show you all the network activity on your computer.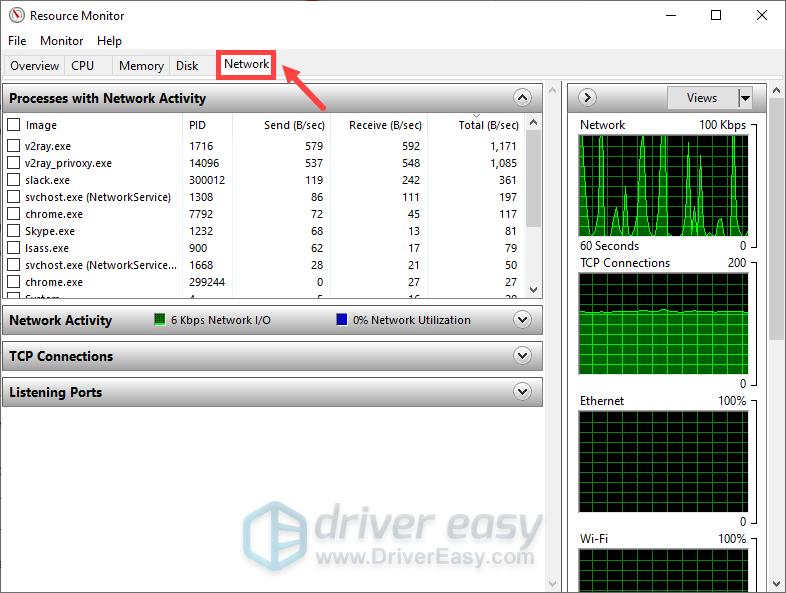
The Processes With Network Activity window is composed of five columns:
- Image: the name of the application
- PID: short for process identifier, it shows you the process ID number
- Send (B/sec): the average number of bytes per second the app sent in the last minute
- Receive (B/sec): the average number of bytes per second the app received in the last minute
- Total (B/sec): total bytes per second the app used in the last minute
4) Find an application that’s using way too much bandwidth, right-click it and select End Process. (Note that you should not close the applications which are significant for your system. If you are not familiar with a certain application, select Search Online to access the information.)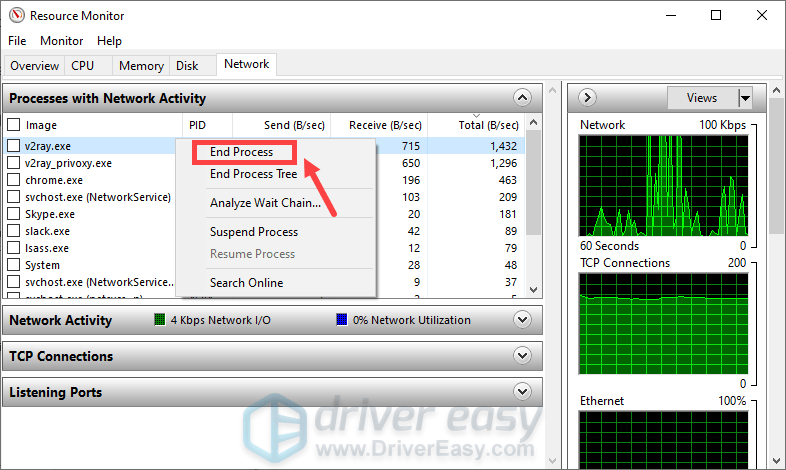
After you’ve done these, you should be able to have noticeable improvements on your connection. If you still have lag issues when playing Enlisted, try the fixes below.
4. Flush your DNS cache
To further troubleshoot the network related issues with Enlisted, you can flush the DNS cache:
1) In the Search box, type cmd. Right-click Command Prompt from the results and select Run as administrator.
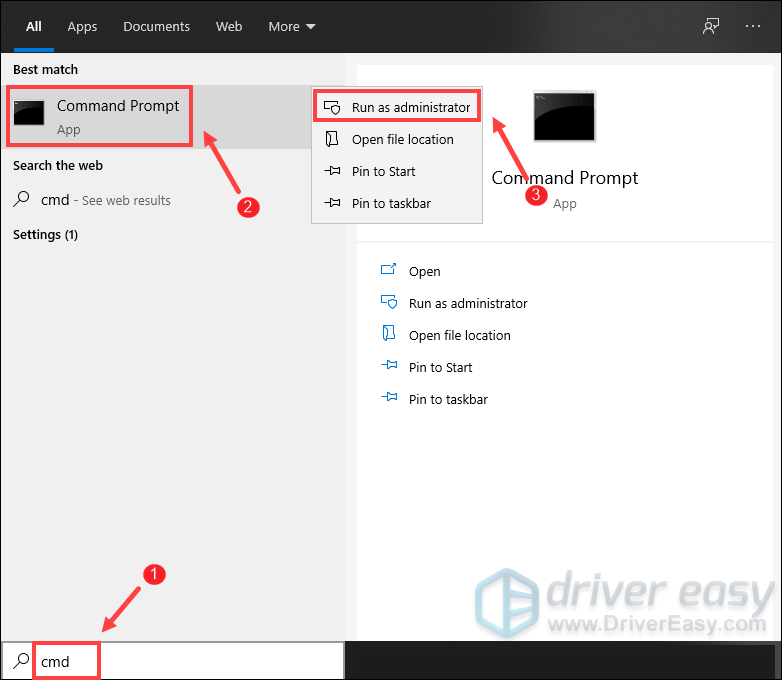
When the User Account Control prompt appears, simply click Yes.
2) In the Command Prompt window that appears, type the following command and then press Enter. This will flush and reset the content of your DNS.
ipconfig /flushdns
Once done, you should be able to receive a message that the task has completed successfully.
In case you’re still experiencing lag issues when playing Enlisted, you should change your DNS server address to verify your connection to your ISP (Internet Server Provider).
5. Change your DNS server address
To change your DNS settings, take these steps:
1) On your keyboard, press the Windows logo key and R at the same time to open the Run dialog box.
2) Type control and then press Enter on your keyboard to open the Control Panel.
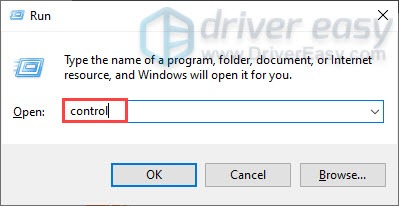
3) Click Network and Internet. (Note: make sure you view the Control Panel by Category.)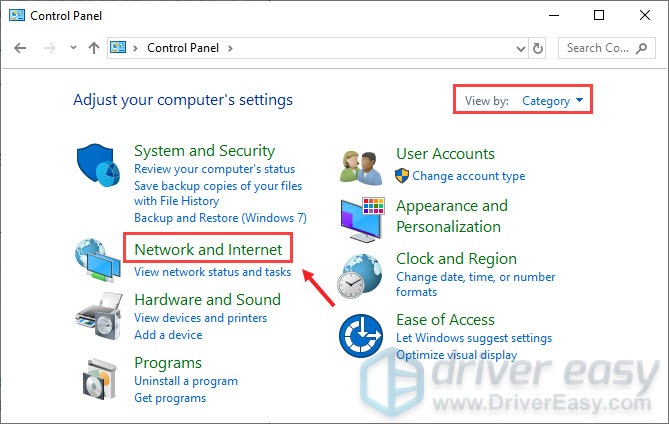
4) Click Network and Sharing Center.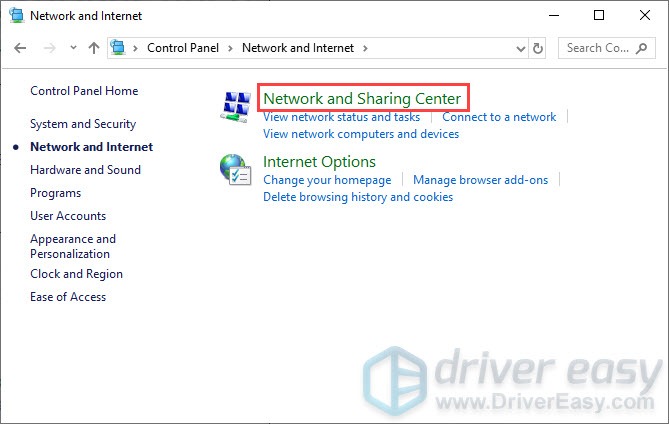
5) Click on your Connections, whether it’s Ethernet, Wifi, or others.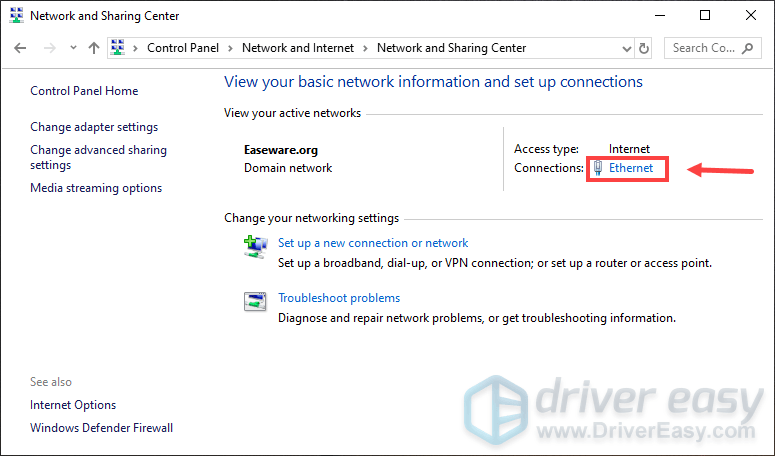
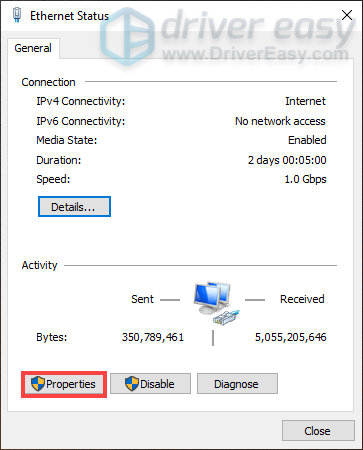
6) Click Properties.
7) When the Properties window opens, click Internet Protocol Version 4 (TCP /IPv4) > Properties.
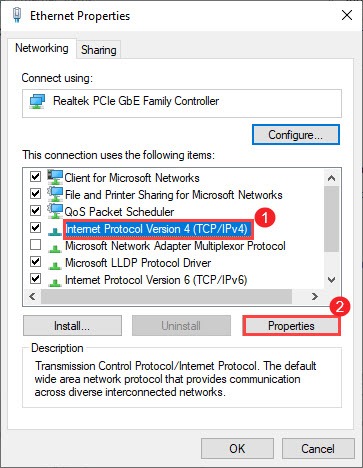
8) Click Use the following DNS server addresses:
As your Preferred DNS server, use 8.8.8.8
As your Alternate DNS server, use 8.8.4.4
Check the box next to Validate settings upon exit and then click OK to confirm the changes.
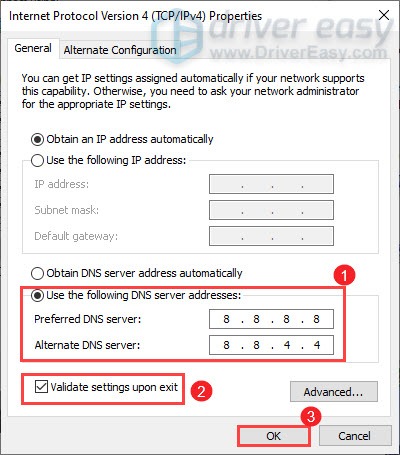
Once the changes are applied, play Enlisted and you should be able to notice that the lag has been reduced.
That’s it – the complete guide on how you can improve the overall performance and significantly reduce lag in Enlisted. If you have any questions or suggestions, feel free to drop us a line in the comment section below.


