The brightness slider is a little built-in tool in Windows systems 10 and 11. However, if your brightness slider is missing, you may find it inconvenient to adjust your PC brightness to fit your various daily needs. This article will introduce 7 fixes for this problem. And hopefully, you’ll find them helpful.

How to fix the brightness slider missing problem?
- Add brightness slider to action center
- Adjust brightness in the Settings
- Disable and enable your Generic PnP Monitor
- Update related drivers
- Check your graphics card software
- Update Windows
- Restart the Display Enhancement Service
You don’t have to try them all. Just walk your way down the list until you find the one that works for you.
Fix 1 Add brightness slider to action center
If your brightness slider is missing, the first thing you should check is the action center. It allows you to quickly adjust system settings without opening any windows or apps. (The brightness slider is no longer visible in Action center, so if you’re on Windows 11, please move on to Fix 2.)
Here is how:
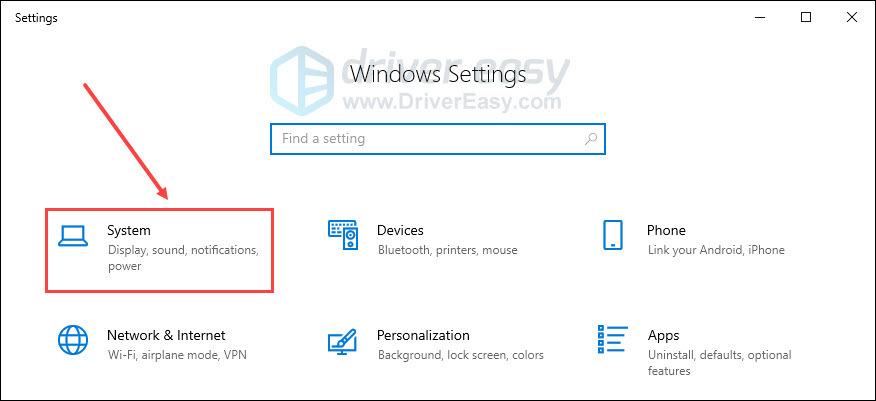
- Press the Windows logo key and I on the keyboard to launch Settings. Click System.
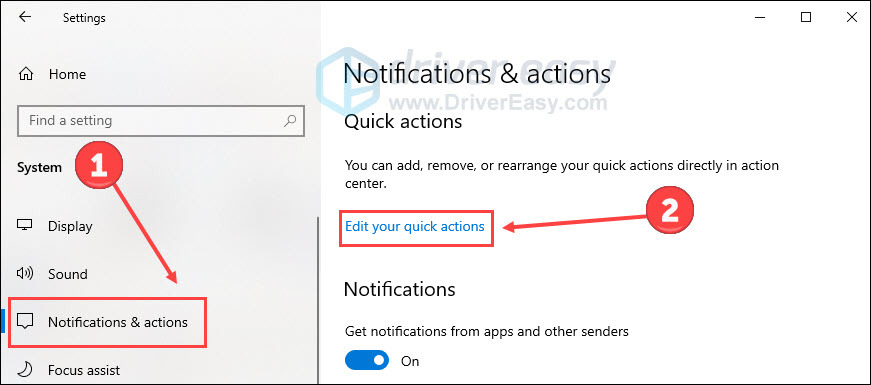
- Choose Notifications & actions. Then click Edit your quick actions.
- Click Add and then Brightness. Once you have added, click Done.
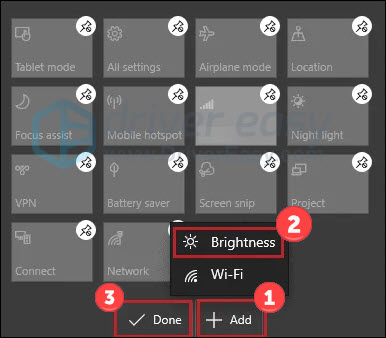
It’s supposed to add a brightness slider to your quick action center. However, if you still cannot find your missing brightness slider back, try the next move below.
Fix 2 Adjust brightness in the Settings
Even if your brightness slider is missing, you can modify your PC’s brightness in the Settings. Just follow these steps:
On Windows 11:
- Press the Windows logo key and I on the keyboard to launch Settings. Click System, then Display.

- Toggle the slider for Brightness to see if it works.

On Windows 10:
- Press the Windows logo key and I on the keyboard to launch Settings. Click System.

- In the Display tab, you’ll find a brightness slider under Brightness and Color. Then you can change the brightness based on your need.
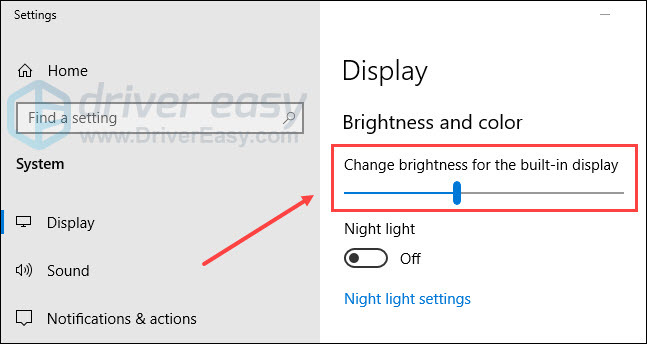
But, if you still have problems with the brightness slider, you may need to check your computer’s monitor.
Fix 3 Disable and enable your Generic PnP Monitor
Sometimes your third-party apps might install a different driver for your monitor, or your monitor driver may get disabled for unknown reasons. If the monitor fails to work well, the brightness adjustment may be affected. Therefore, we recommend refreshing your monitor by disabling and enabling it.
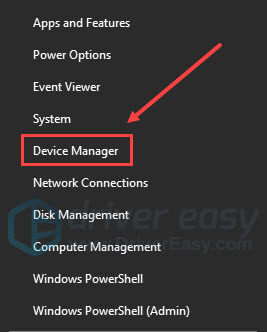
- Press the Windows logo key and X on the keyboard. Then click Device Manager.
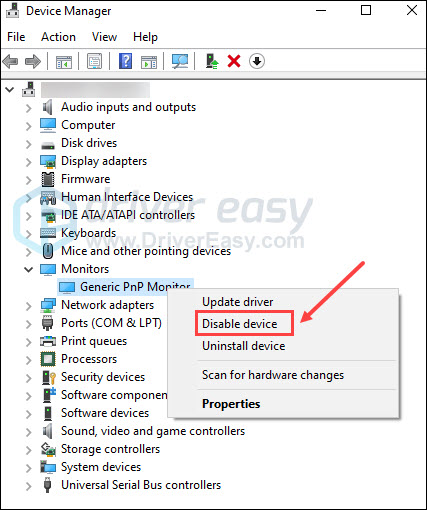
- Expand the Monitor list and right-click Generic PnP Monitor.
- If you see the Enable device option, click it to enable the driver. However, if you can’t see that option, you can click Disable device and then Enable device to make it works again.
Check your brightness settings to see if the problem persists. If you have no luck with this fix, check your computer drivers following the next move.
Fix 4 Update related drivers
When it comes to the brightness slider missing, checking your devices’ drivers is a must. For one thing, the brightness slider disappears may have something to do with the monitor, display, and graphics card. For another, missing, outdated, or faulty drivers are very likely to make your devices malfunction. So you may not want to neglect the driver update on your PC.
In this case, you need to update the monitor driver, display driver, and graphics drivers. All of them may have an impact on the brightness slider.
Generally, there are 2 methods to update device drivers:
Option 1 – Download and install the driver manually
To update your device drivers, you need to go to the manufacturers’ website, find the drivers corresponding with your specific flavor of Windows version (eg. Windows 32 bit) and download the driver manually.
For example, you may visit Nvidia, AMD, Intel, or other official websites to update your graphics driver. Normally you can find download links on the support, driver, or download sections. Search for your device model and find the driver matching your operating system.
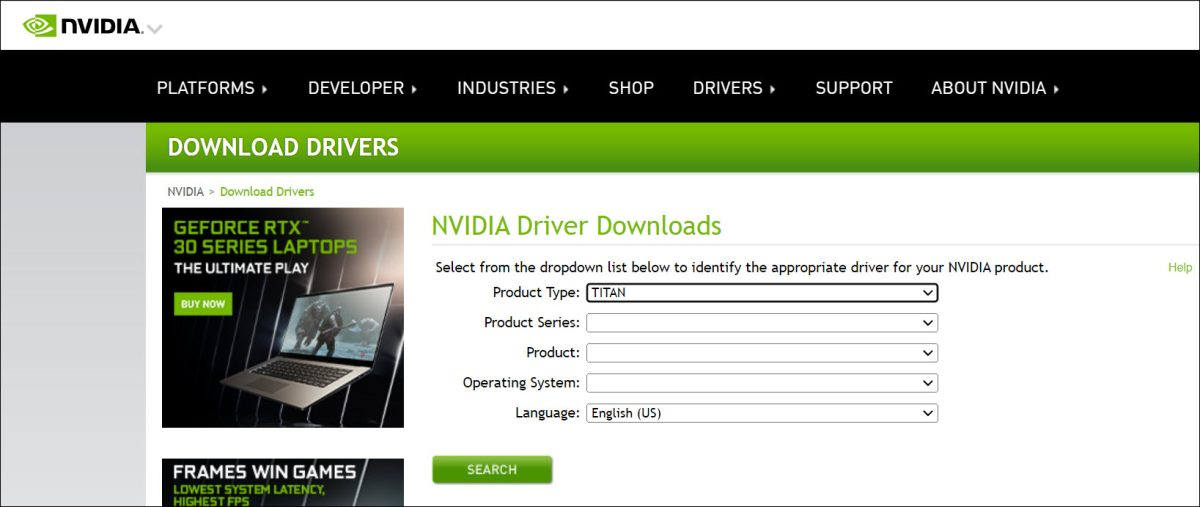
Once you’ve downloaded the correct drivers for your system, double-click on the downloaded file and follow the on-screen instructions to install the driver.
Option 2 – Automatically update all drivers
If you don’t have the time, patience, or computer skills to update all drivers manually, you can do it automatically with Driver Easy.
Driver Easy will automatically recognize your system and find the correct drivers for it. You don’t need to know exactly what system your computer is running, you don’t need to risk downloading and installing the wrong driver, and you don’t need to worry about making a mistake when installing.
- Download and install Driver Easy.
- Run Driver Easy and click the Scan Now button. Driver Easy will then scan your computer and detect any problem drivers.

- Click Update All to automatically download and install the correct version of all the drivers that are missing or out of date on your system.
(This requires the Pro version which comes with full support and a 30-day money-back guarantee. You’ll be prompted to upgrade when you click Update All. If you’re not ready to buy the Pro version, Driver Easy offers a 7-day free trial which includes access to all the Pro features such as high-speed download and one-click install. You won’t be charged anything until your 7-day trial has ended.)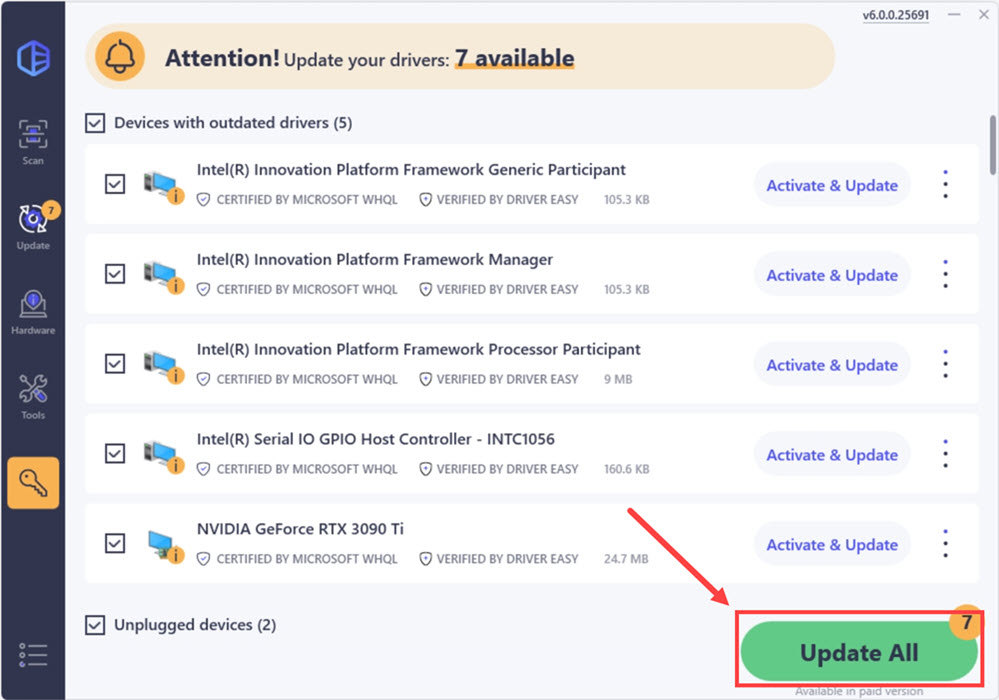
- Restart your computer for the changes to take effect.
When you complete the updating, restart the computer to make changes apply. Then check the brightness slider to see if there is any improvement.
Fix 5 Check your graphics card software
If you are using a graphics card from Nvidia or AMD, you can try to adjust brightness using their control panel.
For instance, if you’re an Nvidia user, here is a step-by-step guide:
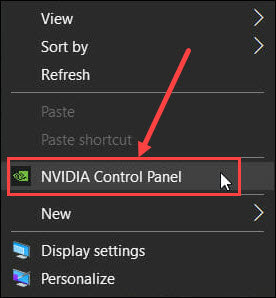
- Right-click the desktop and select NVIDIA Control Panel.
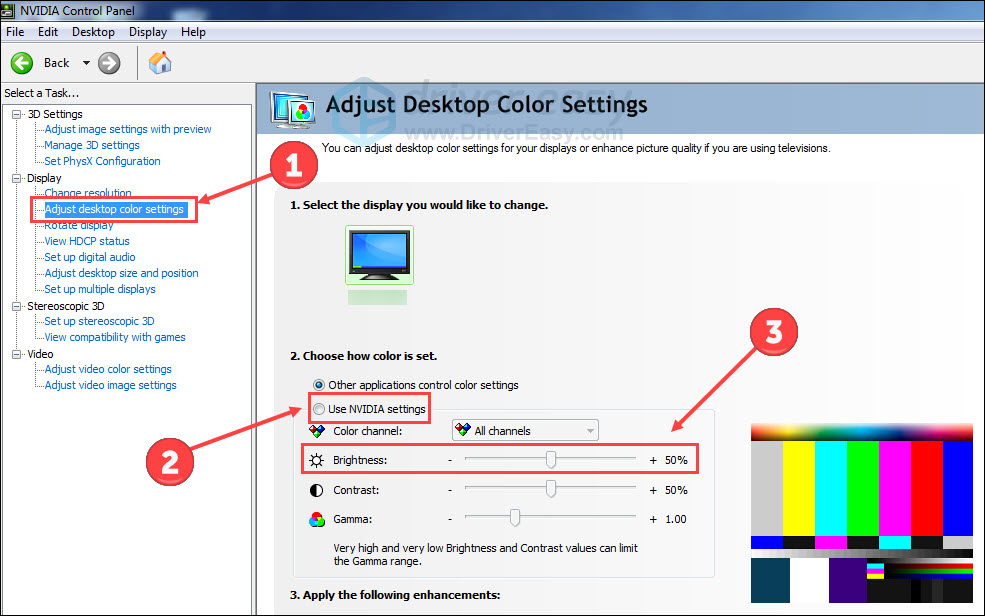
- Click Adjust Desktop Color Settings under Display on the left pane. Then click the Use NVIDIA Settings radio button. Now you can move the Brightness slider to increase or decrease the brightness of your desktop.
Other graphics card producers may have similar applications and guidelines. Search them online to adjust your computer brightness.
Fix 6 Update Windows
The brightness slider missing may happen when your Windows system is not up-to-date. You can check for any new Windows updates to fix this bug.
On Windows 10:
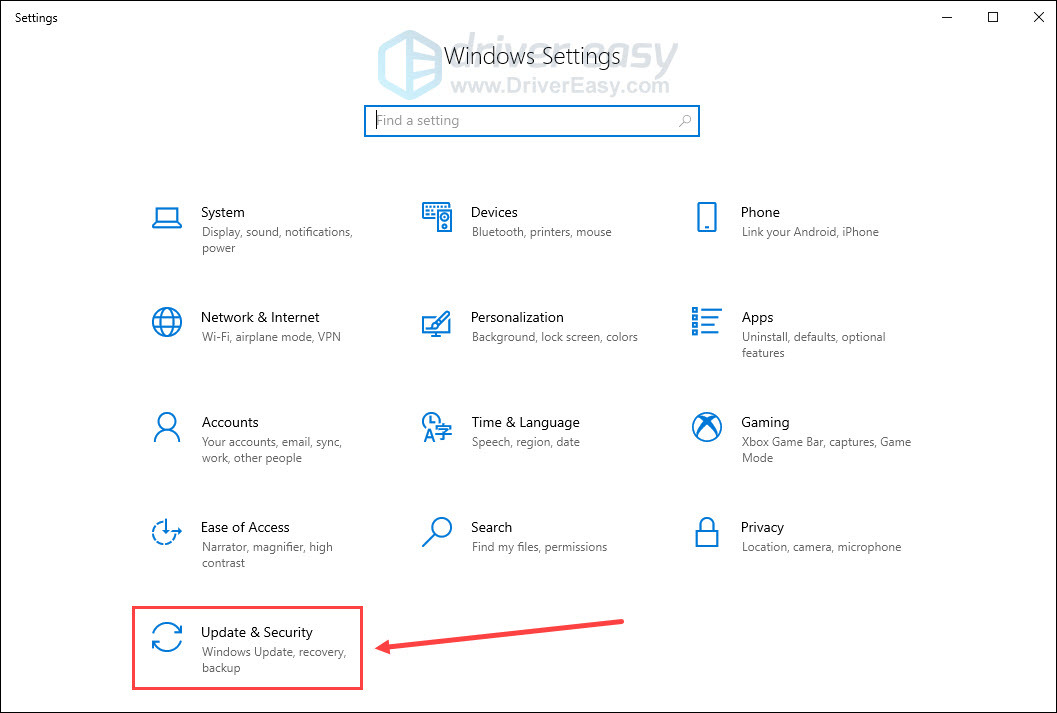
- Press the Windows logo key and I to open Settings. Click Update & Security.
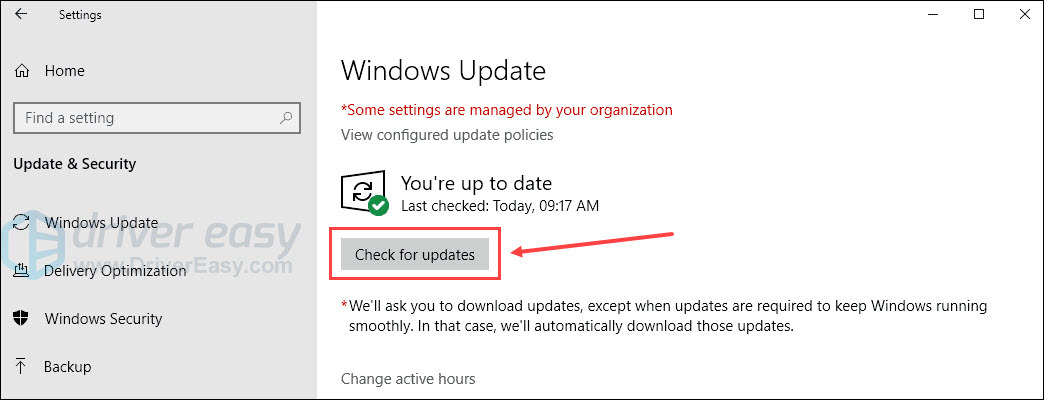
- Click Check for updates. If there are any updates available after scanning, download and install them.
On Windows 11:
- On your keyboard, hit the Windows key, then type check for updates, then click Check for updates.

- Click Check for updates, and Windows will scan for any available updates.

- If there are available updates, Windows will automatically download them for you. Restart your computer for the update to take effect if needed.

- If there are no available updates, you’ll see You’re up to date like this.

Reboot your computer to make updates work. Then try to adjust your brightness.
Fix 7 Restart the Display Enhancement Service
A non-working display service may also be the reason for the brightness slider missing. Restarting this service is expected to help tackle this problem.
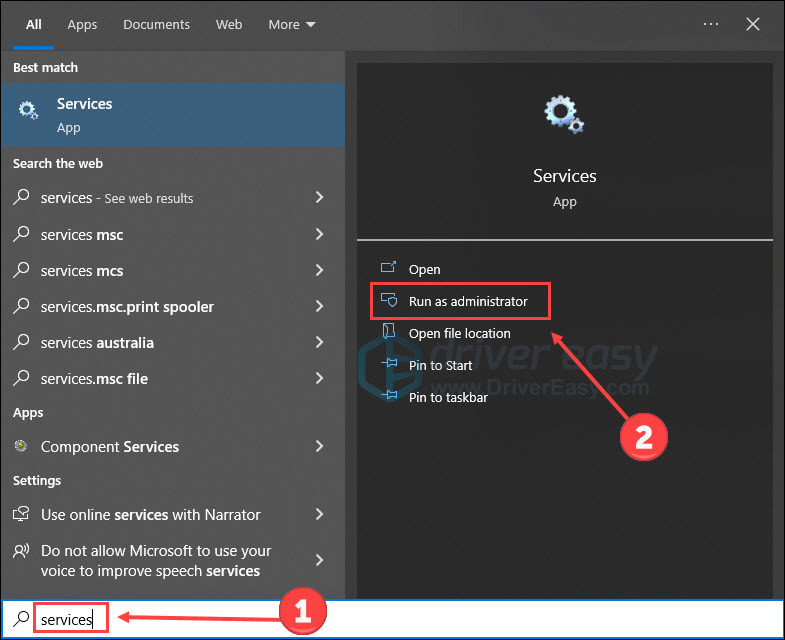
- Type Services on the search bar and click Run as administrator.
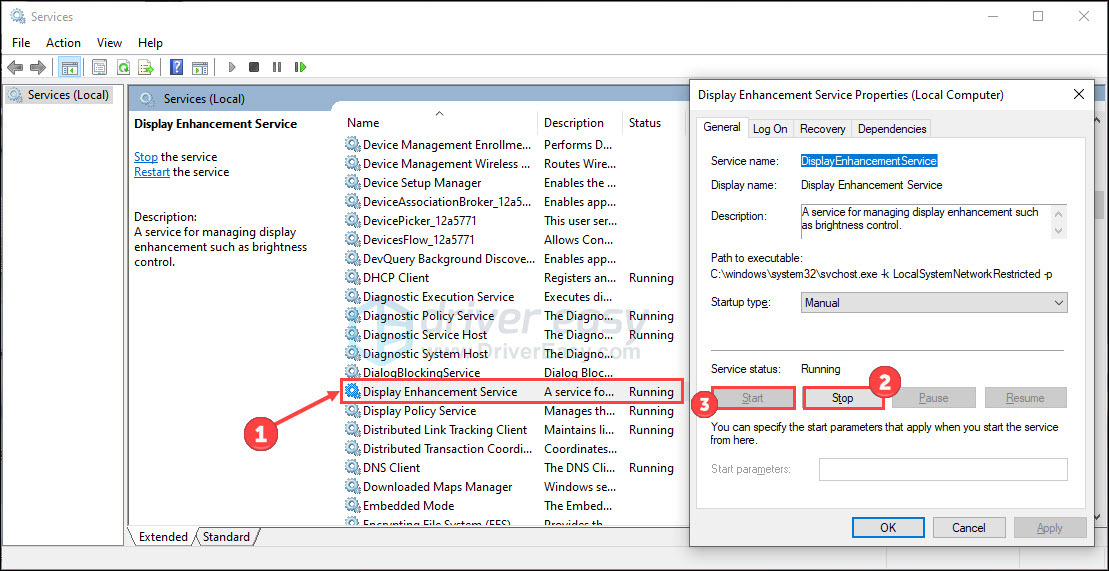
- Check if Display Enhancement Service is running. If it is, double-click it, and click Stop and Start to restart it. If not, double-click it and click Start.
That’s all for solving the brightness slider missing on Windows 11 and 10. If you have any questions or solutions, please feel free to leave a word below.


