
If you see the CMUSBDAC.sys Blue Screen in your Windows computer, don’t panic! This is a common BSOD errors and you can fix it.
What is CMUSBDAC.sys blue screen error? This error occurs when you’re using a USB microphone in your computer, also the C-Media USB Audio Class Drive issue can cause the blue screen error.
How to fix CMUSBDAC.sys Blue Screen of Death
Here are the solutions you can try. You don’t have to try them all; just work your way down the list until everything’s working again.
- Reinstall your C-Media USB Audio Class Driver
- Update available drivers
- Check for viruses and malware
- Restore the system to a restore point
- Repair corrupted system files
Fix 1: Reinstall your C-Media USB Audio Class Driver
Since the CMUSBDAC.sys blue screen error may occur because of the C-Media USB Audio Class Driver issue, you can uninstall and reinstall the driver to fix your problem.
To do so, follow the steps below:
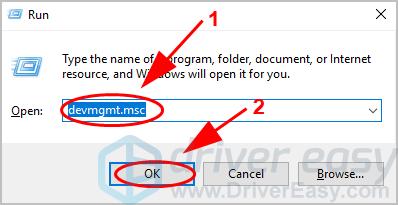
- On your keyboard, press the Windows logo key and R at the same time to invoke the Run box.
- Type devmgmt.msc and click OK.
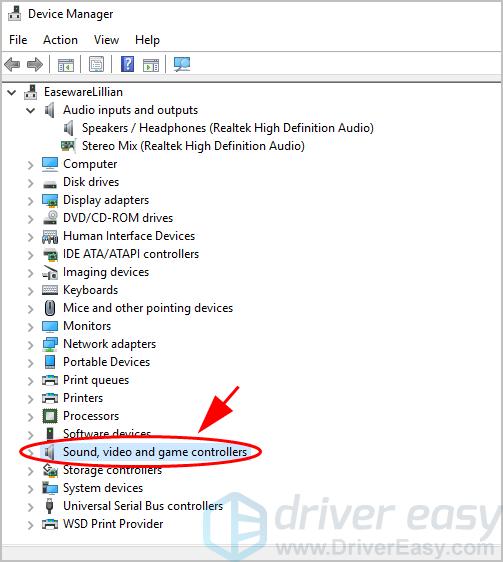
- Double click Sound, video and game controllers to expand the category.
- Right-click on your C-Media USB Audio Class driver, and click Uninstall device.
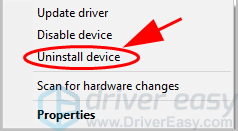
- Then follow the on-screen instructions to finish the uninstallation.
- Restart your computer.
- Go to the manufacturer’s website to download and install the C-Media USB Audio Class driver in your computer.
After reinstalling, restart your computer and see if your CMUSBDAC.sys blue screen has been fixed.
Fix 2: Update available drivers
A missing or outdated device driver can lead to the CMUSBDAC.sys Blue Screen of Death. To rule it out as the cause of your problem, you should update the available device drivers on your computer.
You can manually search for the latest version of your device from the manufacturer, and download and install it on your computer. This requires time and computer skills. We recommend this if you’re confident with your computer skills.
If you don’t have time or patience, you can do it automatically with Driver Easy.
Driver Easy will automatically recognize your system and find the correct drivers for it. You don’t need to know exactly what system your computer is running, you don’t need to risk downloading and installing the wrong driver, and you don’t need to worry about making mistakes when installing.
- Download and install Driver Easy.
- Run Driver Easy and click the Scan Now button. Driver Easy will then scan your computer and detect any problem drivers.
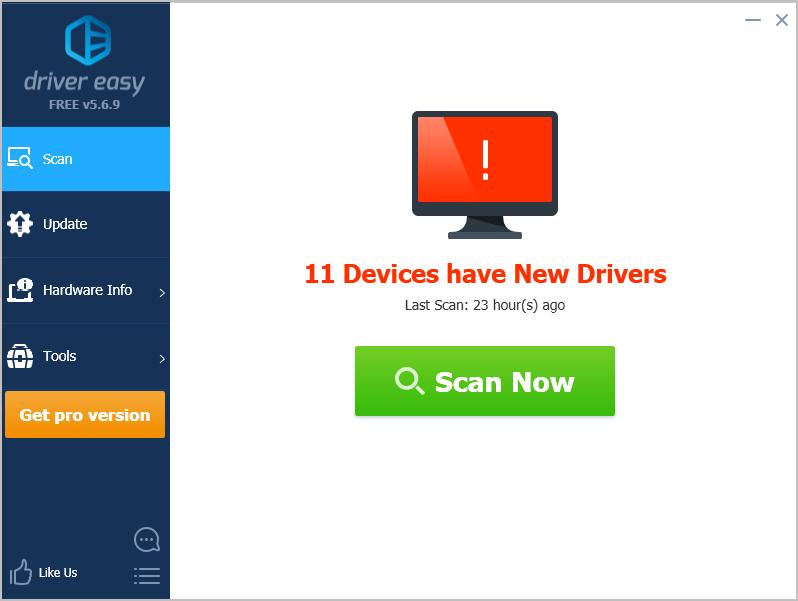
- Click the Update button next to the flagged device to automatically download the correct version of the driver (you can do this with the FREE version), then install the driver in your computer.
Or click Update All to automatically download and install the correct version of all the drivers that are missing or out of date on your system (this requires the Pro version – you’ll be prompted to upgrade when you click Update All).
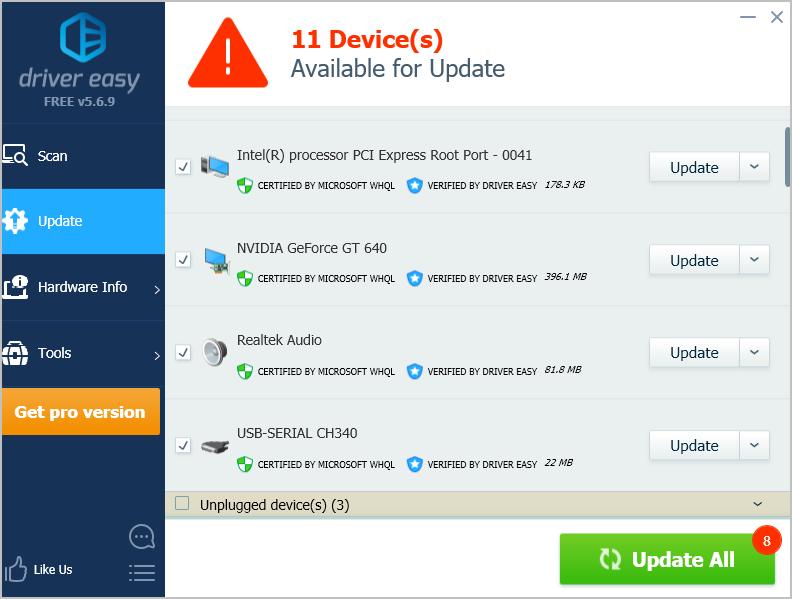
- After updating, restart your computer to take effect.
Now see if your Windows computer can start up correctly.
Fix 3: Check for viruses and malware
You may see the CMUSBDAC.sys blue screen if your system has been infected with viruses or malware.
So run a virus scan across your entire Windows system. Yes, it may take some time to complete, but it’s worth it. Unfortunately, Windows Defender may not detect it, so it’s worth trying another antivirus program such as Avira and Panda.
If any malware has been detected, follow the instructions provided by the antivirus program to fix it.
Then restart your computer as normal and see if it fixes your blue screen issue.
Fix 4: Restore the system to a restore point
Sometimes if your system has been upgraded, or you’ve installed new programs in your computer, the new updates may be incompatible with your computer, then the CMUSBDAC.sys blue screen happens.
If you’ve installed new programs, just uninstalled the programs and see if it works.
If you upgraded system, try running System Restore to the restore point before the blue screen occurs.
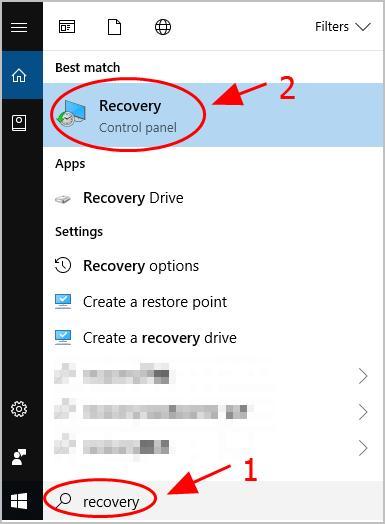
- Click the Start button in the lower left corner of your screen and type “recovery“. Then click Recovery in the list of results.
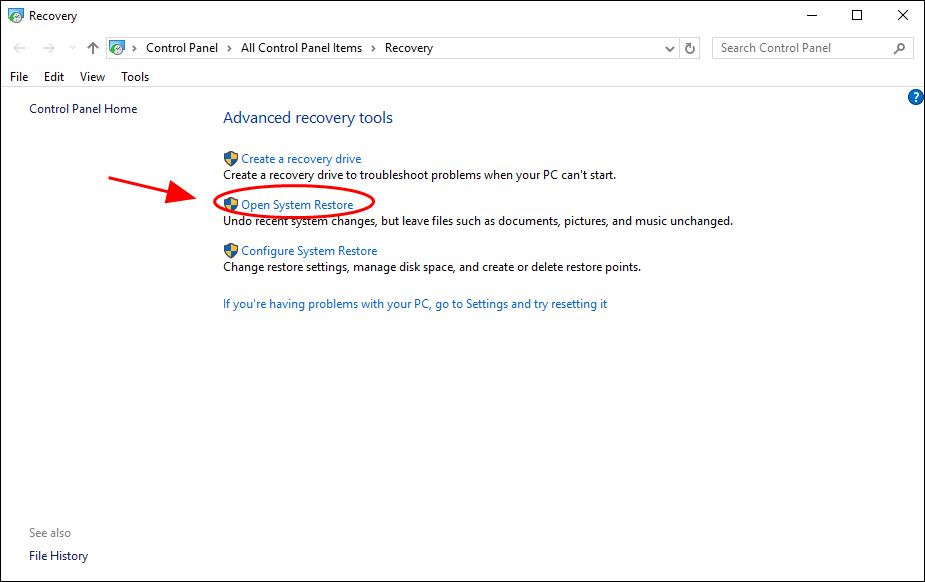
- Click Open System Restore to open the System Restore wizard. (The screenshots below show the different locations of “Open System Restore” on Windows 10 and Windows 7.)
- Follow the instructions of the System Restore wizard to restore your system from a system restore point.
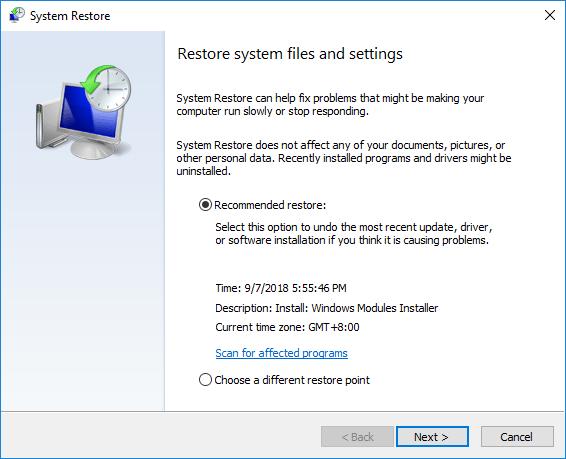
After you restore your system, restart your computer as normal and see if the blue screen error has been resolved.
Fix 5: Repair corrupted system files
Missing, corrupt, or damaged system files may be the culprit for this CMUSBDAC.sys error. To eliminate this issue as a possible cause, you can try using the System File Checker tool to repair possible system file issues.
System File Checker (SFC) is a handy feature in Windows that helps scan your system files and repair missing or corrupted system files(including those related to BSOD). To run the SFC scan:
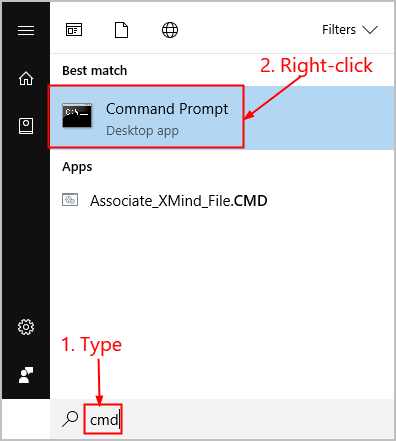
1) On your keyboard, press the Windows logo key and type cmd. Then right-click on Command Prompt and click Run as administrator.
2) Click Yes when prompted to confirm.
3) In the command prompt window, type sfc /scannow and press Enter.
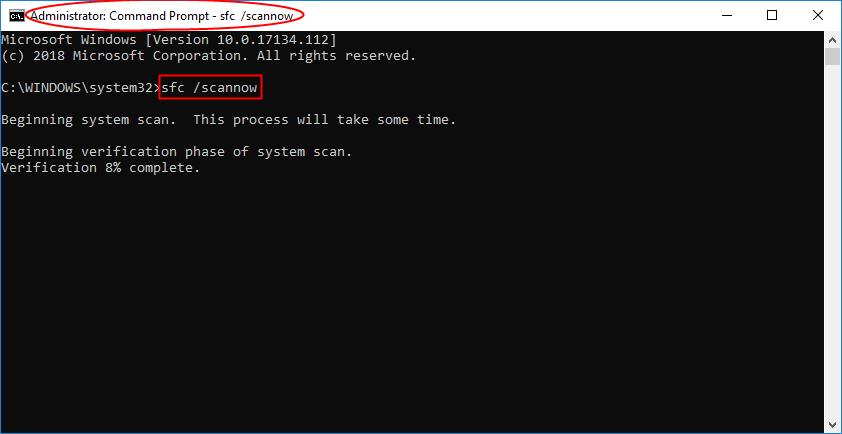
It’ll take some time for the SFC to replace the corrupted system files with new ones if it detects any, so please be patient.
4) Restart your computer for the changes to take effect.
5) Check your computer to see if the problem has been fixed.
So that’s it. Hope this post helps in resolving your CMUSBDAC.sys blue screen issue.
If you have any questions or suggestions, feel free to leave a comment below.


