Many Windows 10/11 users complain that the network printer does not show up on the PC. Even after restarting the PC and printer, it still does not work. This is confusing. But do not worry, I will provide you with some valid methods to fix it.
Try these fixes
Here are 5 fixes to solve the printer problem. You can just try until your network printer shows up.
- Check the network connection
- Add your network printer to the Devices and Printers
- Update your printer drivers
- Enable the Print Spooler service
- Run Printer Troubleshooter
Fix 1: Check the network connection
The network connection is necessary but easily neglected. When your printer does not show up on the PC, you should check the network connection first. Once you find the network is disconnected, you need to reconnect it.
Step 1: Run a ping command
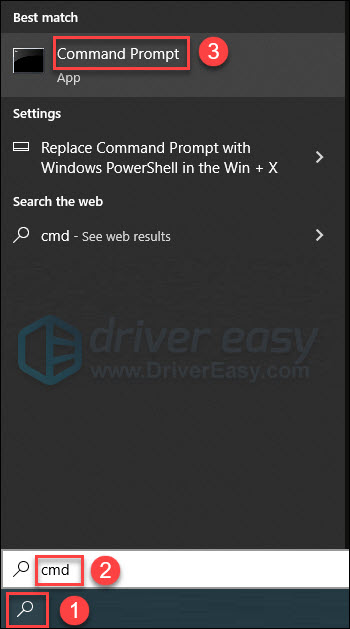
- Click the Search box, and then type cmd. Click Command Prompt.
- Find out the IP address on your printer information tag.
- Type ping and then IP address (eg. ping 10.26.76.249) on the Command Prompt dialog and press Enter. Note that a space is necessary between the ping command and the IP address.
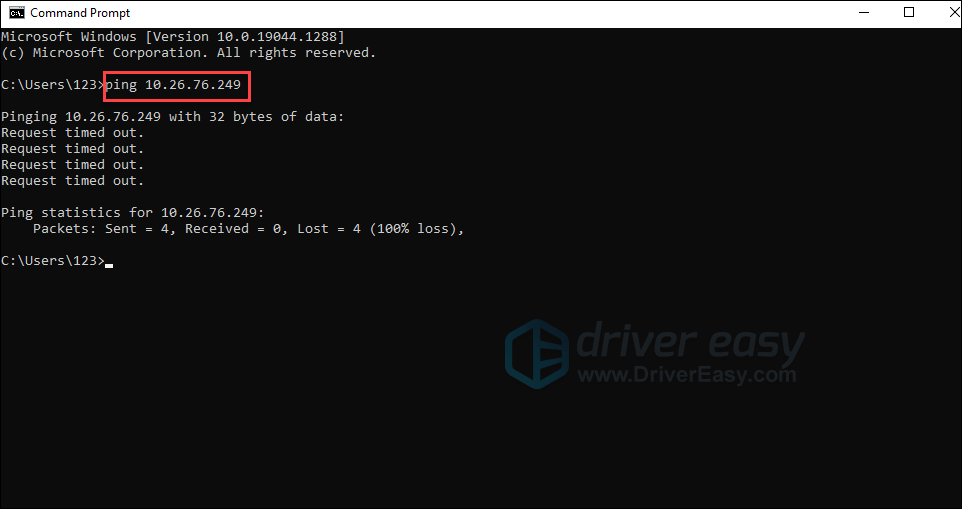
- Your PC will perform the ping command and detect if your printer is connected to the network.
Step 2: Reconnect the printer
If your printer is not connected to the network, you can reconnect the printer. Since this varies from manufacturer to printer, you can refer to your printer manual for instructions or consult the service personnel on the printer website.
If your printer has been connected but it still doesn’t show up on the PC, you can move to the next method.
Fix 2: Add your network printer to the Devices and Printers
Only when your printer is added to the Devices and Printers, can your PC detect and find it. That is, if your network printer is not added to the Devices and Printers, your network printer will not show up. You can add your network printer to fix the problem.
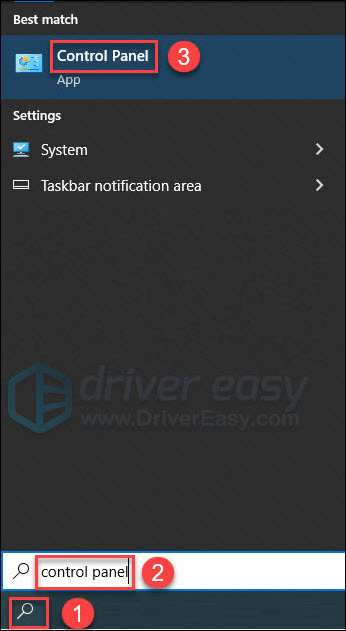
- Click the Search box in the lower left corner of your screen and then type control panel. Click the Control Panel.
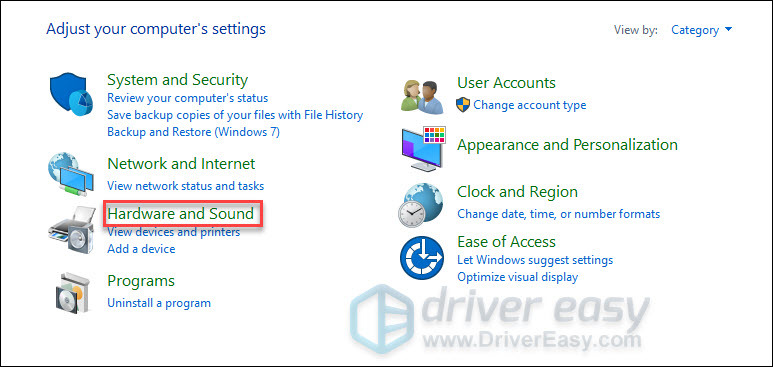
- Click Hardware and sound.
- Click Devices and Printers.
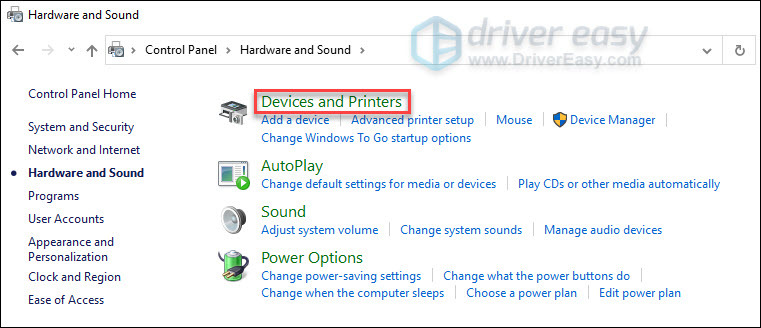
- Click Add a printer.
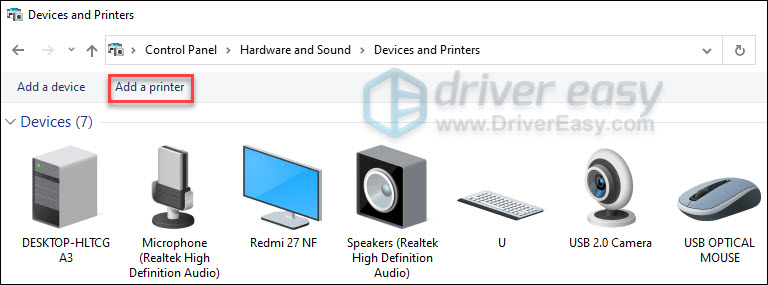
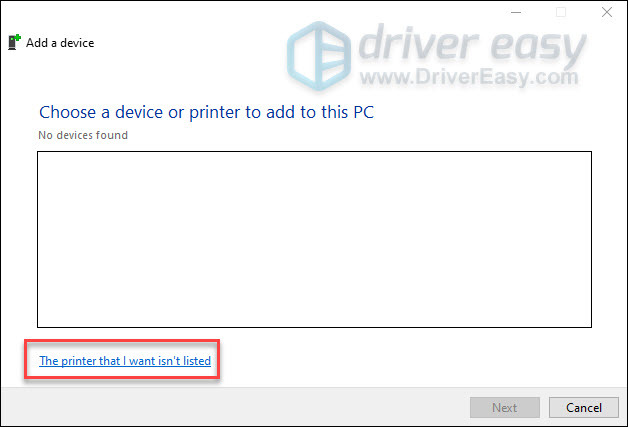
- The windows below will pop up. If your PC doesn’t detect your printer automatically, click The printer that I want isn’t listed.
- Click the option button next to Select a shared printer by name. Type your computer or printer name in the empty text box and then click the Next Button.
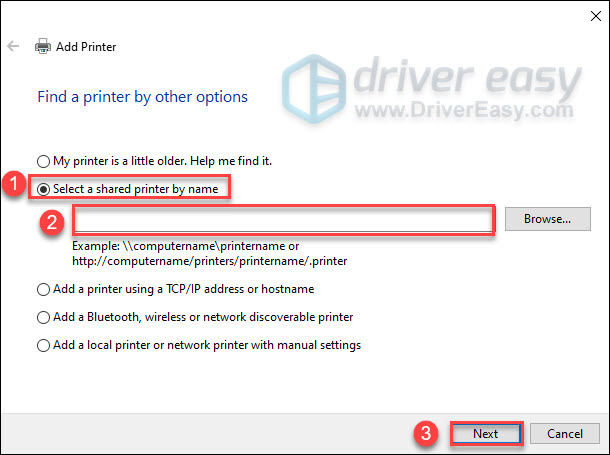
- Your PC will connect to the printer you add. Then you can check if your network printer is visible on your PC.
Fix 3: Update your printer drivers
When your Windows updates but your printer driver doesn’t, your printer may be not compatible with your Windows version. It can cause a series of problems, including your printer not showing up on the PC. Therefore, you can try to update your printer drivers in two ways to fix the problem.
Option 1- Manually download and install the driver
You can update your print driver manually by going to the manufacturer’s website, and searching for the most recent correct driver. It will take time and effort.
Option 2- Automatically update the driver
If you don’t have the time, patience or computer skills to update the printer driver manually, you can do it automatically with Driver Easy.
Driver Easy will automatically recognize your system and then find the correct drivers for it. In other words, You don’t need to know exactly what system your computer is running, you don’t need to risk downloading and installing the wrong driver, and you don’t need to worry about making a mistake when installing.
You can update your drivers automatically with either the FREE or the Pro version of Driver Easy. But with the Pro version it takes just 2 clicks:
- Download and install Driver Easy.
- Run Driver Easy and then click the Scan Now button. Driver Easy will then scan your computer and detect any drivers that need to update.
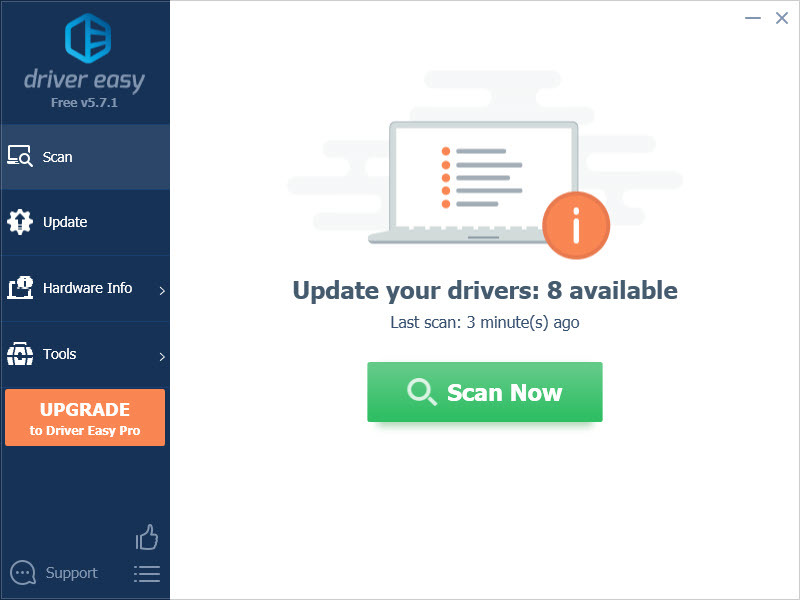
- You can choose to update the driver with a FREE version. Click the Update button next to the flagged driver to automatically download the correct version of that driver, then you can manually install it.
Or you can click Update All to automatically download and install the correct version of all the drivers that are missing or out of date on your system. (This requires the Pro version – you’ll be prompted to upgrade when you click Update All).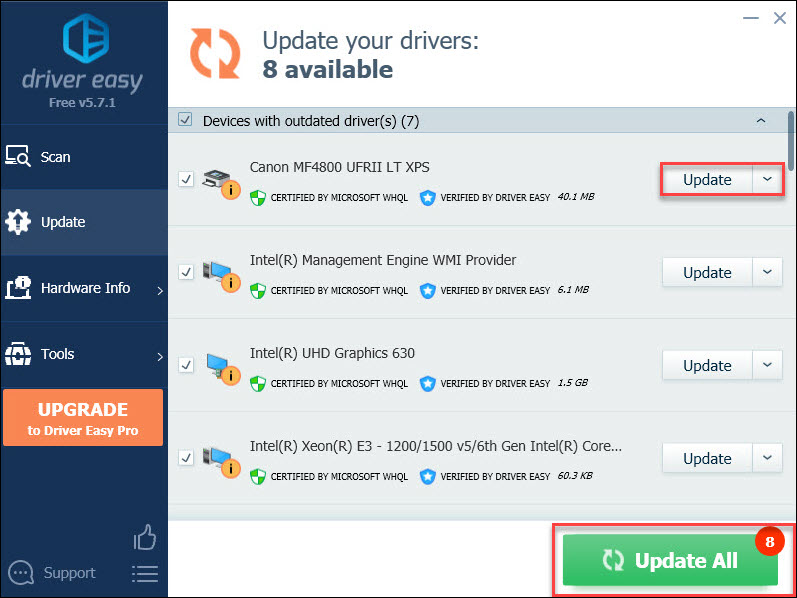
After updating your device drivers, see if your network printer shows up. If not, move to the next method.
Fix 4: Enable the Print Spooler service
The Printer Spooler service is responsible for managing all printing jobs. That is, if the service is disabled, it will cause a series of printer problems. So when your network printer is not visible on the PC, you can try to check the print spooler service and enable it.
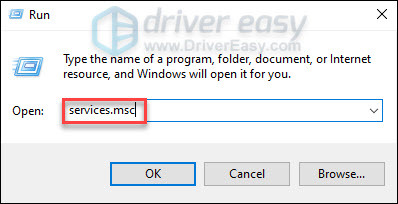
- Press the Windows logo key and R key on keyboard at the same time to open the Run dialog.
- Type services.msc and then press Enter.
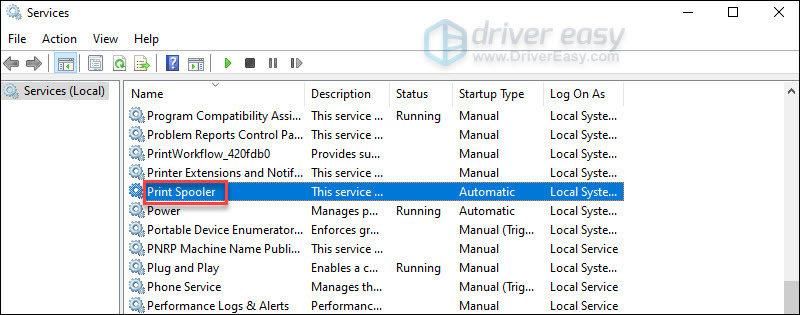
- Slide down your mouse until you find the Printer Spooler. Double click the Printer Spooler.
- The Print Spooler Properties dialog will pop up. Click Start and then select the OK button.
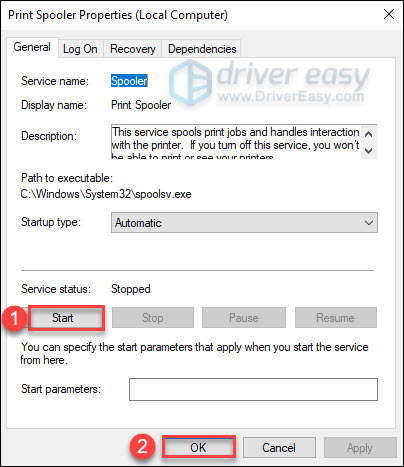
After enabling the Print Spooler service, you can check if your network printer appears on your PC.
Fix 5: Run Printer Troubleshooter
The Troubleshooter can find and solve any problem of your PC automatically. After you have tried the above method, it still doesn’t work. You can run the Troubleshooter to check if there is an error in the printer.
- On the keyboard, press the Windows logo key and I key at the same time to open the Settings.
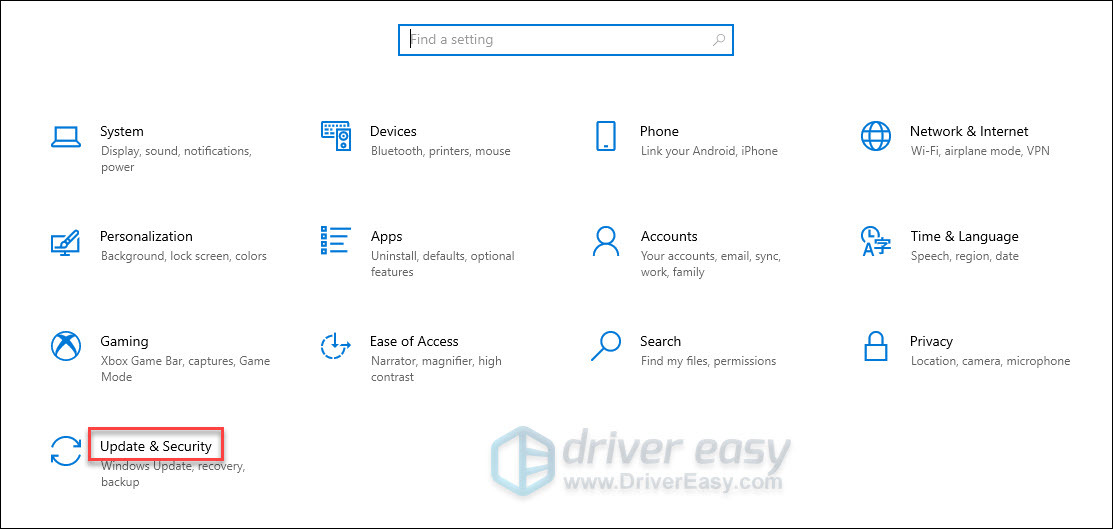
- Click the Update and Security from the menu options.
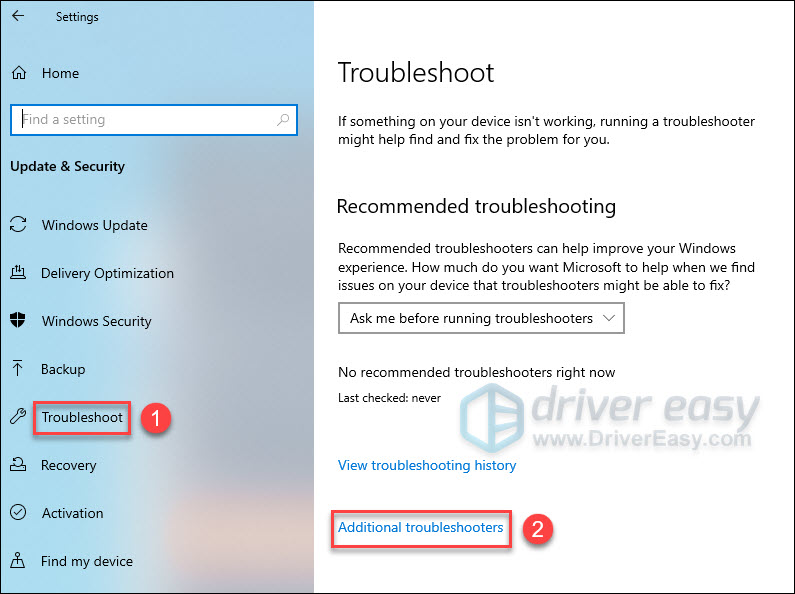
- Select Troubleshoot on the left panel and click Additional troubleshooters (or if Printer appears on the right panel, click Run the troubleshooter below Printer).
- Click Run the troubleshooter below Printer.
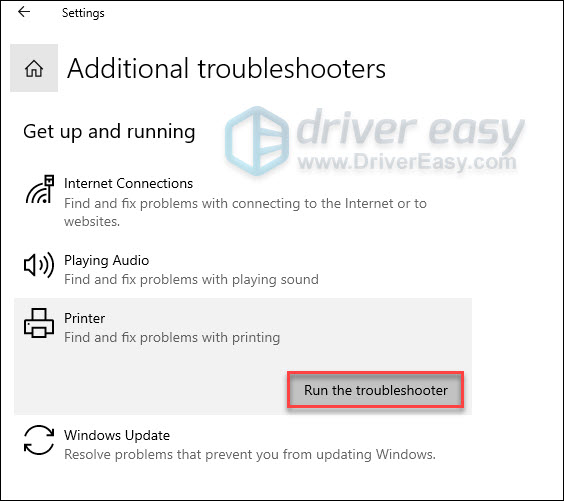
- The troubleshooter will fix problems it might find. After the troubleshooter finishes work, see if your printer is visible on your PC.
In short, I hope this article is helpful to you. If you have any questions, please feel free to leave a comment below.


