We expect our tech products to work every time we turn them on. It’s never more upsetting than seeing a black screen all of a sudden. Everything else seems to work just fine. The fan is spinning, and the indicator light is on. What’s wrong with my screen? Don’t panic. The Black Screen of Death is very common, and whatever the cause is, you can fix it with the following methods.
Why you’re experiencing a black screen issue
The main cause of the Dell black screen issue is a bad connection between your graphics drivers and your operating system. Another possible cause is a display adapter driver update issue. You may also run into a Black Screen of Death after system updates or installations, which you may need a reinstallation of Windows.
Try these fixes
- Restart your graphics drivers
- Force shut down your laptop
- Boot into Safe Mode
- Update your graphics driver
- Restart your explorer.exe process
- Reset or update the Bios
Fix 1: Restart your graphics drivers
Whenever you run into a BSOD problem, you can always try the keyboard shortcut: press the Windows logo key + Ctrl + Shift + B at the same time. This hotkey combination will help you restart your PC’s graphics drivers.
In many cases, your Dell laptop’s black screen error is simply caused by a bad connection between your operating system and monitor. Therefore, you can try the hotkey combination first to reconnect the display.
If this doesn’t fix your black screen problem, please try the next fix.
Fix 2: Force shut down your laptop
Since you can’t restart your Dell laptop the usual way as it gets stuck, here’s what you can do:
- Disconnect all external devices or peripherals (such as a printer, Bluetooth, or USB devices).
- Power off your laptop by pressing the Power button for about 10 to 20 seconds.
- Disconnect the AC adapter and remove the battery intact.
- Drain the remaining battery by holding onto the power button for approximately 60 seconds.
- Place the battery back in and plug in the charger.
- Press the Power button to turn on your laptop.
If your laptop still doesn’t show the display, you might need to boot into Safe Mode to fix it.
Fix 3: Boot into Safe Mode
Safe mode allows your computer to run in a basic state. This can help you narrow down the source of your black screen problem and do some basic troubleshooting. Here’s how to do it:
1. How to enter Safe Mode
- Your Dell laptop should be off. If your laptop is on, turn it off.
- Turn on your laptop by pressing the Power button.
- Hold the Shift key and tap the F8 key before the Windows logo shows up. Doing so will bring out the Recovery Mode menu.
- If you couldn’t enter Safe Mode on your first attempt, then try again. It may take several attempts before it works so just be patient.
- While in the Recovery Mode menu, select See advanced repair options > Troubleshoot > Advanced options > Windows Startup Settings > Restart.
- After the computer restarts, there’s a list of options. Choose 5 or F5 to enter Safe Mode with a network connection.
If everything works out fine in Safe Mode, then the problem is most likely triggered by an outdated graphics driver, third-party applications, or computer virus.
To get rid of the black screen error, you can try to uninstall the newly installed applications and perform a virus scan. If the black screen still persists, then head to Fix 4 to update your graphics driver.
2. Screen still goes black? Connect to an external display.
Press the Windows logo key + P to bring up the display list. Try selecting different display options for other attached displays such as a TV or a second monitor. Then press the P or down arrow key to select a display and then hit Enter.
Fix 4: Update your graphics driver
A black screen problem may occur if your graphics driver is out of date. To improve computer performance, it’s important to make sure that you always have the latest graphics driver installed.
You can update your audio driver manually, if you like, by visiting the manufacturer’s website, finding their driver download page, finding the right driver, etc. But if you’re not comfortable playing with device drivers, or you simply don’t have the time, we recommend doing it with Driver Easy. Here’s how:
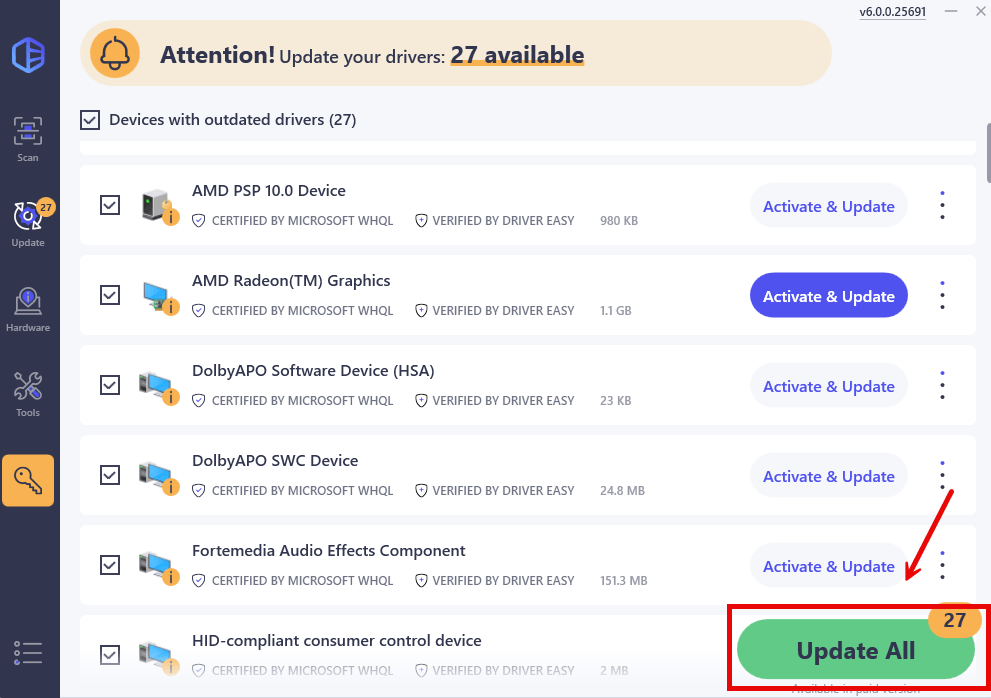
1) Download and install Driver Easy, then launch it and run a full scan.

2) Then click Update All to automatically download and install the correct version of all the drivers that are missing or out of date on your system. (This requires the Pro version of Driver Easy – you’ll be prompted to upgrade when you click ‘Update All’. If you’re not sure Driver Easy is right for you, it offers a 7 day free trial that allows you to test out all the features.)

Don’t forget to restart your PC for the changes to take effect.
Check if the annoying black screen issue reoccurs. If your desktop becomes normal again, then congrats! If the black screen still persists, please move on to the next fix.
Fix 5: Restart your explorer.exe process
Explorer.exe manages the desktop, taskbar, and other processes on your laptop, so if it’s not working properly, your screen goes black. In this case, you will need to restart the process to see if it solves the problem.
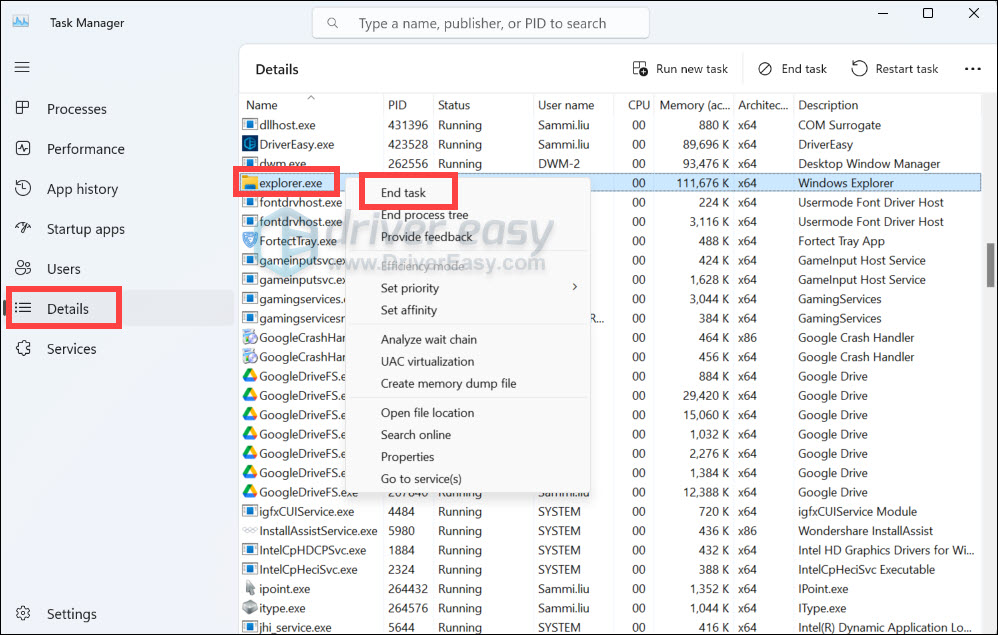
1) On your keyboard, press the Ctrl + Shift + Esc keys at the same time to open Task Manager.
2) Click the Details tab, then right-click explorer.exe and select End task.

3) Restart your computer and see if the black screen is gone now.
If you still see the black screen, then go on to try the next fix.
Fix 6: Reset or update the Bios
Another possible cause of black screen can be corrupt bios settings or outdated bios version. To fix it, you can reset the bios first to see if solves your problem.
- Restart your laptop.
- When you see the Dell logo, press the F2 or F12 key several times until you see Entering Setup.
- Press F9 (or Alt + F, or the load defaults button shown on the screen) to load the default settings.
- Press ESC to exit the BIOS screen and be sure to select the Save and Exit option.
- Choose the Enter key to save all changes and exit the BIOS screen. Allow your system to restart for the BIOS settings to reset.
You can also update the BIOS to the latest version if resetting the BIOS to factory defaults won’t fix the problem.
Go to Dell Support Page to download the latest Bios version of your Dell laptop model. Then follow the instructions provided by Dell to update Bios.
If you don’t know how to do it, please check Dell Bios Update Guide.
Hopefully, one of the fixes above solved your Dell laptop’s black screen issue. Feel free to drop us a comment if you have any questions or suggestions. Black screens that occur seemingly at random are usually the result of a more serious hardware problem which might be better left with professional hands.


