Regular driver updates are essential for maintaining system stability and preventing crashes. Driver Easy simplifies this process by automatically identifying devices with outdated drivers, then downloading and installing the latest drivers for your system, direct from the device manufacturer.
Marvel Rivals is a free-to-play PvP hero shooter that has quickly gained immense popularity among players. Its thrilling gameplay offers an immersive experience. However, some players have encountered persistent crashes, occurring either at startup or during matches.
Some may receive error messages such as “Out of video memory trying to allocate a rendering resource.”, “Our system has detected a GPU crash.”,
or “An Unreal process has crashed: UE-Marvel”.
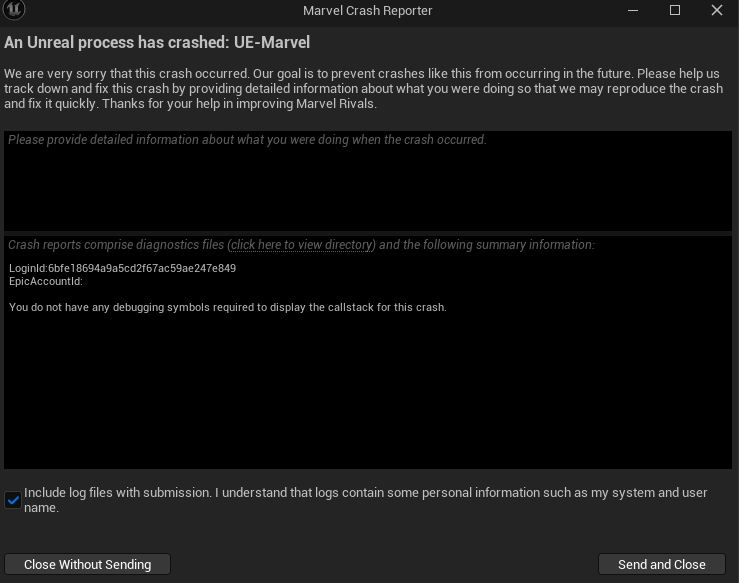
If you’re facing similar issues, don’t worry—this tutorial is here to help. You can try the fixes below. Note that you do not have to try them all; simply work your way down the list until you find the one that works for you.
- Make sure your PC is capable
- Download and install all Windows updates
- Roll back your graphics driver to a previous version
- Verify integrity of game files
- Run the game as administrator
- Temporarily disable overlays
- Close unnecessary programs
- Adjust virtual memory settings
- Set launch options
1. Make sure your PC is capable
Ensuring that your PC meets the minimum system requirements for Marvel Rivals is a crucial step. If your system doesn’t meet the game’s minimum specifications, it may struggle to handle the game’s demands, leading to performance issues such as stuttering, freezing, or unexpected crashes. Players experiencing a complete PC crash when launching the game should verify their system’s compatibility.
MINIMUM:
OS: Windows 10 64-bit (1909 or newer)
Processor: Intel Core i5-6600K or AMD Ryzen 5 1600X
Memory: 16 GB RAM
Graphics: NVIDIA GeForce GTX 1060 / AMD RX 580 / Intel Arc A380
DirectX: Version 12
Network: Broadband Internet connection
Storage: 70 GB available space
Additional Notes: It’s recommended that you install the game on SSD drive for better experience.
However, even systems that meet the minimum requirements can experience performance degradation over time due to various issues. For instance, users have reported that after certain updates, the game’s memory leaks and lack of optimization became apparent, causing massive stutters and frame rate drops.
Therefore, to ensure optimal performance and minimize the risk of crashes, it’s advisable to upgrade your PC to meet or exceed the recommended system requirements.
RECOMMENDED:
OS: Windows 10 64-bit (1909 or newer)
Processor: Intel Core i5-10400 or AMD Ryzen 5 5600X
Memory: 16 GB RAM
Graphics: NVIDIA GeForce RTX 2060 (Super) / AMD RX 5700-XT / Intel Arc A750
DirectX: Version 12
Network: Broadband Internet connection
Storage: 70 GB available space
Additional Notes: It’s recommended that you install the game on SSD drive for better experience.
How to check your system specifications
To determine if your PC meets the necessary requirements for Marvel Rivals, follow these steps:
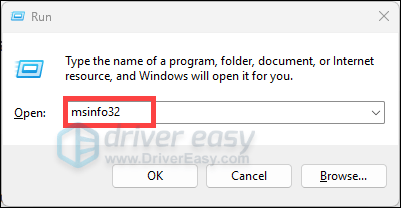
- On your keyboard, press Win + R to open the Run dialog box.
- Type msinfo32 and hit Enter. This will open the System Information tool, which provides detailed information about your system’s hardware and software.
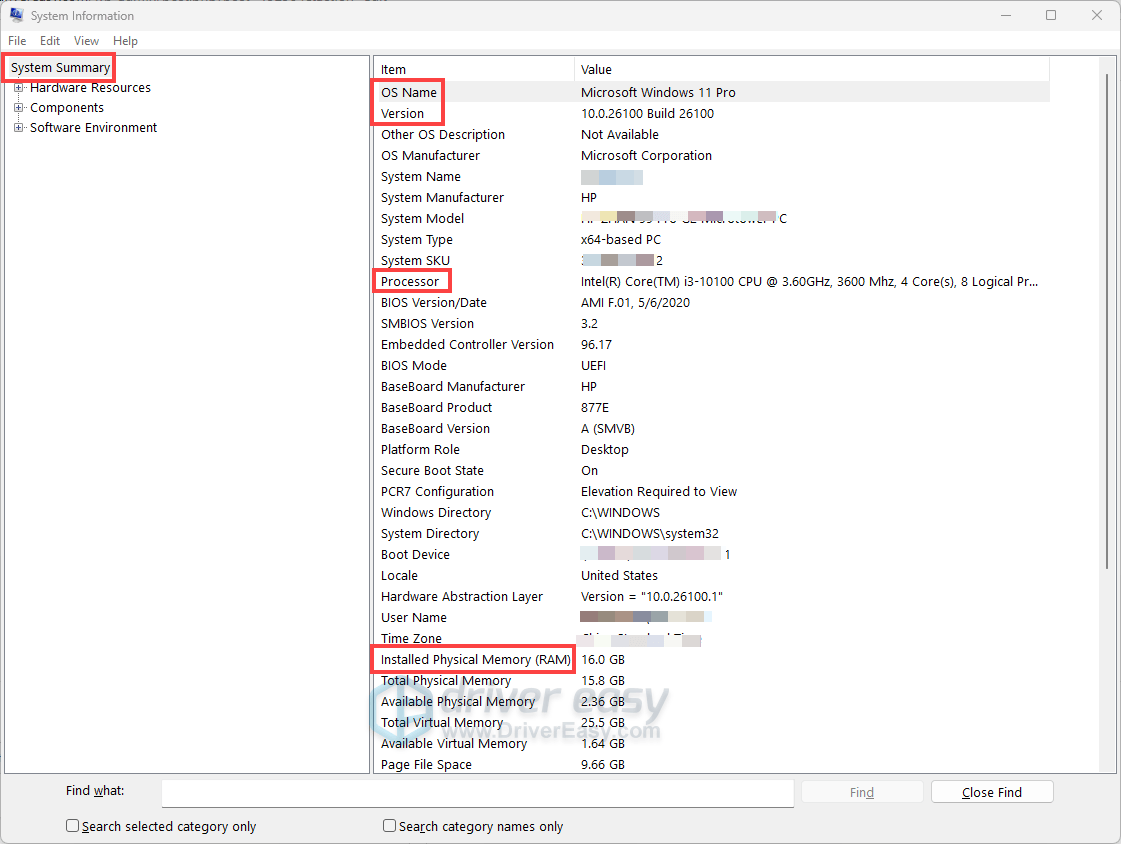
- In the System Information window, select System Summary from the left pane. Here you’ll find details about your operating system, processor, installed RAM, and other essential components.
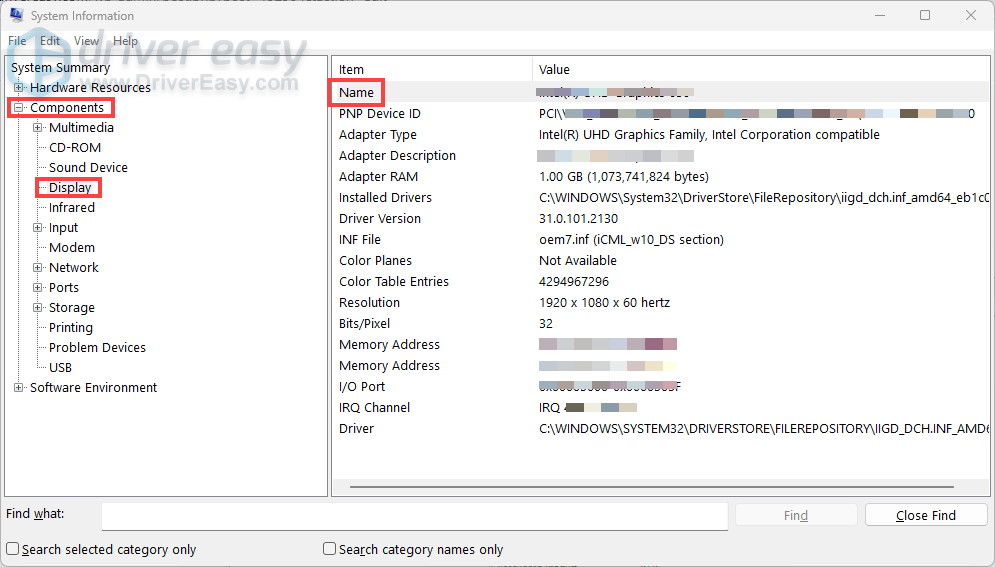
- In the left pane, expand Components and then select Display. This section will provide information about your graphics card.
- In the left pane, expand Components, then click on Storage > Drives. You’ll see a list of your drives, for each drive, you’ll find information such as Free Space: The amount of available free space on the drive.
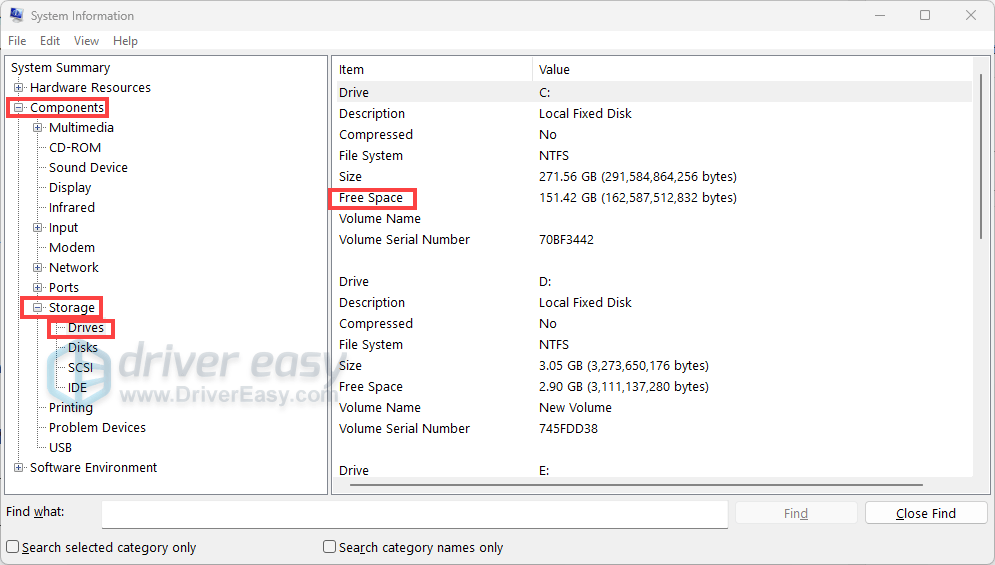
After you gather the necessary information, compare your system’s specifications against the minimum and recommended requirements for Marvel Rivals. If your system falls short in any area, consider upgrading the relevant components to enhance your gaming experience.
2. Download and install all Windows updates
Keeping your Windows operating system up to date is essential for maintaining system stability and compatibility with applications like Marvel Rivals. Outdated system files can lead to conflicts, resulting in game crashes or performance issues. To troubleshoot your issues, ensure that all Windows updates are installed.
- From the Search bar, type check for updates. Then click Check for updates from the list of results.
- Click on the Check for updates button. Windows will search for available updates and begin downloading them automatically.
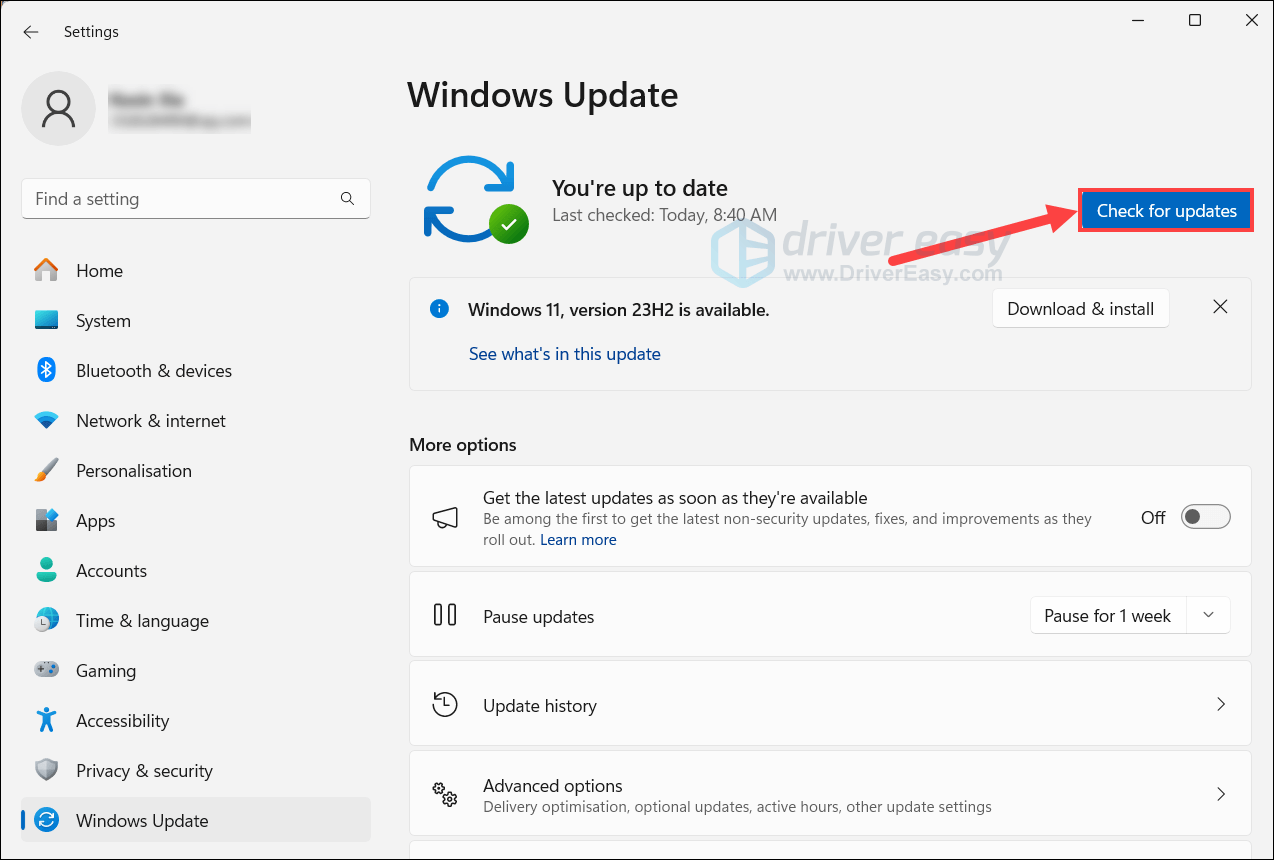
- Once the updates are downloaded, click on Install now to begin the installation process. Once finished, you may be required to restart your system.
If you’re up to date and still encounter constant crashes, move on to the next fix.
3. Roll back your graphics driver to a previous version
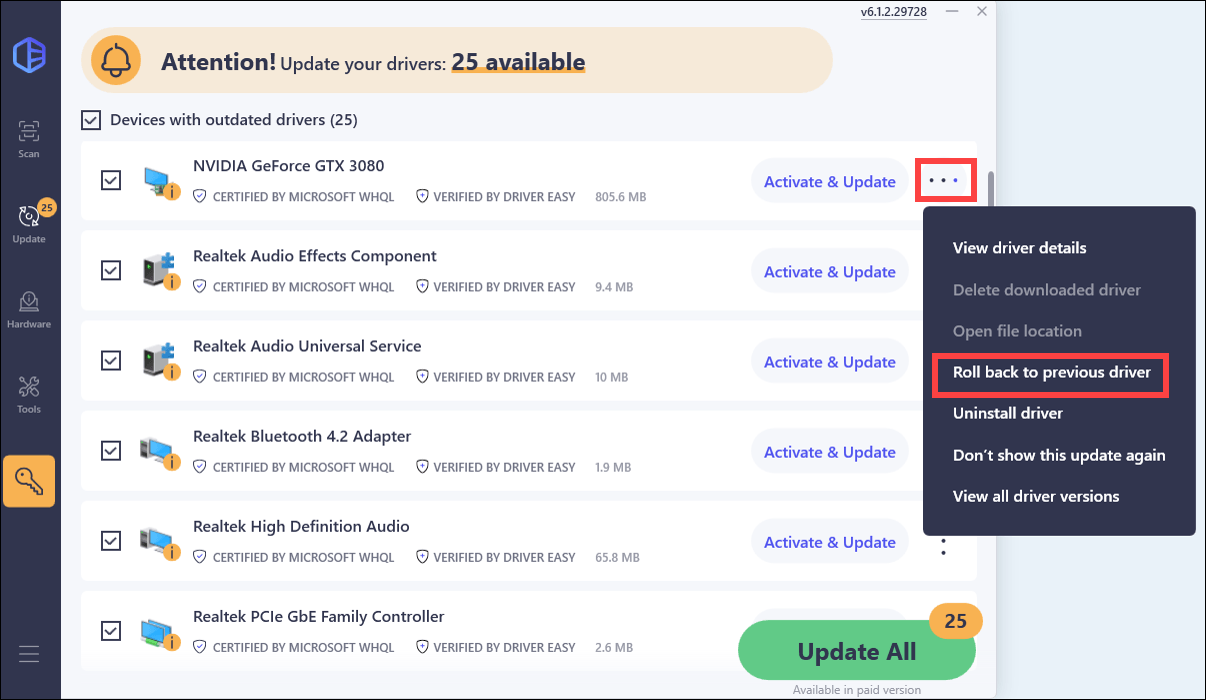
If you’ve noticed that Marvel Rivals crashes more frequently after a game update, reverting to a previous version may help stabilize performance. Some players have reported that rolling back their NVIDIA drivers reduced crashes. You can do this with Driver Easy, a handy tool that is designed to simplify the process of updating drivers. However, it’s more than just providing you with easy access to the latest driver updates. There are a bunch of features and tools such as Roll back to previous driver, Uninstall driver, and View all driver versions, making it an all-in-one tool to get a properer understanding of your device drivers.
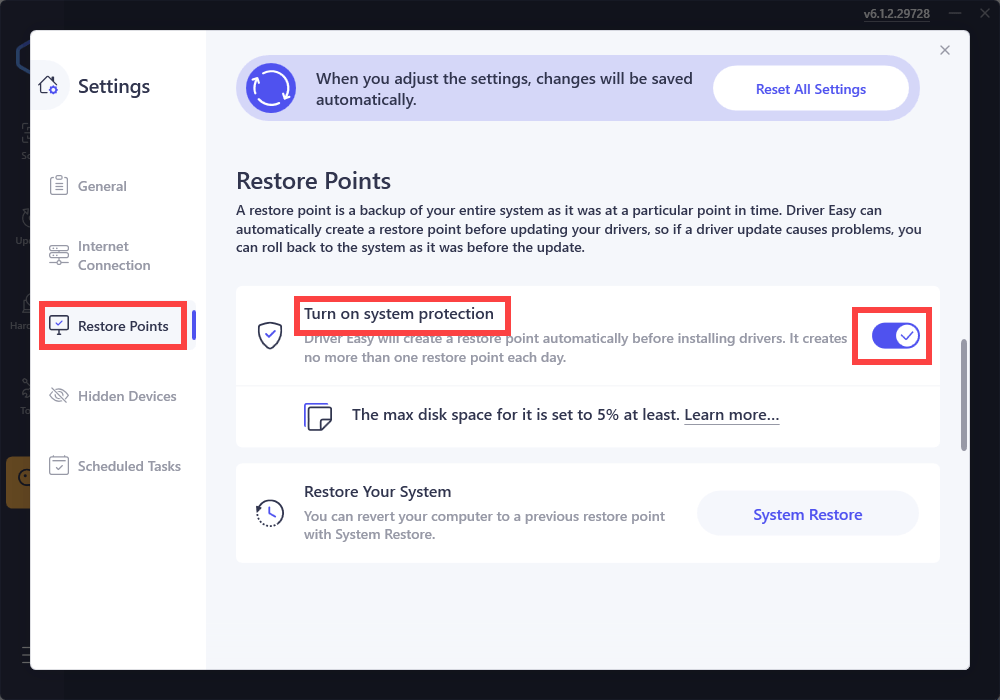
Additionally, Driver Easy can automatically create a restore point before performing tasks, which is a prudent step to safeguard your system by allowing you to revert to a previous state if any issues arise during the process. Below are the instructions to view and modify the settings about this feature, as well as detailed steps to roll back to a previous driver:
- Download and install Driver Easy.
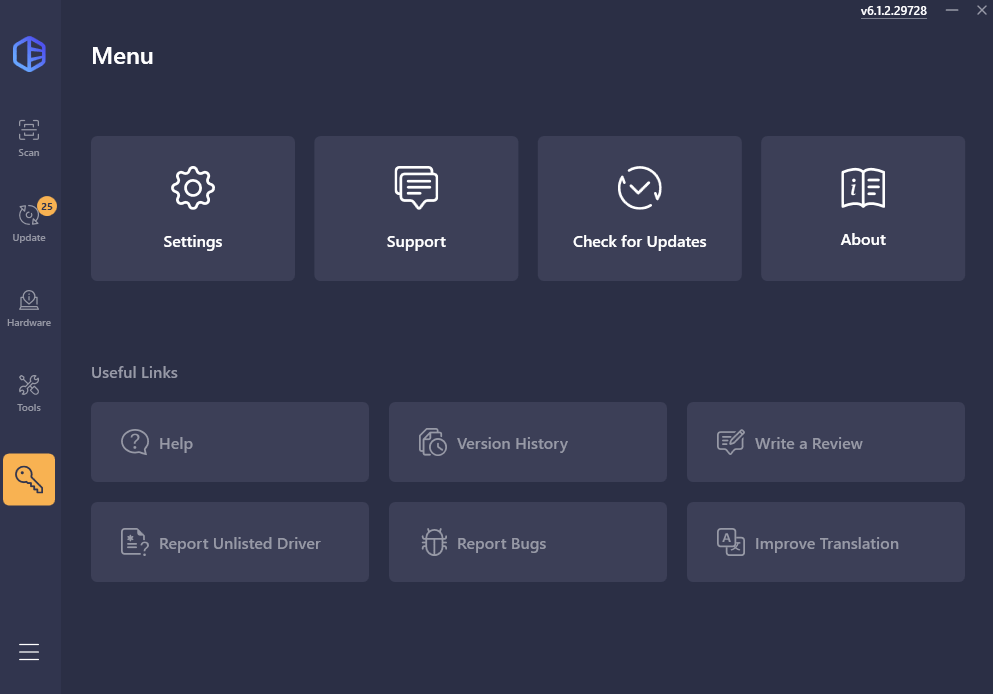
- Run Driver Easy and click the menu button at the bottom left. Click Settings.
- Click Restore Points. Enable the option Turn on system protection. The changes will be saved automatically.
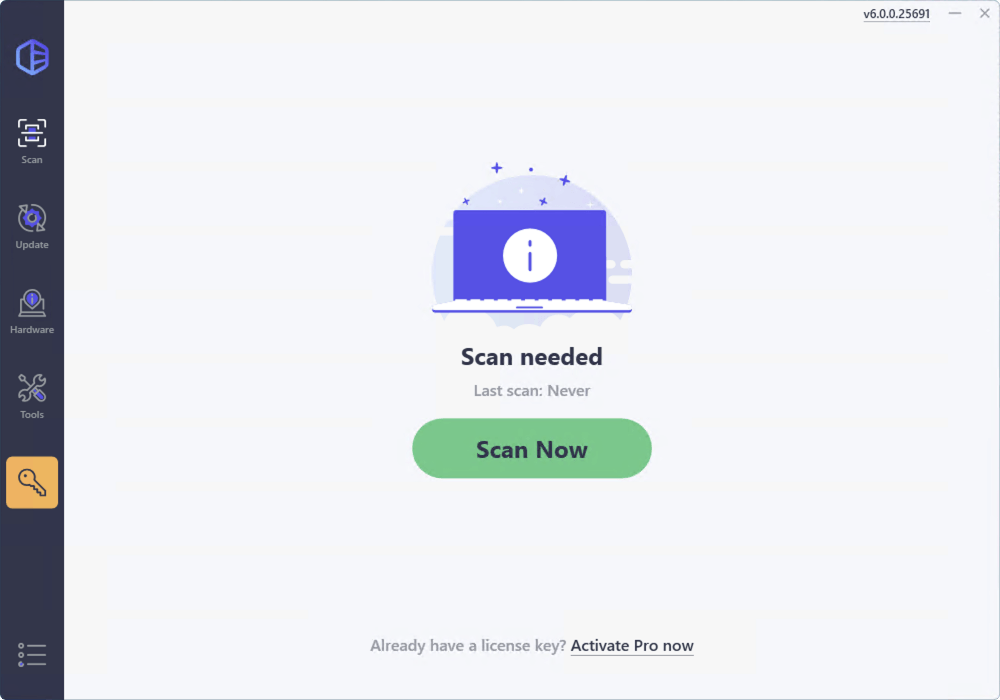
- Now close the window and click on Scan from the left pane. Then click on the Scan Now button. Driver Easy will then scan your computer and detect any devices with outdated drivers.
- Locate your device. When available, click on the three-dot and select Roll back to previous driver. To proceed, you’ll need to subscribe to Driver Easy Pro. Not ready yet? Enjoy a 7-day free trial. Rest assured, you won’t be charged until after the trial ends.
Tips: If Marvel Rivals continues to crash after attempting the previous fixes, consider updating to the latest graphics driver. While rolling back to the previous driver version may help you mitigate the issues introduced by recent updates, it’s not a permanent solution. Manufacturers regularly release driver updates to fix known issues, enhance performance, and improve compatibility with new games and applications. With a Driver Easy trial or subscription, you can update your drivers effortlessly.
If you prefer to manually roll back your graphics driver to a previous version, take these steps:
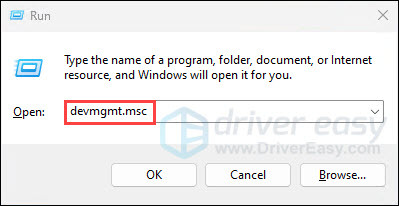
- On your keyboard, press Win + R to open the Run dialog box. Then type devmgmt.msc to open the Device Manager.
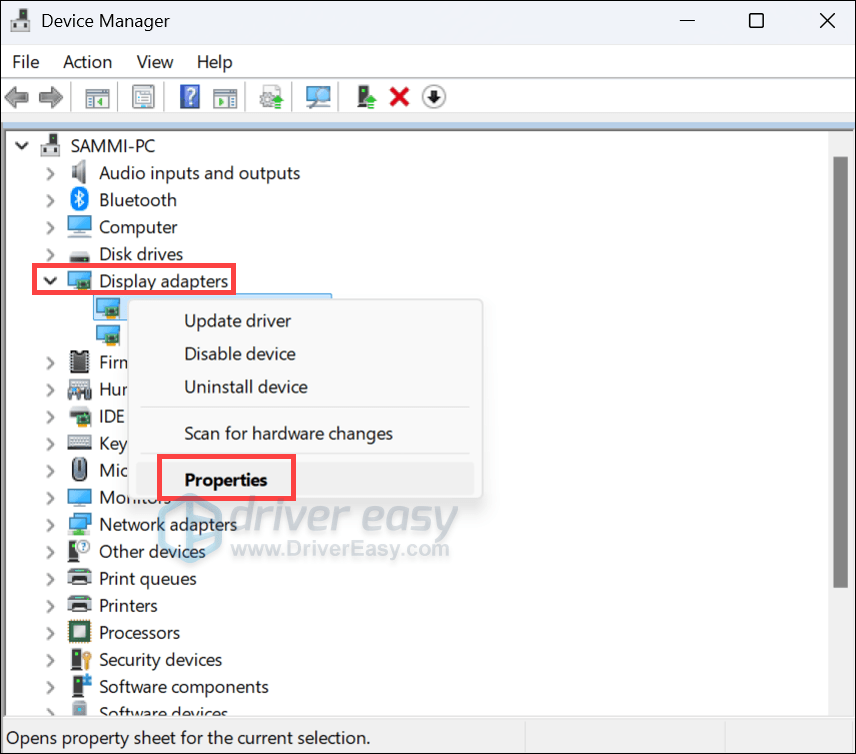
- Expand the Display adapters section, and right-click your graphics card and choose Properties.
- Navigate to the Driver tab, then click Roll Back Driver.
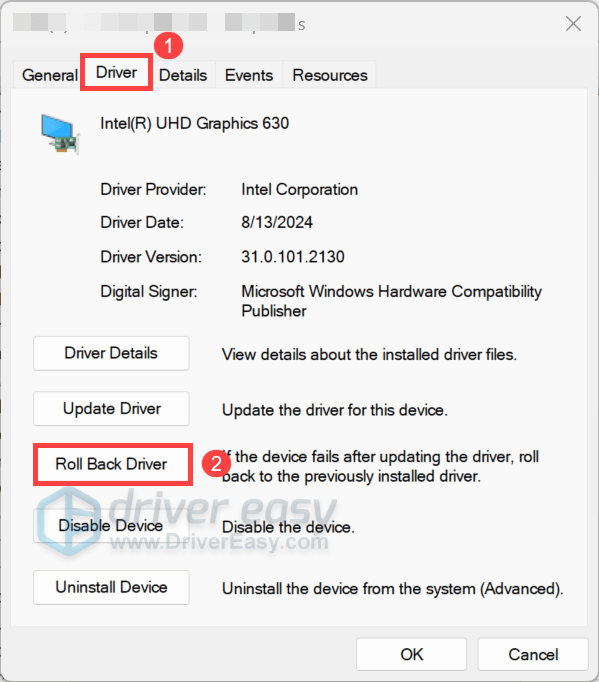
- Then follow the on-screen instructions to finish it.
If the rollback option isn’t available or the provided version isn’t the one you’re expecting, you can manually install it by following the steps below:
- Visit your GPU manufacturer’s website to find and download a stable driver. If you’re using an NVIDIA graphics card, version 551.61 or 560.94 have been reported to work well for players experiencing crashing issues.
- After you download the file and are ready for the installation, open Device Manager, right-click your graphics card and select Uninstall device. Follow the on-screen instructions to complete.
We recommend finding and downloading the driver first before uninstalling your current one, as manually searching for the correct version can be time-consuming and sometimes tricky. You might end up with the wrong driver or none at all.
4. Verify integrity of game files
Over time, your game files may become damaged or corrupted, causing a wide variety of issues such as crashing, freezing, or stuttering. To troubleshoot your issues, verify game files:
on Steam
- From your LIBRARY, find your game and right-click it, then select Properties….
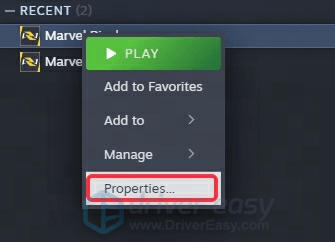
- Go to the Installed Files tab and click on the Verify integrity of game files.
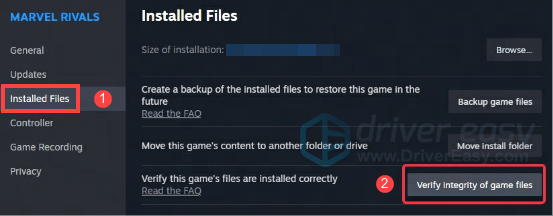
- Wait for the verification process to complete. If any files are found to be missing or corrupted, wait for the necessary files to download.
on Epic Games Launcher
- Right-click on Marvel Rivals in your library and select Manage.
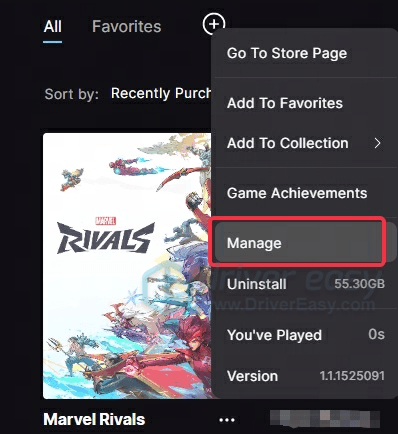
- Then click on Verify.
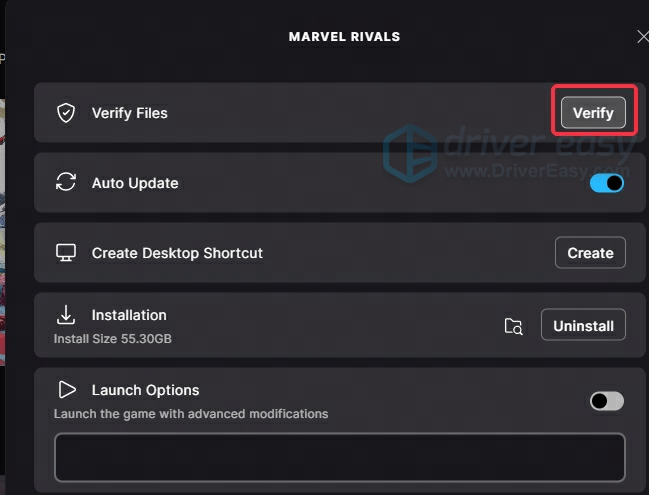
- Wait for the installation to complete.
5. Run the game as administrator
Experiencing crashes while playing Marvel Rivals can be attributed to several factors, and one of them could be the lack of administrative privileges. To address the issue, running the game as an administrator can help by granting it the necessary rights to access system resources effectively.
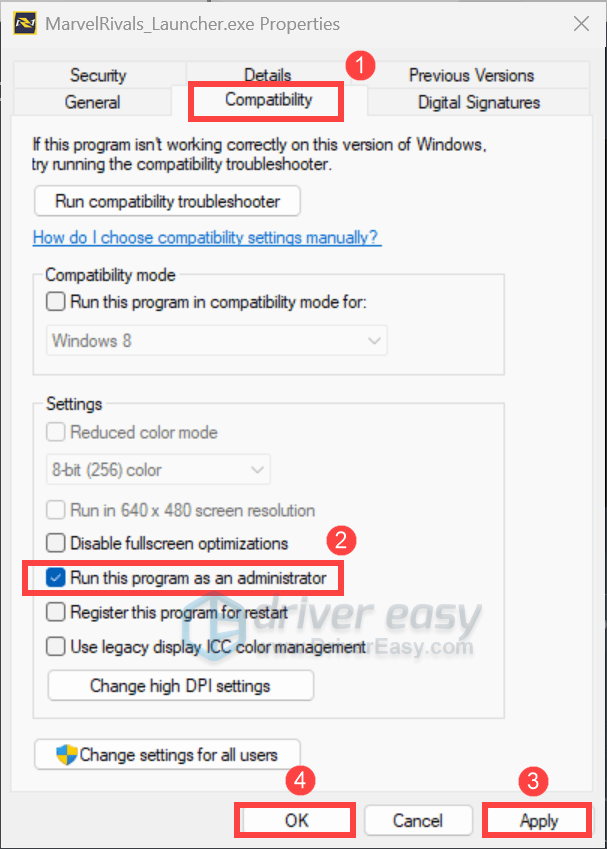
What you have to do is navigate to your game’s installation directory and locate the MarvelRivals_Launcher.exe file. Right-click it and choose Properties. Then go to the Compatibility tab, check the box labeled Run this program as an administrator, and click Apply > OK.
6. Temporarily disable overlays
Some overlay tools on Steam, Discord, or NVIDIA GeForce Experience may also influence gaming performance. To address the issue you’re encountering, disable these overlays in their respective settings:
For Steam
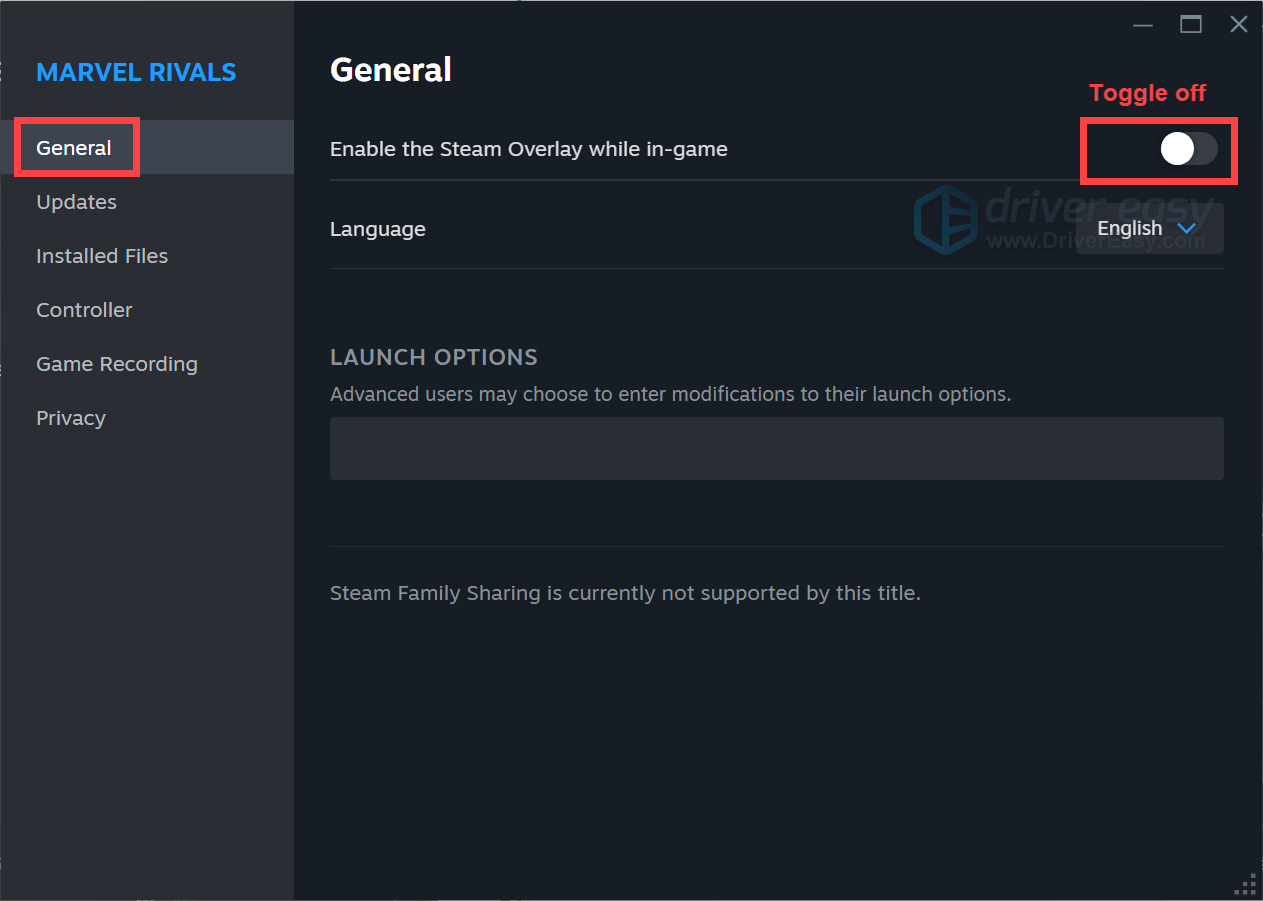
- From your LIBRARY, find your game and right-click it, then select Properties….

- Select the General tab, then toggle off the option Enable the Steam Overlay while in-game.
For NVIDIA GeForce Experience
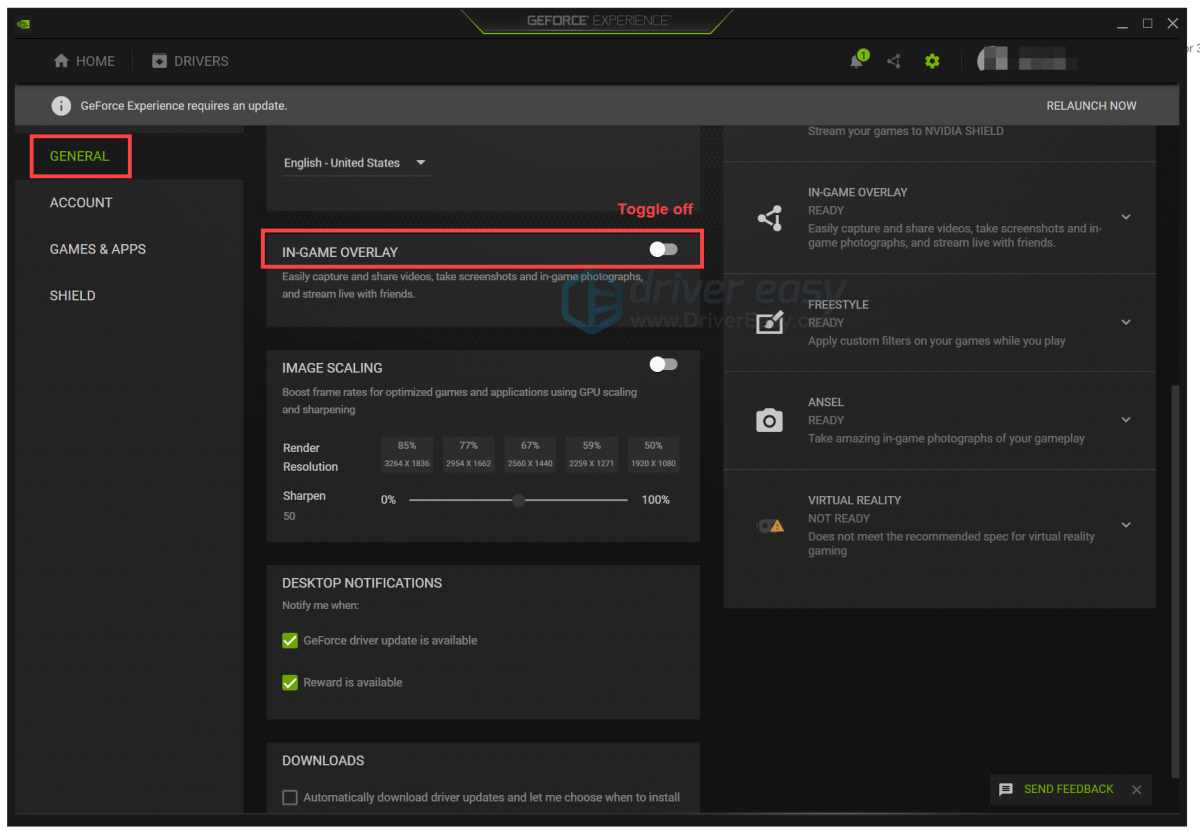
Open the app, find the gear icon on the top bar and click on it to go to Settings. From GENERAL, locate the IN-GAME OVERLAY option and toggle it off to disable it.
For Discord
Click on the gear icon from the bottom left corner. Scroll down and find Game Overlay, then toggle off the option Enable in-game overlay.
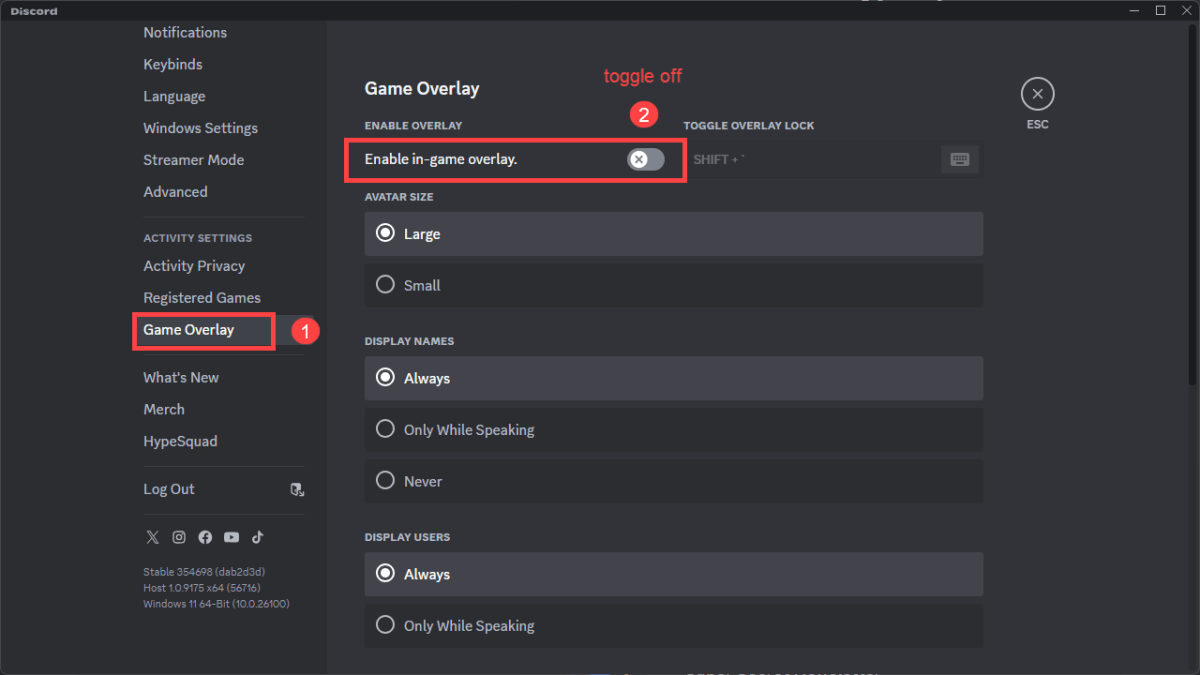
If this does not do the trick, don’t worry! Below are other fixes you can try.
7. Close unnecessary programs
Crashes in Marvel Rivals can sometimes occur due to conflicts between the game and other programs running in the background. Players have reported that software like RGB control applications and Razer Synapse can interfere with the game. In addition, they consume significant resources. To minimize such issues, it’s essential to close these programs before launching the game. To do this:
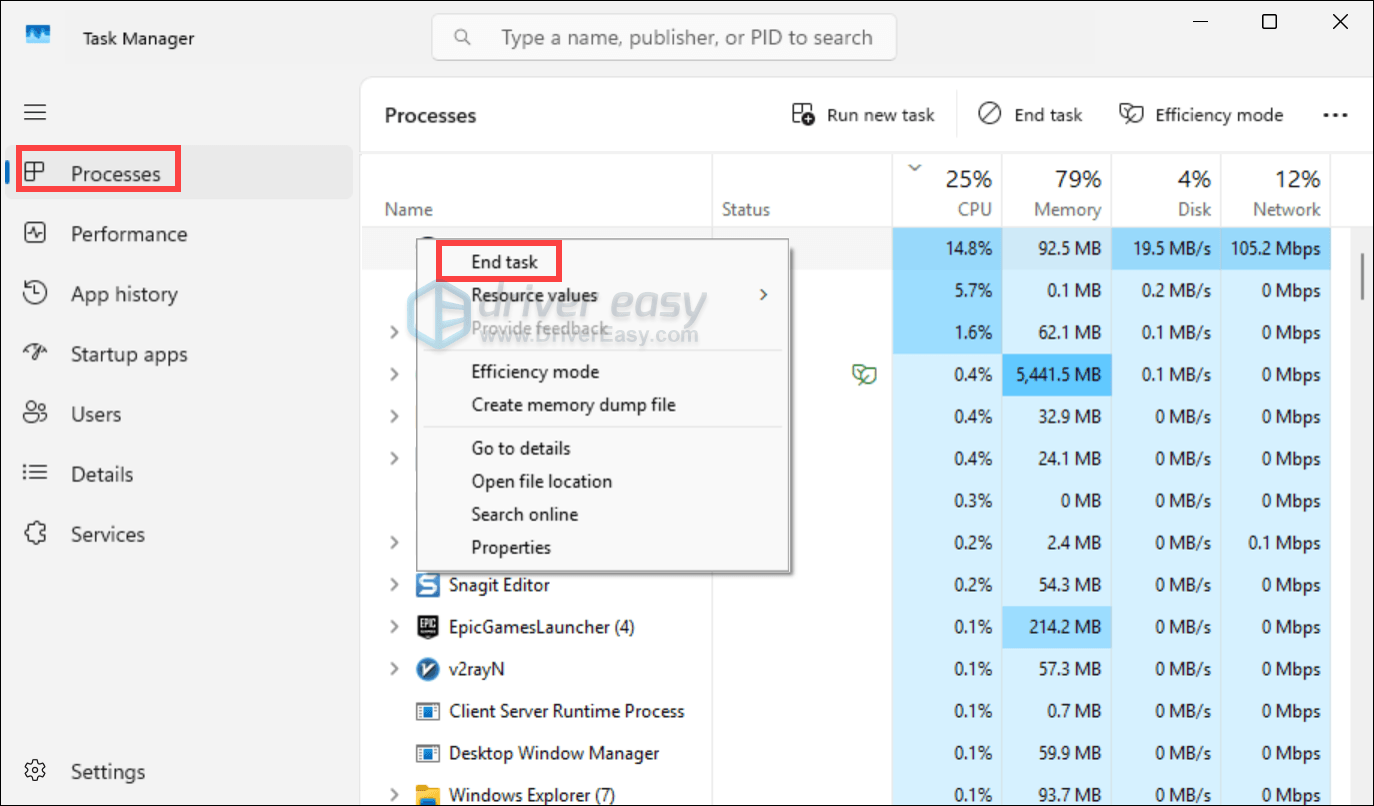
- Press Ctrl + Shift + Esc to open the Task Manager.
- Go to the Processes tab. Look for any non-essential programs such as Corsair iCUE or Razer Synapse. Right-click on each program and select End task.
8. Adjust virtual memory settings
Games like Marvel Rivals can be demanding on system resources. If your physical RAM is insufficient, the system resorts to virtual memory. Ensuring that your virtual memory is adequately configured can help prevent crashes related to memory shortages.
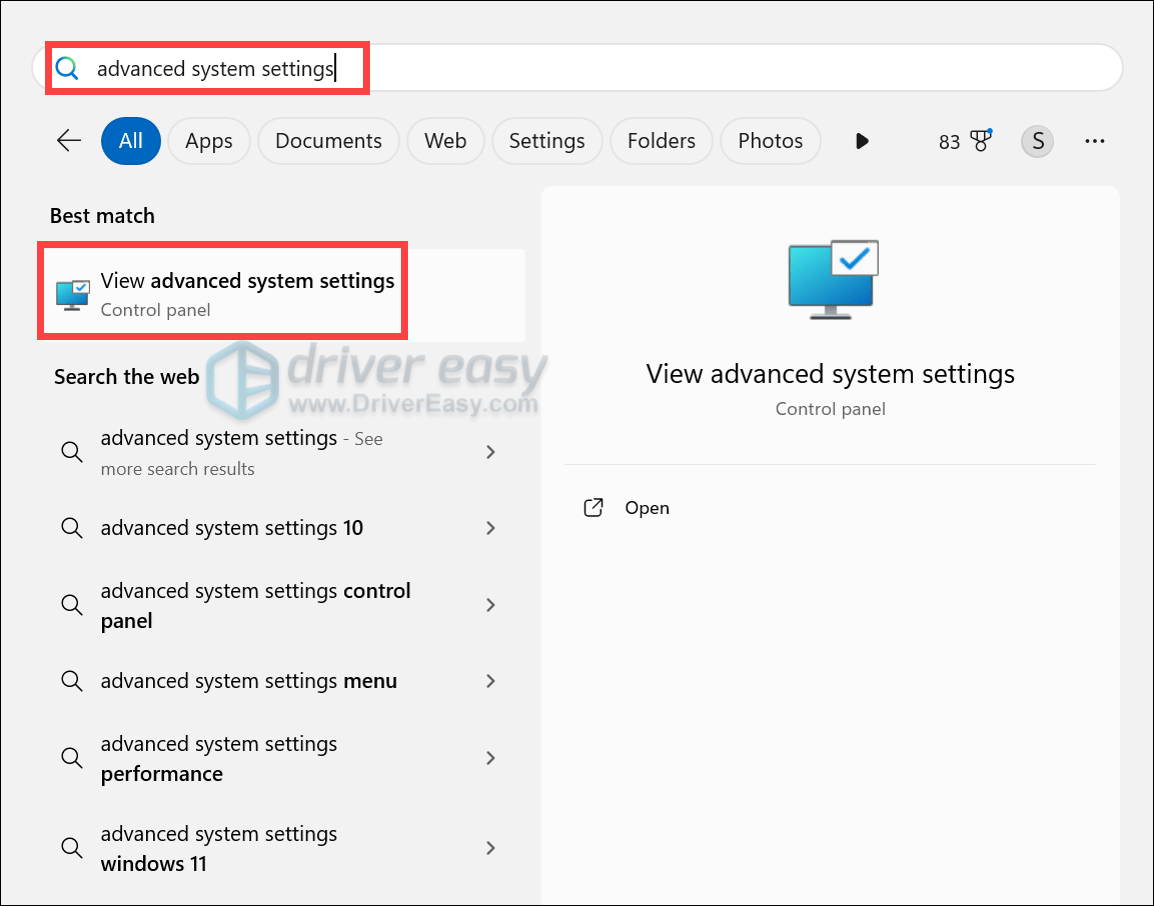
- In the Search bar, type advanced system settings. Click View advanced system settings from the list of results.
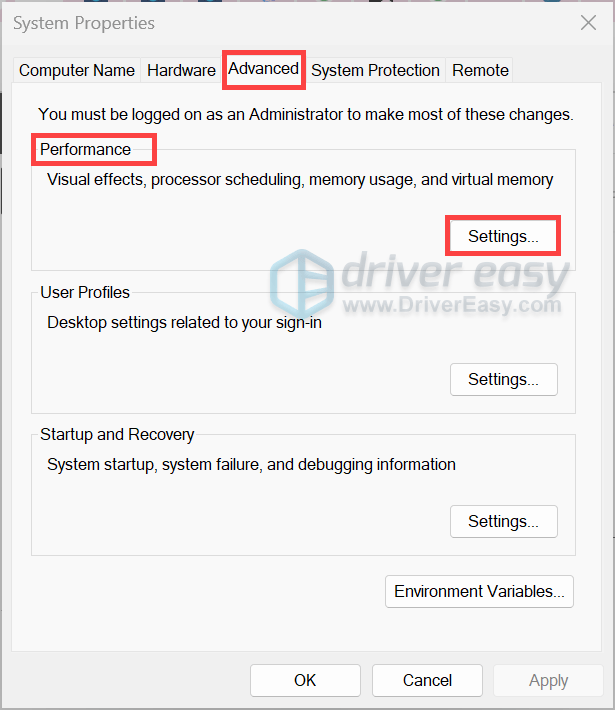
- Select the Advanced tab. Under the Performance section, click on Settings….
- Under the Advanced tab, find the Virtual memory section and click on Change….
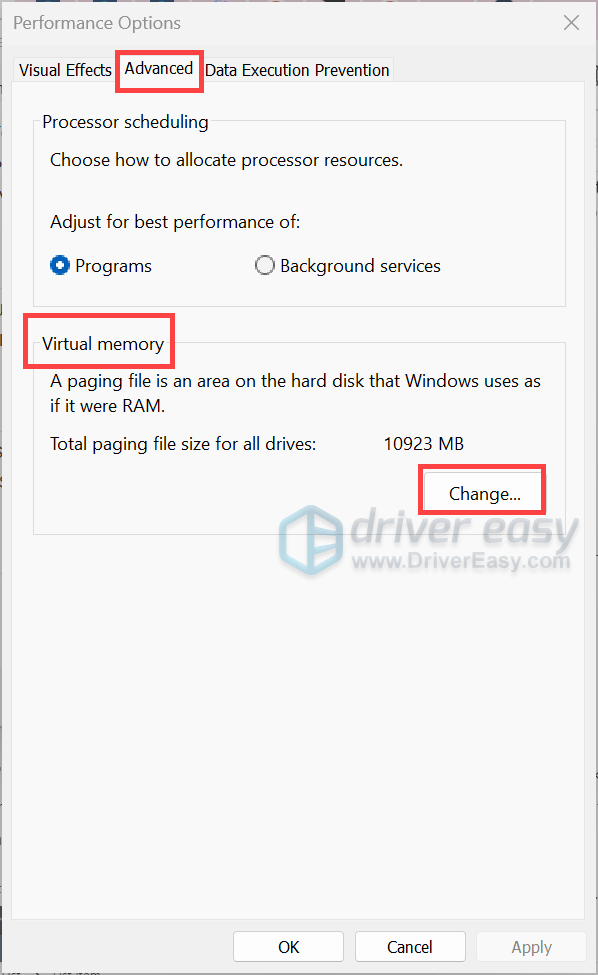
- Uncheck the box labeled Automatically manage paging file size for all drives. Select the drive where your operating system is installed (usually C:). Tick the option Custom size, then enter an Initial size (MB) and a Maximum size (MB). The paging file should be a minimum of 1.5 times the size of your installed RAM, and a maximum of 3 times your RAM size.
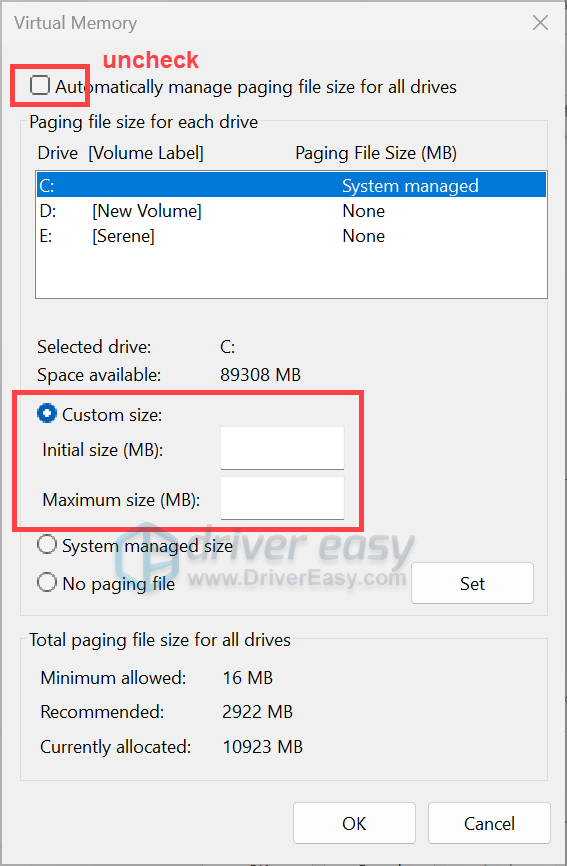
After applying the changes, launch your game and check if it works.
9. Set launch options
If you’re playing Marvel Rivals on a Linux-based system, including the Steam Deck, you might receive the error message “An Unreal process has crashed: UE-Marvel”. To fix that, set a specific launch option in Steam:
- From your LIBRARY, find your game and right-click it, then select Properties….

- Select the General tab. Under LAUNCH OPTIONS, type SteamDeck=1 %command%. Then close the window and load into your gameplay.
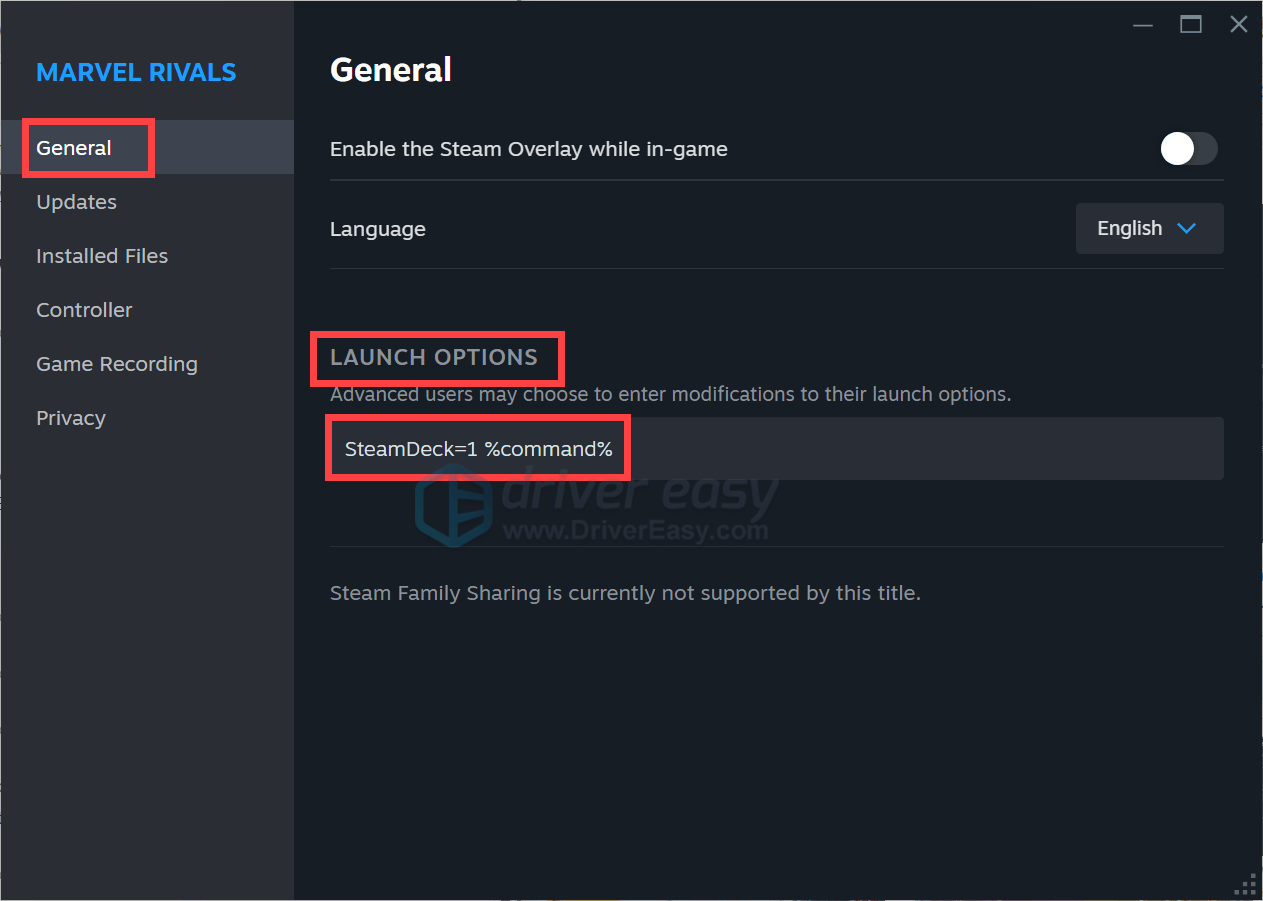
If the above steps don’t resolve your issues, consider reaching out to the game’s support team for further assistance. Or feel free to leave a comment below, and we’ll get back to you as soon as we can!


