Having lag in Minecraft is easy to steal the fun of the game. We are here to help you reduce the lag in Minecraft.
Before you try the below fixes, look up your computer specifications to see whether it meets the Minecraft minimum system requirements. This could be the element that affects your game speed.
Try these fixes:
There’re 6 fixes that have helped many gamers solve their problems. You don’t have to try them all; just work your way down the list until you find the one that works for you.
- Change video settings
- Set Java as a priority
- Provide enough RAM
- Close unnecessary apps and cleanup disks
- Speed up your internet connection
- Update your graphics card drivers
Fix 1: Change video settings
High video settings can bring you nice pictures but they can also make your computer work with more stuff that lowers the gaming speed which may be the reason for lagging. So setting your game in low settings can make Minecraft run faster.
- Run Minecraft.
- Click Options.
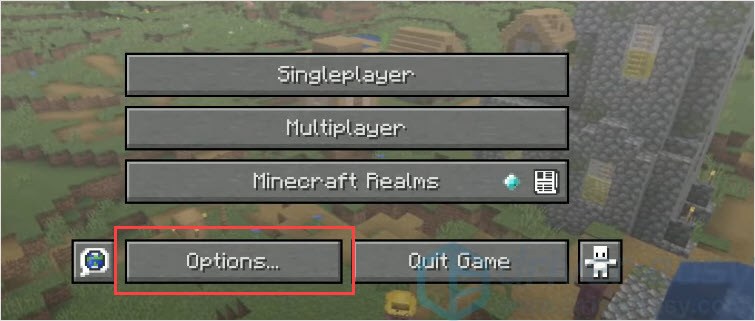
- Click Video Settings.

- Set keys.
Graphics = Fast.
Smooth Lighting = OFF.
3D Anaglyph = OFF.
VSync = OFF.
Bobbing = OFF.
Clouds = OFF.
Lower Max Framerate.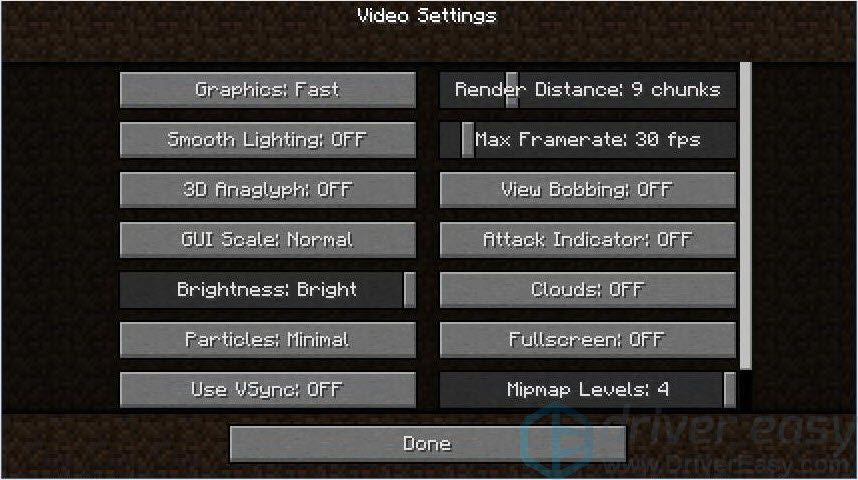
- Launch the game to check.
Fix 2: Set Java as a priority
As we know, Minecraft was developed by Mojang and the game is written in Java. The Java Runtime environment on your computer could affect the speed of running Minecraft. Therefore, set Java as a priority could help you reduce Minecraft lagging.
- Press Ctrl + Shift + Esc together to open the Task Manager.
- Click Details.
- Right-click on Java, choose Set priority > High.

Fix 3: Provide enough RAM
Minecraft is intensive to RAM and CPU, if you don’t have enough RAM, the Minecraft lagging is reasonable. We recommend 4GB of RAM for Minecraft but don’t lower than 2GB.
Here’s how to check your RAM and how to add more RAM for Minecraft:
- Check your installed memory by pressing the Windows logo key + Pause key together. You’ll see how much RAM space you have.

- Run Minecraft, click the menu button in the top-right corner.
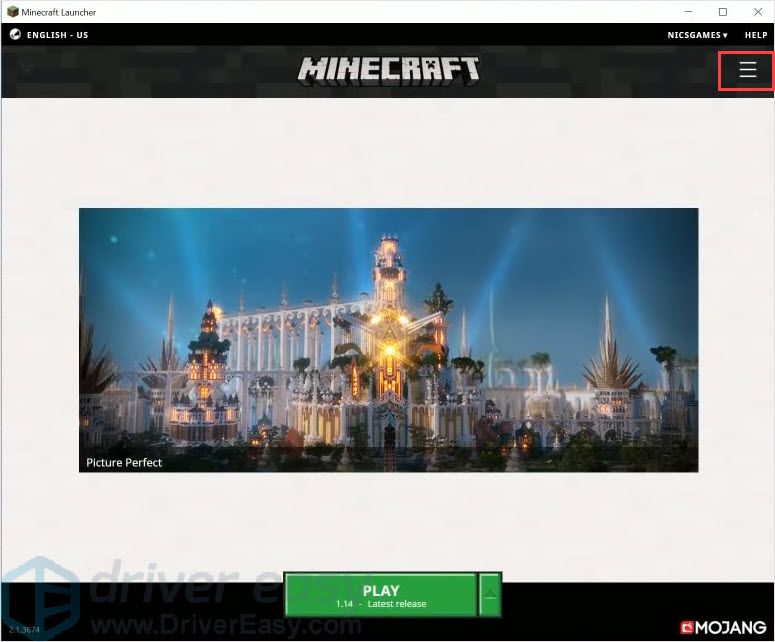
- Click Lauch options > Advanced settings > Add new.
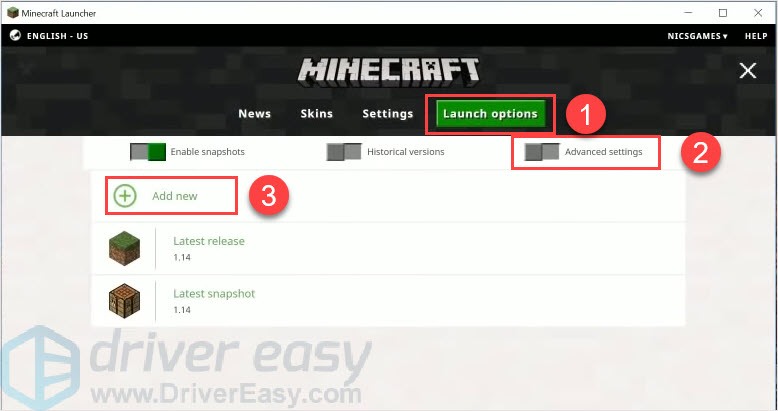
- Add a name then click JVM arguments.
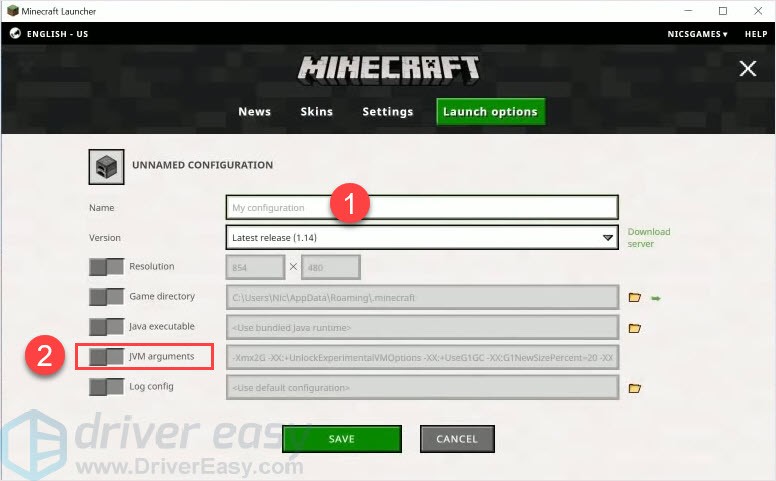
- Change the Xmx2G into Xmx4G. Xmx2G means Xmx 2 gigabytes of RAM, you can change 2 into 4 or 8 as you like. Then click Save.
Note: You can never have more RAM dedicated than you have installed on your computer. And there’s no need to add more than 75% of your RAM for Minecraft.
- Back to the News tab, click the arrow button beside PLAY and choose the name you add.
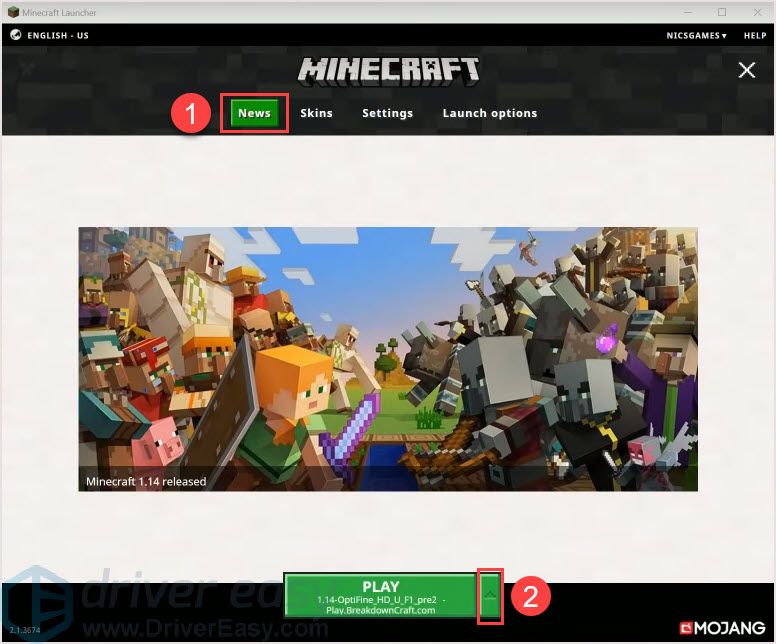
- Click PLAY to check.
Fix 4: Close unnecessary apps and cleanup disks
High CPU usage could affect your game speed. So closing the programs you don’t need could release resources.
Also, you could clean up your disks to release more room which may help you reduce Minecraft lagging. This tip is only for Windows users.
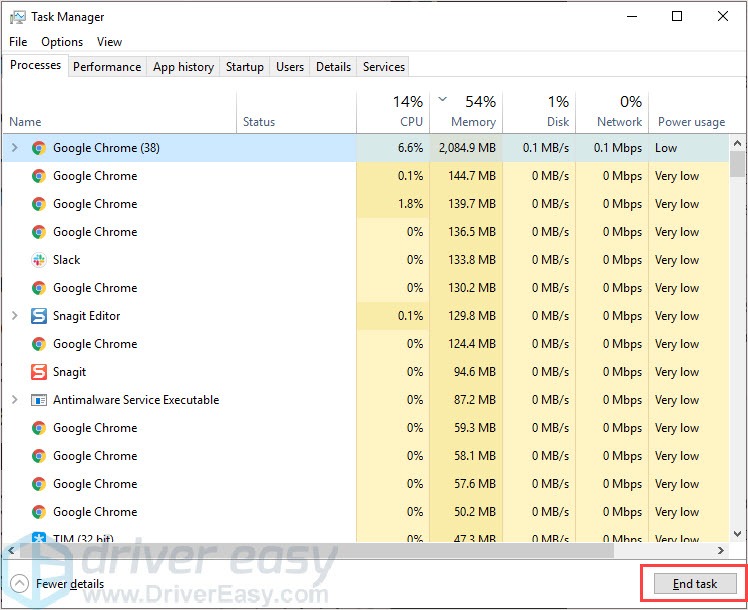
Open Task Manager to end unnecessary programs.
- Press Ctrl + Shift + Esc together to open the Task Manager.
- Choose the program and click End task.
Clean up disks:
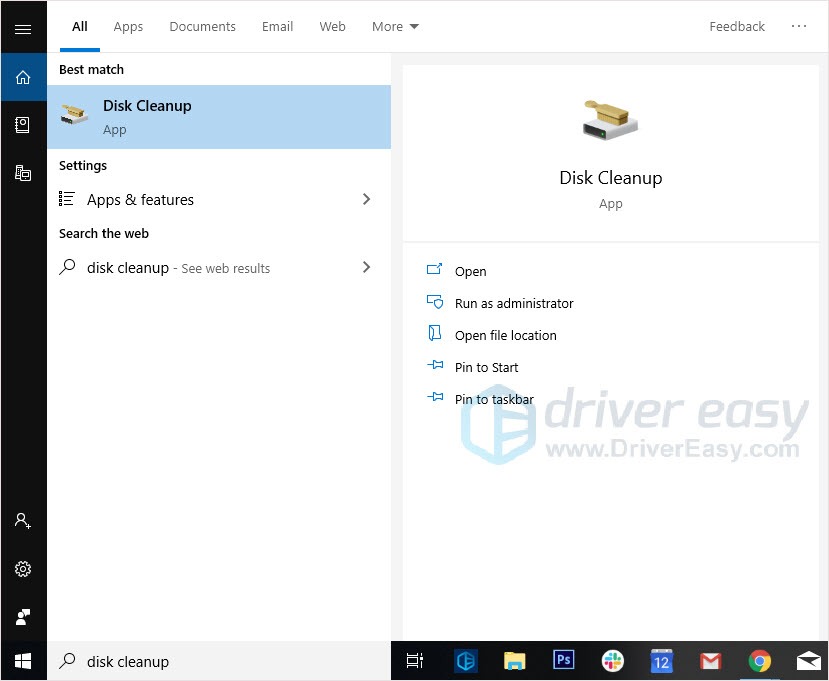
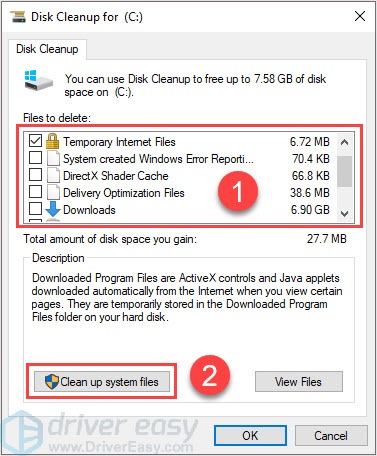
- Type disk cleanup in the search bar and press the Enter key.
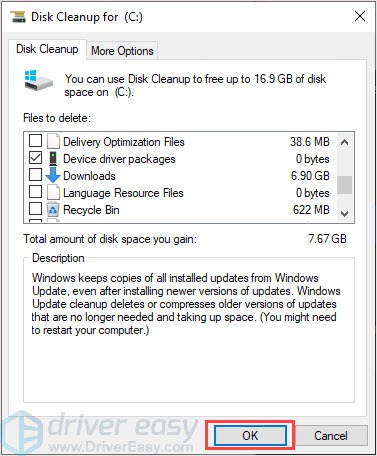
- Select the files you want to delete.
- Click Clean up system files.
- Click OK.
Fix 5: Speed up your internet connection
Your internet connection could be the reason for the Minecraft lagging issue. Your geography location, and ISP service could affect stability.
If this is the reason for your latency, you need to speed up your internet.
Fix 6: Update your graphics card drivers
Games keep releasing new patches, and so do hardware manufacturers. They will keep releasing new drivers to fit new systems. When you use outdated or wrong drivers, they could cause trouble. To make your computer run properly, it’s important to keep your drivers up to date.
There are two ways you can update your driver: manually and automatically.
Option 1 – Manually– You’ll need some computer skills and patience to update your drivers this way, because you need to find exactly the right driver online, download it and install it step by step.
OR
Option 2 – Automatically (Recommended)– This is the quickest and easiest option. It’s all done with just a couple of mouse clicks – easy even if you’re a computer newbie.
Option 1 – Download and install the driver manually
You can download graphics drivers from the manufacturer official website. Search for the model you have and find the correct driver that suits your specific operating system. Then download the driver manually.
Option 2 – Automatically update drivers
If you don’t have time or patience to manually update your graphics drivers, you can do it automatically with Driver Easy.
Driver Easy will automatically recognize your system and find the correct drivers for it. You don’t need to know exactly what system your computer is running, you don’t need to risk downloading and installing the wrong driver, and you don’t need to worry about making a mistake when installing.
You can update your drivers automatically with either the FREE or the Pro version of Driver Easy. But with the Pro version it takes just 2 clicks (and you get full support and a 30-day money back guarantee):
- Download and install Driver Easy.
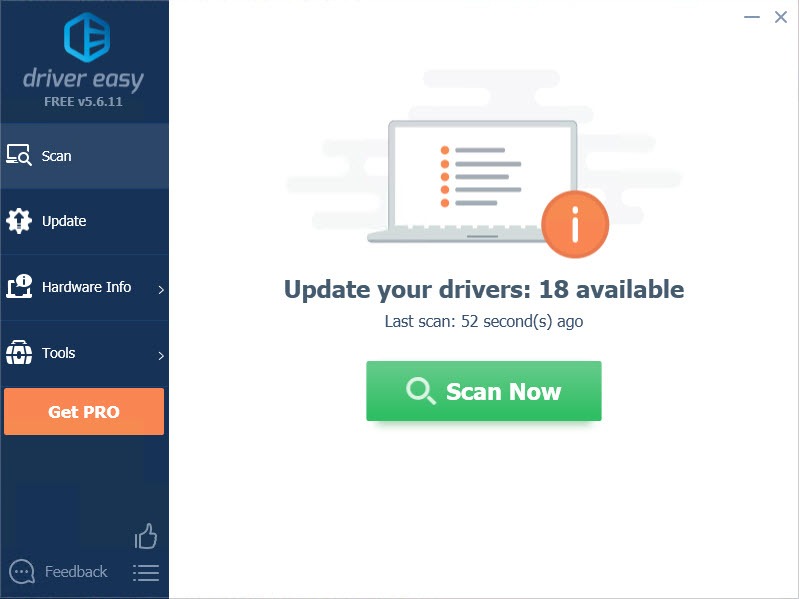
- Run Driver Easy and click the Scan Now button. Driver Easy will then scan your computer and detect any problem drivers.
- Click the Update button next to the flagged driver to automatically download the correct version of that driver, then you can manually install it (you can do this with the FREE version).
Or click Update All to automatically download and install the correct version of all the drivers that are missing or out of date on your system. (This requires the Pro version which comes with full support and a 30-day money back guarantee. You’ll be prompted to upgrade when you click Update All.)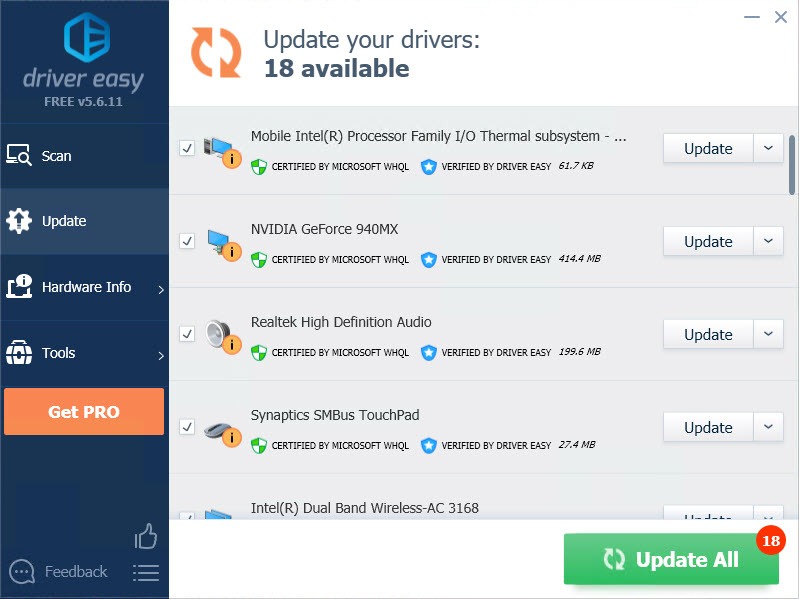
- Relaunch the game and check whether it will freeze or not.
Be sure to attach the URL of this article if needed for more expedient and efficient guidance.
We hope you find the above information helpful. And if you have any ideas, suggestions, or questions, feel free to leave a comment below.


