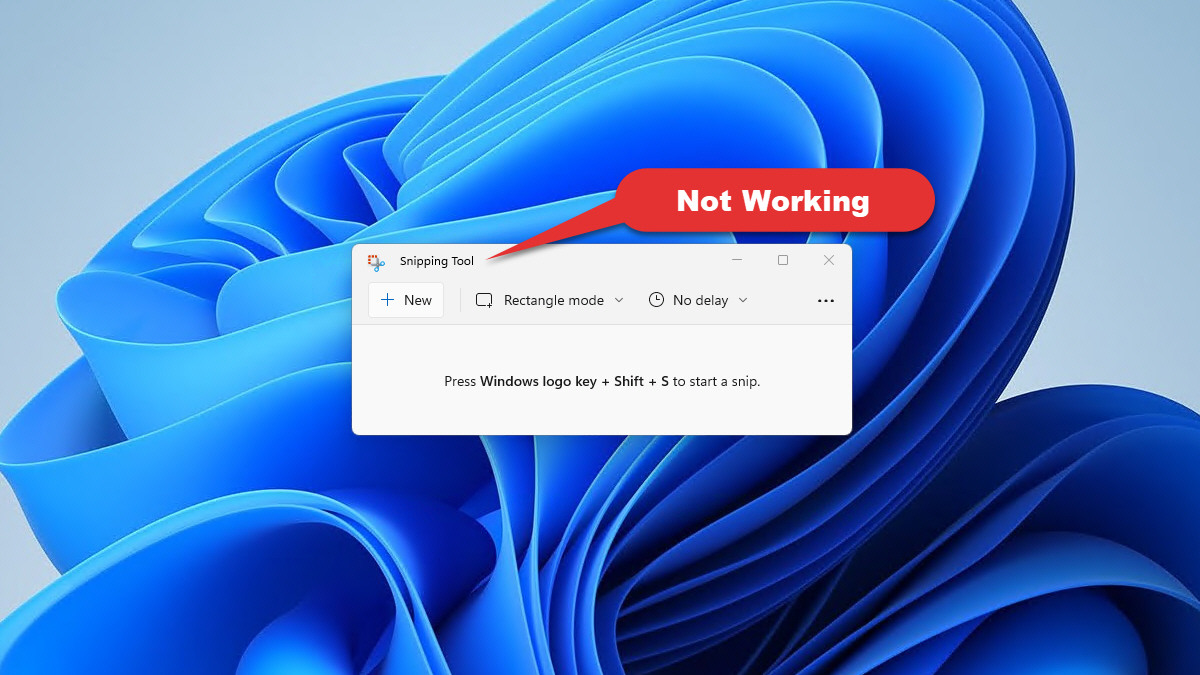
Snipping Tool is a handy screenshot-taking & editing tool for many Windows users. As one of the native Windows apps, it’s lightweight and useful in producing screenshots, but sometimes it also fails to work properly.
Users may encounter issues such as a pop-out error message, blank or black screen, images failing to be saved or the app not working after the system is upgraded. If you’re stuck in one of these Snipping Tool problems, you’ve found the right place! In this article, we will guide you through several methods that may help you out. Now, let’s move on to show you how:
Try these methods:
You might not need to try them all, just walk your way down the list until you find the one that fixes the snipping tool not working issue.
- Relaunch Snipping Tool in Task Manager
- Allow the Snipping Tool to run in the background
- Update your graphics driver
- Update your Operating System
- Repair or reset apps in Apps & features
- Run DISM tool
- Run System File Checker
Method 1: Relaunch Snipping Tool
Simply quitting the Snipping Tool and restarting it may help with the problem. You can use the built-in program Task Manager that allows you to close any non-responding or freezing application to end the Snipping Tool completely, and then have a relaunch to see if your problem can be solved.
- Press Ctrl + Shift + Esc keys to open the Task Manager.
- Under the Processes tab, right-click the Snipping Tool listed on the left and select End task from the pop-up menu.
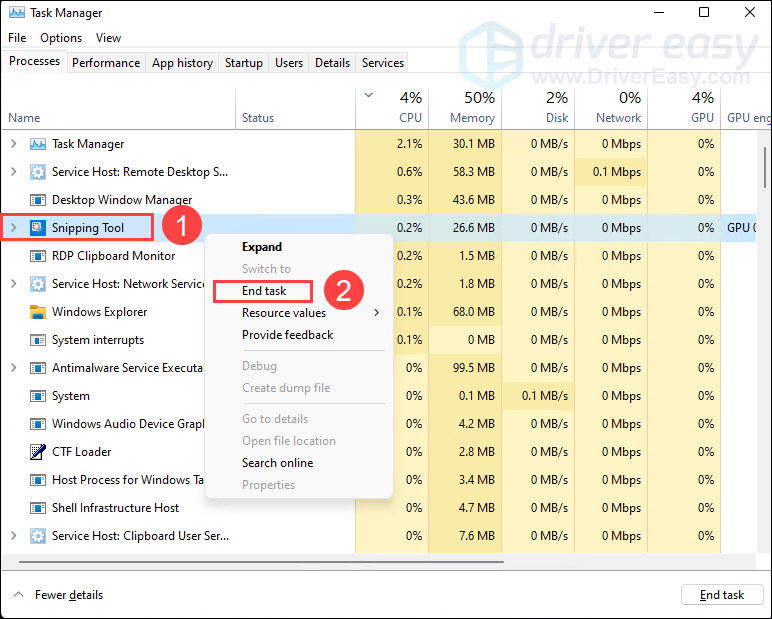
- Restart your Snipping Tool and check if it can function properly.
If this fix doesn’t work, try the next below.
Method 2: Allow the Snipping Tool to run in the background
For most of the time, Snipping Tool is an app that “stays behind the screen” and waits for being woken. If Snipping Tool lacks permission from your PC to run in the background, it won’t be able to work at any time when you are not active in the app’s window.
On Windows 10
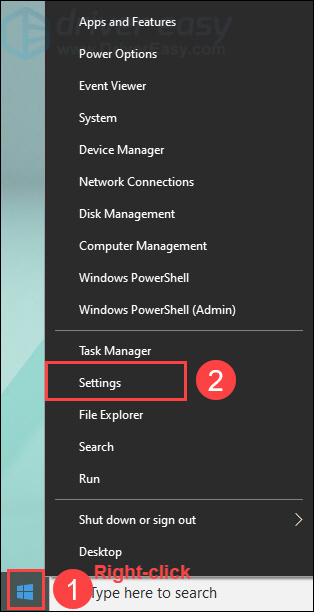
- Right-click the Windows icon on the taskbar to open the quick access menu and then select Settings.
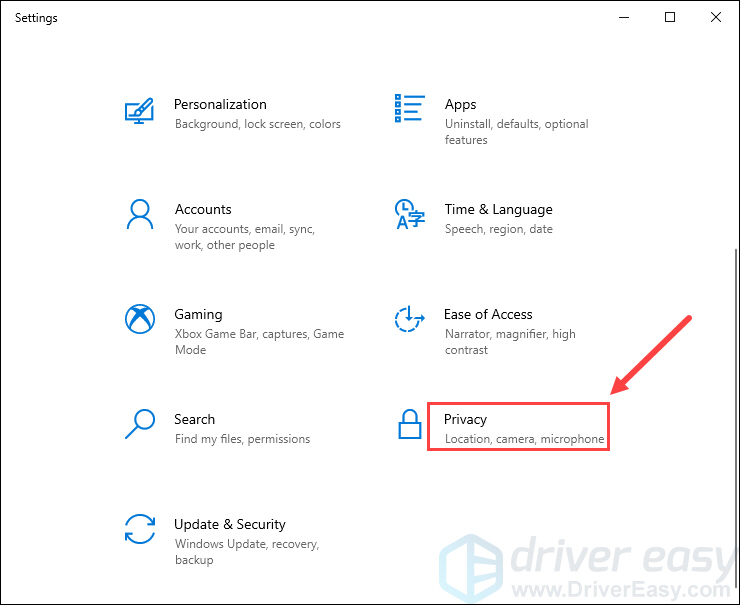
- In Settings, click Privacy.
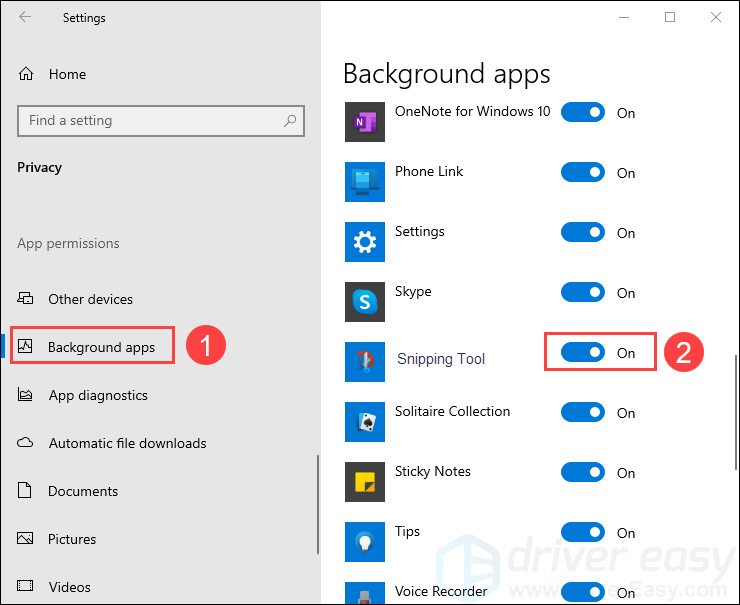
- On the left panel, scroll down to the Background apps, check if the Snipping Tool is turned on. If not, toggle the switch to On
On Windows 11
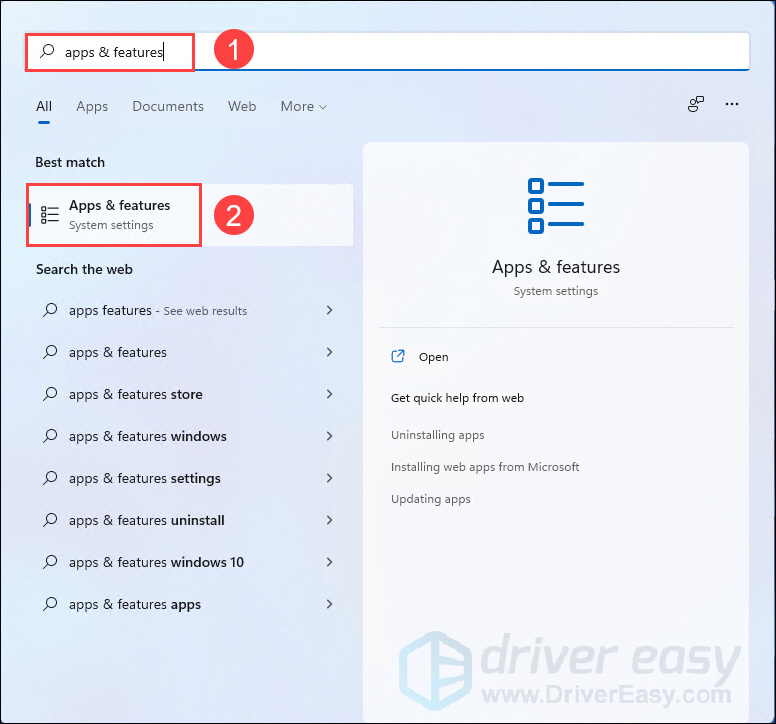
- Press the Windows key to open the Start menu, type apps & features in the search box and select it from the result.
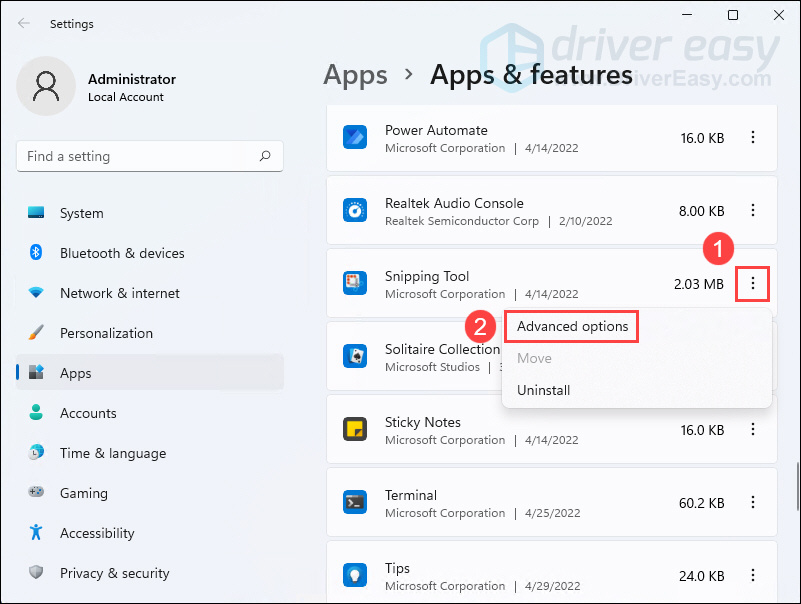
- Scroll down to the Snipping Tool in the right list and click the 3-dots icon next to it, then select Advanced options.
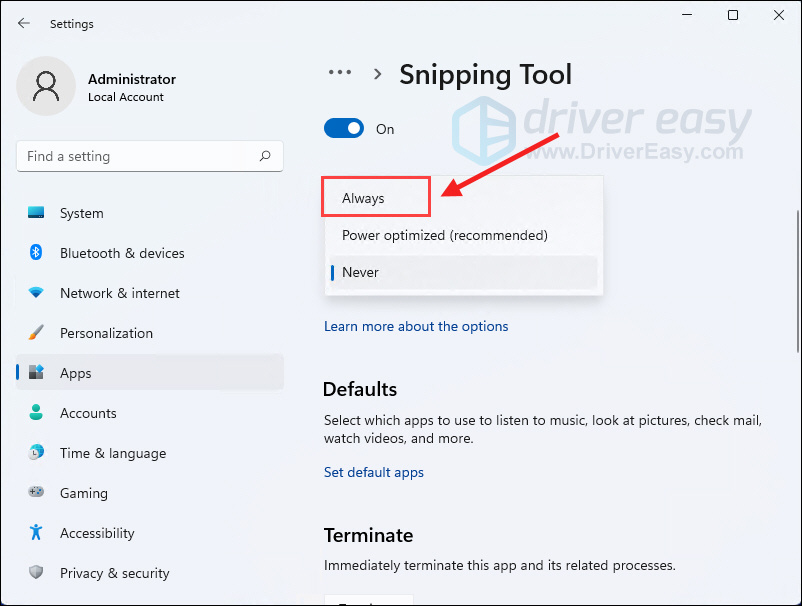
- In the Background apps permissions section, click on the box under Let this app run in the background.
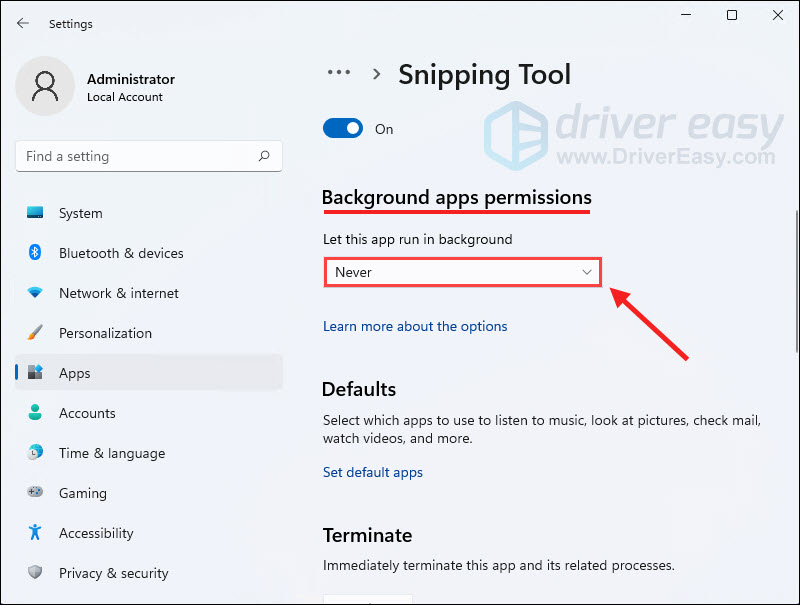
- Select Always from the drop-down list.
If this fix doesn’t work, try the next below.
Method 3: Update your graphics driver
If you have an outdated graphics driver, your graphics would not be able to process images appropriately in your computer and as a result, the Snipping Tool cannot be used properly. So you should update your graphics driver to see if it fixes your problem.
You can update your graphics driver manually by visiting the manufacturer’s website (NVIDIA/AMD), finding the latest correct installer and installing step by step. But if you don’t have the time, patience or skills to update the driver manually, you can do it automatically with Driver Easy.
Driver Easy will automatically recognize your system and find the correct drivers for it. You don’t need to know exactly what system your computer is running, you don’t need to be troubled by the wrong driver you would be downloading, and you don’t need to worry about making a mistake when installing.
- Download and install Driver Easy.
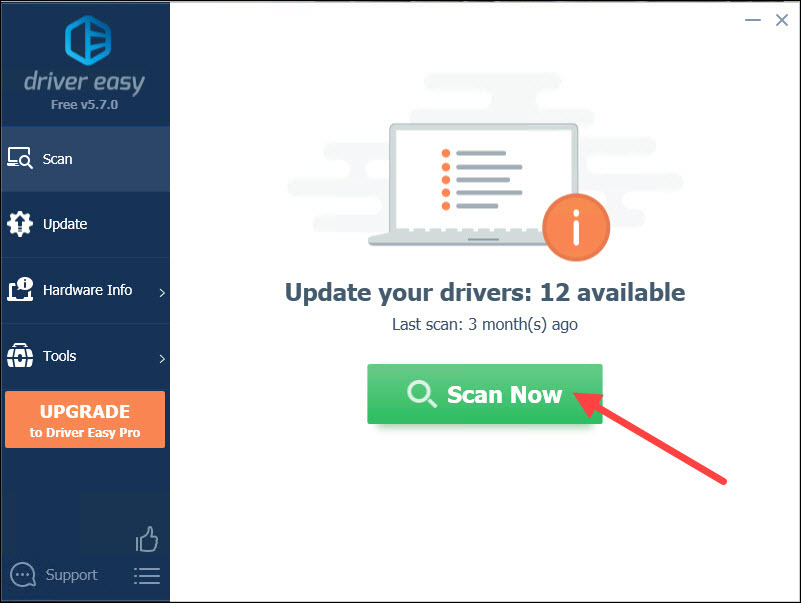
- Run Driver Easy and click the Scan Now button. Driver Easy will then scan your computer and detect any problem drivers.
- Click Update All to automatically download and install the correct version of all the drivers that are missing or out of date on your system (this requires the Pro version with full support and a 30-day money-back guarantee – you’ll be prompted to upgrade when you click Update All).
You can do it for free if you like, but it’s partly manual.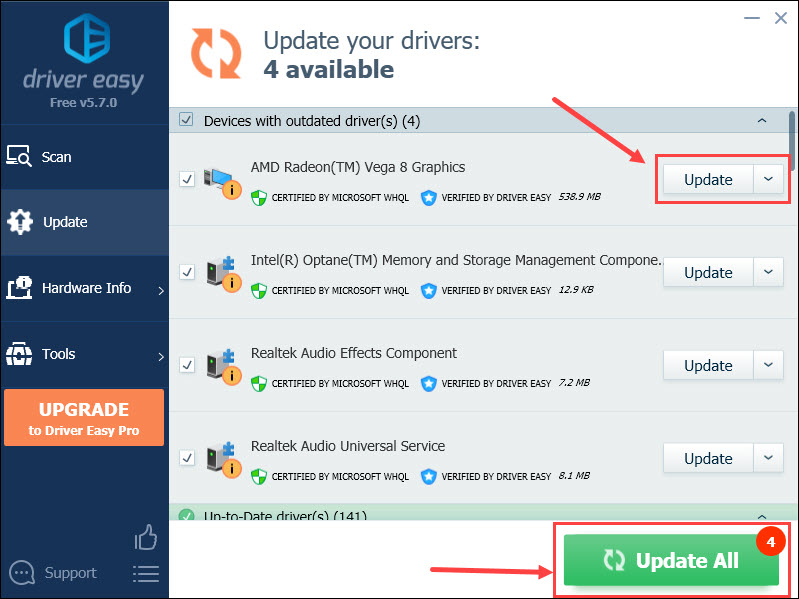
Method 4: Update your Operating System
Apart from updating the graphics driver, updating your Windows should also be a trick that is worth trying since Microsoft keeps releasing OS updates with bug fixes for its apps including Snipping Tool. Here’s how you can check for updates:
On Windows 10
- In the search box, type check for updates and select it from the result that appears.
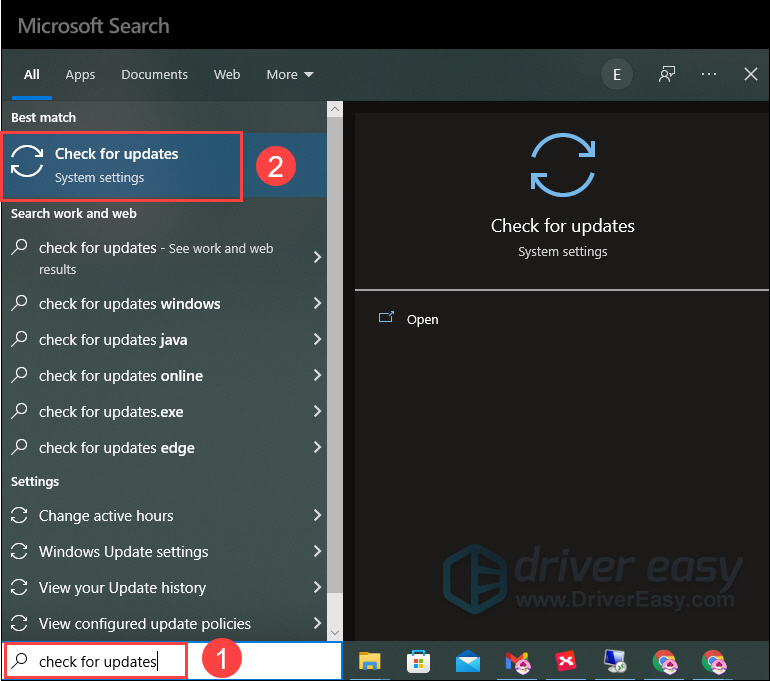
- Click Check for updates on the right section and wait for the checking.

- The checking result could be You’re up to date, which means you don’t need to do anything about it next.
If not, there will be a Download and install button. Click on it to have a Windows update.
On Windows 11
- Press the Windows + I keys to open Settings.
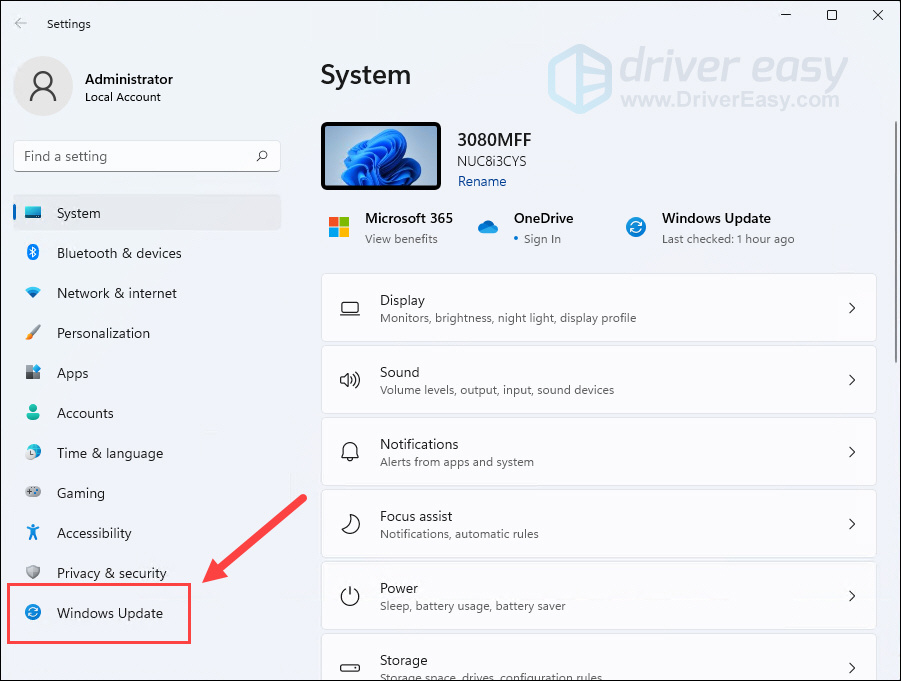
- Click Windows Update on the left section.
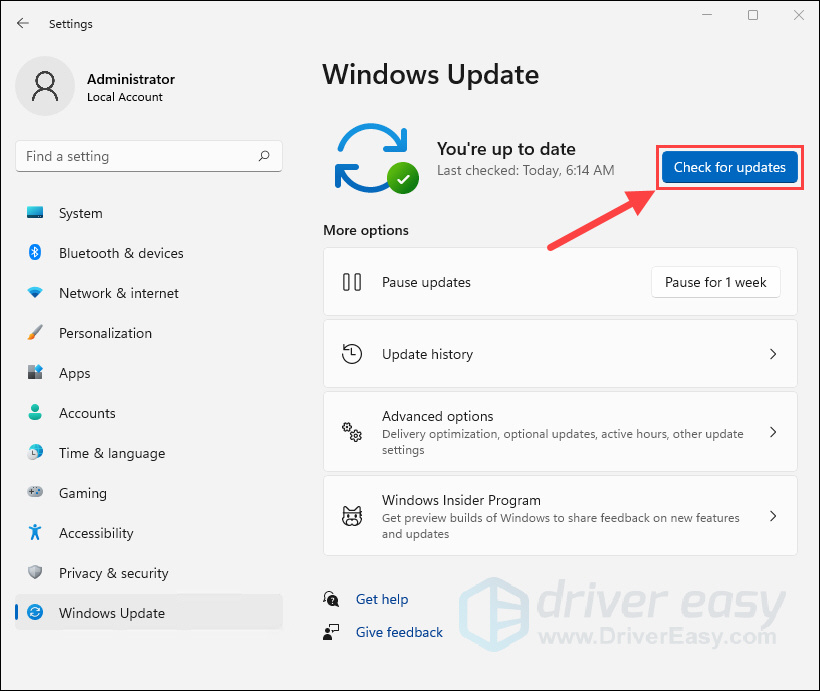
- Click Check for updates. Then Windows will start downloading the updates if they are available.
- Click Restart now when the process is finished.
Method 5: Repair or reset the Snipping Tool
When an app is not running correctly or the app’s certain features fail to work properly, you can give it a try to repair and reset it with the built-in process Apps & features. Below is how to do it when your Snipping Tool is somehow not working.
On Windows 10
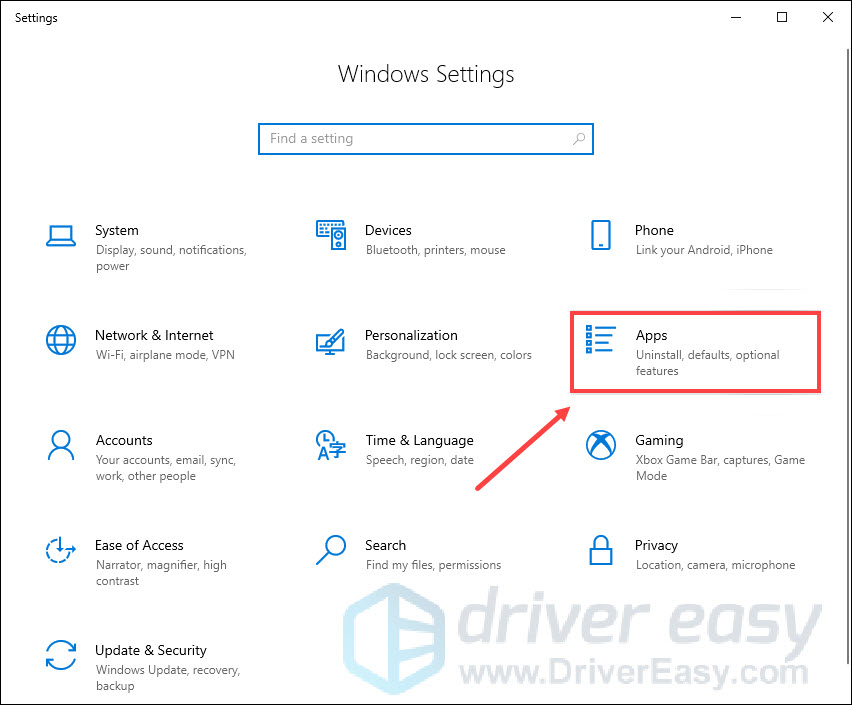
- Press Windows + I keys to open Windows Settings and then click Apps.
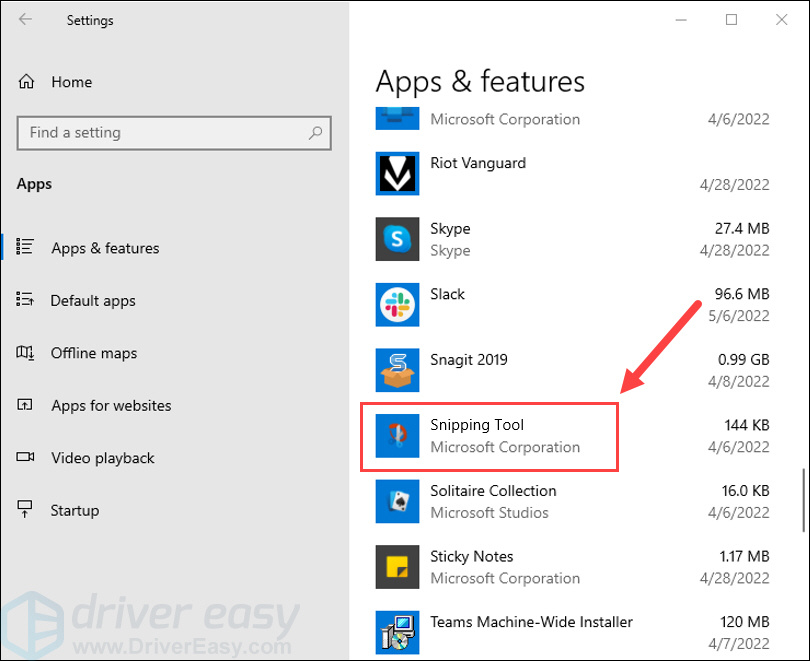
- Scroll down to the Snipping Tool in the right list and click to expand it.
- Click Advanced options.

- If Repair is available, click on it.
If it isn’t available or doesn’t fix the problem, select Reset.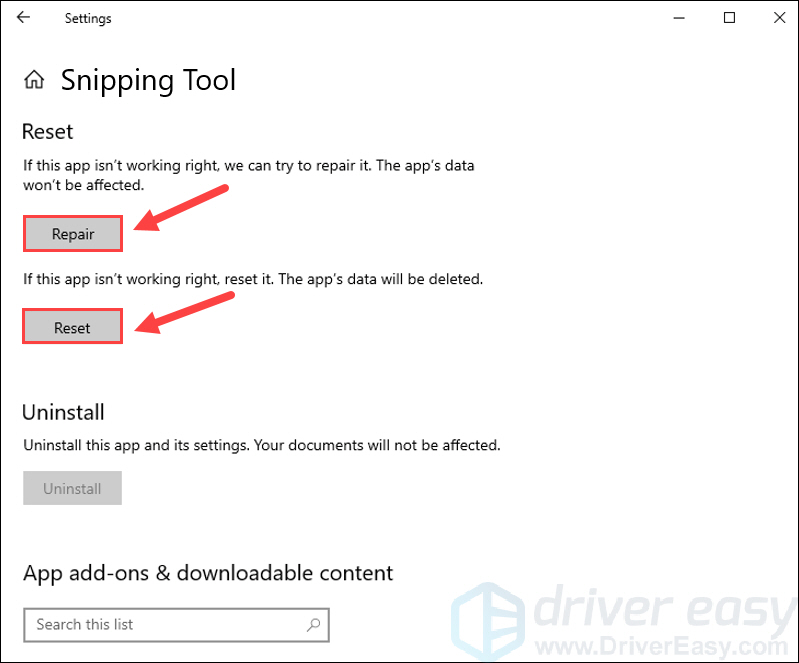
On Windows 11
- Press the Windows key to open the Start menu, type apps & features in the search box and select it from the result.

- Scroll down to the Snipping Tool in the right list and click the 3-dots icon next to it, then select Advanced options.

- Click Repair if it’s available.
If it isn’t available or doesn’t fix the problem, then select Reset.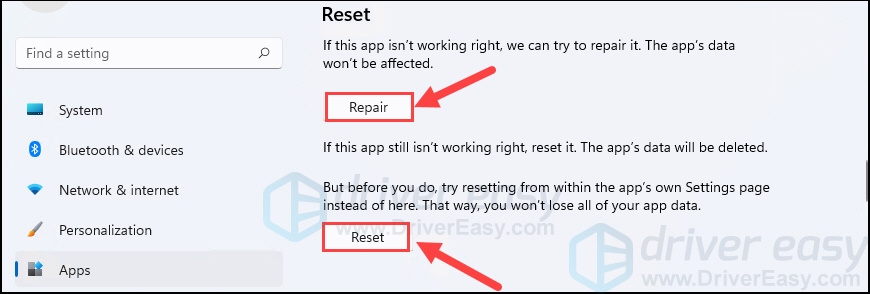
Move on to the next fix below if this method doesn’t work for you.
Method 6: Run the DISM tool
The Deployment Image Servicing and Management (DISM) is a command-line tool for Windows image service. One of its many uses is to repair system images when image-related problems occur. So if your Snipping Tool is not working correctly, you can run the DISM command with the RestoreHealth option to see whether problems come from the system image.
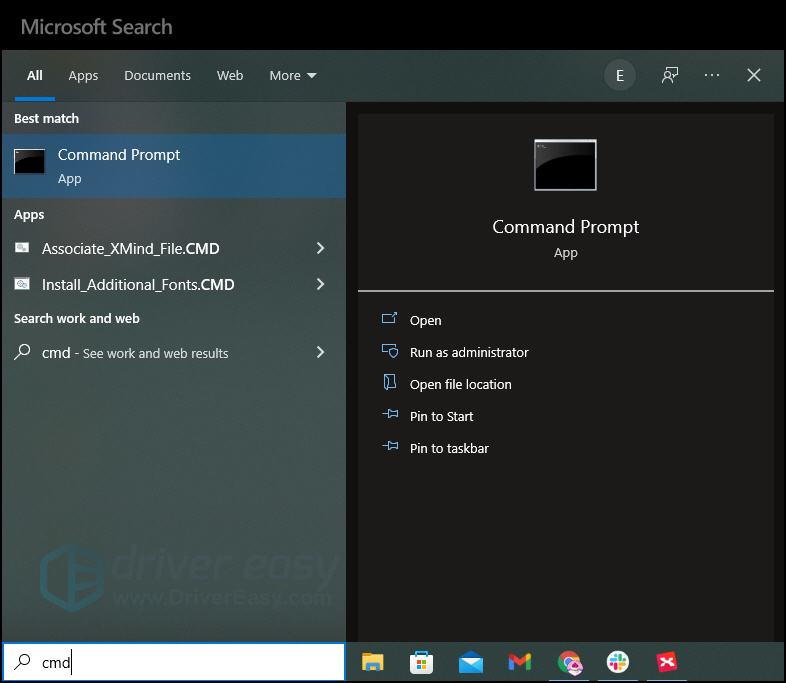
- Type cmd in the search box and select Run as administrator to open the Command Prompt.
- Copy the following command to the Command Prompt and press Enter.
DISM /Online /Cleanup-Image /RestoreHealth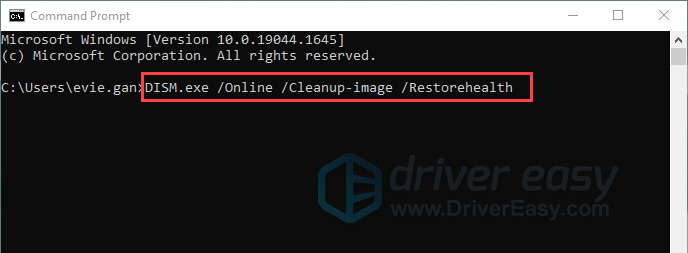
- Wait for the restore operation to complete.
- Restart your PC to see if the Snipping Tool is working now.
If this fix doesn’t work, try the last method below.
Method 7: Run System File Checker
When corrupted or damaged system files exist in your system, they could also cause the Snipping Tool to go wrong. In this case, maybe you should run a system scan to detect broken system files in your PC.
To do this, follow these steps:
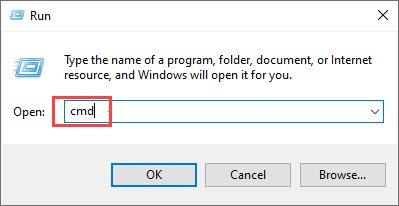
- Press the Windows logo key and R on your keyboard to invoke the Run box.
- On your keyboard, type cmd and press Ctrl, Shift and Enter at the same time to run Command Prompt as administrator.
- You’ll be prompted for permission. Click Yes to open Command Prompt.
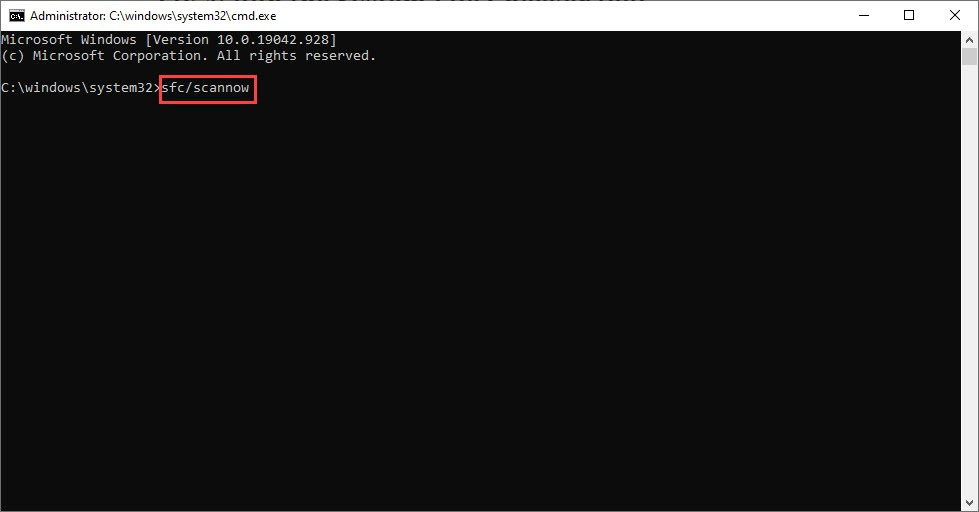
- Type sfc/scannow, then press Enter.
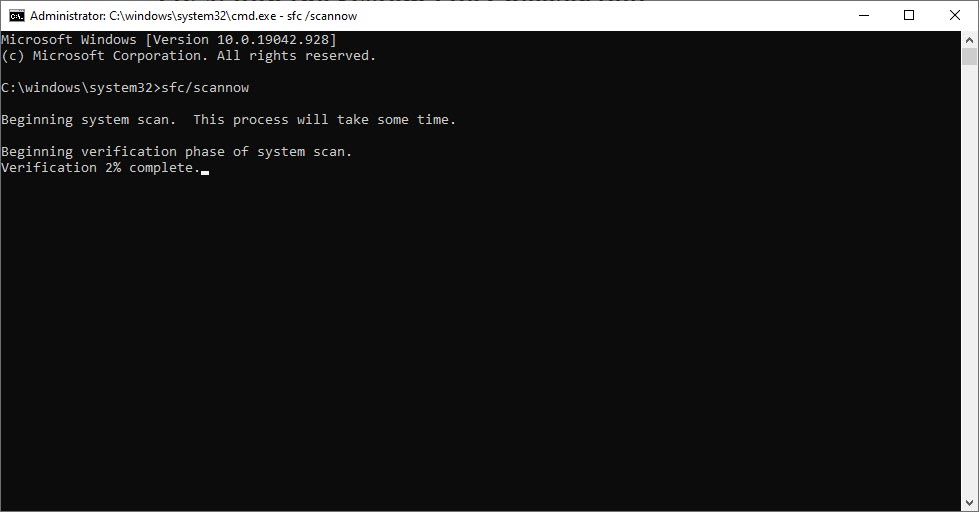
- The System Files Checker tool will automatically scan for corrupt or missing files and fix them, if there’s any.
Restart your PC to see if the issue persists.
That’s it – hopefully, this guide could help you solve the Snipping Tool not working problem. If you have any ideas or other fixes for this issue, please feel free to leave comments below. We would appreciate your thoughts!


