The Steam Remote Play is a feature that allows you to stream your games from your computer to other devices and share your local co-op games online with friends. But it might not always work as intended. Sometimes it’s just stuck on the loading screen or not recognizing controller. If this happened to you, don’t worry. With some tweaks, you definitely can fix the Steam Remote Play not working issue.
Try these fixes
You may not need to try them all; simply work your way down the list until you find the one that works.
- Check if your game supports Remote Play
- Update your Steam client and games
- Update your device drivers
- Disable hardware encoding
- Disable IPv6
- Use a static IP address
Fix 1: Check if your game supports Remote Play
If you’re not sure whether or not the game you’re trying to share supports Steam Remote Play, you can visit the game’s store page to double-check it.
1) Open your Steam client and select the Store tab. Then click the magnifying glass in the top right and type the title of the game you’re trying to share into the search bar. For example, the game among us. From the list of results, click on your game.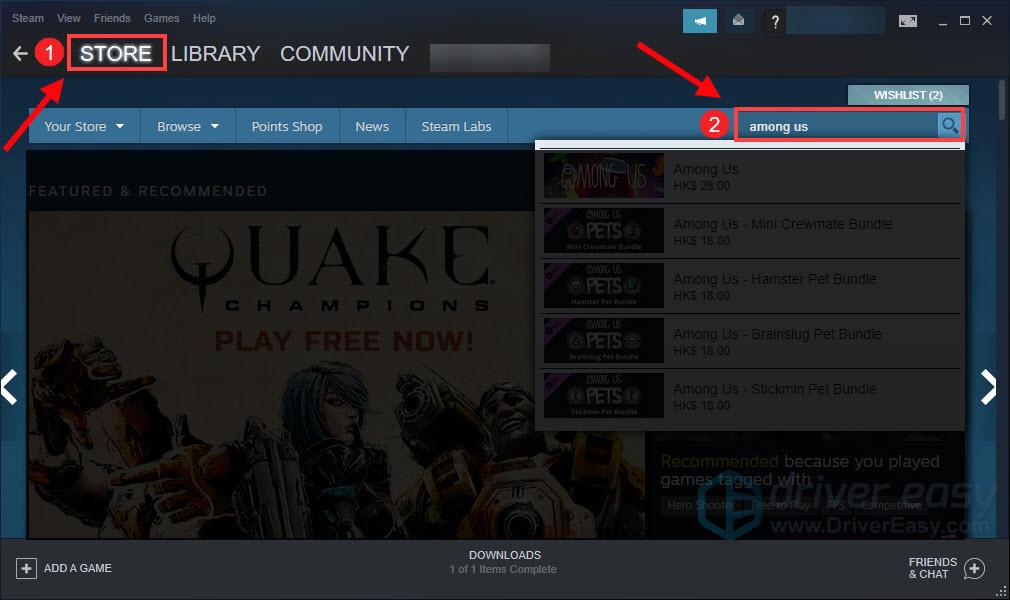
2) On your game’s store page, scroll down and on the right side, you’ll see if your game supports Remote Play or not. 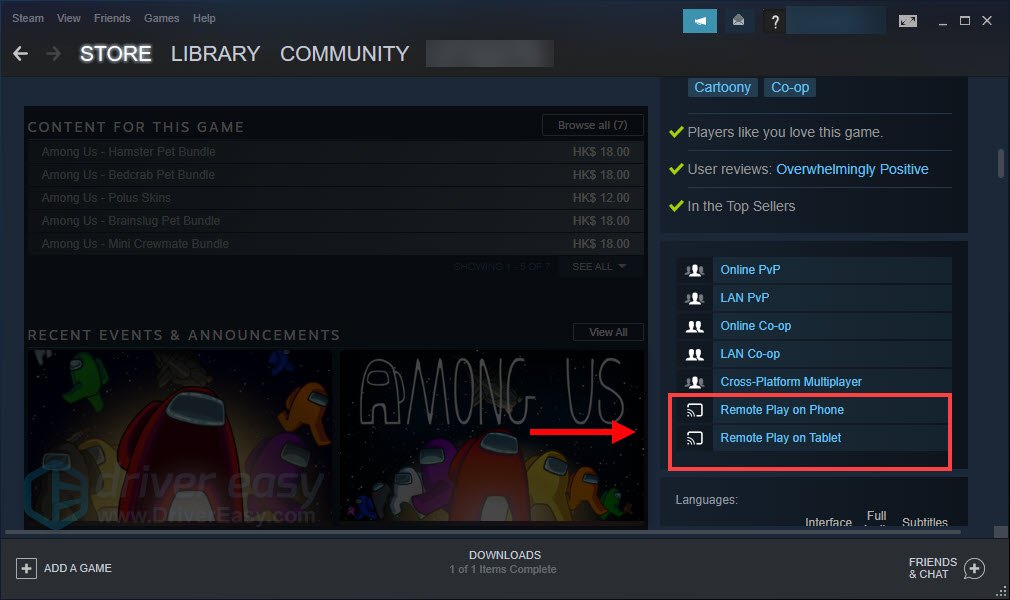
After you’ve made sure that your game supports Remote Play, you can perform the troubleshooting steps below to fix the issue.
Fix 2: Update your Steam client and games
Before using the Remote Play feature, make sure your Steam client is updated. It can be a prerequisite to use the feature smoothly. Although most of the time, it will automatically download an update if there’s one available, you can always update it manually by selecting the Steam tab and click Check for Steam Client Updates.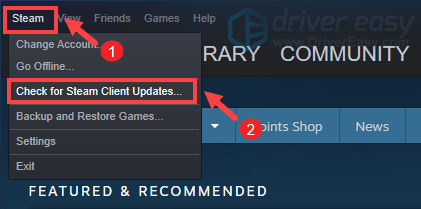
After you’ve updated your Steam client, also make sure that you have your game updated. An update would most possibly fix some known bugs, which can guarantee a better gaming experience.
Fix 3: Update your device drivers
A number of bugs can be fixed by performing a dirver update. If Remote Play isn’t working for you or you are getting poor performance, graphical glitches or black screens, make sure you have the latest drivers installed. driver updates can give you a speed boost, fix problems, and sometimes even provide you with completely new features, all for free.
There are two ways you can update your drivers: manually and automatically.
Option 1 – Manually update your drivers
To update your drivers manually, you can go to the Device Manager, then manually update each driver by following the on-screen instructions.
Or you can go to the device manufacturer’s driver download page. Then find the correct driver for your system, download and install it step by step.
Option 2 – Automatically update your drivers (recommended)
If you don’t have the time, patience, or computer skills to update drivers manually, you can do it automatically with Driver Easy.
Driver Easy will automatically recognize your system and find the correct drivers for it. You don’t need to know exactly what system your computer is running or risk downloading and installing the wrong driver.
1) Download and install Driver Easy.
2) Run Driver Easy and click the Scan Now button. Driver Easy will then scan your computer and detect any devices with missing or outdated drivers.
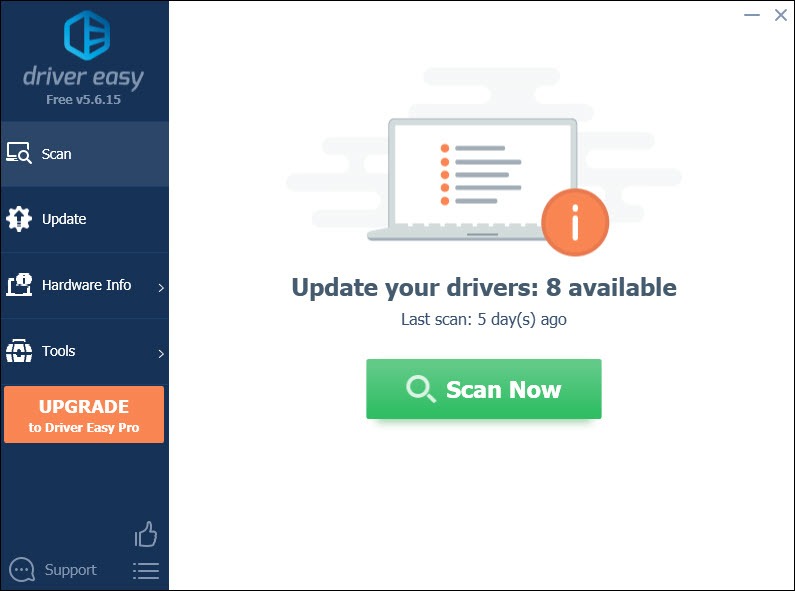
3) Click Update All. Driver Easy will then download and update all your outdated and missing device drivers, giving you the latest version of each, direct from the device manufacturer.
(This requires the Pro version which comes with full support and a 30-day money-back guarantee. You’ll be prompted to upgrade when you click Update All. If you don’t want to upgrade to the Pro version, you can also update your drivers with the FREE version. All you need to do is to download them one at a time and manually install them. )
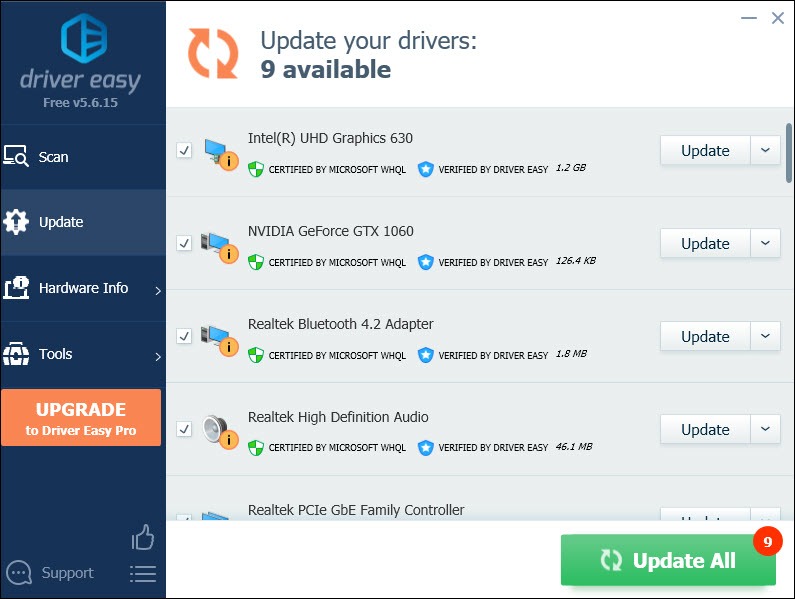
After updating drivers, try connecting to your remote computer to check if it works.
Fix 4: Disable hardware encoding
Hardware encoding is that it reduces the load on your CPU by using a purpose-built piece of hardware. It’s enabled by default to give you the maximum performance. But there is a possibility that it hinders your Remote Play from functioning properly. So you and your friends should disable it from the Steam client. To do this, follow the instructions below:
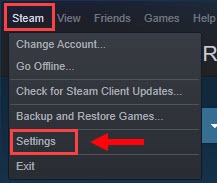
1) Open your Steam client. Click Steam and select Settings.
2) In the left pane of the window, select Remote Play. Then click ADVANCED CLIENT OPTIONS.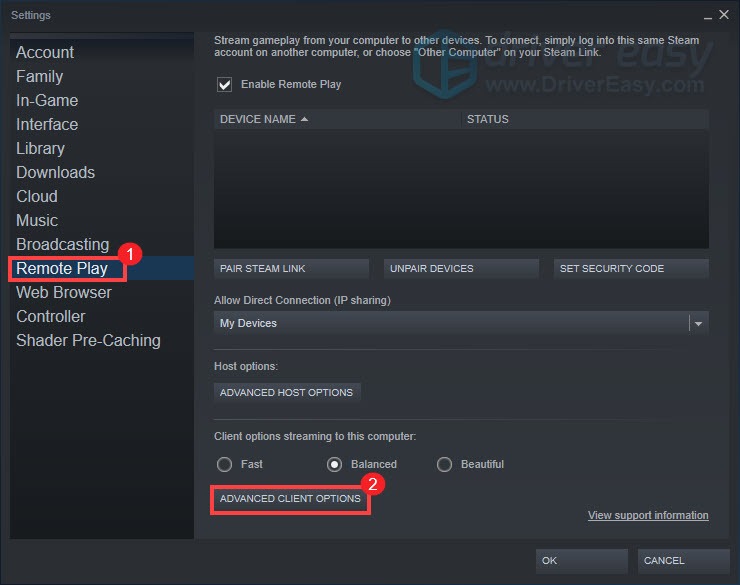
3) Uncheck the option Enable hardware decoding and then click OK.
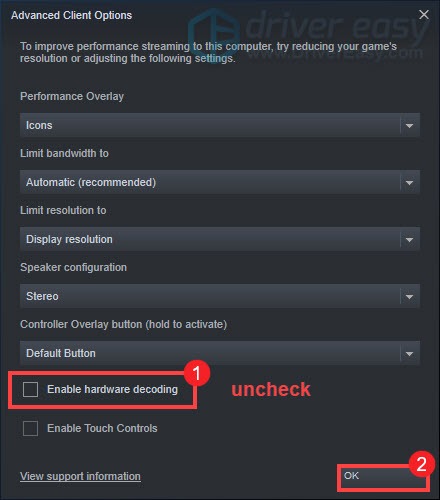
Now try reconnecting your device to check if the issue persists.
Fix 5: Disable IPv6
IPv 6, Internet Protocol version 6, is the most recent version of the Internet Protocol (IP). But it isn’t necessarily more secure than IPv4. While many users have IPv4 and IPv6 running and allowing traffic on both types of network addresses, some applications might not be able to adapt to IPv6. And this would cause some connection issues and can be the cause of Steam Remote Play not working. So to fix it, you need to disable IPv6.
1) On the bottom right hand side of your screen, right-click on the network![]() or Wi-Fi
or Wi-Fi ![]() icon. Then select Open Network & Internet settings.
icon. Then select Open Network & Internet settings.

2) In the Change your network settings section, click Change adapter options.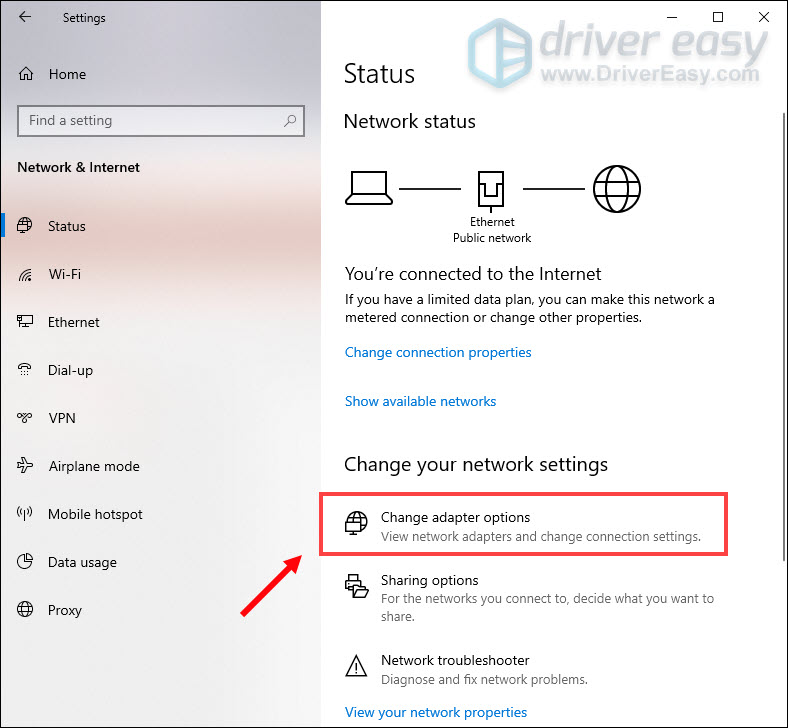
3) Right-click on your active network adapter, whether it’s Ethernet or Wi-Fi. Then select Properties.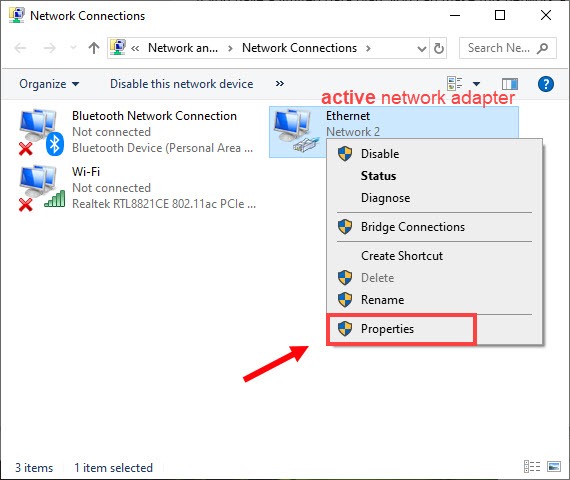
4) In the Properties window, scroll down until you see Internet Protocol Version 6 (TCP /IPv6). Uncheck the Internet Protocol Version 6 (TCP/IPv6) checkbox and click on OK to save the changes.
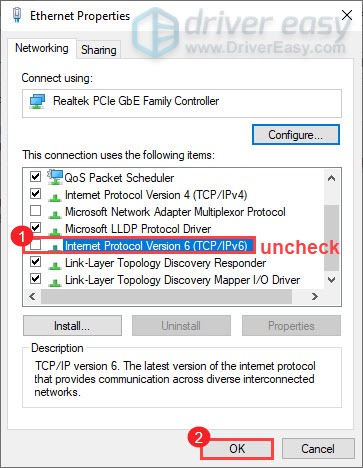
5) Now restart your computer for the settings to take effect.
Fix 6: Use a static IP address
Most devices use dynamic IP addresses, which are assigned by the network when they connect and change over time. While when a device is assigned a static IP address, the address does not change. Despite the fact that most users don’t need static IP addresses, some remote access solutions only trust certain IPs for security purposes. So if you can’t use the Steam Remote Play feature, using a static IP address might be working.
To set a static IP address, you can:
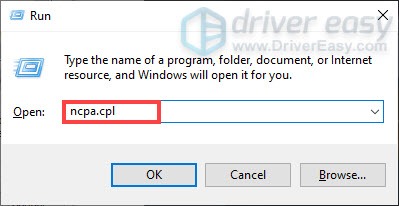
1) On your keyboard, press the Windows logo key  and R at the same time to invoke the Run box.
2) Type ncpa.cpl and press Enter.
3) Right-click on your active network adapter, whether it’s Ethernet or Wi-Fi. Then select Properties.

4) In the Properties window for the adapter, select Internet Protocol Version 4 (TCP/IPv4) and then click the Properties.
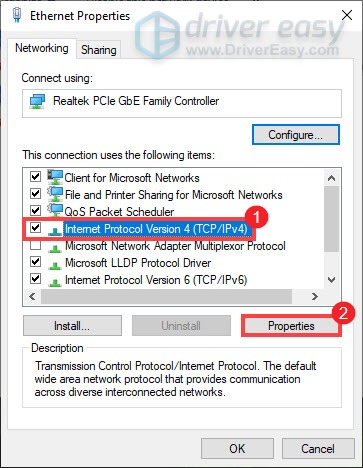
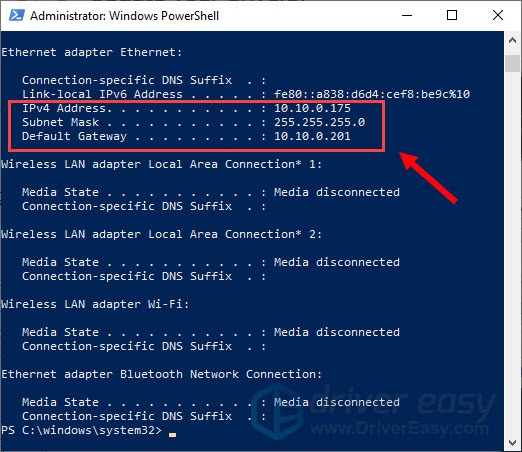
5) Select the Use the following IP address option. Then type in the IP address, Subnet mask, and Default Gateway corresponding to your network setup.
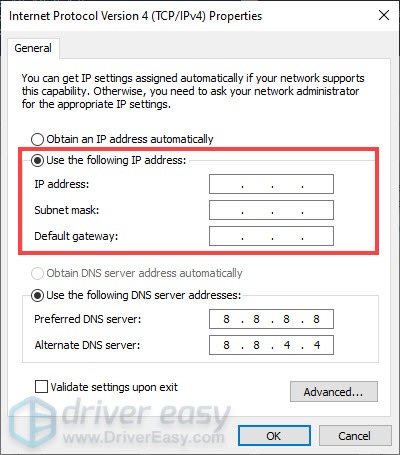
To check them, you can:
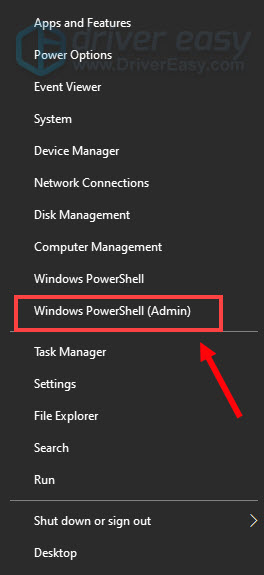
- Right-click on the Start button and select Windows PowerShell (Admin).
- Copy and paste the following command line and press Enter.
ipconfig /release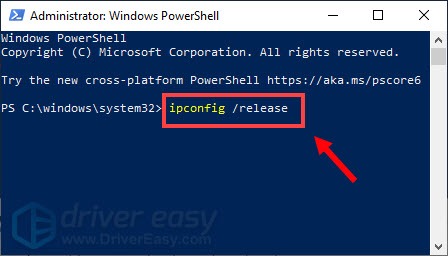
- Copy and paste the following command line and press Enter.
ipconfig /renew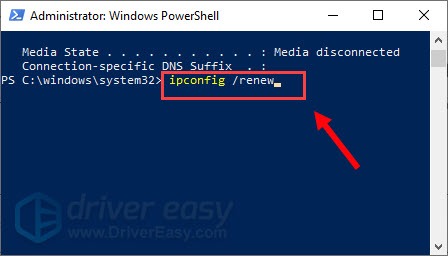
- Now you can see your IPv4 Address, Subnet Mask and Default Gateway.
After you’ve set a static IP address, try connecting to your devices to check if it works.
To conclude, the Steam Remote Play not working issue is something related to the connections and also outdated drivers. I hope the fixes in this article can do the trick for you. If you have any questions or ideas, please leave us a comment below.


