After you reinstall Windows or upgrade it to newer versions, if USB 3.0 Ports stop working properly, you can go to Device Manager and check for the USB driver status, as the most impossible causes for this issue are faulty drivers. The USB 3.0 drivers probably are removed or corrupted.
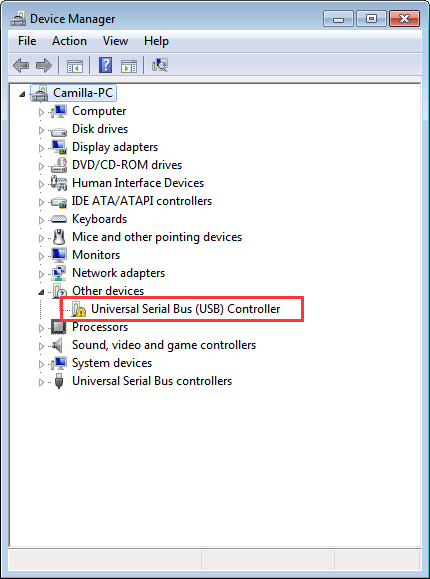
If there are problems with the USB 3.0 drivers, you’ll probably see there is a yellow mark next to the Universal Serial Bus (USB) Controller like displaying as follows:

So if the USB 3.0 ports stop working after Windows reinstall or upgrade, try updating the drivers and the problem should resolve. There are 3 ways recommended below that you can use to update the drivers for your USB 3.0 ports.
Way 1: Use Windows Update
Note: To use this, please make sure Windows Update feature is enabled.
Follow these steps:
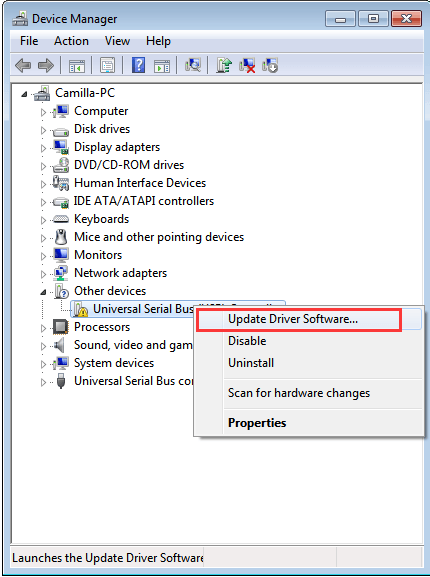
1. In Device Manager, right-click on the device name and select Update Driver Software…

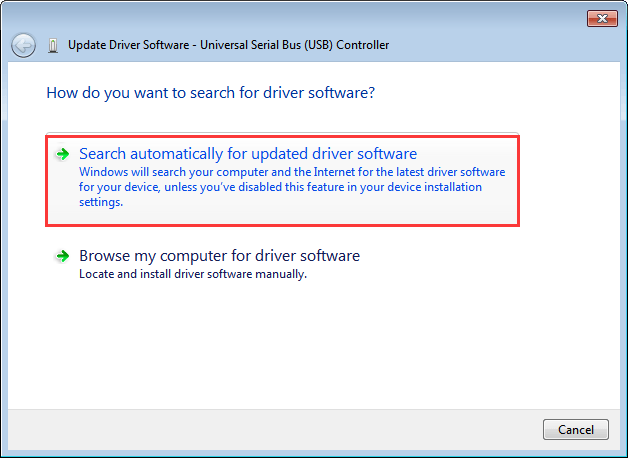
2. Click Search automatically for updated driver software

3. It might take some time for Windows to check if there is new driver for this device. If there is new driver available, Windows will load it automatically.
Way 2: Download Drivers from Manufacturer
If you are using a brand computer, you can go to your PC manufacturer’s website to download the USB drivers. For some manufacturers, they would release chipset drivers which include USB drivers. So if you don’t find USB drivers but chipset drivers in the website, download the chipset drivers. Before you get started, please make sure that you know the PC model name or the specific operating system that your PC is running.
Way 3: Update Drivers Using Driver Easy
Windows Update doesn’t always provide the new drivers successfully, and downloading drivers manually could be time consuming. So if both of them don’t fit your case, you can use Driver Easy to update USB 3.0 drivers.
Driver Easy will automatically recognize your system and find the correct drivers for it. You don’t need to know exactly what system your computer is running, you don’t need to risk downloading and installing the wrong driver, and you don’t need to worry about making a mistake when installing.
You can update your drivers automatically with either the FREE or the Pro version of Driver Easy. But with the Pro version it takes just 2 clicks (and you get full support and a 30-day money back guarantee):
1) Download and install Driver Easy.
2) Run Driver Easy and click Scan Now button. Driver Easy will then scan your computer and detect any problem drivers.

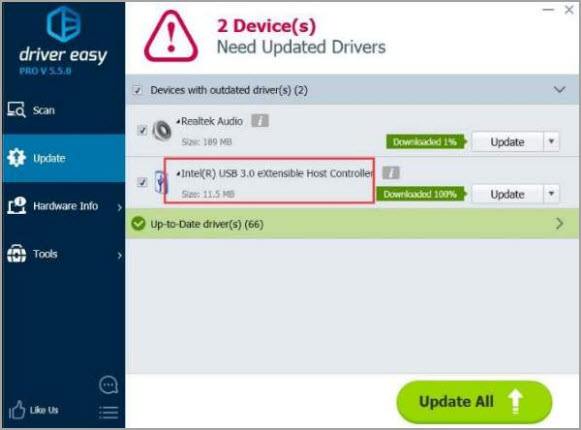
3) Click the Update button next to a flagged USB driver to automatically download the correct version of this driver, then you can manually install it (you can do this with the FREE version).
Or click Update All to automatically download and install the correct version of all the drivers that are missing or out of date on your system (this requires the Pro version – you’ll be prompted to upgrade when you click Update All).

Hopefully you find this article helpful. If you have any questions, ideas or suggestions, feel free to leave a comment below.


