When you’re entering this complicated fantasy world, nothing upsets you more than getting a not launching problem. You’re definitely not alone and many players have solved the Witcher 3 not launching issue with the fixes below.
Try these fixes
Here is a list of methods that have helped many other players to solve their Witcher 3 not launching issue.
- Run Witcher 3 as Administrator
- Remove Mods
- Update device drivers
- Verify the integrity of game files
- Run System File Checker
- Disable in-game overlay
- Disable Antivirus temporarily
- Perform a clean boot
- Delete the Gog.dll file
- Clean reinstall
Fix 1: Run Witcher 3 as Administrator
Witcher 3 sometimes can’t access certain game files on your PC under normal user mode, which could be the cause of the not launching issue. To fix it, you can try running both of your Steam/GOG and Witcher 3 as administrators.
1. Run Steam/GOG as Administrator
1) Right-click your Steam/GOG, and select Properties.

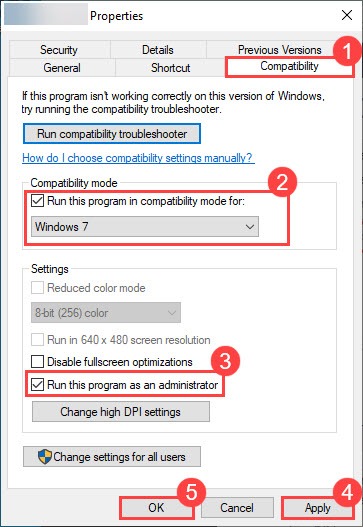
2) Select the Compatibility tab, and tick the Run this program as an administrator box. Then click Apply > OK.

2. Run Witcher 3 as administrator
You need to start Witcher 3 in admin mode as well to have full access to the game file. Also, you should run the game in compatibility mode with previous operating systems.
1) Go to the folder where you installed your Witcher 3 and find the Witcher 3 executable file.
The executable for the game is located in:
- For GOG: GOG Games\The Witcher 3 Wild Hunt\bin\x64\witcher3.exe
- For Steam: steam\steamapps\common\The Witcher 3\bin\x64\witcher3.exe
2) Right-click your Witcher 3 application and select Properties.

3) Select the Compatibility tab and tick the box next to Run this program in compatibility mode for: and select your previous operating system. Then tick Run this program as an administrator. Click Apply > OK.
Fix 2: Remove Mods
If you have added any mods to Witcher 3, you can uninstall them to see if it works. Witcher 3 may have been worked fine with the mods before, but mods can be unpredictable at times.
Just delete the mods subfolder within the Witcher 3 folder and it should work. After that, you can launch the game to test the issue. If you can launch the game normally, then great! If not, you can try the next fix below.
Fix 3: Update device drivers
Witcher 3 not launching is probably caused by driver issues. If your device drivers (especially your graphics driver) are outdated or corrupt, you may bump into Witcher 3 not launching or crashing issues. To improve your gaming experience and fix bugs, you should always have the latest graphics driver installed.
There are two ways for you to update your drivers:
Option 1 – Manually – You’ll need some computer skills and patience to update your drivers this way because you need to find exactly the right driver online, download it and install it step by step.
OR
Option 2 – Automatically (Recommended) – This is the quickest and easiest option. It’s all done with just a couple of mouse clicks – easy even if you’re a computer newbie.
Option 1: Update your graphics driver manually
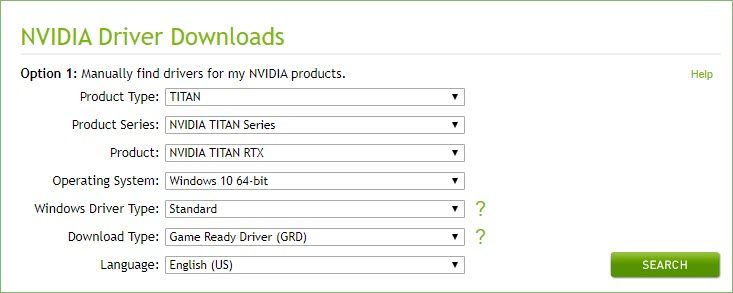
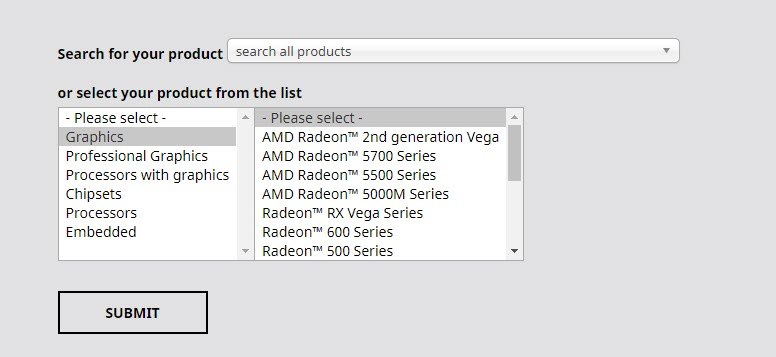
NVIDIA and AMD keep updating drivers. To get them, you need to go to their official website, download the driver corresponding with your specific flavor of Windows version (for example, Windows 10 64-bit) and install the driver manually.
- For NVIDIA: Go to NVIDIA Driver Downloads.
- For AMD: Go to AMD Drivers & Support.
Once you’ve downloaded the correct drivers for your system, double click the downloaded file and follow the on-screen instructions to install the driver. After that, restart your computer for the changes to take effect.
Option 2: Update your graphics driver automatically (Recommended)
If you don’t have the time, patience, or computer skills to update the graphics driver manually, you can do it automatically with Driver Easy.
Driver Easy will automatically recognize your system and find the correct drivers for it. You don’t need to know exactly what system your computer is running, you don’t need to risk downloading and installing the wrong driver, and you don’t need to worry about making a mistake when installing.
You can update your drivers automatically with either the FREE or the Pro version of Driver Easy. But with the Pro version it takes just 2 clicks:
1) Download and install Driver Easy.
2) Run Driver Easy and click the Scan Now button. Driver Easy will then scan your computer and detect any problem drivers.

3) Click Update All to automatically download and install the correct version of all the drivers that are missing or out of date on your system (this requires the Pro version – you’ll be prompted to upgrade when you click Update All. You get full support and a 30-day money back guarantee.)
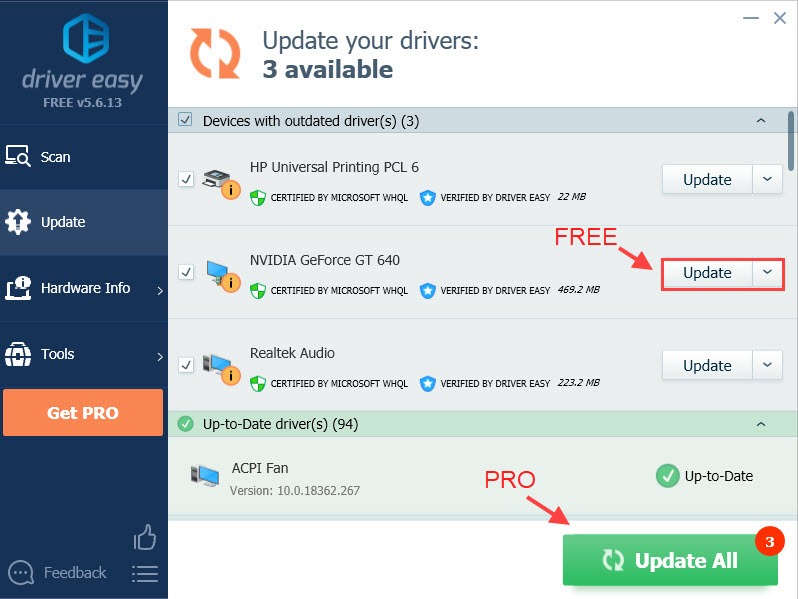
Note: You can do it for free if you like, but it’s partly manual.
4) Restart your PC and launch Witcher 3 again to test the issue.
Fix 4: Verify the integrity of game files
If you have the latest graphics driver installed but Witcher still won’t launch, then the culprit could be corrupt game files.
- For GOG:
- Launch GOG Galaxy
- Go to the Game tab.
- Click MORE > Manage installation > Verify / Repair > VERIFY GAME.
- For Steam:
- Launch Steam
- Go to Library.
- Right-click Witcher 3 and select Properties.
- Select the Local files tab and click Verify integrity of game cache.
- For Origin:
- Launch Origin
- Select My Games.
- Right-click the game, and select Repair Game.
After repairing the game files, relaunch your Witcher 3 to see if the issue still persists.
If Witcher 3 still won’t launch, there might be something wrong with your system files. Try the next fix below to check for system file corruption using the System file checker.
Fix 5: Run system file checker
System File Checker is an in-build tool for scanning corrupt system files, and it will repair any detected missing or corrupt files.
1) Type cmd in the Search box. Then right-click Command Prompt and select Run as administrator.

2) Type the command: sfc /scannow in the window and hit Enter.
sfc /scannow
3) Wait for the verification process to finish. This may take 3-5 minutes.
When the verification finishes, you may receive one of the following messages:
- Windows Resource Protection did not find any integrity violations.
It means you don’t have any missing or corrupted system files. You can go ahead with the next fix to solve your problem. - Windows Resource Protection found corrupt files and successfully repaired them
You can perform a restart and try to relaunch the game to see if Witcher 3 not launching issue is gone.
Fix 6: Disable in-game overlay
Sometimes in-game overlay can screw over your game and your Witcher 3 not launching issue may be caused by this feature. The game simply takes a lot of time to react when the overlay is on.
To make sure if this is your problem, you can go to the directory where you installed the game, and run Witcher 3 .exe here. If this method works, you can go to your Game launcher and turn off the in-game overlay.
- For GOG:
- On the game’s library page select Settings > Uncheck the In-Game Overlay box. Then click OK.
- For Steam:
- Right-click the game in your Library > Select Properties > Under the General tab, uncheck the box next to Enable the Steam Overlay while in-game
- For Origin:
- click on Origin at the top-left corner of the window > select Application Setting > More > ORIGIN IN-GAME > move the slider to turn off Enable Origin In-Game
After disabling the in-game overlay, you can launch your Witcher 3 again. If Witcher 3 launches successfully, then great! But if it doesn’t, you can try the next fix below.
Fix 7: Disable Antivirus
Witcher 3 not launching problem is sometimes caused by interference from your antivirus software. To see if that’s the problem for you, temporarily disable your antivirus program and check if the problem persists.
Alternatively, you can add the entire folder where Witcher 3 is installed to its list of exclusions.
Follow the links below to learn how to do it:
Try launching your game again to see if Witcher 3 works normally again.
Fix 8: Perform a clean boot
Your Witcher 3 not launching can be caused by other conflicting applications. To see if that’s your problem, try performing a clean boot.
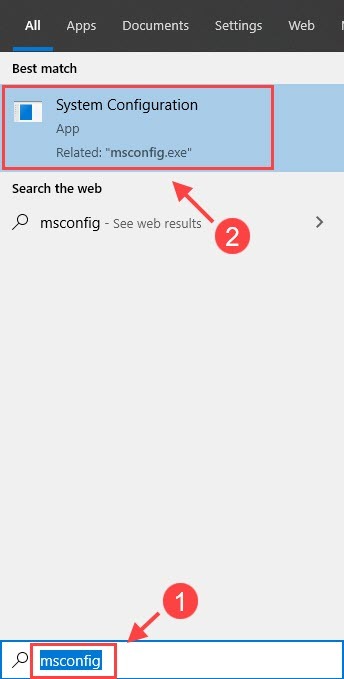
1) Type msconfig in the Search box and select System Configuration.
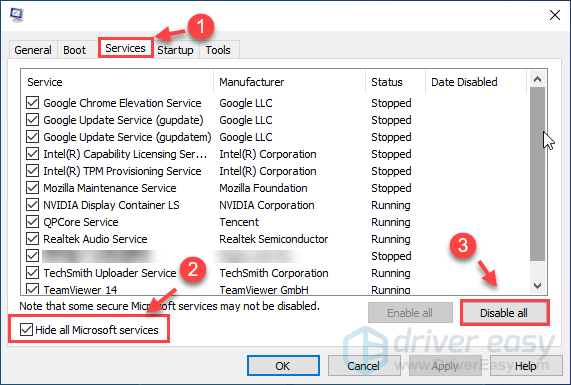
2) Click the Services tab and check the Hide all Microsoft services box, then click Disable all. Click OK to apply the changes.
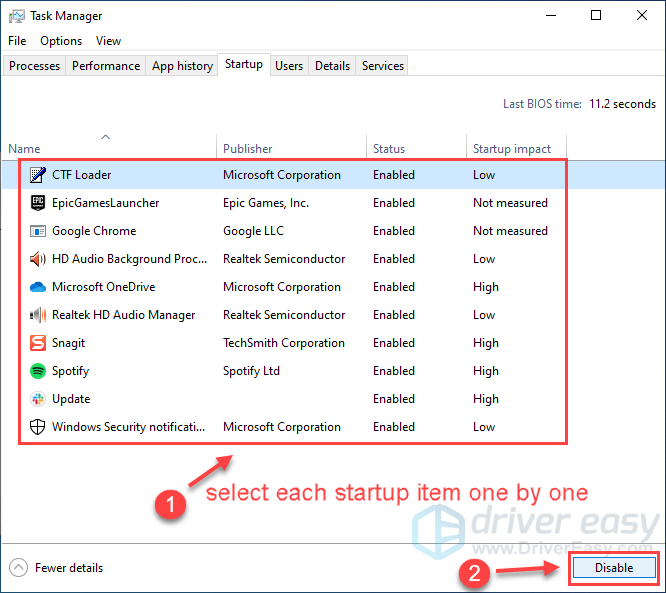
3) On your keyboard, press Ctrl + Shift + Esc at the same time to open Task Manager and click the Startup tab.
4) Select every startup application and click Disable.
5) Restart your PC and launch Witcher 3 again.
If Witcher 3 launches successfully again, then congrats! However, you’ll need to find out the problematic software. Here is how to do it:
- Open the System Configuration again.
- Enable services and applications that you’ve disabled before one by one until you find the problematic one.
- After enabling each startup application, you need to restart your computer again to find the conflicting one.
Once you find out the problematic software, you may need to uninstall or disable it to avoid running into the same issue in the future .
Fix 9: Delete the GoG.dll
If you ever transferred your Witcher 3 from GOG to Steam, there might be two .dll files in your Steam > steamapps > common > The Witcher 3 > bin folder. One of them is Steam.dll and the other is GoG.dll. You may delete the GoG.dll file and try running Witcher 3 again to test your issue.
Fix 10: Perform a reinstall
If the methods above fail to solve your problem, you can reinstall Witcher 3 to see if the issue persists.
1) Press the Windows key + R at the same time to open the Run box.
2) Type appwiz.cpl in the box and hit Enter.

3) Right-click Witcher 3 and select Uninstall.
4) Download the game again to see if it launches normally this time.
We genuinely hope that one of the fixes above solved your Witcher 3 not launching issue. If the issue still persists, please make sure your PC meets the minimum system specs to run the game.
MINIMUM REQUIREMENTS:
| OS | 64-bit Windows (10, 8, 8.1 ,7) |
| Processor | Intel CPU Core i5-2500K 3.3GHz AMD CPU Phenom II X4 940 |
| Memory | 6 GB RAM |
| Graphics | Nvidia GPU GeForce GTX 660 AMD GPU Radeon HD 7870 |
| Storage | 35 GB available space |
RECOMMENDED REQUIREMENTS:
| OS | 64-bit Windows (10, 8, 8.1 ,7) |
| Processor | Intel CPU Core i7 3770 3.4 GHz AMD CPU AMD FX-8350 4 GHz |
| Memory | 8 GB RAM |
| Graphics | Intel CPU Core i7 3770 3.4 GHz AMD CPU AMD FX-8350 4 GHz |
| Storage | 35 GB available space |
To gather detailed information about your computer, you can open the DirectX Diagnostic Tool.
- On your keyboard, press the Windows logo key and R at the same time to open the Run box.
- Type dxdiag in the box and hit Enter.
Here you can check your computer’s graphics, sound, and other devices related to gaming. You can also create a Dxdiag report by clicking Save All Information.


