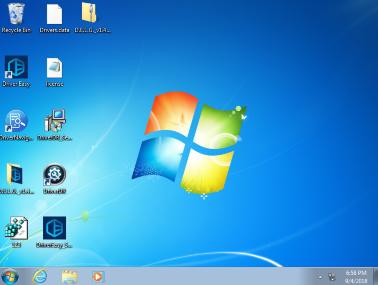
Your Windows 7 computer is running slow down to a crawl? Don’t worry. We’ve got you covered.
Why is Windows 7 running slow?
Sometimes your Windows 7 computer become slower after Windows Update, or you open several programs in your computer will also cause your slow system. Sometimes it’s hard to exactly identify the cause.
Generally speaking, the insufficient disk space or system memory will cause your computer slow or lag. And too many programs and applications running in your computer will lead to the problem as well, since these programs are eating up most of your system resources.
But there are workarounds to improve Windows 7 performance. So let’s cut to the chase and go straight to the point.
How to speed up Windows 7
- Run the Performance troubleshooter
- Update available drivers
- Uninstall unnecessary programs
- Limit startup programs
- Scan malware and virus
- Run Disk Cleanup
- Perform Disk Defragment
- Turn off Visual Effects
- Add more RAM
Method 1: Run the Performance troubleshooter
The Performance troubleshooter in Windows 7 changes settings to help improve overall speed and performance. It’s a helpful tool to figure out what is slowing down your Windows 7 computer and fix it. Here’s how to do it:
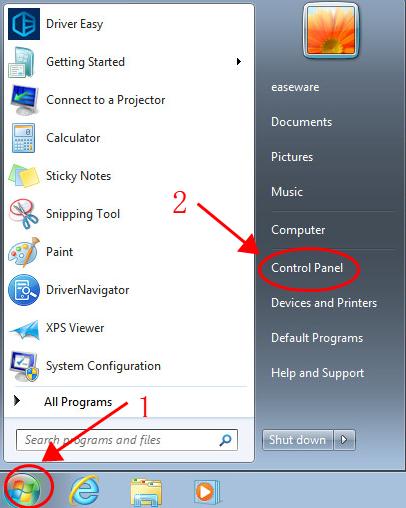
1) Click the Start button at the bottom left corner, and click Control Panel.
2) Type troubleshooter in the search box on Control Panel.
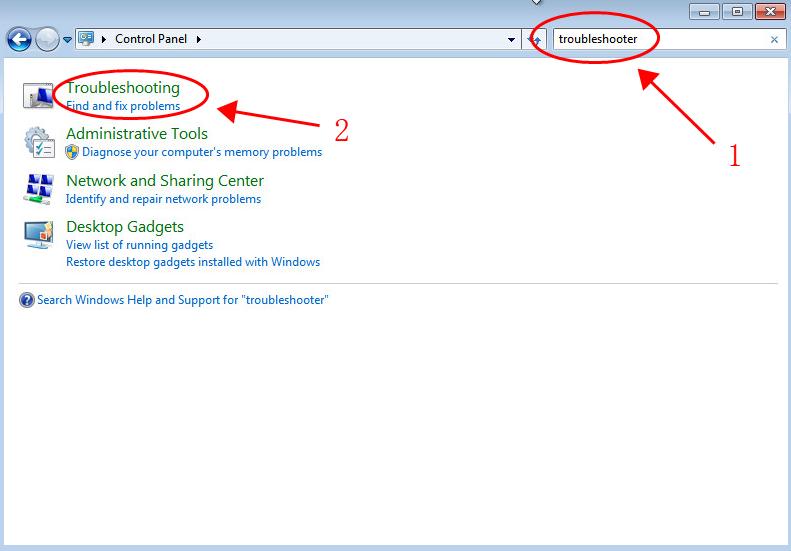
3) Click Troubleshooting in the search result.
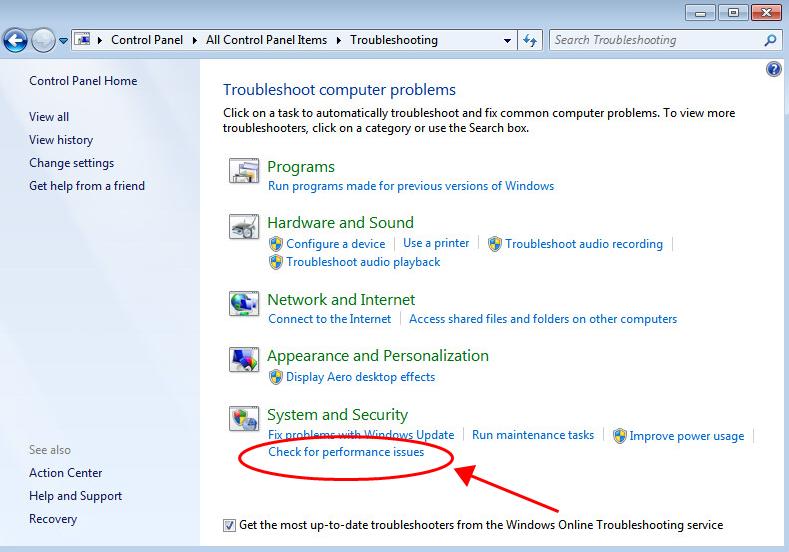
4) Click Check for performance issues in the System and Security section.
5) Then click Next.
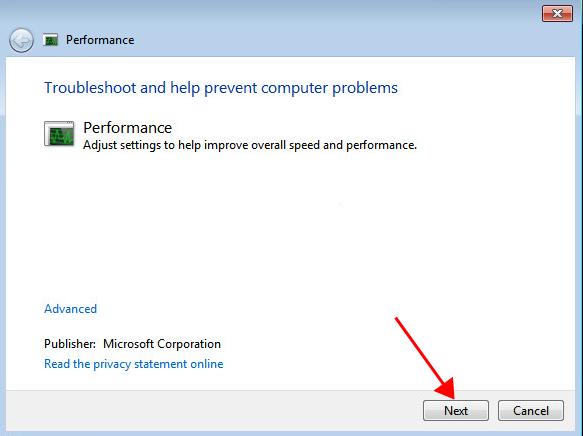
6) Follow the on-screen instructions to fix the detecting issues.
This will improve the performance for your Windows 7 computer. Check if your Windows 7 computer becomes faster.
Method 2: Update available drivers
A missing or outdated driver can cause your devices in Windows 7 working improperly, so you should keep the drivers in your computer up to date. By doing so, it will keep your devices and computer in good condition and bring the best possible experience.
There are two ways to update drivers: manually and automatically.
Manually update drivers: you can go to the websites of the device manufacturers, find the latest drivers for your device, and install in your computer. Ensure to download the correct driver that is compatible with the operating system. This requires time and computer skills.
Automatically update drivers: if you don’t have time or patience, you can do it automatically with Driver Easy.
Driver Easy will automatically recognize your system and find the correct drivers for it. You don’t need to know exactly what system your computer is running, you don’t need to risk downloading and installing the wrong driver, and you don’t need to worry about making mistakes when installing.
You can update your drivers automatically with either the FREE or the Pro version of Driver Easy. But with the Pro version, it takes just 2 clicks (and you will get full support and a 30-day money back guarantee).
1) Download and install Driver Easy.
2) Run Driver Easy and click the Scan Now button. Driver Easy will then scan your computer and detect any problem drivers.

3) Click the Update button next to the flagged device to automatically download the correct version of the driver (you can do this with the FREE version). Then install the driver in your computer.
Or click Update All to automatically download and install the correct version of all the drivers that are missing or out of date on your system (this requires the Pro version – you’ll be prompted to upgrade when you click Update All).
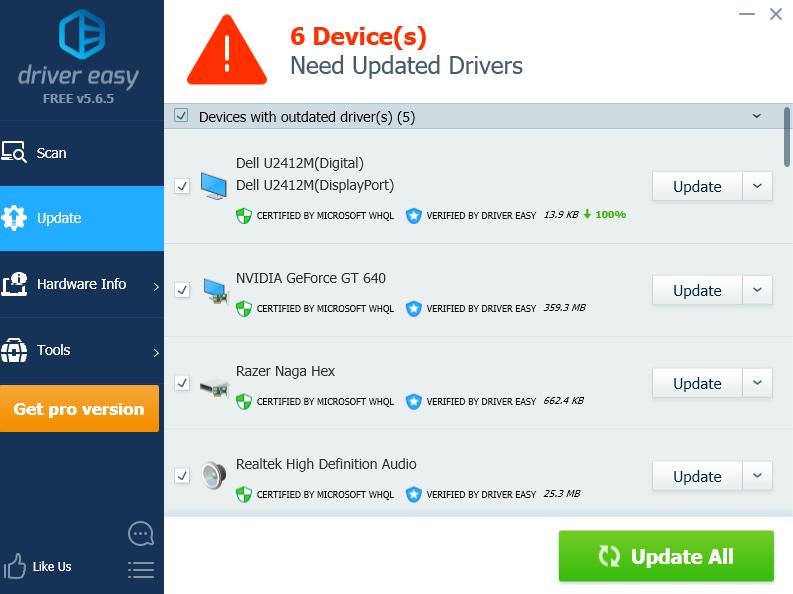
4) Restart your computer to take effect.
Method 3: Uninstall unnecessary programs
When installing Windows 7, there are pre-installed programs, whether you like it or not, and you may never use those programs in your computer. In that case, you can uninstall these programs to speed up Windows 7. Here’s what to do:
1) On your keyboard, press the Windows logo key and R at the same time to invoke the Run box.
2) Type appwiz.cpl and click OK.
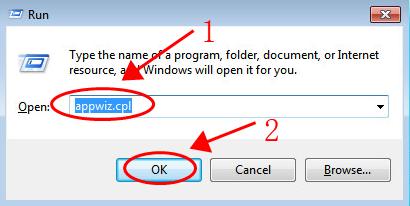
3) In the Programs and Features pane, simply take a look at the program that you seldom use, and click Uninstall to delete it.
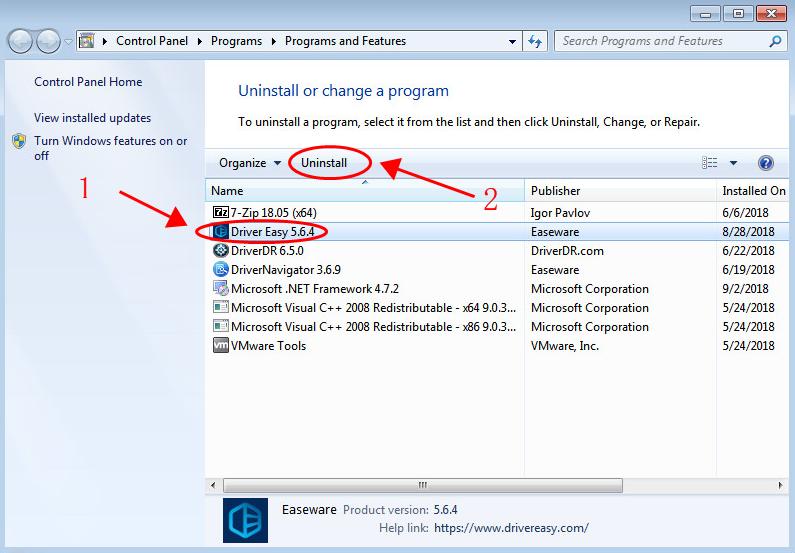
Kindly note that you should search for the program if you don’t know what it is, in case you delete some important programs that cause the system corruption.
Method 4: Limit startup programs
If too many applications and programs start running when booting Windows 7, your computer will slow down without doubt. So try disabling the unwanted programs to run from startup.
You can do this in System Configuration:
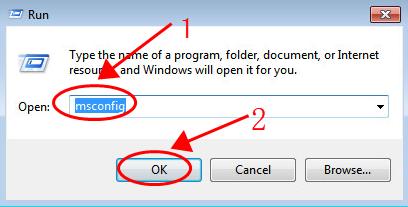
1) On your keyboard, press the Windows logo keyand R at the same time to invoke the Run box.
2) Type msconfig and click OK.
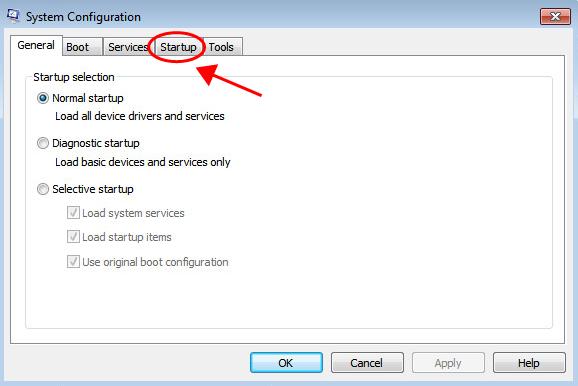
3) In System Configuration, click the Startup tab.
4) Check the startup program list, and select the one that doesn’t need to run with booting, and click Disable.
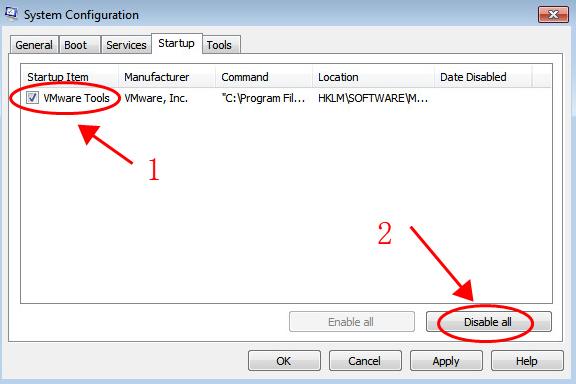
5) Click OK to save the changes.
You’ll need to repeat the steps to disable if there are more than one programs. In addition, programs like antivirus program should be allowed to run with startup for security concerns.
As a side note, some programs like the browser running in Windows 7 can consume a lot of CPU and disk space, so it’s recommended to open programs only when you need to use, and close the programs that you don’t need any more so that they won’t slow down Windows 7.
Method 5: Scan malwares and virus
If the Windows 7 system is infected by malware or virus, your computer will become slower, and even corrupted. That’s why we need the antivirus programs, and also need to scan our computers regularly.
So run a virus scan across your entire Windows system. Yes, it will take some time to complete, but it’s worth it. Unfortunately, Windows Defender may not detect it, so it’s worth trying another antivirus application such as Avira and Panda.
If any malware has been detected, follow the instructions provided by the antivirus program to fix it.
Then restart your computer and try to launch your program again to see if it works.
Method 6: Run Disk Cleanup
Cleaning up your hard disk can clear unnecessary files in Windows 7 system, and empty the Recycle Bin, so it can reduce your system lagging. Here’s what you need to do:
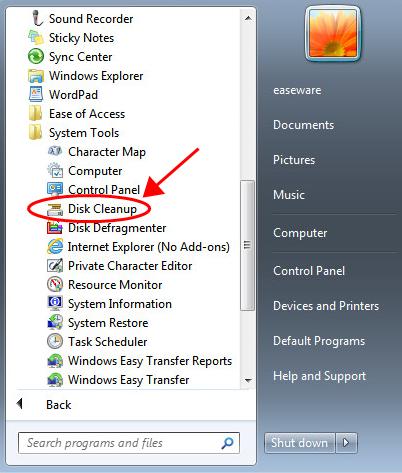
1) Click the Start button at the bottom left corner, and click All Programs.
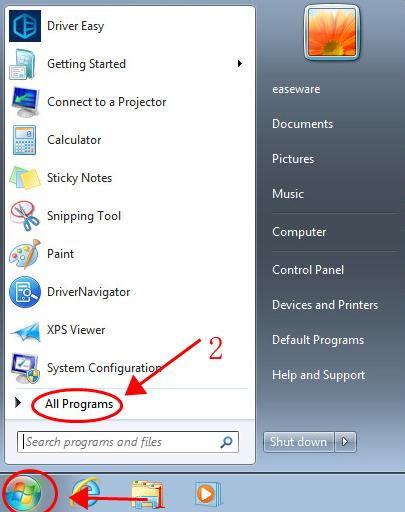
2) Go to Assessories > System Tools > Disk Cleanup.
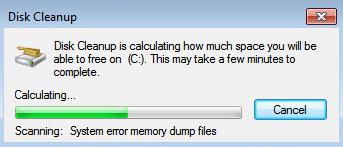
3) It’ll start calculating the dump files. This takes a while depending on your system.
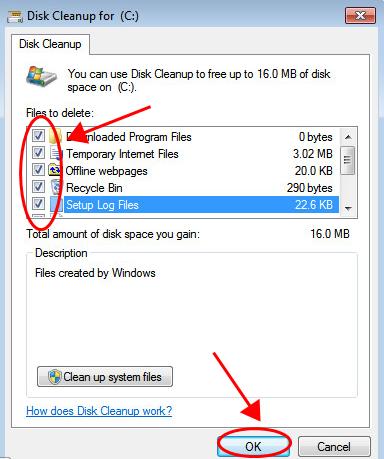
4) Check the box next to the files to delete, and click OK.
5) Click Delete Files to confirm.
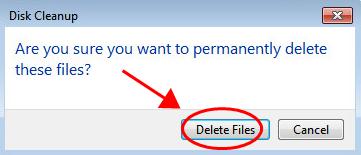
Follow the on-screen instructions to finish the steps, then restart your computer.
Method 7: Perform Disk Defragment
Fragmentation makes your hard disk to do extra work that slows down your computer, so a Disk Defragment can re-arrange the fragmentation and make the hard disk work faster.
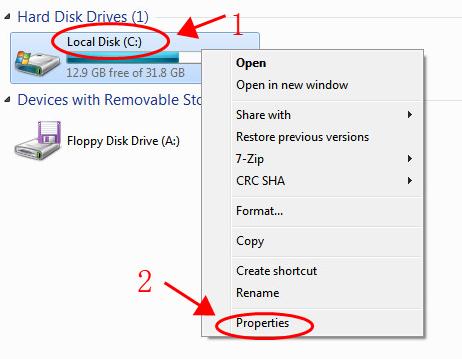
1) Right click on the hard disk that is going to defrag, and select Properties.
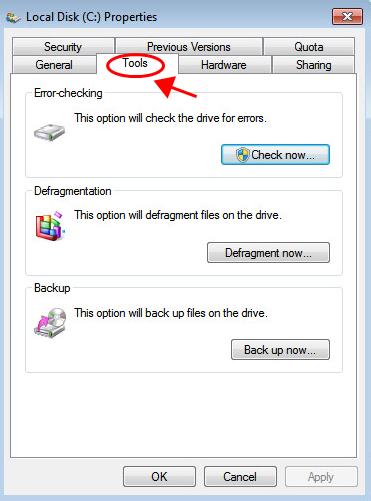
2) Click the Tools tab.
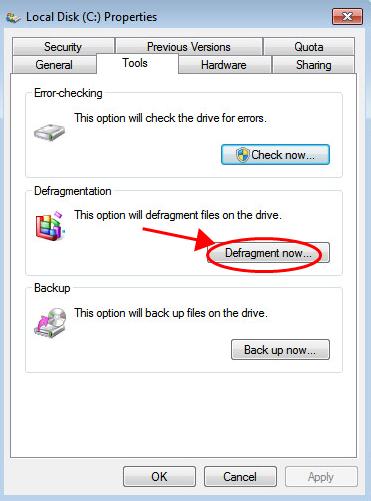
3) Click Defragment now.
4) Then select the disk and click Defragment disk.
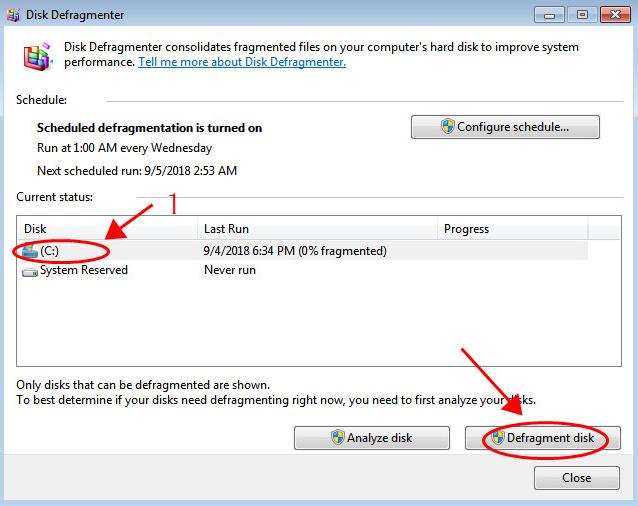
5) You’ll see the progress bar under the Progress volume.
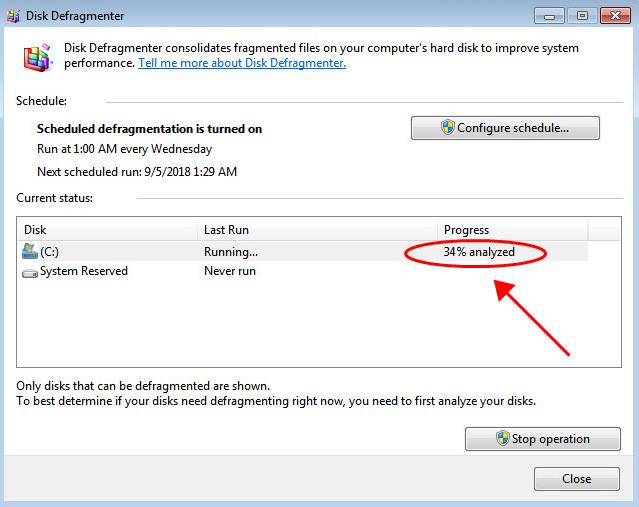
Wait for some minutes for it to finish. Then restart your computer to take effect. This should speed up Windows 7.
Method 8: Turn off Visual Effect
Many people don’t aware of the host of Visual Effects in Windows 7, which can be one of the possible reasons why Windows 7 is slow. So you can turn off Visual Effects to speed up Windows 7.
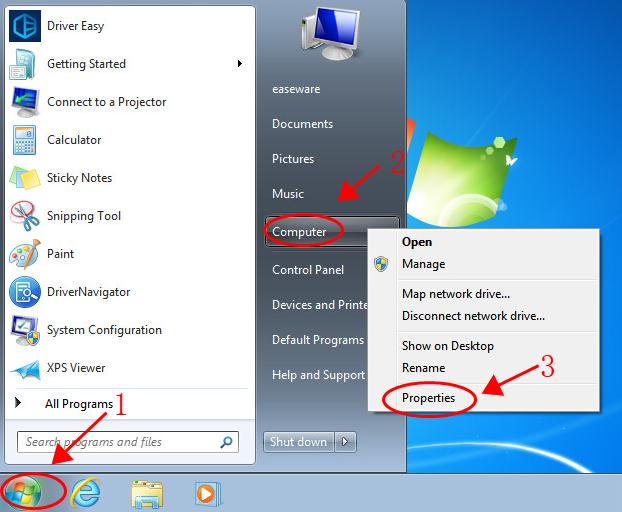
1) Click the Start button on your desktop, then right click on Computer and select Properties.
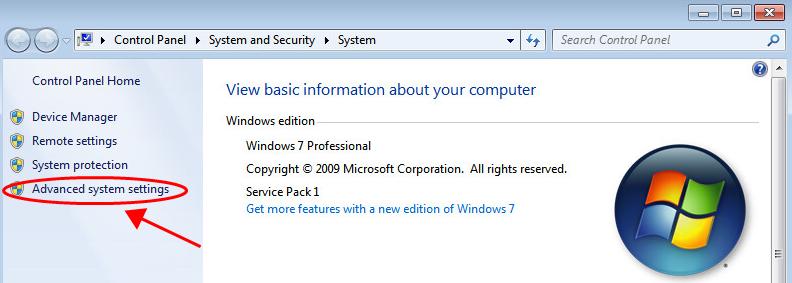
2) Click Advanced system settings on the left.
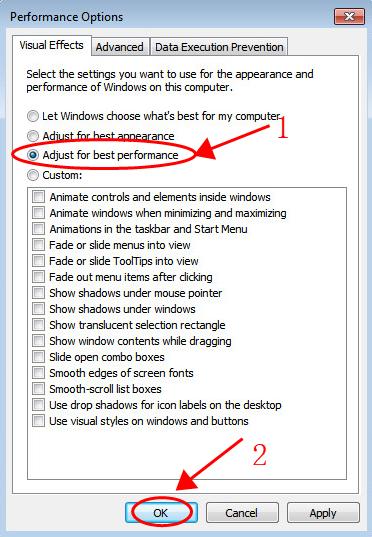
3) Click Settings in the Performance section.
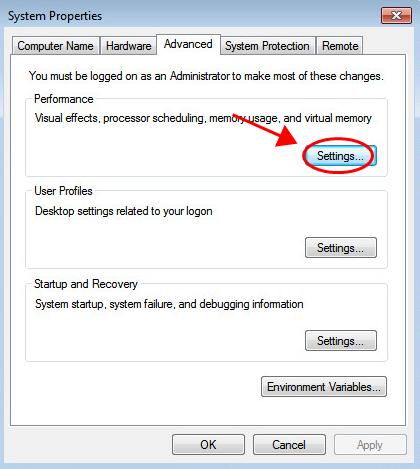
4) In the popup dialog, select Adjust for best performance and click OK.
Restart Windows 7 and your system should be running faster.
Method 9: Add more RAM
If Windows 7 is too slow, it’s usually because your computer doesn’t have enough RAM, and the best way to speed it up is to add more RAM to your computer.
If you’re confident with your computer skills, you can buy RAM for Windows 7 and add it to your computer.
So there you have it – the 9 effective ways to fix Windows 7 running slow and speed up Windows 7 and optimize system performance.


