Your keyboard stops working for no reason? This is a very annoying problem – and quite scary. You’re probably thinking, “I can’t even use Windows without a keyboard! How am I supposed to fix a problem like this without one?”
But don’t panic! It’s possible to fix this problem – even without your keyboard. Here are 6 solutions to try.
Fixes to try:
Here is a list of fixes that have proved useful to many users. You may not have to try them all; just work your way down the list until you find the one that works for you.
- Open the on-screen keyboard
- Update your keyboard driver
- Check for the Power Management setting
- Check for Windows updates
- Reconnect your keyboard to your computer
- Run the Keyboard Troubleshooter
Fix 1: Open the On-Screen Keyboard
It would be difficult, if not impossible to fix your keyboard issue without login into your computer first. So if you encountered the keyboard not working issue at the login screen, follow the instructions below to open the On-Screen Keyboard so you can sign in to your PC.
The On-Screen Keyboard is a visual keyboard with all the standard keys. It a built-in Ease of Access tool that can be used instead of a physical keyboard.
- Turn on your computer and let the login screen load.
- Once in the Login screen, click the Ease of access and then click on-screen keyboard.
- A virtual keyboard will appear on the screen. Use your mouse and then type your keyboard to enter your account.
Once you are logged into your account, make use of your mouse and follow the steps below to open the On-Screen Keyboard for temporary use. To fix your keyboard issue, move on and try the solutions below.
on Windows 11
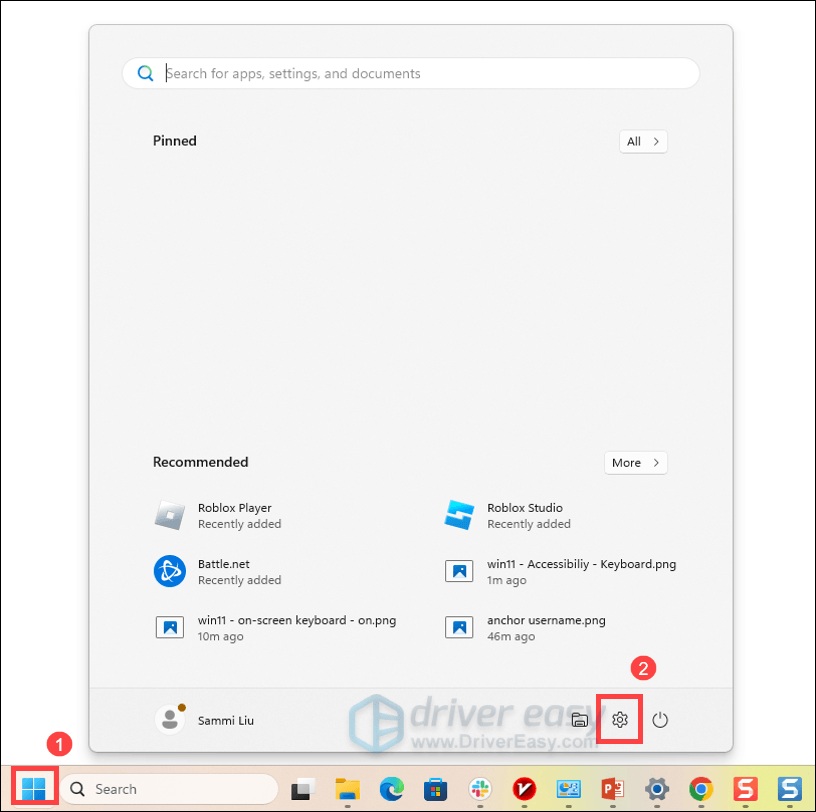
- On the center of left end of the taskbar, select the Start
 icon. Then select Settings
  .
.
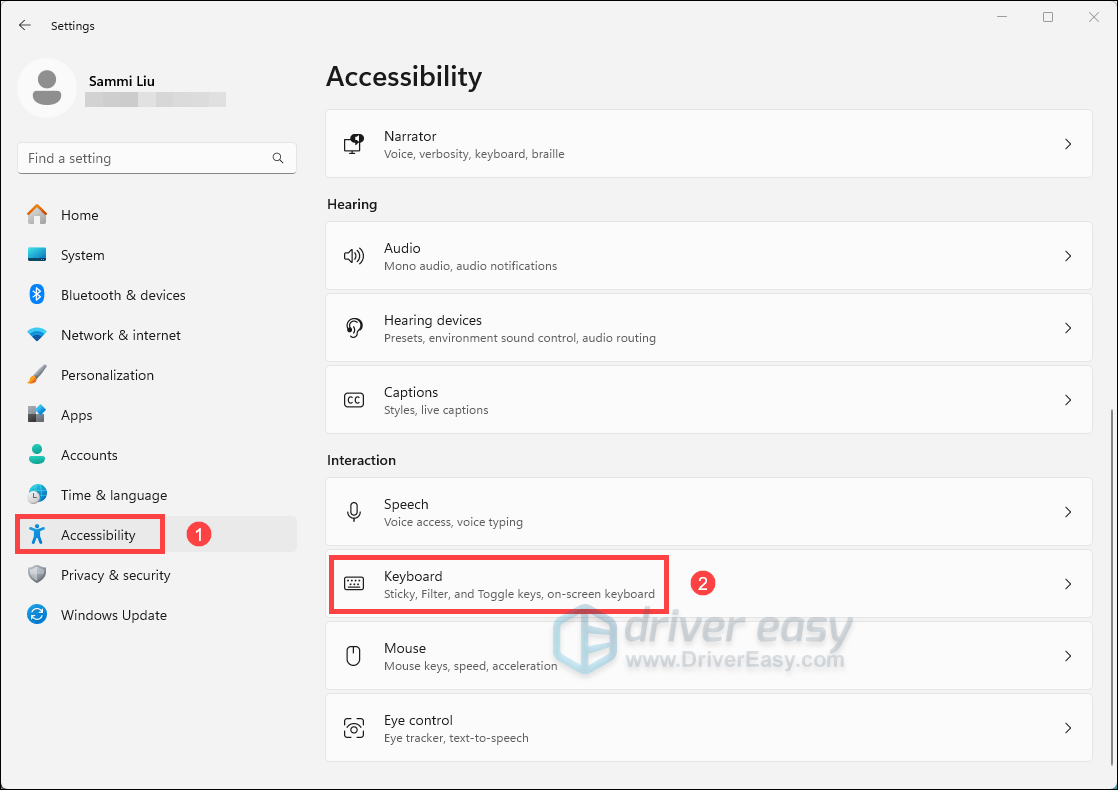
- Select Accessibility > Keyboard.
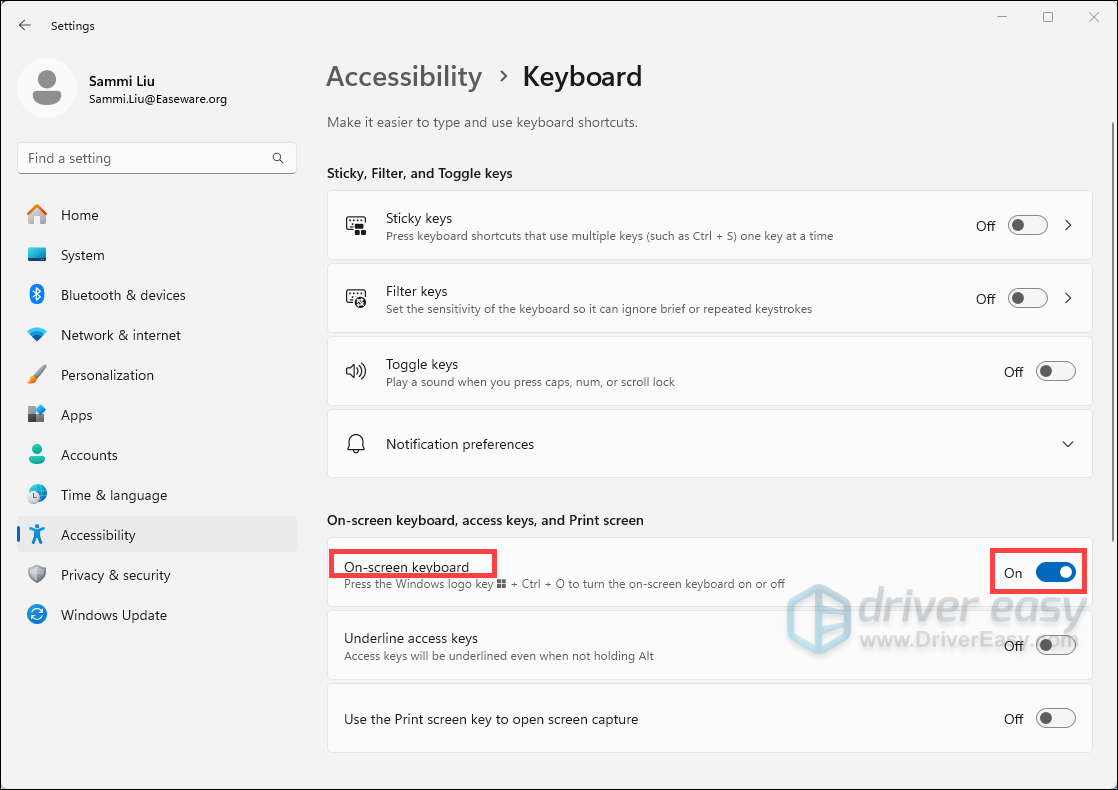
- Find On-Screen Keyboard and turn on the toggle.
on Windows 10
- Go to Start
 , then select Settings
  .
. - Select Ease of Access
 > Keyboard.
 - Turn on the toggle under Use the On-Screen Keyboard.
Fix 2: Update your keyboard driver
An outdated or a faulty keyboard driver can also resulting in keyboard issues like this. It’s essential that you have the latest correct keyboard driver at all times.
There are two ways you can get the right driver for your keyboard:
Manual driver update – You can update your keyboard driver manually by going to the manufacturer’s website for your keyboard, and searching for the most recent correct driver. Be sure to choose only drivers that are compatible with your Windows version.
Automatic driver update – If you don’t have the time, patience or computer skills to update your keyboard and other device drivers manually, you can, instead, do it automatically with Driver Easy. Driver Easy will automatically recognize your system and find the correct drivers for your exact keyboard, and your Windows version, and it will download and install them correctly:
- Download and install Driver Easy.
- Run Driver Easy and click the Scan Now button. Driver Easy will then scan your computer and detect any problem drivers.

- Click Update All to automatically download and install the correct version of all the drivers that are missing or out of date on your system.
(This requires the Pro version which comes with full support and a 30-day money-back guarantee. You’ll be prompted to upgrade when you click Update All. If you’re not ready to buy the Pro version, Driver Easy offers a 7-day free trial which includes access to all the Pro features such as high-speed download and one-click install. You won’t be charged anything until your 7-day trial has ended.)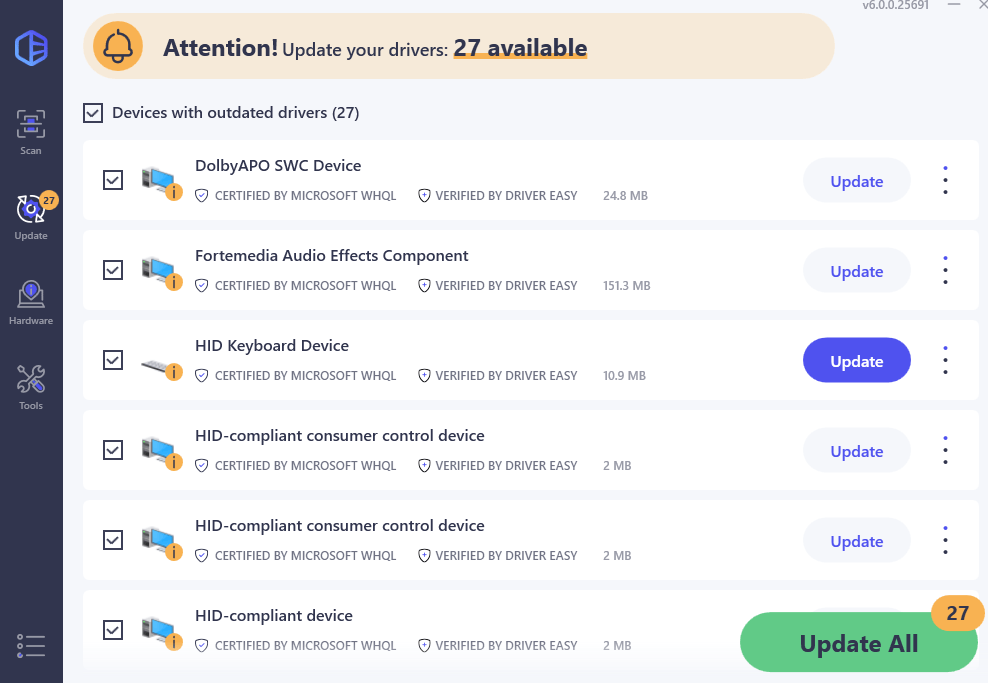
- Restart your computer for the changes to take effect.
Fix 3: Check the Power Management setting
In some cases, this issue occurs because your computer turns off your keyboard to save power. So you should check your Power Management setting to see if that’s the problem for you. Follow the instructions below:
- Click the Windows icon on the bottom left corner.

- Paste device manager on the search box, then click Device Manager.
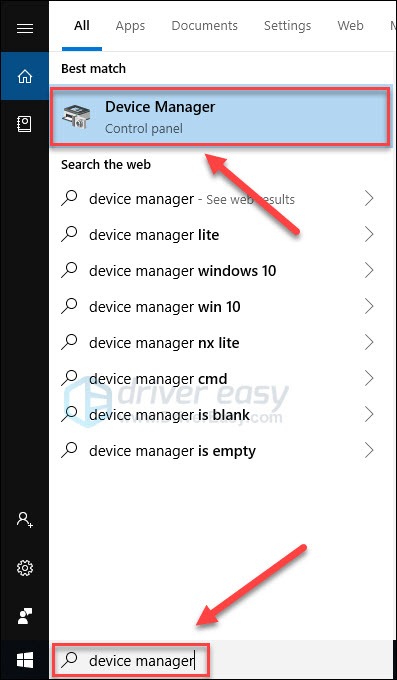
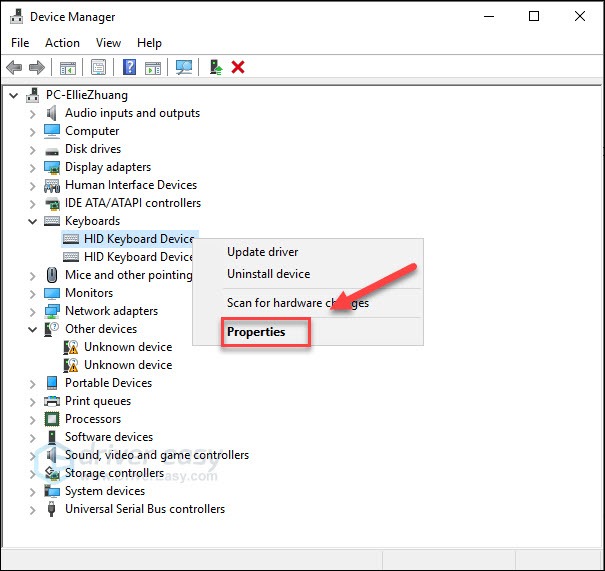
- Double-click Keyboards. Then, right-click your Keyboard’s name and select Properties.
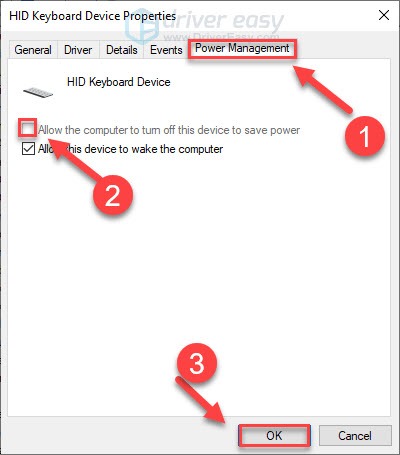
- Click the Power Management tab, verify that the box next to Allow the computer to turn off this device to save power is unchecked, then click OK.
- Restart your computer.
If your keyboard is still not working after the reboot, read on and try the fix below.
Fix 4: Check for Windows updates
Windows updates can address bugs related to both hardware and software. So, when something goes wrong with your computer, you should try performing a Windows update. Here is how to do it:
- On your keyboard, hit the Windows key, then paste check for updates, then click Check for updates.

- Click Check for updates, and Windows will scan for any available updates.

- If there are available updates, Windows will automatically download them for you. Restart your computer for the update to take effect if needed.

- If there are no available updates, you’ll see You’re up to date like this.

Check if your keyboard can work properly now. If it is not, move on to the fix, below.
Fix 5: Reconnect your keyboard to your PC
Your issue is sometimes caused by a poor connection between your PC and keyboard. In this case, reinstalling your keyboard is very likely the solution to your issue. Here is how to do it:
If you’re using a USB keyboard
1) Turn off your computer.
2) Unplug the USB cable that connects your keyboard to your computer.
3) Reconnect your keyboard to your computer. (Or, try plugging the USB cable into another USB port.)
4) Restart your computer to check your issue.
Hope this has fixed your issue. If you have any questions, please leave a comment below.
If you’re using a wireless keyboard
1) Turn off your computer.
2) Make sure the keybaord batteries are good. You can replace them with brand new ones to see if that fixes your problem.
3) Unplug your keyboard receiver on the back or front of the computer case.
Note: All wireless keyboards have a receiver that is plugged into the computer, and the keyboard connects to that receiver wirelessly. Here is what a receiver looks like:

4) Wait for 3 minutes, then connect the receiver back to the computer.
5) Restart the computer to test your issue.
Fix 6: Run the Keyboard Troubleshooter
Windows has a built-in keyboard troubleshooter that can automatically detect and fix common issues affecting your keyboard’s functionality. To run the Keyboard Troubleshooter in Windows, follow these steps:
on Windows 11
- Go to Start
 , then select Settings
  .
. - Select System > Troubleshoot.
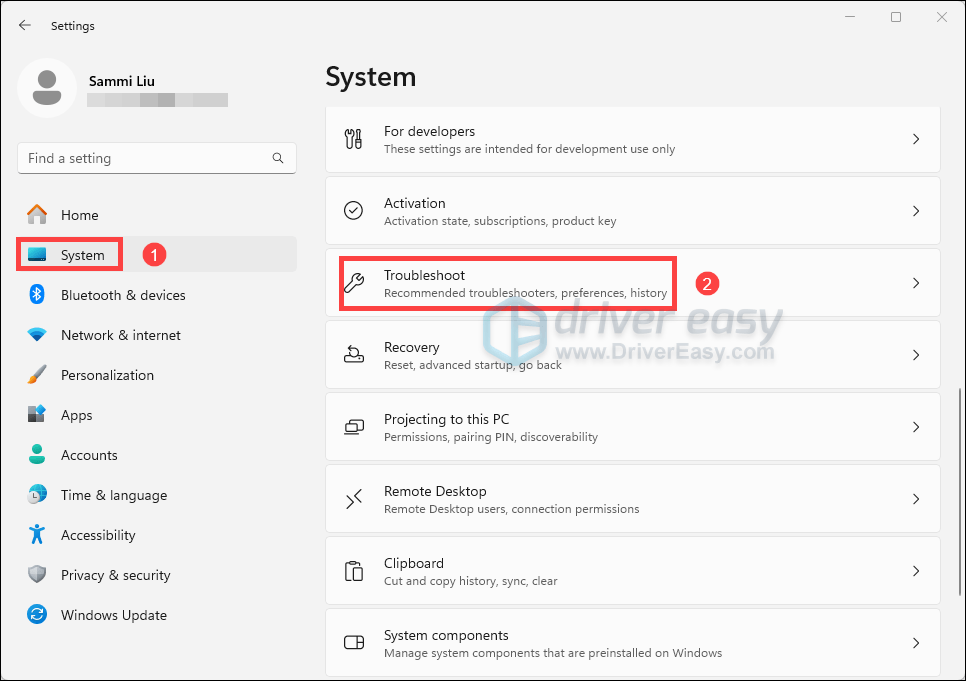
- Click Other troubleshooters.
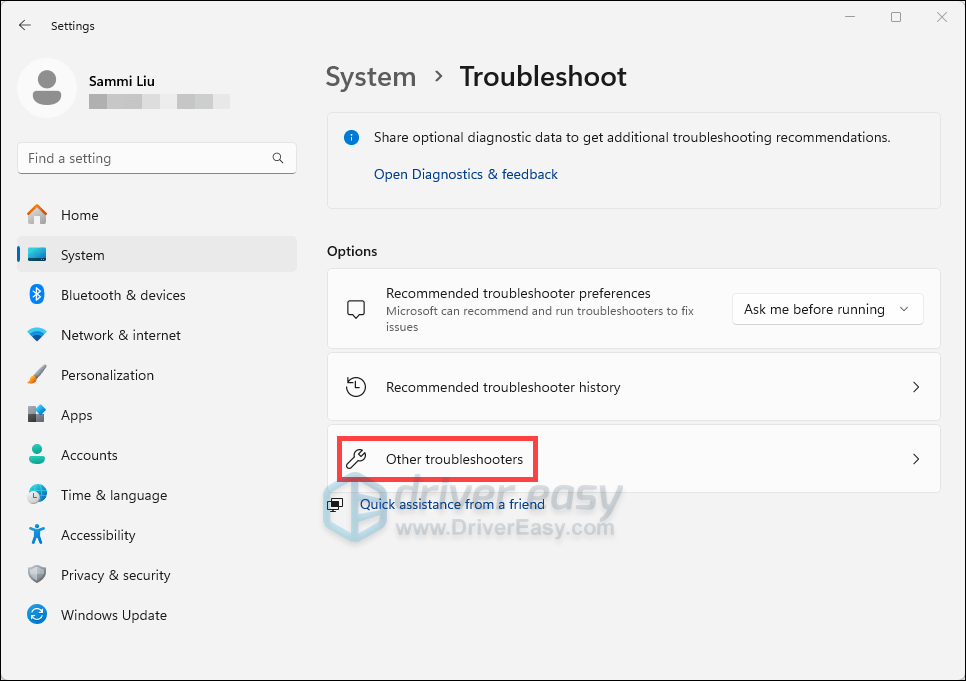
- Click Run on the Keyboard item. Then follow the on-sceen prompts to detect and resolve problems.
on Windows 10
- Go to Start
 , then select Settings
  .
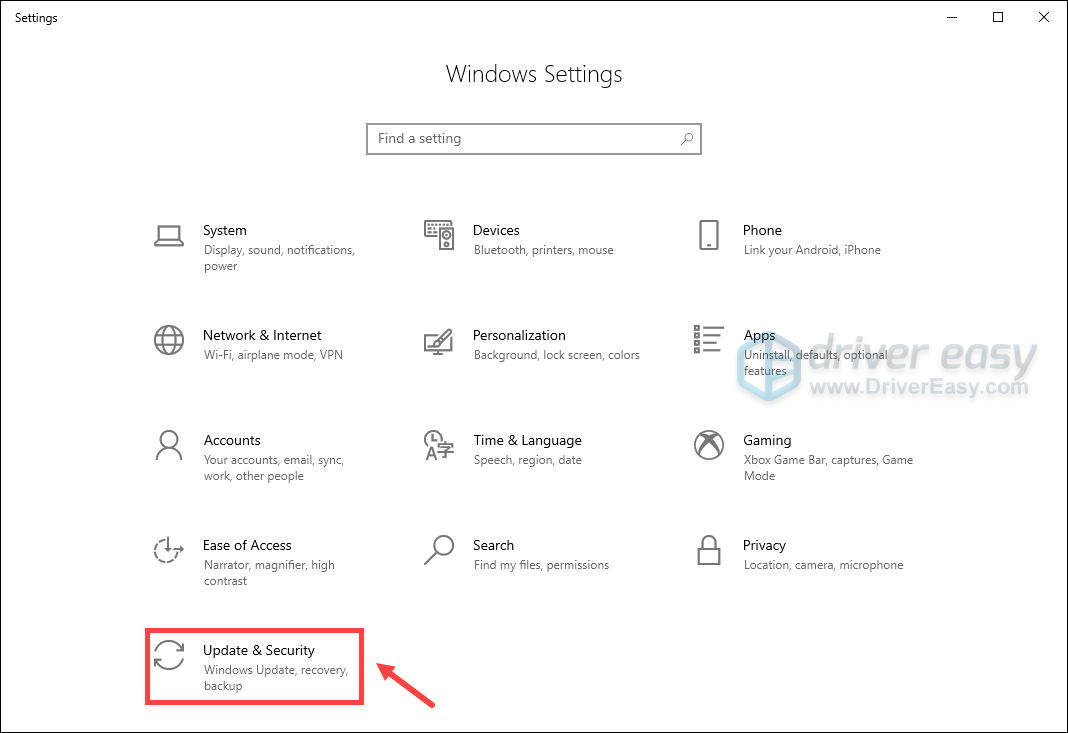
. - Navigate to Update & Security.
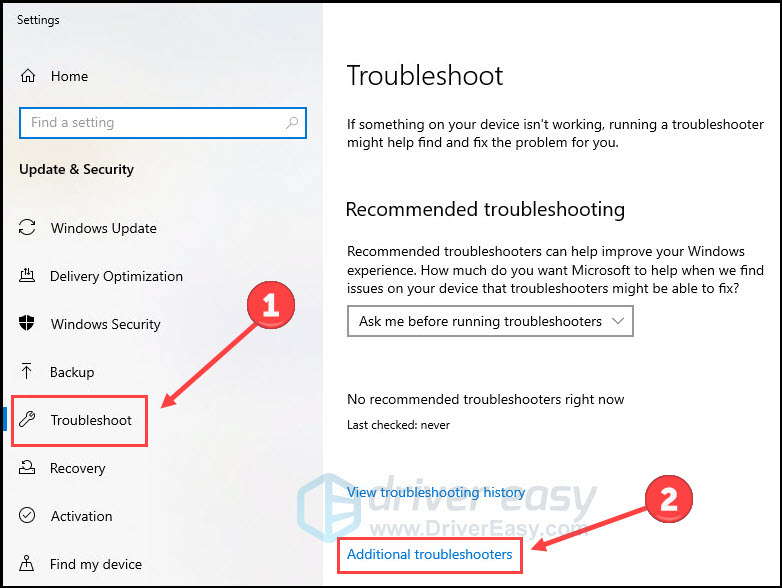
- Select Troubleshoot from the left panel. Then click on Additional troubleshooters.
- Locate Keyboard and click Run the troubleshooter.
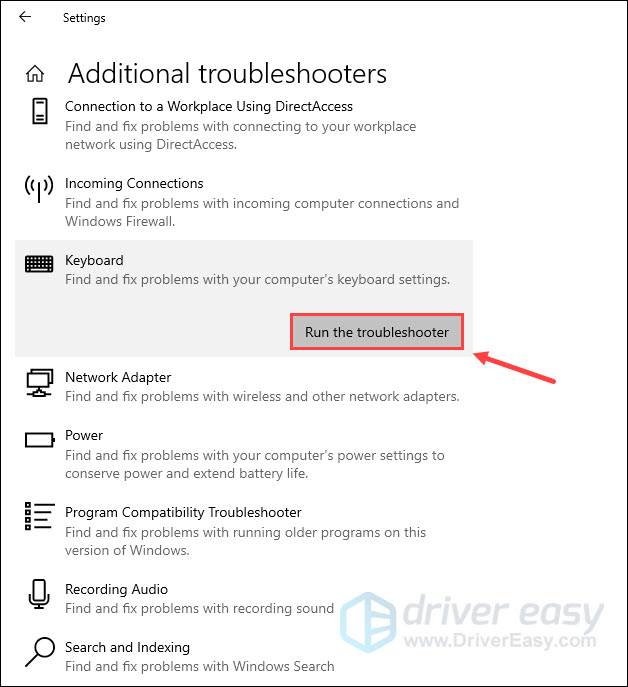
- Follow the on-screen instructions to detect and resolve keyboard issues.
Hopefully, one of the fixes above helped in resolving your issue! If you have any questions or suggestions, please feel free to leave a comment below.


