If Modern Warfare 2 is using up to 95-100% of your CPU and causes stuttering while playing, don’t worry, you’re not alone. And there are fixes to solve the Modern Warfare 2 high CPU usage.
Try these fixes:
Simply work your way down until you find the one that works for you.
- Update your chipset drivers
- Set the CPU affinity only use 0-3
- Rollback your NVIDIA driver
- Edit Config file
- Change the power plan setting
1. Update your chipset drivers
Updating drivers could be a solution for MW2 high CPU usage because drivers must be updated to accommodate new software and fix bugs. So we recommend updating your drivers on a regular basis to get the best performance and experience. For AMD CPU users who are suffering frame issues, you can update your motherboard drivers to the latest version.
There are mainly two ways you can update your driver: manually and automatically.
Option 1: Update your driver manually
First, you need to go to the official website (NVIDIA/AMD/Intel) to find the correct driver. Then find the device drivers corresponding with your Windows version and download the drivers manually. Once you’ve downloaded the correct drivers for your system, double-click on the downloaded file and follow the on-screen instructions to install the drivers.
Option 2: Update your driver automatically (recommended)
If you don’t have the time, patience, or computer skills to update drivers manually, you can do it automatically with Driver Easy.
Driver Easy will automatically recognize your system and find the correct drivers for it. You don’t need to know exactly what system your computer is running, you don’t need to risk downloading and installing the wrong driver, and you don’t need to worry about making mistakes when installing.
You can update your drivers automatically with either the 7 days free trial or the Pro version of Driver Easy. It takes just 2 clicks, and you get full support and a 30-day money-back guarantee with the Pro version:
- Download and install Driver Easy.
- Run Driver Easy and click the Scan Now button. Driver Easy will then scan your computer and detect any problem drivers.

- Click the Activate & Update button next to the flagged device to automatically download and install the correct version of this driver.
Or click Update All to automatically download and install the correct version of all the drivers that are missing or out of date on your system (You’ll need the Pro version for this – when you select Update All, you’ll get a prompt to upgrade. If you’re not prepared to purchase the Pro version yet, Driver Easy provides a 7-day trial at no cost, granting access to all Pro features like fast downloads and easy installation. No charges will occur until after your 7-day trial period ends.)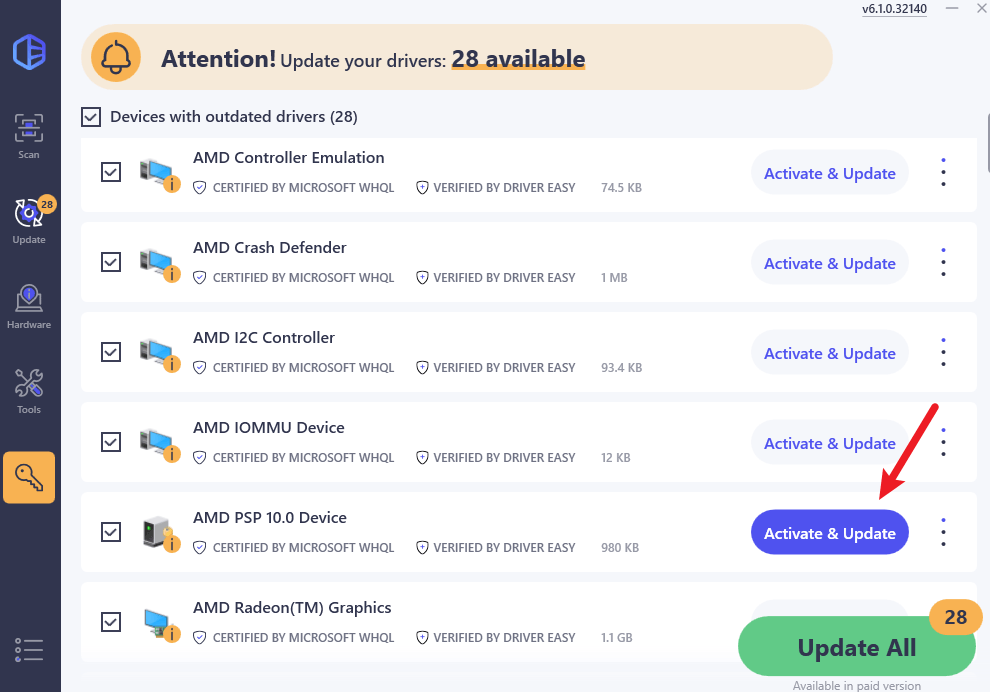
After updating your drivers, restart your computer for the changes to take effect.
2. Set the CPU affinity only use 0-3
Windows automatically puts running applications on the least-busy processors, so the core to which a given thread or process is assigned can be different each time. Setting the CPU affinity forces Windows to only use the CPU or the cores selected. This helps scale the performance on multiple-core processor architectures that share the same memory and have local caches.
- Press the Ctrl + Shift + Esc together to open the Task Manager.
- In the Process tab, right-click on the CoD.exe and click Go to details.

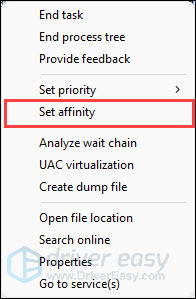
- Right-click on cod.exe and click Set affinity.
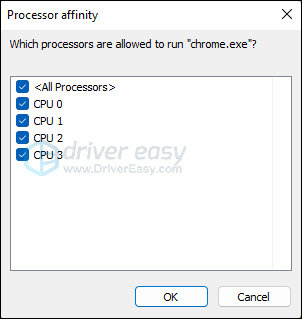
- Set the CPU affinity only using 0-3.
If the Task Manager doesn’t work or you receive an access denied error, you can download Process Lasso to do it. Process Lasso is Windows process automation and optimization software, you can use it to control how many cores/threads a program is able to use in Windows.
- Launch CoD MW2 and open Process Lasso.
- Right-click cod.exe under the Active processes tab. Select CPU Affinity > Always. Then set the rules you want.
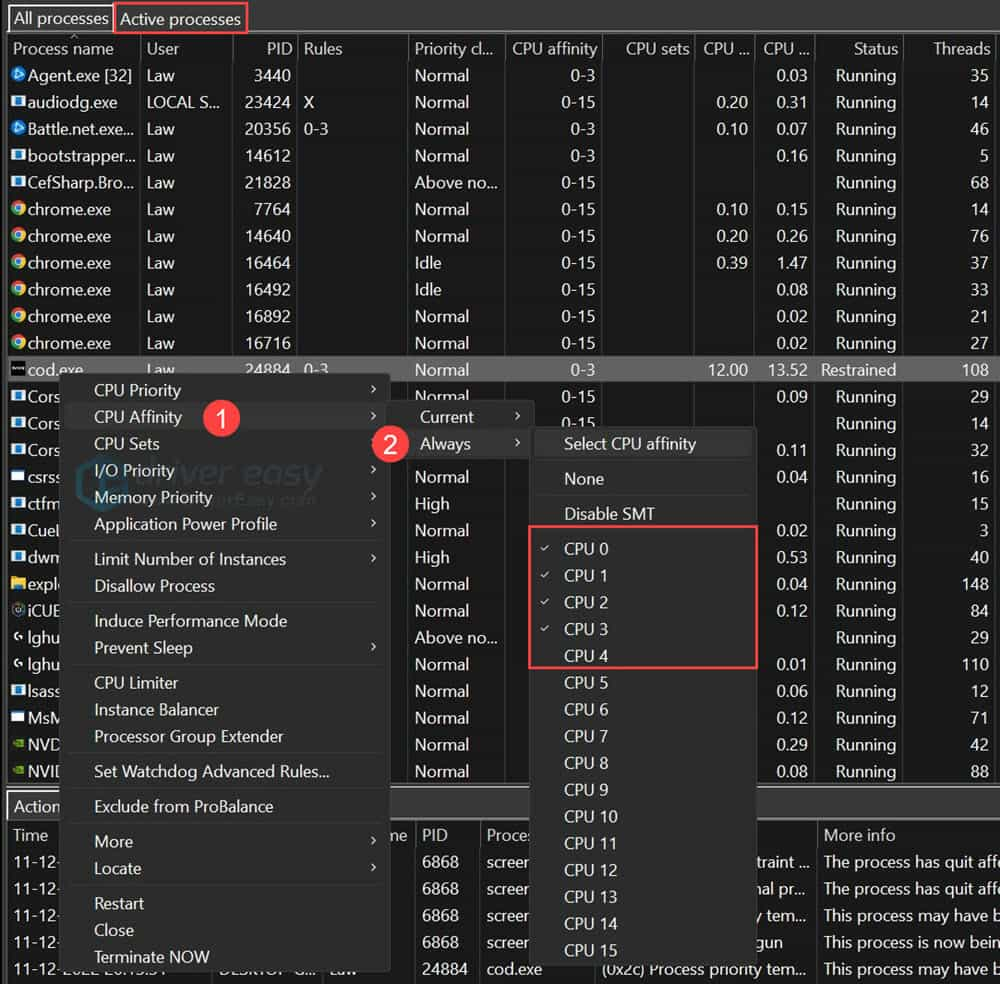
- Click the Options tab, and tick Forced Mode (continuously reapply settings) to make sure it’s applying your rules strictly.
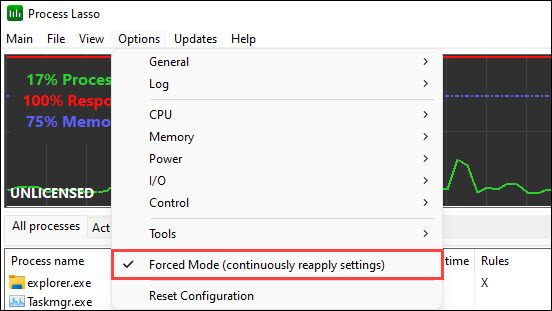
- Close CoD and relaunch it.
Some users reported after doing this, the game will be back to using all of the cores. When this happens, you just go back to the CPU selection in PL, re-do the process and then relaunch CoD.
3. Rollback your NVIDIA driver
If you’re an NVIDIA user, rolling back your NVIDIA driver may fix your issue. Sometimes the latest drivers cause incompatibility. In fact, @BeenoxCODPC suggests users keep the 516.59, or 522.25 drivers.
- In the search box on the taskbar, type Device Manager and press the Enter key.
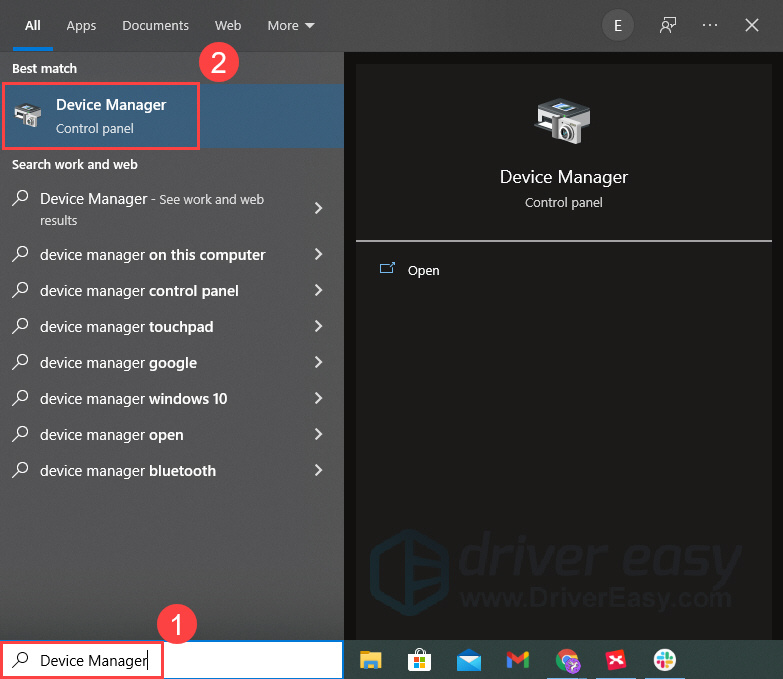
- Select Display Adapters and right-click your card. Click Properties.
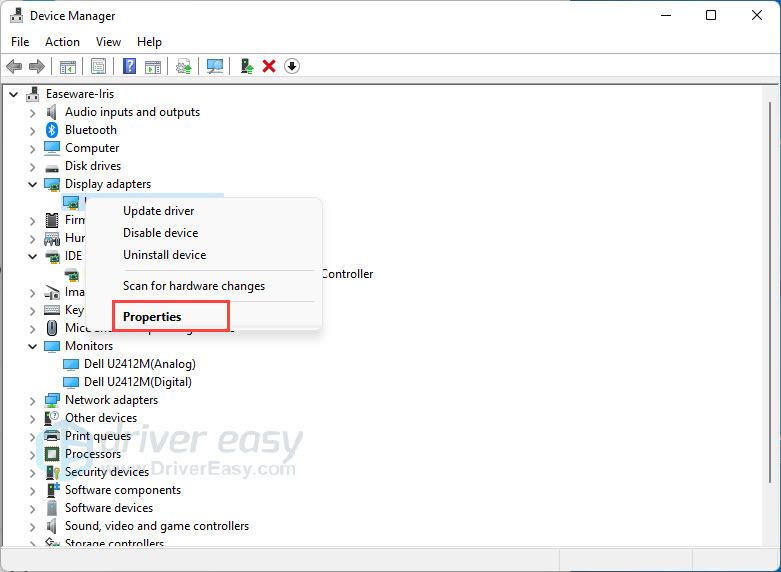
- Under the Driver tab, click Roll Back Driver. Follow the onscreen instructions and finish the process.
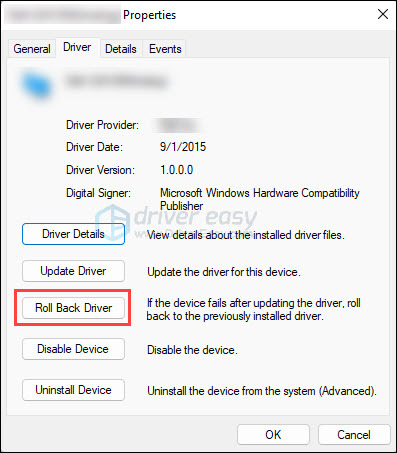
- Restart your PC and launch MW2 to see the difference.
4. Edit Config file
The game doesn’t know how many cores you have and it can really use, so changing a couple of game settings would fix the issue.
- Make sure your game is not running and open your Explorer.
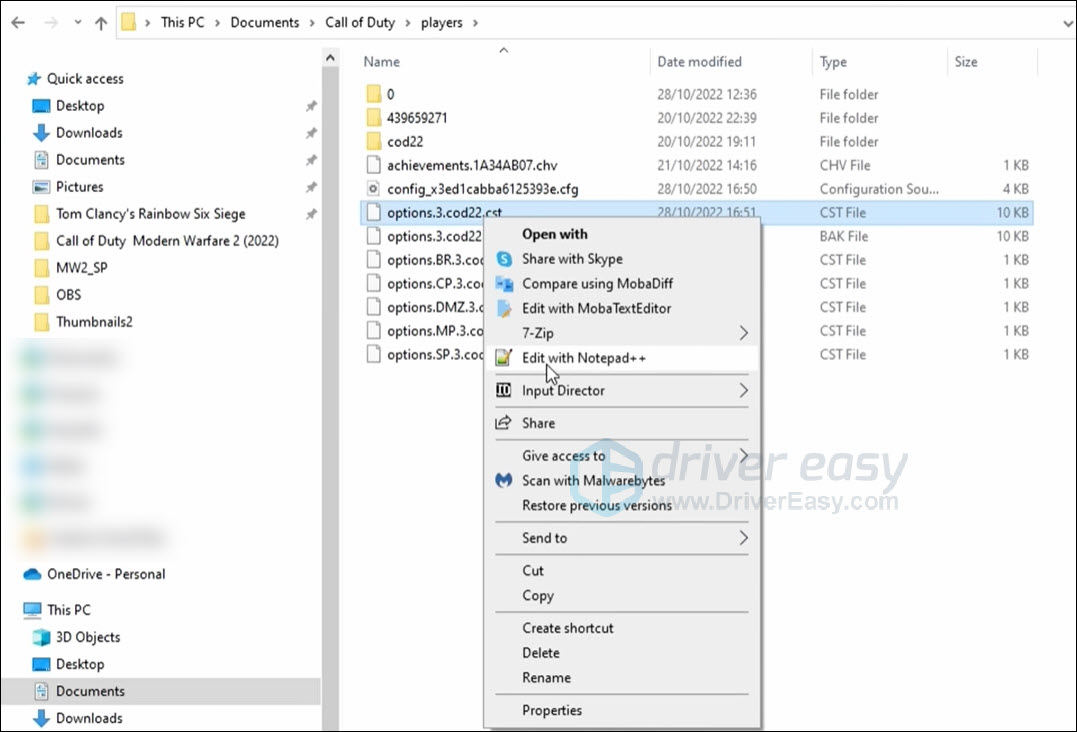
- Go to Documents > Call of Duty > Players. Right-click on options.3.cod22.cst and select Edit with Notepad++.
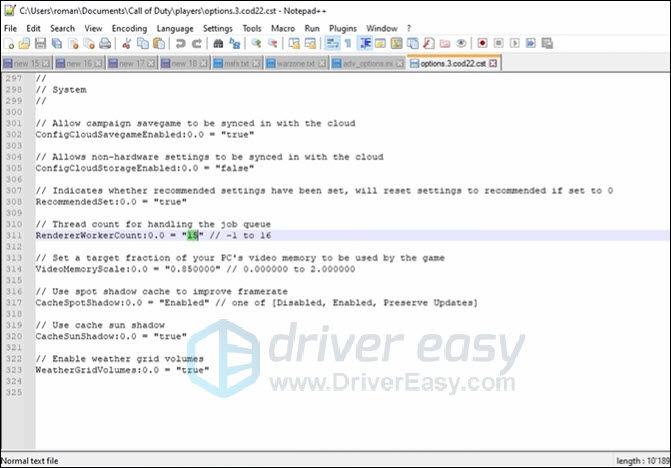
- Scroll down to the bottom and find RendererWorkerCount.
- To change the number in the setting, you need to know what CPU you have in your system. Open Task Manager.
- In the Performance tab, click CPU and you’ll see the CPU you’re currently using. E.g. i9-12900KF.

- Search the processor in the search engine to find its specifications. Check Performance-cores number.
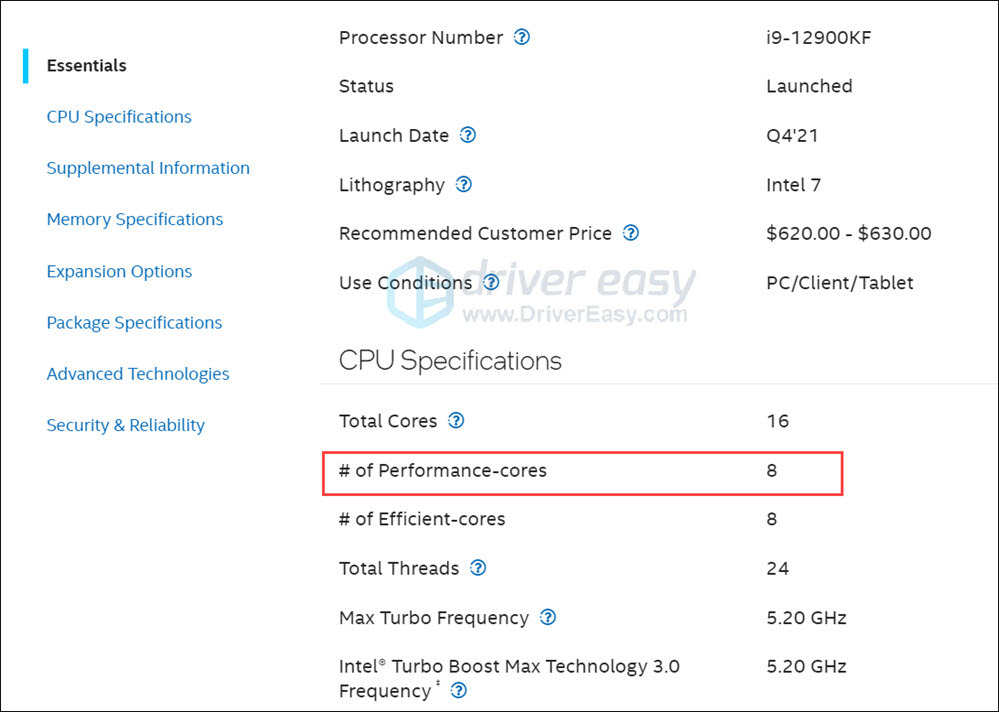
- Change the number in the RendererWorkerCount. If you have an older processor, you can only find one number of cores and use it instead.

- Relaunch the game to see if it makes a difference.
5. Change the power plan setting
Your device may be running slow because you’re using an energy saving power plan, which reduces your computer performance and cause CPU usage. Try going into your power plan settings and changing it to high performance, it could make a big difference.
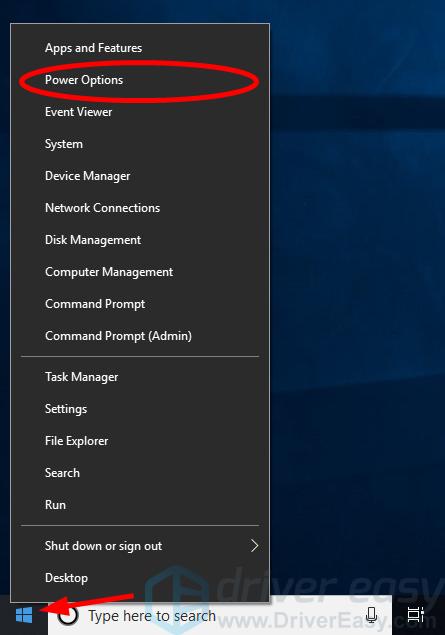
- Right-click the Start button in the lower-left corner of your screen, then click Power Options.
- Click Additional power settings.
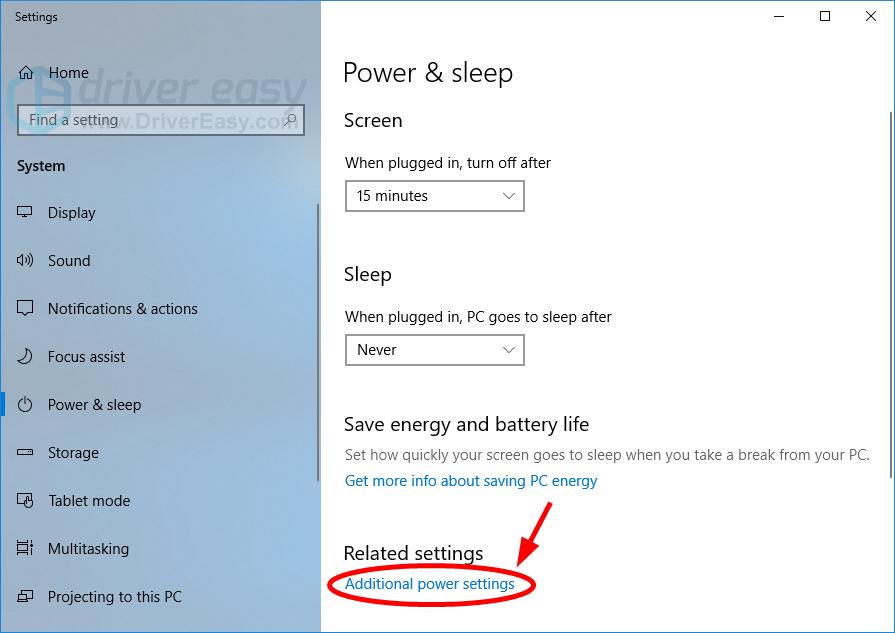
- Make sure the Power saver plan is NOT chosen. For the best performance, you should choose the High performance plan. But if you want a longer battery life, it’s recommended that you select the Balanced plan.
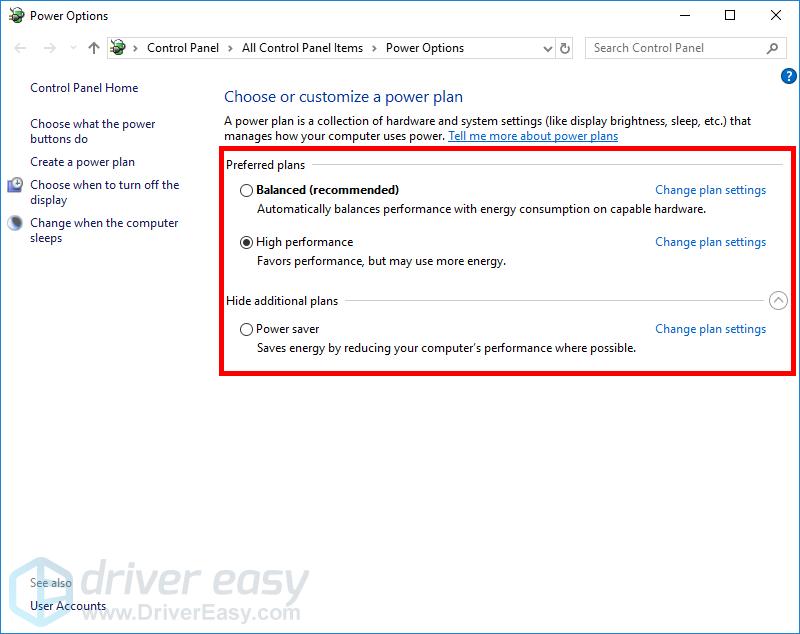
Now you’ve chosen a power plan that favors performance for your system.
Hopefully one of the fixes works for you. Please comment below if you have questions or suggestions.


