Are you eager to dive into the virtual gaming world, only to be left disappointed when Oculus Air Link refuses to cooperate? We understand the frustration all too well. But fear not, your virtual game excitement is within reach once more.
In this article, we’ve compiled effective solutions to resolve the Oculus Air Link not working issue, allowing you to enjoy the virtual gaming experience once again. Let’s dive right into the fixes and get you back in the game!
Try these fixes:
- Relaunch Oculus software with Task Manager
- Adjust your devices’ Wi-Fi channel
- Update device drivers of your PC
- Update your Operating System
- Close conflicting programs
- Check for Oculus Debug Tools
- Factory reset your Quest
You may not need to try all the above fixes; just work your way down the list until you find the one that works for you.
Fix 1: Relaunch Oculus software with Task Manager
When your Oculus Air Link is not working, one easy way that may solve it is to end the Oculus software and its related process completely by the Windows in-built program Task Manager and later open the Oculus software again to see if the Air Link shows up and works.
- Press Ctrl + Shift + Esc keys to open the Task Manager.
- Under the Processes tab, right-click the three Oculus processes and select End task from the pop-up menus.
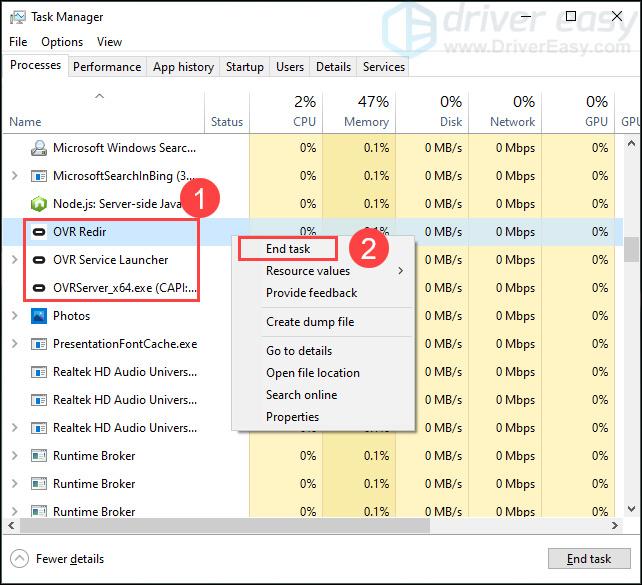
- Restart your Oculus software and check if the Air Link functions properly.
If this method doesn’t work for you, try the following below.
Fix 2: Adjust your devices’ Wi-Fi channel
Air Link’s performance might be impacted if the network connection environment isn’t ideal for it. When a Wi-Fi channel is used by too many devices, it could cause many problems including Air Link lagging or even not responding at all. To avoid this, you’d better use a modern router that comes with dual-band connections (2.4GHz and 5GHz) and arrange your network setup like this:
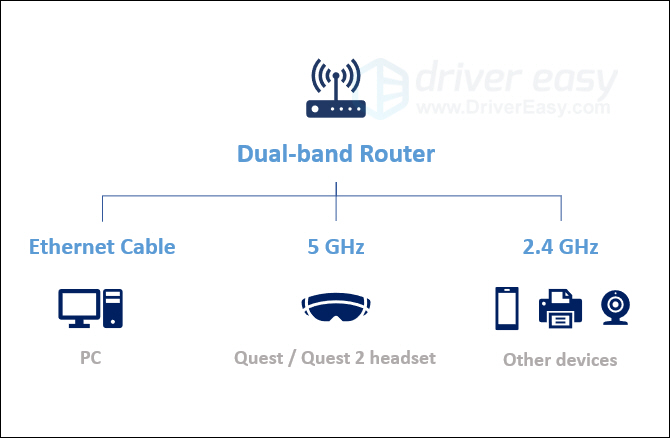
- Clear other devices in the 5 GHz band and set it only for your headset for optimal Air Link performance.
- Have the 2.4GHz band for other home devices such as phones, printers, and monitors.
- Use an ethernet cable to connect your PC or laptop to your router.
- Make sure that your router isn’t far away from your headset. Placing them within the same room is the best.
If your Air Link setup has already gone through the above practices but the problem is still there, try the next fix.
Fix 3: Update device drivers of your PC
This issue might also occur when you’re using outdated or faulty device drivers, especially the GPU driver and USB driver. Updated drivers can keep your accessories working flawlessly and smoothly with your operating systems and applications. Therefore, having your device drivers fully updated can possibly troubleshoot the Oculus Air Link issue.
You can update your device drivers manually by going to the manufacturer’s website for each device, and searching for the driver for your exact module. Or you can update drivers automatically in just two clicks with Driver Easy.
Driver Easy will automatically recognize your system and find the correct drivers for it. You don’t need to know exactly what system your computer is running. You don’t need to risk downloading and installing the wrong driver, and you don’t need to worry about making a mistake when installing.
- Download and install Driver Easy.
- Run Driver Easy and click Scan Now. Driver Easy will then scan your computer and detect any problem drivers.
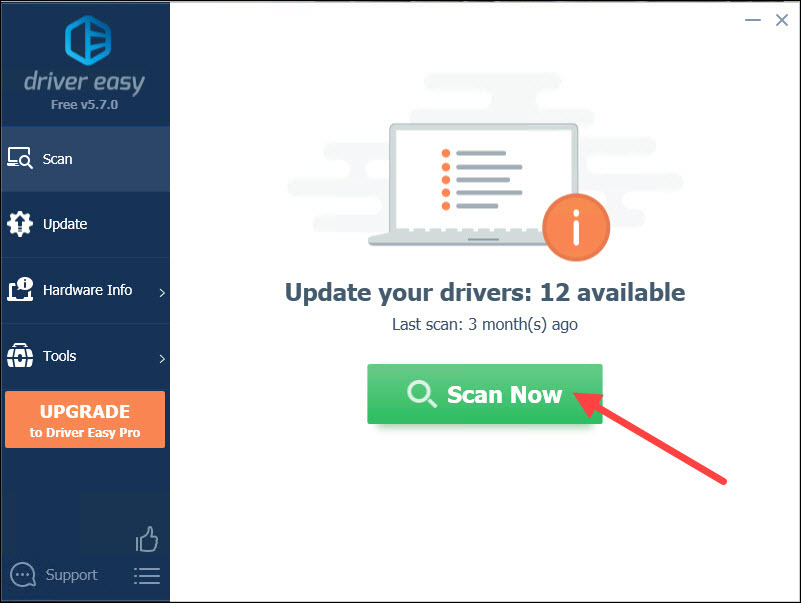
- Click the Update button to automatically download the correct version of your device drivers, then you can manually install it (you can do this with the FREE version).
Or click Update All to automatically download and install the correct version of all the drivers that are missing or out of date on your system (this requires the Pro version with full support and a 30-day money-back guarantee – you’ll be prompted to upgrade when you click Update All).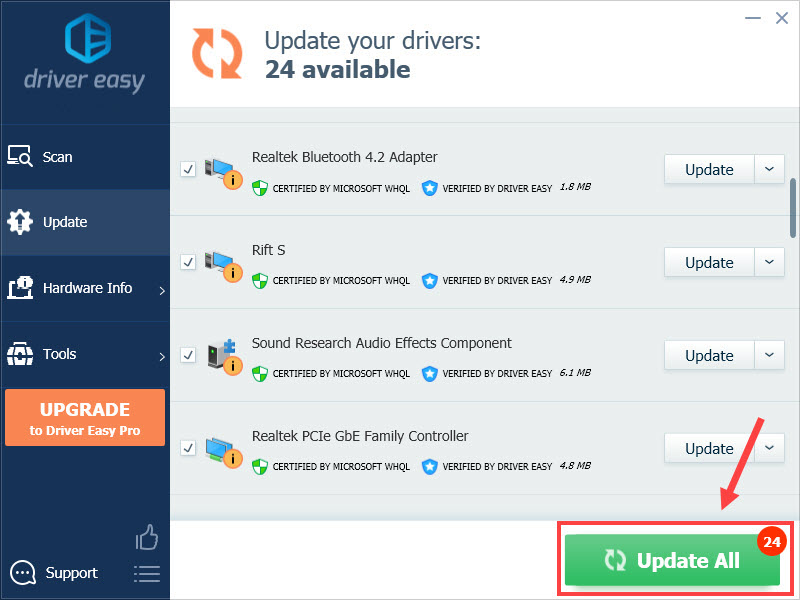
- Restart your PC and Relaunch the Oculus Air Link to check if this fix works.
Fix 4: Update your Operating System
In addition to updating your device drivers, you should consider upgrading the Windows operating system. Since Microsoft keeps releasing OS updates with bug fixes for applications and processes, it may resolve some conflicts with the Oculus Air Link. Here’s how you can check for updates:
On Windows 10
- Type check for updates in the search box, and select it from the results.
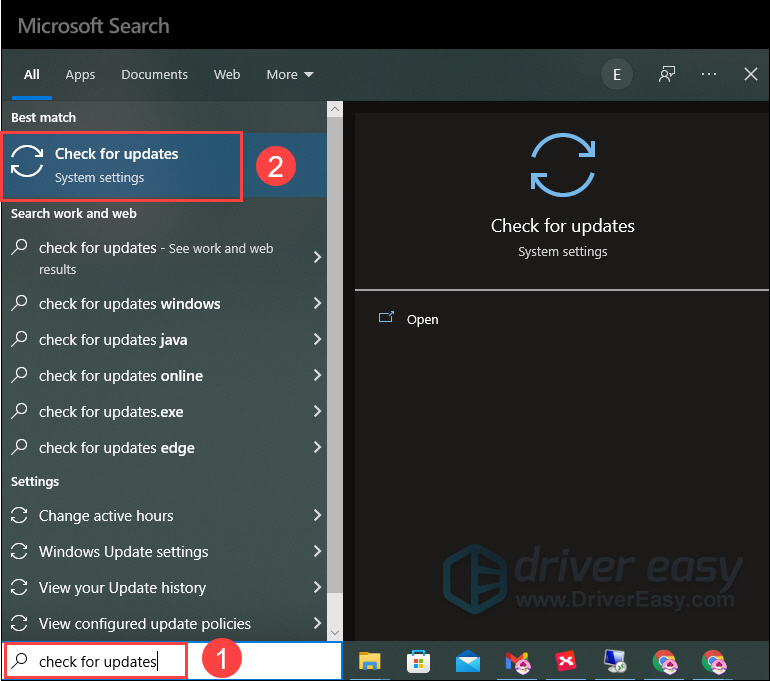
- Click Check for updates and wait for the checking.

- The checking result could be You’re up to date, which means you don’t need to do anything else.
If not, a Download and install button will appear. Click on it to initiate a Windows update.
On Windows 11
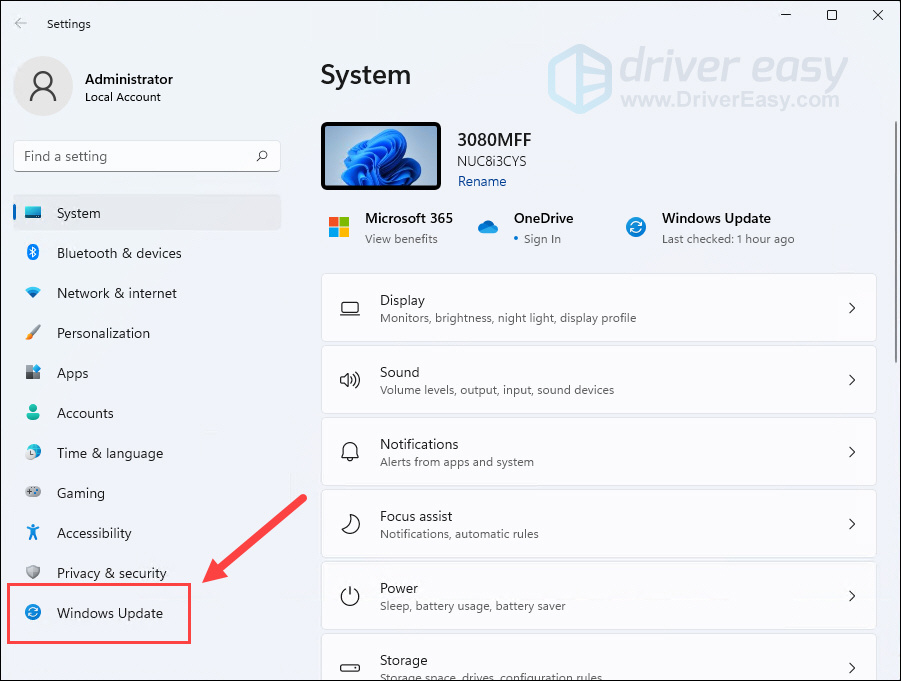
- Press the Windows + I keys to open Settings, and then click Windows Update on the left panel.
- Click Check for updates. Then Windows will start downloading the updates if they are available.
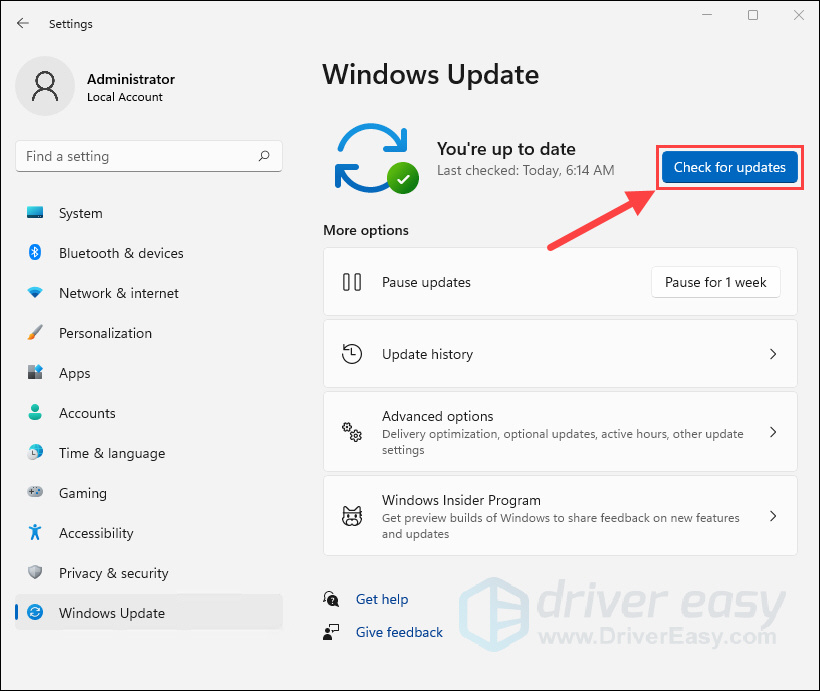
- Click Restart now when the update process is finished.
If this method doesn’t work for you, try the following below.
Fix 5: Close conflicting programs
Two programs can conflict with each other when they run on the same computer at the same time due to some programming bugs and manifests. In this case, problems could occur, causing the Oculus software to run wrong and thus affect the Air Link. Here’s a list of programs that might conflict with Oculus software according to reports online.
| Asus GameFirst V |
| Geforce Experience |
| Lenovo Nerve Sense |
| Lenovo Vantage |
| McAfee, Avast / AVG / ESET Norton antivirus |
| MSI Afterburner |
| NordVPN, Bitdefender VPN, PIA, Proton VPN |
| Razer Cortex |
| Riots Vanguard |
| Steam VR |
| TeamViewer application |
| WebRoot, MalwareBytes |
| Windows Xbox Game Bar |
If your Oculus Air Link is crashing while one of the above programs is running, try closing the program as well as its background running process and then rebooting the Air Link.
If this trick doesn’t give you luck, try the next one.
Fix 6: Check for Oculus Debug Tools
The Oculus Debug Tool (ODT) packed in the Oculus install file is an advanced tool that enables you to check and configure your game’s performance or debugging settings. So when things go wrong with Oculus software or Air Link, you could simply check on the ODT to see whether some of the settings aren’t right. Here’s how:
- Press Windows + E keys to open the File Explorer. Copy and paste the following path into the address bar, then hit Enter.
C:\Program Files\Oculus\Support\oculus-diagnostics - Double-click the OculusDebug Tool.
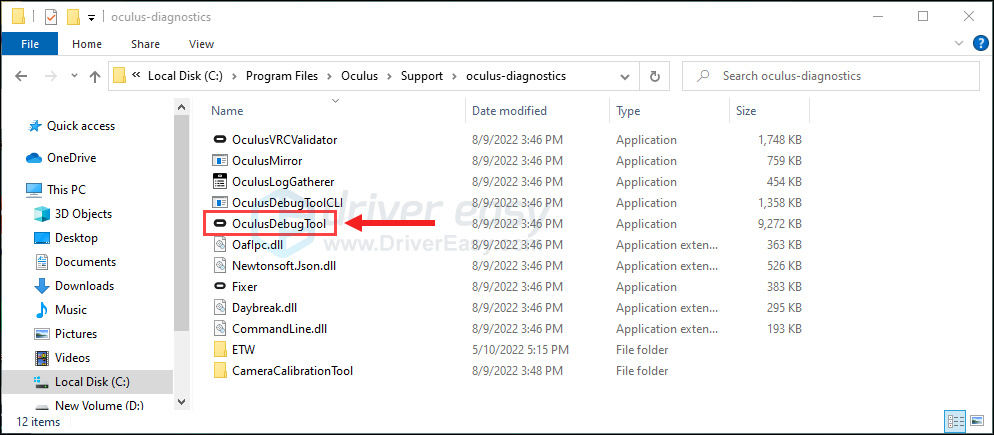
- Under the category Oculus Link, check if the Enode Dynamic Bitrate Enode is in “Default” status. If not, click on the option and select Default from the drop-down menu.
Go on to check if the parameter of Encode Bitrate (Mbps) is “0”. If not, change it to 0.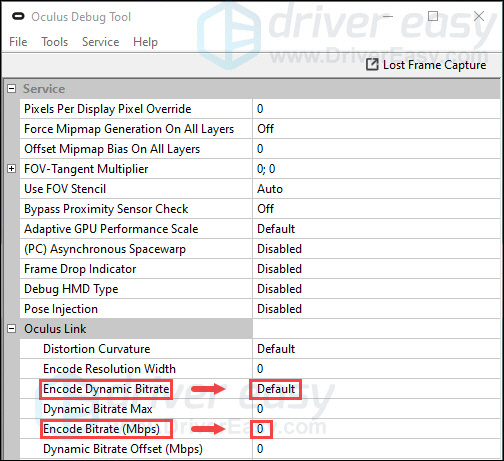
Move on to the last fix if this one doesn’t work for you.
Fix 7: Factory reset your Quest
This is the solution you should try last when you somehow run into issues with your Quest and the Air Link. It may clear out the errors in your headset and the Oculus software but the shortcoming is that the factory reset will wipe all your game data off. So please proceed at your own peril.
Here’s how to perform a factory reset using the headset:
- Press and hold the power and volume buttons until it turns on.
- Highlight Factory reset, then press the power button to select it.
- Select Yes, erase and factory reset, then press the power button to initiate the reset.
That’s all – hopefully, this article could help you fix the Oculus Air Link not working problem. If you need more help, you can try to contact Oculus support and submit a request to the support team.
If you have other fixes or suggestions, please feel free to leave us a comment below.


