If your Windows computer keeps crashing when you’re playing games, there’s nothing more you can do but restart your computer or wait for it to restart itself. Still, it runs well when you use your computer for other tasks, like streaming videos and browsing on the internet. If this is also you, don’t worry, this is a post for you.
There are too many reasons why your computer crashes when you play games, both hardware and software, so this is going to be a rather long post. If you don’t have enough time or enough skills for the following troubleshooting, you can skip to method 1.4 to see if the automatic tool and the support can help.
Try these fixes for the PC crashing when playing games issue
The following troubleshooting process is sorted by software- and hardware-related areas, you don’t have to try them all, just work your way down the list until you find the one that fixes the problem for you.
But please note that if the last software-related solution still doesn’t help to fix the PC crashing when playing games problem for you, it’s very likely that you’re having a hardware problem with your PC. Now let’s dig in.
1. On the software front
1.1 Make sure your computer meets the minimum system requirements for the games
If your computer always crashes when you play games, one of the first things you should do is to make sure that your computer specs are above the minimum system requirements for the games.
To find out the minimum system requirements for the games, simply search “game name + system requirements” on Google. For instance, if my PC crashes when I play COD Warzone 2.0, then I should search “COD Warzone 2.0 system requirements”, and this page has the information that I need: https://us.battle.net/support/en/article/322047
If you’re not sure how to check your computer specs, you can refer to this post here for more detailed information: How to find computer specs
If your machine is below or just at the requirements, you may need to upgrade your hardware for some games to run smoothly, especially newer games that were released in recent years, as they usually require more advanced computer hardware devices.
When you’re sure that your machine meets (or better, way above) the minimum system requirements to run the games, but you’re still experiencing crashing when playing games, please move on to the other fixes below.
1.2 Update BIOS and firmware
When your computer crashes without any error notification beforehand during games, you’ll also need to consider a BIOS and firmware update, as it could be a bug that’s fixed in the latest BIOS. Even though a BIOS and firmware update won’t usually boost your computer performance, it can, however, fix problems or bugs related to certain hardware, and thus stop the computer from crashing when playing games.
You can refer to this post we have on how to update the BIOS and firmware.
1.3 Do a clean boot
PC keeps crashing when playing games could also caused by conflicting third-party services or programs. Some users mentioned antivirus programs and network-resource-hogging software like FPT and P2P clients. If you have these programs installed, you can try a clean boot to see if they’re the culprit here.
A clean boot will start your PC with the minimum sets of drivers and services that Windows requires to run. By doing a clean boot, you can identify if there’s any background program interfering with your games.
To perform a clean boot:
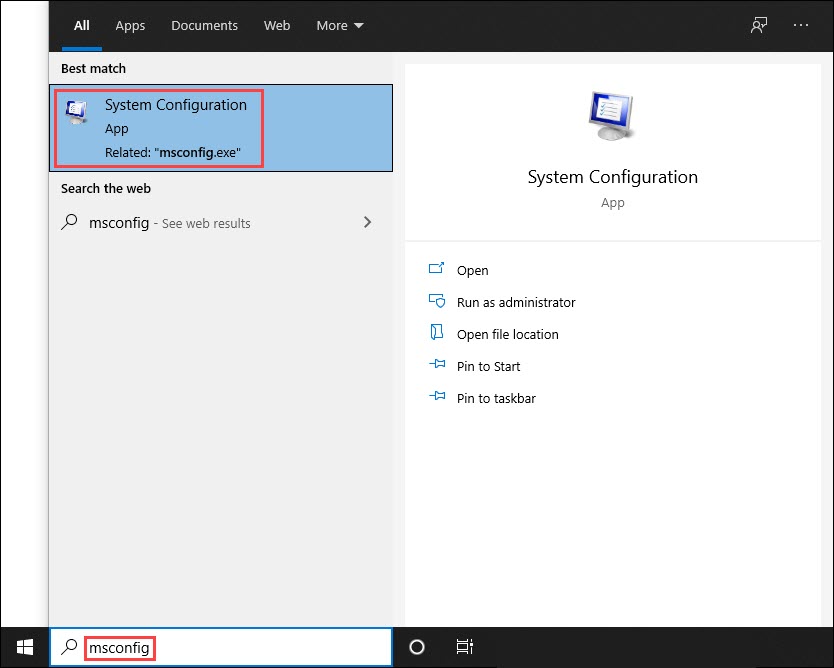
- In the search bar next to the Start button, type msconfig then click System Configuration.
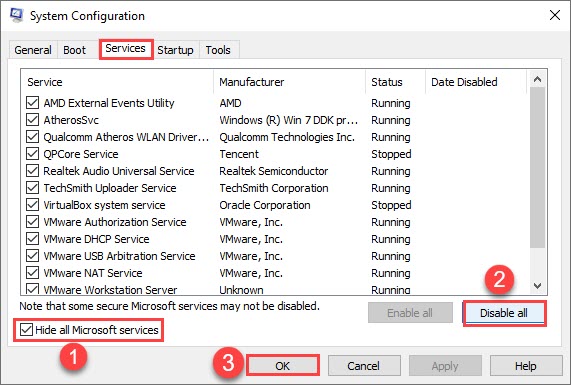
- Under the Services tab, check Hide all Microsoft services, then click Disable all and OK.
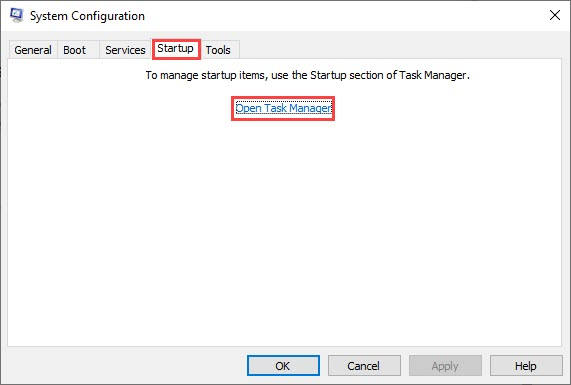
- Switch to the Startup tab, click Open Task Manager.
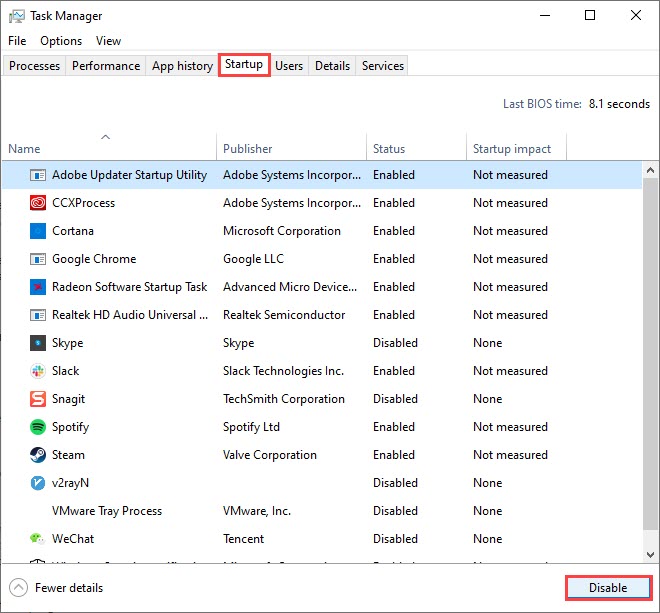
- Under the Startup tab, click each startup item then click Disable until you’ve disabled all startup items.
- Restart your PC.
Then see if your computer still crashes when playing games. If so, please move on to method 1.4.
If your games run well when you do a clean boot, at least one of the programs you disabled is causing the PC crashing problem.
Here’s how to find out which one(s):
- In the search bar next to the Start button, type msconfig then click System Configuration.

- Under the Services tab, tick the Hide all Microsoft services checkbox, then tick the checkboxes in front of the first five items in the list. Then click Apply and OK.
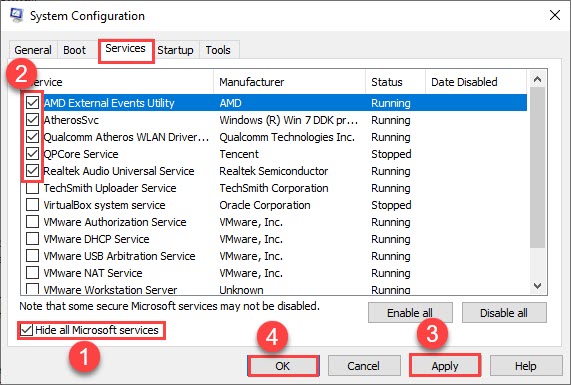
- Reboot your computer and launch the games again. If your computer crashes once again, then you know that one of the services you ticked above is causing the crashing problem. If it does launch, then the above five services are fine, and you’ll have to keep looking for the offending service.
- Repeat steps 2 and 3 until you find the service that causes the crashing problem.
NOTE: We recommend testing five items in a group since it’s more efficient, but you’re welcome to do it at your own pace.
If you don’t find any problematic services, you’ll need to test the startup items. Here’s how:
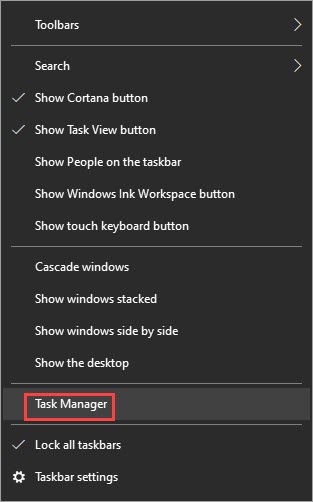
- Right-click anywhere empty on your taskbar and click Task Manager.
- Switch to the Startup tab, and enable the first five startup items.
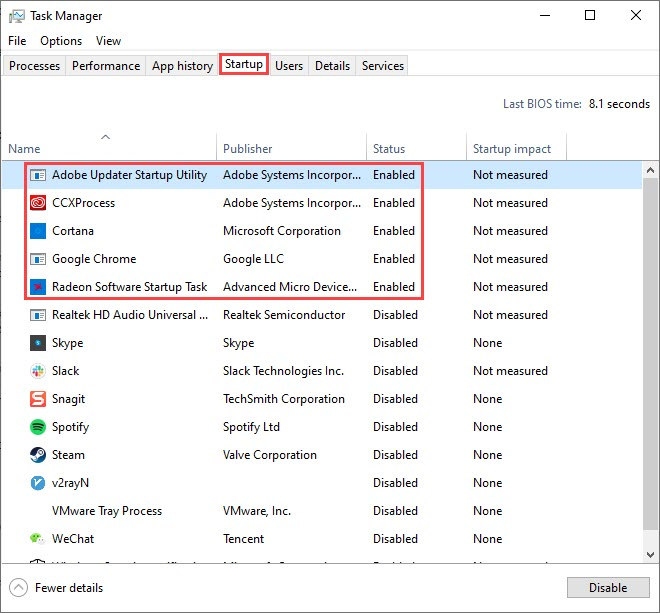
- Reboot and try to play the games and see if your PC keeps crashing again.
- Repeat until you find the startup item that’s causing the PC crashing problem.
- Disable the problem program and reboot your PC.
This is a rather time-consuming troubleshooting process, but it’s totally worth the time if it helps to identify the culprit that causes the crashing problem. If the test doesn’t help to stop the crashing, please move on.
1.4 Update device drivers
One of the most common reasons why your computer crashes when playing games is outdated or incorrect device drivers, since they failed to be the messenger between your hardware and software, which rendered your hardware almost useless. This is especially true if the outdated or incorrect device drivers are for your sound card and graphics card(s). So you should make sure that they’re updated to the latest versions, with the correct driver files.
If you don’t have the time, patience or skills to update the drivers manually, you can do it automatically with Driver Easy. Driver Easy will automatically recognize your system and find the correct drivers for it. You don’t need to know exactly what system your computer is running, you don’t need to be troubled by the wrong driver you would be downloading, and you don’t need to worry about making a mistake when installing. Driver Easy handles it all.
You can update your drivers automatically with either the 7 days free trial or the Pro version of Driver Easy. It takes just 2 clicks, and you get full support and a 30-day money-back guarantee with the Pro version:
- Download and install Driver Easy.
- Run Driver Easy and click the Scan Now button. Driver Easy will then scan your computer and detect any problem drivers.

- Click the Activate & Update button next to the flagged device to automatically download and install the correct version of this driver.
Or click Update All to automatically download and install the correct version of all the drivers that are missing or out of date on your system (You’ll need the Pro version for this – when you select Update All, you’ll get a prompt to upgrade. If you’re not prepared to purchase the Pro version yet, Driver Easy provides a 7-day trial at no cost, granting access to all Pro features like fast downloads and easy installation. No charges will occur until after your 7-day trial period ends.)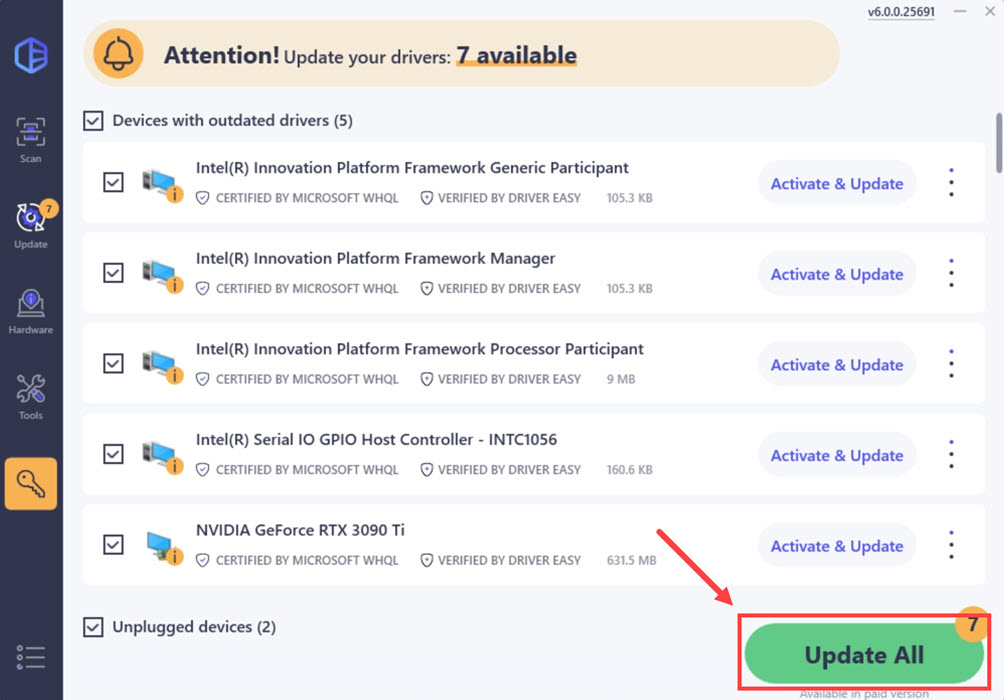
- After updating, restart your computer to take effect.
Play your games again to see if the latest device drivers help to stop your PC from crashing. If this fix doesn’t work for you, try the next fix, below.
1.5 Reset your computer
If none of the above software-related troubleshooting processes helps to stop the crashing problem for you when playing games, then you may need to consider doing a computer reset, given the time and energy spent already.
A full computer reset or reinstall wipes out all software incompatibilities and problems, it’s also the rule of thumb in telling a software problem from a hardware one: if the problem remains even after a system reset, then it’s definitely a hardware problem.
Microsoft has actually made the system reset process much easier: you can choose to keep all your files and install them back after the system reinstall, without having to lose them over to the reinstallation.
To reinstall or reset your computer, here’s a post for your reference: Reinstall/Reset Windows 10 [Step By Step]
2. On the hardware front
As mentioned above, if your computer still crashes after a system reset or reinstallation, we can almost be certain that the culprit is a faulty hardware device. And here are some important factors that you need to keep an eye out for:
2.1 Stop overclocking the CPU and/or GPU
Overclocking your CPU and GPU can enhance your PC performance, especially if you’re a gamer. But doing so will also add more pressure to your hardware components, and therefore cause instability, overheating, and damage to them if done excessively or improperly. Computer crashing during games could then be a result of overclocking since games usually consume more resources than other programs.
So if you’re doing it, please stop now to see if it helps to stop your computer from crashing when playing games. If not, please move on.
2.2 Make sure that your computer is not overheating
An overheating computer environment is also very likely the culprit to a crashing computer, especially if your games freeze or run very slow before your computer crashes.
If the ventilation for your computer is rather poor, your machine may run hot, especially when you’re playing games, which occupies a rather big chunk of computer resources and energy and easily makes your CPU run hot.
If you can feel the heat on your computer case or on your computer itself, or you can hear the fan(s) running very loud when you play games, you need a cooler environment for your machine to make sure that your computer doesn’t crash because of the heat.
You can usually use free tools like HWMonitor or AIDA64 to tell whether your computer CPU, the CPU core, and the GPU are running too hot.

Here is a detailed post with more detailed information if your computer is overheating and how you can do about it: How to Know Your CPU Overheating and How to Fix It
2.3 Make sure that your PSU is powerful enough
If you’re using a desktop computer, a less powerful and/or defective power supply can cause the system to shut down completely, or even cause a fire or kill other components when your computer is running heavy-loaded programs like games.
As two of the most powerful PC components, the CPU and GPU draw a lot of power during heavy loads, and your PSU must be ready to deliver that power at all times. Additionally, the PSU needs to have a certain amount of headroom on top of this to accommodate unexpected power spikes that may occur from time to time.
To troubleshoot the PSU issue, you can use some stress-testing programs like AIDA64, which offers a free trial and is quite easy to use.

When doing a stress test on your PSU with such tools, if your computer crashes in the middle of the test, then the PSU should be at fault. In that case, you should start shopping around for adequate clean power for each component and, when building a system in the future, choose a PSU after calculating the exact power requirements.
2.4 Check your HDD
If you’re using HDDs (instead of SSDs), and your computer crashes frequently when you play games, it’s possible that there are bad tracks or bad sectors with your hard drives.
This is because your hard drives spin rapidly when you’re playing games so the data can be extracted and read. When there are bad tracks or bad sectors, which means that the data on that area can’t be read, your computer will run into problems, and therefore shut itself down to protect itself.
To check whether you have bad sectors or bad tracks, you can use a free tool like DiskGenius, which is pretty easy to use:

2.5 Check your RAM
Insufficient RAM space or loosened RAM sticks could also be the culprit to your crashing computer when playing games. This is because when games are running, many memory resources will be used, just like your CPU and GPU.
To see if this is your case, you can first use the Windows Memory Diagnostic tool as follows:
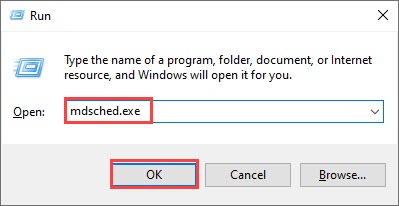
- Press the Windows logo key and R on your keyboard to invoke the Run box.
- Type mdsched.exe, then click OK.
- Click Restart now and check for problems (recommended).
IMPORTANT: Make sure to save all your work before restarting.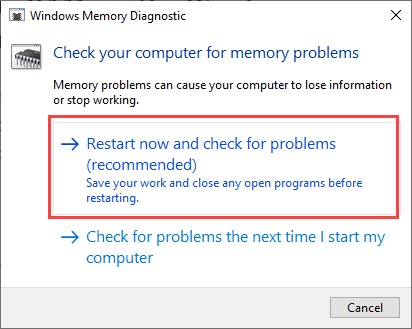
- Windows will run diagnosis automatically, which can take a few minutes. When it’s finished, your PC will reboot.
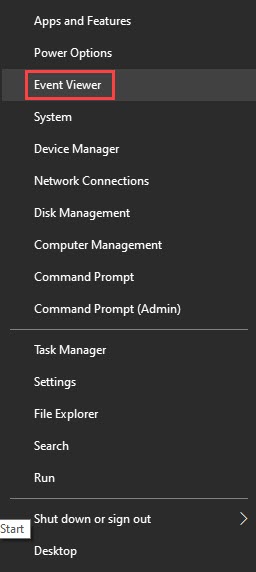
- The results will be shown on your desktop. If you don’t see any notification, right-click the Start menu then click Event Viewer.
- Click Windows Logs >> System >> Find.
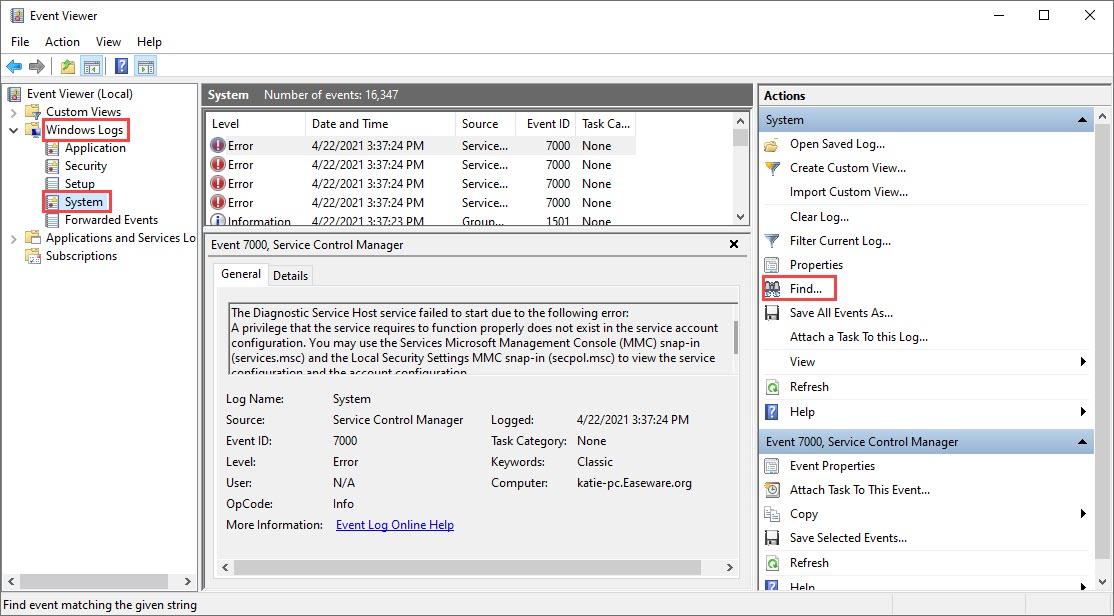
- Type memory diagnostic, then click Find Next.

- If you see “no errors”, your RAM is functioning well and is not the culprit to your crashing computer.
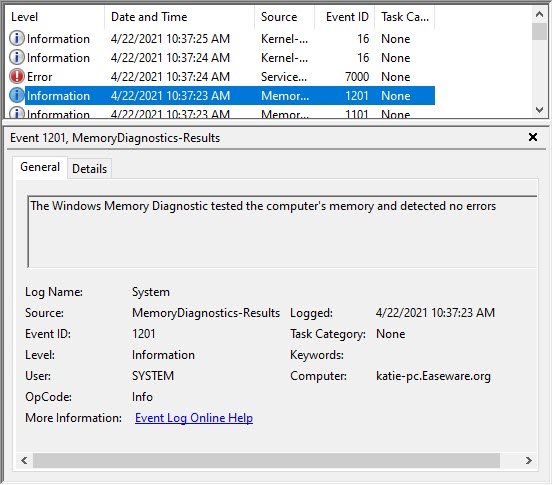
If you do see an error, you may consider replacing your RAM sticks. You will need to check if your device is still under warranty or consult your machine’s manufacturer for assistance if you’re not tech-savvy enough to do this on your own.
Thanks for reading this rather long post. Hope one of the above methods helps to fix the crashing computer problem for you when playing games, or at least points you in the right direction to continue with your further troubleshooting.


