Dying Light 2 Stay Human is finally here – taking us to one of the last surviving cities. But there are some bugs in this new title. Players have been getting terrible quality in graphics, terrible FPS and stutters, literally anything you wouldn’t want in a game. If you’re on the same boat and at a complete loss what to do, you’ve come to the right page.
How to achieve better frame rates and remove stutters
FPS drops and stuttering can occur when there are excessive startup entries, registry items, hardware/RAM decline, fragmented files and so on. To fix your problem, you can check the methods below.
- Make sure your PC is capable
- Download your game updates
- Close background processes
- Check for Windows updates
- Update your graphics driver
- Verify integrity of game files
- Change in-game settings
- Enable hardware-accelerated GPU scheduling
1. Make sure your PC is capable
Before tweaking Windows and in-game settings, you’ll first need to make sure that you have at least the minimum required specs on your PC
64-bit processor and operating system required
operating system: Windows® 7
processor: Intel Core i3-9100 / AMD Ryzen 3 2300X
RAM: 8 GB RAM
Graphics card: NVIDIA® GeForce® GTX 1050 Ti / AMD Radeon™ RX 560 (4GB VRAM)
storage: 60 GB available space
When the hardware you currently have meets the requirements, you can try the methods below for improving your low frame rate.
2. Download your game updates
Early in the life cycle of a new title, developers release patches with major performance impacts and bug fixes. So enable the automatic updates to ensure you don’t miss one. By default, auto-update is enabled. But sometimes that may not be your case. Thus you can manually enable it on Steam or Epic Games Launcher by following the instructions below.
On Steam
1) Open your Steam client. Under LIBRARY, right-click your game title and select Properties.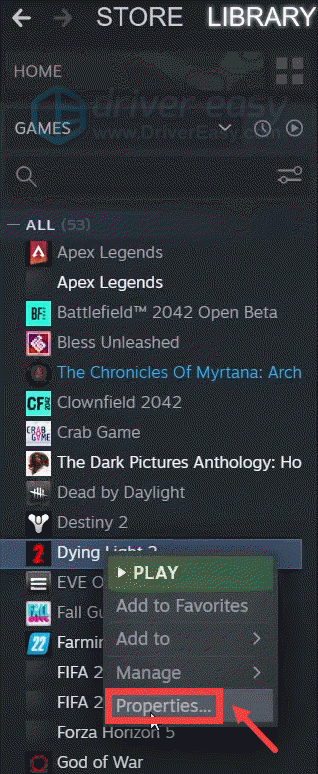
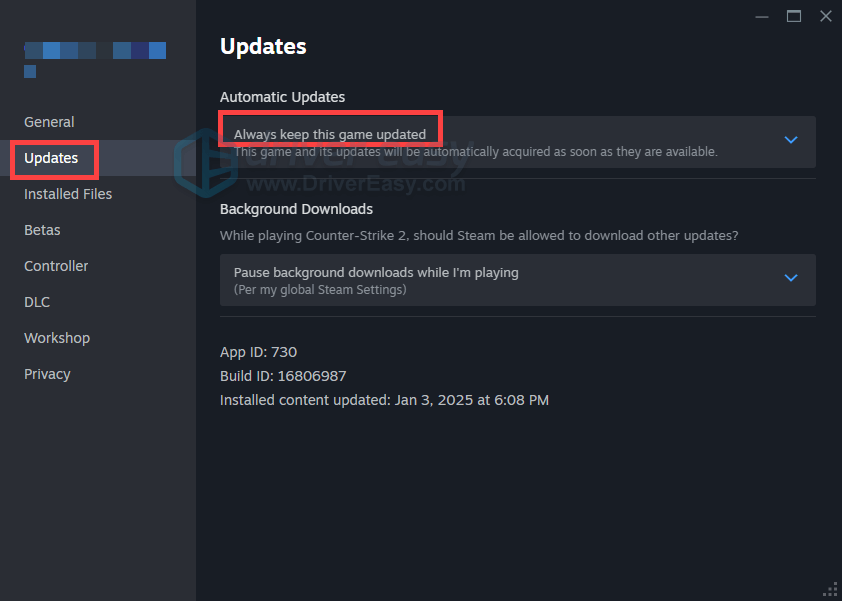
2) Select the Updates tab and select the settings Always keep this game updated from AUTOMATIC UPDATES.
On Epic Games Launcher
1) Open your Epic Games Launcher. Navigate to your game in the LIBRARY.
2) Click on the gear icon (three dots) next to your game to enter the Settings menu.
3) Make sure the option Auto Update is toggled on.
If having the latest game updates doesn’t give you the best performance, you should try the next fix below.
3. Close background processes
There are certain background programs that are known for resource-hogging. They can slow things down and also throttling your bandwidth, which will be a problem for multiplayer and connection-dependent games. To prevent this from happening, follow the steps below to close some background processes.
(Screenshots below come from Windows 10. If you’re running Windows 11, your screen will look slightly different. But the steps taken are exactly the same. )
1) On your keyboard, press the Windows logo + R keys simultaneously to bring up the Run box.
2) Type taskmgr and press Enter.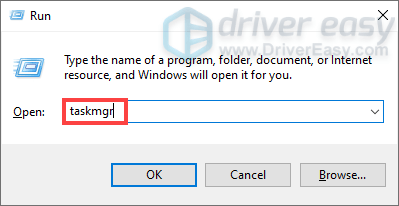
3) Click the CPU or Memory tab to check whether anything is using up large chunks of your CPU or RAM (for instance, a web browser with dozens of tabs open).
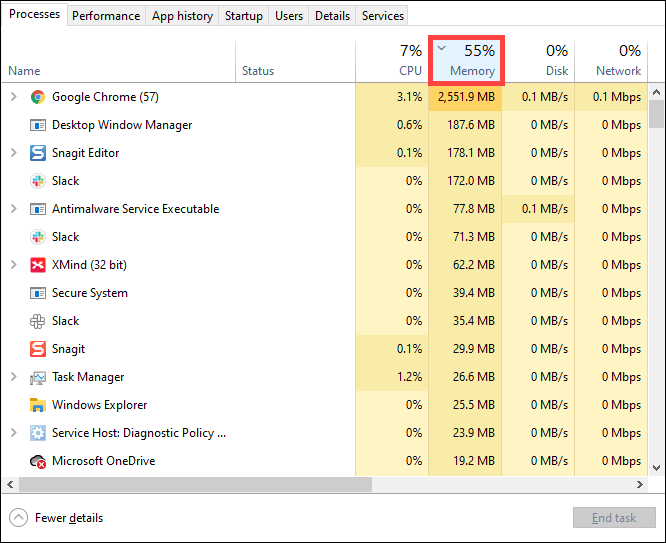
4) Find any programs or processes that can affect the PC performance, right-click on it and select End task.
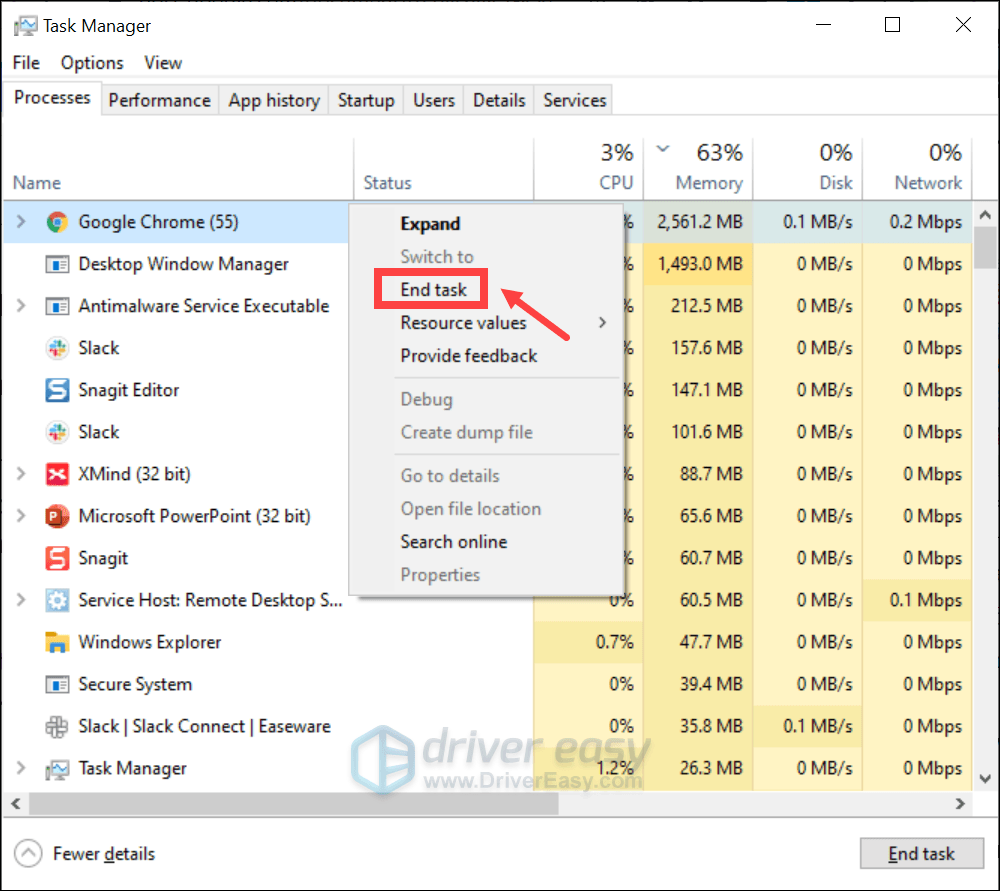
Once you’ve done these, relaunch your game and test if you can notice an FPS boost.
4. Check for Windows updates
Windows updates usually fix errors and compatibility issues in Windows and associated software, and occasionally bring new features. To take advantage of Windows updates, definitely check if there are any updates available. This may be the easiest way to fix the issue you’re having without much troubleshooting.
On Windows 10
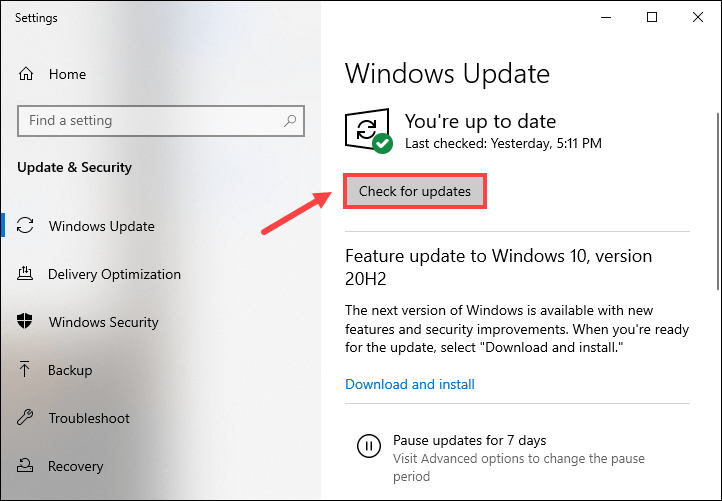
1) In the Search box, type check for updates. Then click Check for updates from the results.

2) Click on the Check for updates button. If there are any updates available, it’ll automatically start to download and install it. Simply wait for the process to complete. Then you’ll be asked to restart your computer.
On Windows 11
1) On your keyboard, press the Windows logo + I keys simultaneously to open Settings.
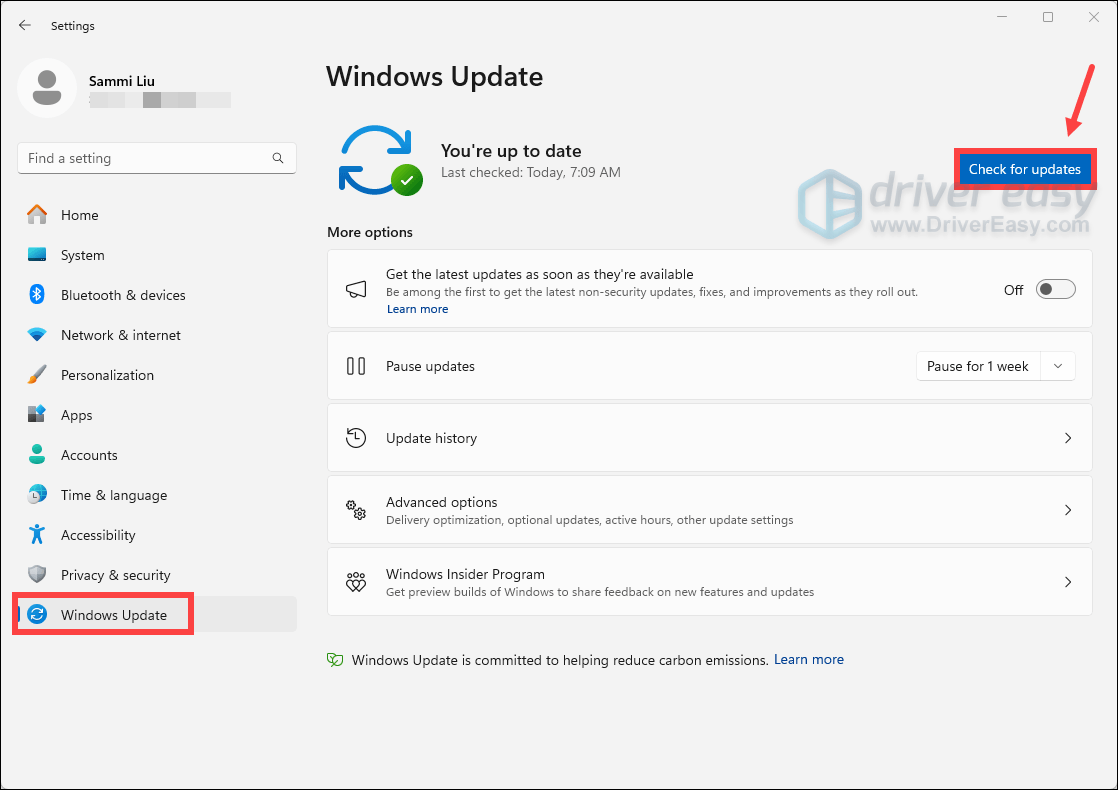
2) Click Windows Update.
3) Click Check for updates. If it detects any updates available, it will download it for you.
4) When it finishes downloading the updates, click Restart now to restart your PC. Or you can Schedule the restart.
If updating Windows doesn’t give you any luck, proceed to the next fix.
5. Update your graphics driver
Your outdated graphics driver is probably the top troublemaker for gaming problems and FPS drops in particular. To solve your issues, you need to download and install the latest graphics driver for your system. Game ready drivers are released regularly to optimize for new titles.
To get the latest graphics driver, you can go to the manufacturer’s download page and follow the on-screen instructions to manually download and install the correct driver corresponding with your system.
Or you can do it automatically with Driver Easy. It’s an automatic driver updater tool that helps you scan and detect any missing or outdated drivers, then download and install the latest drivers for your system, direct from the device provider. With Driver Easy, you don’t need to waste your hunting for driver updates. As it will do all the busy work for you.
1) Download and install Driver Easy.
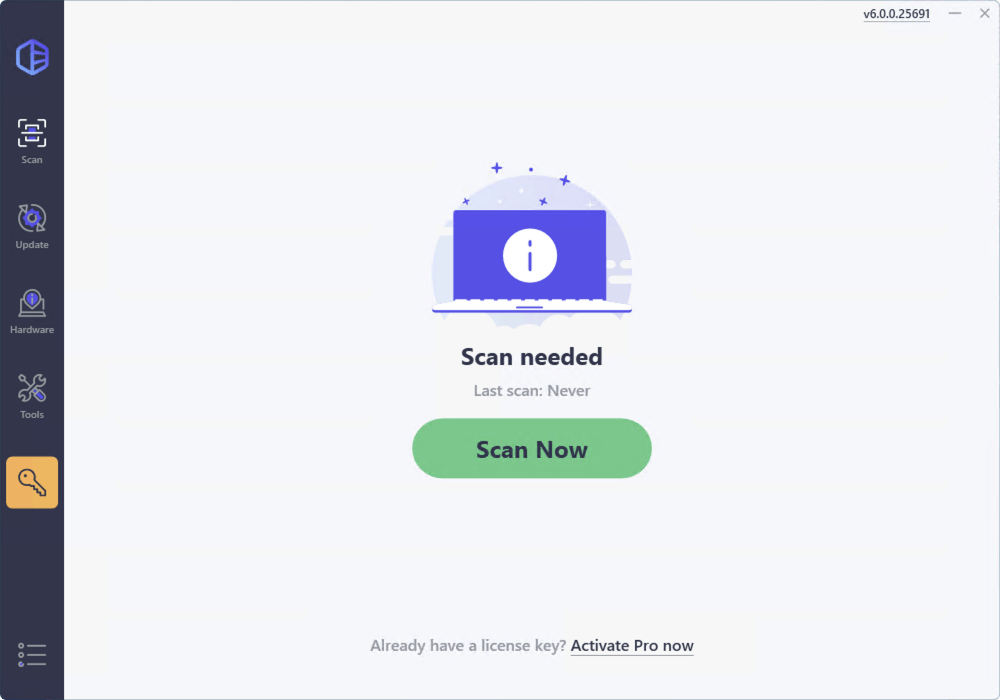
2) Run Driver Easy and click the Scan Now button. Driver Easy will then scan your computer and detect any devices with outdated drivers.
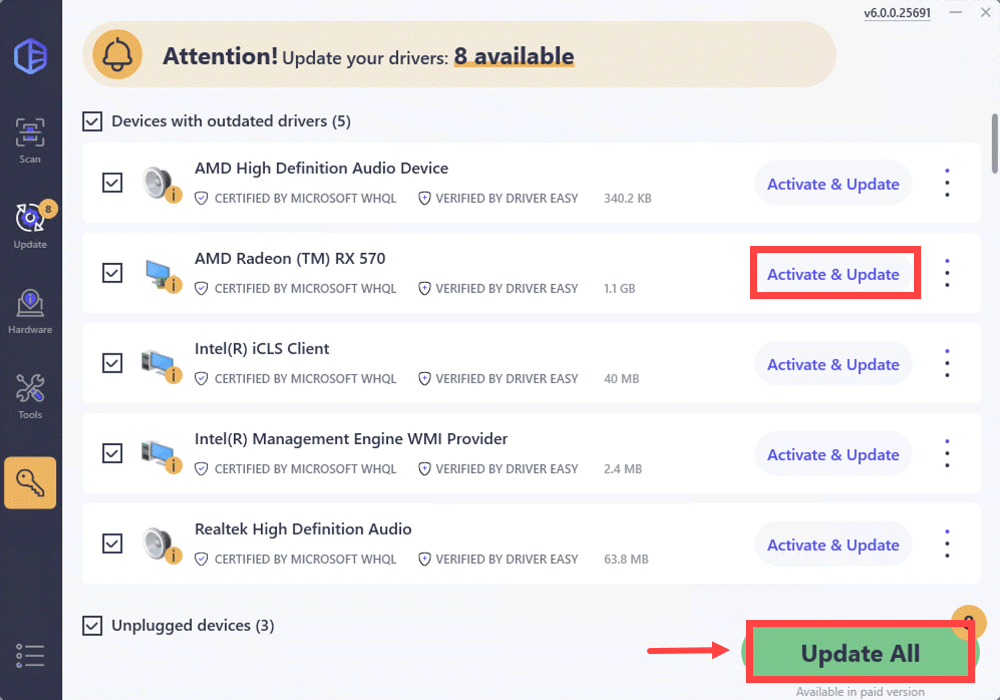
3) Click the Activate & Update button next to any flagged device or click Update All to update all the outdated drivers. You can sign up for the free trial to update drivers with no upfront cost.
Note that after the 7-day free trial, a subscription is required to continue using the Pro features. If you do not wish to continue the subscription, you can cancel before the trial ends.
After updating drivers, restart your PC and test your gameplay. If your problem persists, proceed to the next fix.
6. Verify integrity of game files
This may resolve installation corruption that prevents you from being able to enjoy the game to the fullest.
Now follow the steps below to verify cache files on Steam or Epic Games Launcher.
On Steam
1) Open your Steam client.
2) Under LIBRARY, right-click Dying Light 2 and select Properties.
2) Select the Installed Files tab. Then click on the Verify integrity of game files button.
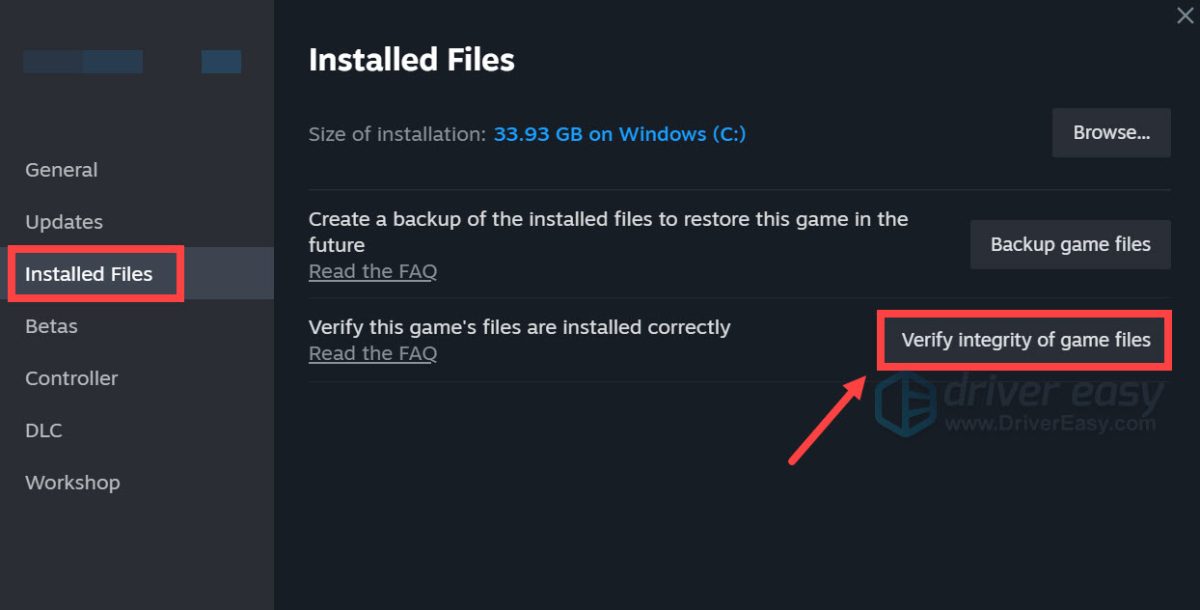
Now Steam will verify your game’s files. This process may take several minutes. Once the process is completed, close the Window then launch your game. If you’re still getting low FPS and massive stutters, move on to the next fix.
On Epic Games Launcher
1) Open your Epic Games Launcher. Navigate to your game in the LIBRARY.
2) Click on the gear icon (three dots) next to your game to enter the Settings menu.
3) Select Verify from the drop-down.
Depending on the size of the game it may take a few minutes to verify all your files. Once it completes, launch your game and test the gameplay.
7. Change in-game settings
Most games will automatically test your PC after installation and assign custom settings. However, those settings don’t give frame rate the priority you’d like. Here are a few common settings to turn down (or off) for measurable performance boosts.
1) Head across to the Options menu.
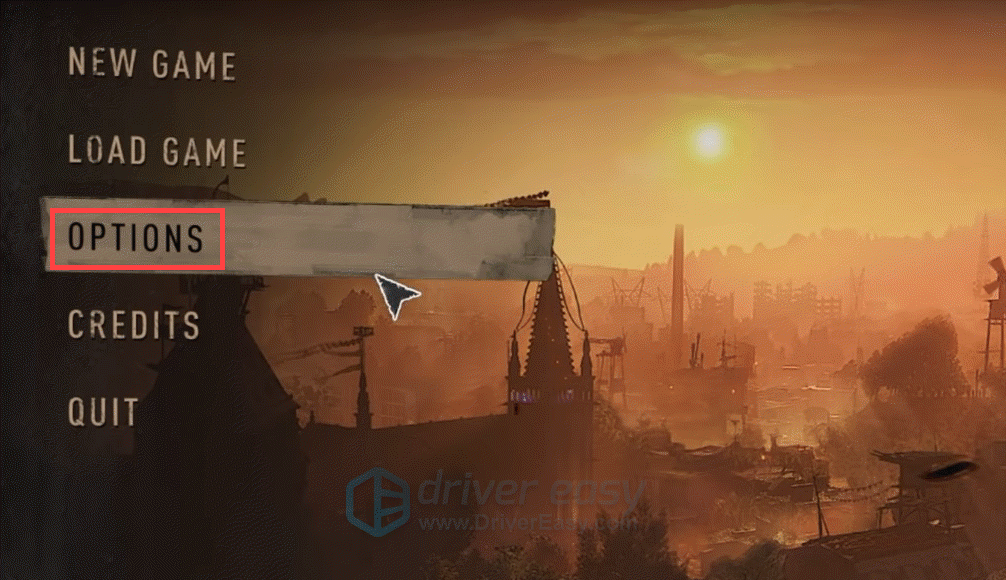
2) Select the VIDEO tab at the very top. Then make the following changes:
Window Mode: Fullscreen
Resolution: Set this option here to match the resolution of your display and no higher or now lower.
Vertical Synchronization: Off
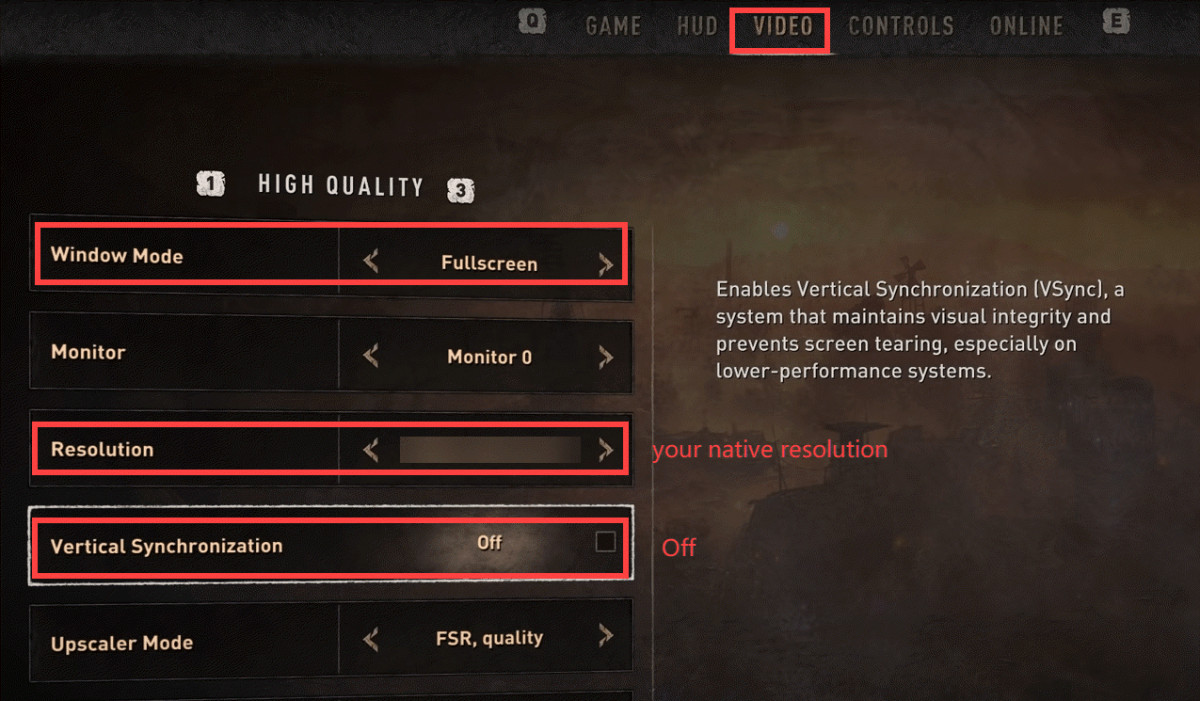
Now scroll down and make these changes:
Particles Quality: Low
Contact Shadows Quality: None
Ambient Occlusion Quality: None
Global Illumination Quality: Low
Global Illumination Quality: Low
Reflection Quality: Low
Fog Quality: Low

Then apply the changes. Press the Esc key and click OK.
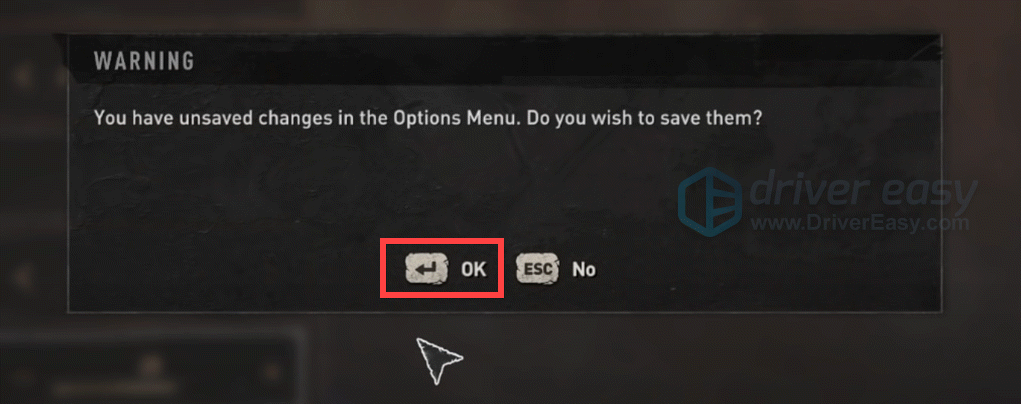
However, by applying these changes, you’ll have to settle for less in-game visual detail. If you find you’re sacrificing too much in your graphical settings to hit your frame rate target, there’s always another option: Upgrading to a new system with a faster GPU and CPU.
8. Enable hardware-accelerated GPU scheduling
The next method you should try is to enable the hardware-accelerated GPU scheduling. It is a feature that comes with a recent Windows update designed to boost in-game FPS. If you have the latest Windows version, a Geforce 10 series or later/ Radeon 5600 or 5700 series graphics card with the latest driver, you can enable this feature and see if you can notice a performance improvement. Now follow the steps below to enable it.
(Screenshots below come from Windows 10. If you’re running Windows 11, your screen might look slightly different. )
1) In the search box, type graphics settings.
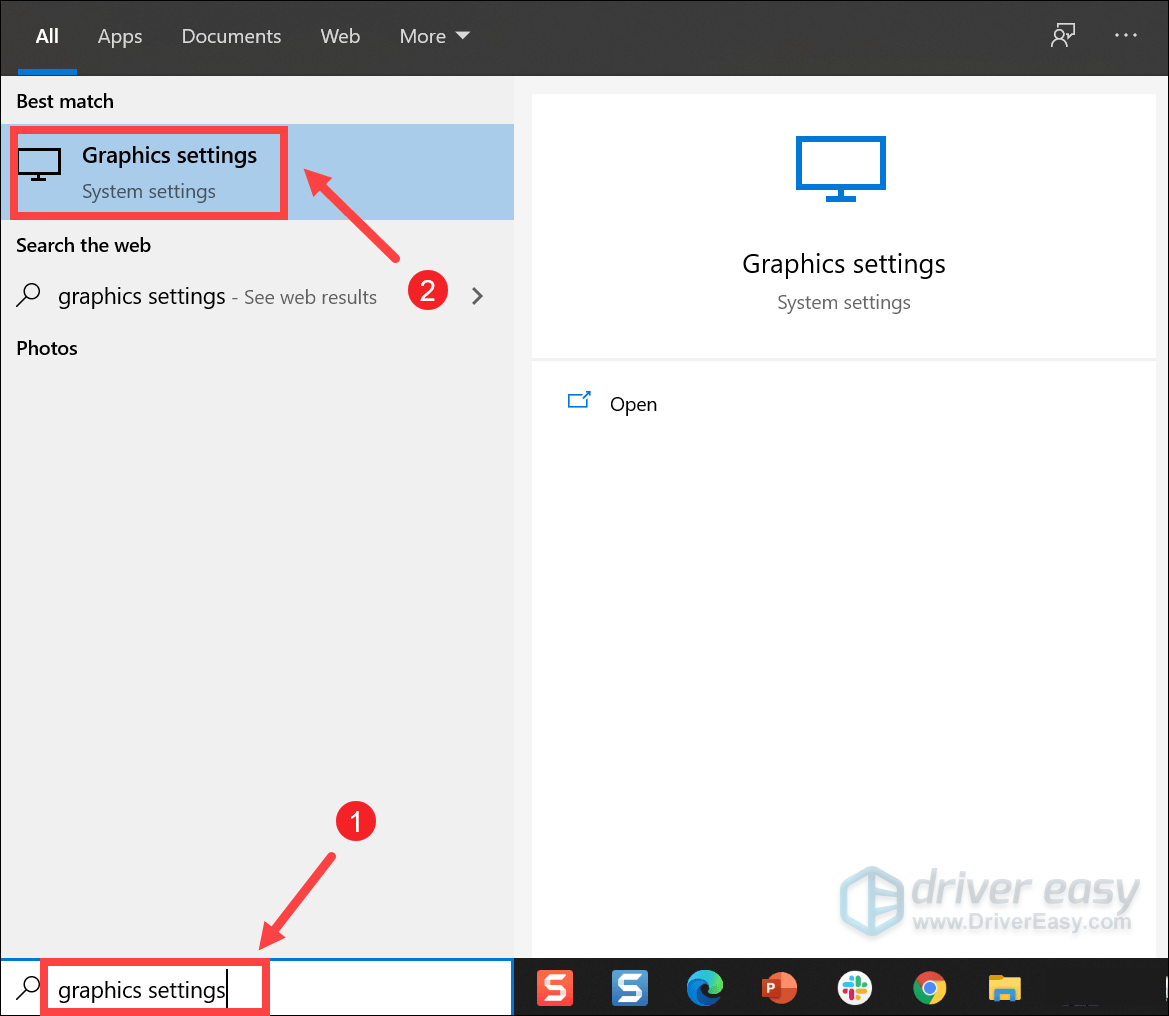
2) Toggle on Hardware-accelerated GPU scheduling. Then select Desktop app from the drop-down. Then click on the Browse button.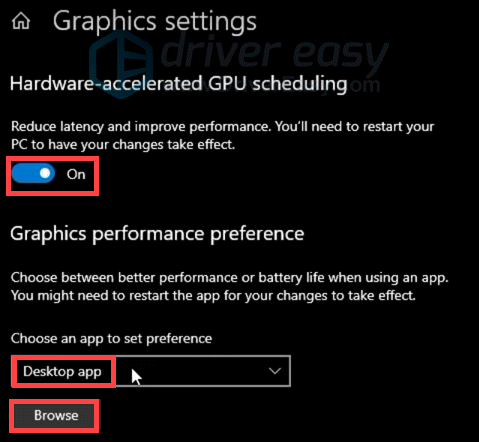
3) Navigate to your game’s installation folder. If you’re on Steam, follow the instructions below to locate your game’s installation folder.
(If you’re playing it on Epic Games Launcher, it’s Default: C:\Program Files\Epic Games\[Game Name] by default. )
Locate the game’s installation folder on Steam:
- Open your Steam client.
- Under LIBRARY, right-click Dying Light 2 and select Manage > Browse local files.
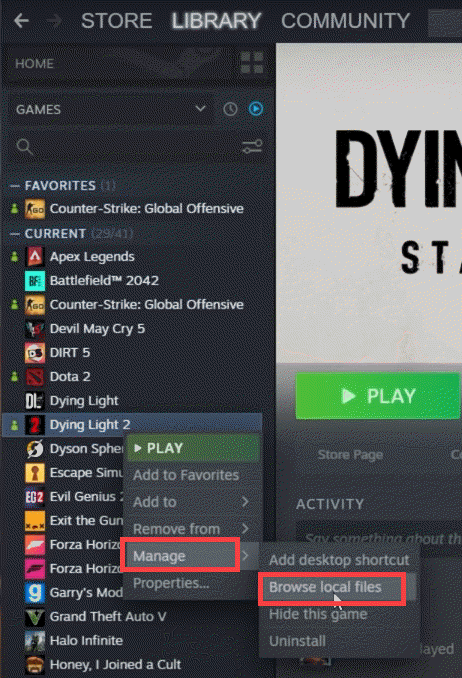
- Then open the files ph > work > bin > x64. Click the very top to copy the file path.
4) Paste the path of the game’s installation file into the address bar. Then double-click on the game’s exe.file.
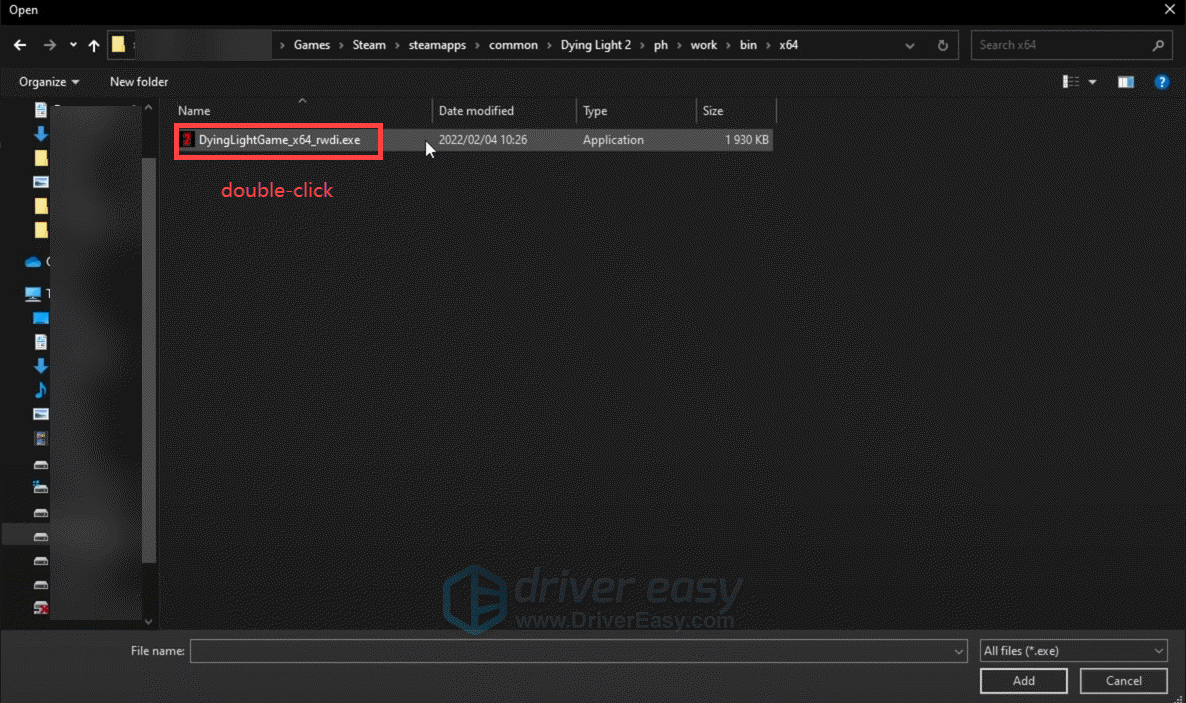
5) Once it’s added to the list, simply select it and click Options.
6) Choose High performance and click Save. 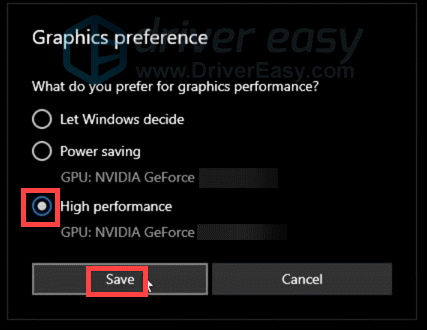
Doing this will make sure that the game runs on the best graphics processor you have on your computer, not holding back any performance.
That’s it – the full guide on how you can get more FPS in Dying Light 2 Stay Human and reduce in-game stutters. If you have any ideas or questions, do not hesitate to drop us a line in the comment section below.


