


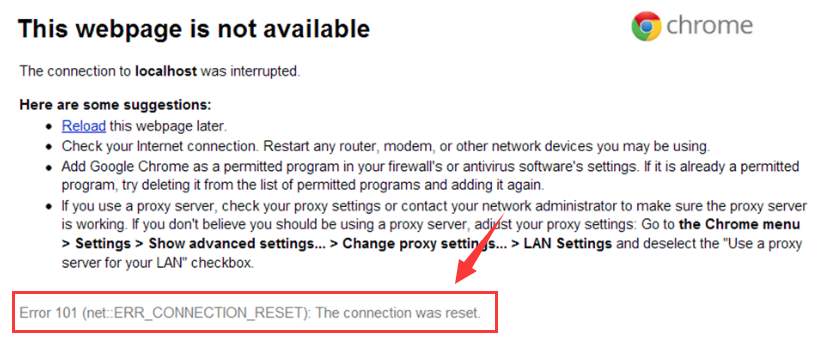
 Error 101 ERR_CONNECTION_RESET: The connection was reset is usually seen when the site you are visiting cannot connect to the destination site, meaning you have no access to certain websites that you want to go.
There are many causes to this problem, such as changes in registry, tcpip or some other network settings, so there could be multiple resolutions. You need to try them one by one until you find the one works for your situation.
Step One: Disabling Antivirus Programs
Step Two: Setup Maximum Transmission Unit (MTU)
Step Three: Reset netsh winsock
Step Four: Check the Internet Proxy settings
Step Five: Clear Browsing History
Step Six: Update Network Drivers
Step One: Disabling Antivirus Programs
You can check the antivirus program(s) on your computer and temporarily stop the real time scanning if this feature is supported. Also, disable the firewall in your antivirus program(s). Then restart your browser and reload the webpage that you couldn’t open again. If it opes just fine, then you should consider reinstall your antivirus program or replace it with another one.
Step Two: Setup Maximum Transmission Unit (MTU)
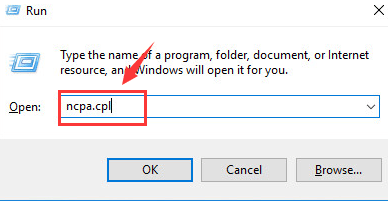
1) Press Windows key and R at the same time, then type ncpa.cpl in the search box and hit Enter.
Error 101 ERR_CONNECTION_RESET: The connection was reset is usually seen when the site you are visiting cannot connect to the destination site, meaning you have no access to certain websites that you want to go.
There are many causes to this problem, such as changes in registry, tcpip or some other network settings, so there could be multiple resolutions. You need to try them one by one until you find the one works for your situation.
Step One: Disabling Antivirus Programs
Step Two: Setup Maximum Transmission Unit (MTU)
Step Three: Reset netsh winsock
Step Four: Check the Internet Proxy settings
Step Five: Clear Browsing History
Step Six: Update Network Drivers
Step One: Disabling Antivirus Programs
You can check the antivirus program(s) on your computer and temporarily stop the real time scanning if this feature is supported. Also, disable the firewall in your antivirus program(s). Then restart your browser and reload the webpage that you couldn’t open again. If it opes just fine, then you should consider reinstall your antivirus program or replace it with another one.
Step Two: Setup Maximum Transmission Unit (MTU)
1) Press Windows key and R at the same time, then type ncpa.cpl in the search box and hit Enter.
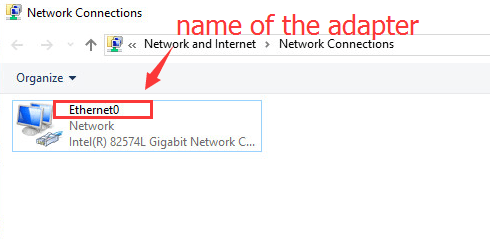
 2) You will be lead to the window where you can see all your network connections listed. Copy the name of the active adapter (as highlighted by the boxes) that you use to connect to the Internet, exactly as it is.
 3) Press Windows key and X at the same time, then choose Command Prompt (Admin).
 4) In the command prompt window, type in the following command:
netsh interface ipv4 set subinterface “Ethernet0” mtu=1472 store=persistentReplace Ethernet0 with the name of your network adapter and hit Enter.
 5) Restart your computer after this.
Step Three: Reset netsh winsock
1) Press Windows key and X at the same time, then choose Command Prompt (Admin).
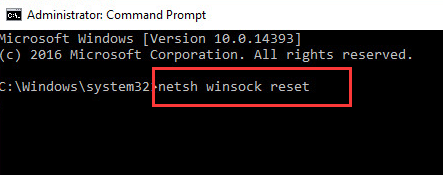
2) In the command prompt window, type in the following command:
5) Restart your computer after this.
Step Three: Reset netsh winsock
1) Press Windows key and X at the same time, then choose Command Prompt (Admin).
2) In the command prompt window, type in the following command:
netsh winsock resetMake sure you have made no typo, and then hit Enter.
 3) Restart your computer after this.
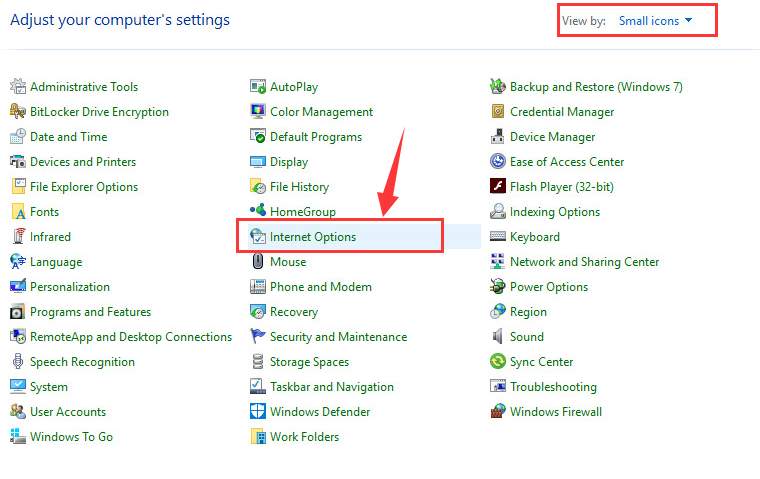
Step Four: Check the Internet Proxy settings
1) Follow the path: Start button > Control Panel > Internet options (view by Small icons).
3) Restart your computer after this.
Step Four: Check the Internet Proxy settings
1) Follow the path: Start button > Control Panel > Internet options (view by Small icons).
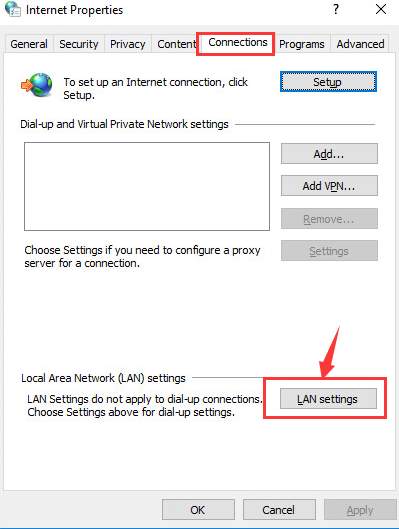
 2) Under Connection tab, choose LAN settings option.
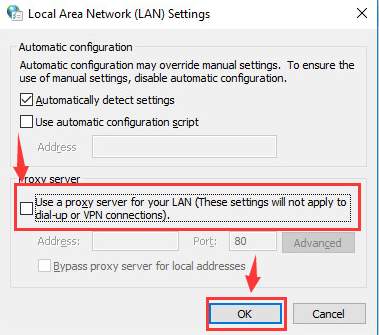
 3) Then make sure the box for Use a proxy server for your LAN (These settings will not apply to dial-up or VPN connections). option is empty. Then press OK to exit.
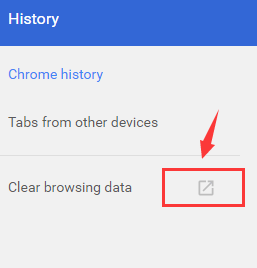
 Step Five: Clear Browsing History
1) Go to your Google chrome browser, press Ctrl + H at them same time. Then click the icon as shown in the screenshot.
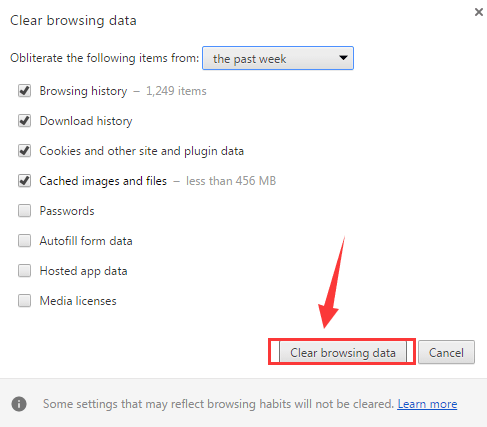
Step Five: Clear Browsing History
1) Go to your Google chrome browser, press Ctrl + H at them same time. Then click the icon as shown in the screenshot.
 2) You will be lead to the clear history window, choose the data that you want to delete and hit Clear browsing data.
 Step Six: Update Network Drivers
If none of the above methods work, you should consider getting your network driver updated. Now finding the appropriate network driver could be a very hard thing to do, your PC could be rather old for the manufactures of the hardware or the PC to produce any new network drivers available for you to download, hence, you need a powerful tool that can help you automatically update your network driver.
Driver Easy is such a useful too. It helps you automatically scan, detect and download device drivers that are missing or outdated on your computer for totally free.
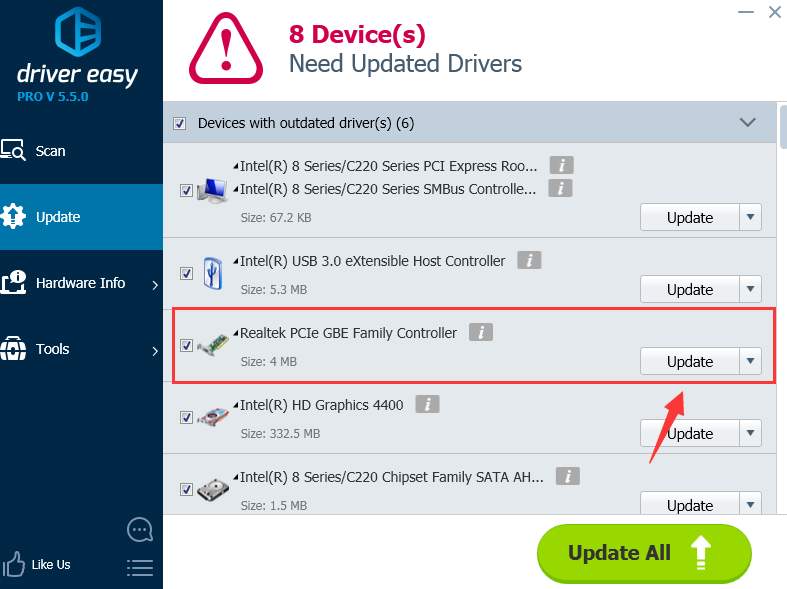
Step Six: Update Network Drivers
If none of the above methods work, you should consider getting your network driver updated. Now finding the appropriate network driver could be a very hard thing to do, your PC could be rather old for the manufactures of the hardware or the PC to produce any new network drivers available for you to download, hence, you need a powerful tool that can help you automatically update your network driver.
Driver Easy is such a useful too. It helps you automatically scan, detect and download device drivers that are missing or outdated on your computer for totally free.
 Why not give it a shot?
27
27 people found this helpful
Available in other languages
Bekommen Sie die Fehlermeldung »Diese Webseite ist nicht erreichbar« mit dem Fehlercode ERR_CONNECTION_RESET? Hier finden Sie 8 Lösungen.

2 Comments
Most Voted