Errors and issues are pretty common in video games and Halo 4 is not immune to it. Recently, players got an error message UE4 Fatal Error popping up while in-game. This caused the game to exit completely and players were back to the desktop. If you’re also experiencing this issue, don’t worry. In this guide, we’ll help you how to fix Halo 4 UE4 Fatal Error on PC.
Try these fixes
You may not need to try them all; simply work your way down the list until you find the one that works for you.
- Install the latest Microsoft Visual C++
- Try Windowed mode
- Verify the integrity of game files
- Update your graphics driver
- Run your game on a dedicated graphics card
- Disable overclocking and overlays
Fix 1: Install the latest Microsoft Visual C++
To work properly, most newer games need the latest version of Microsoft Visual C++. And there is a possibility that some of your Visual C++ Redistributables files are missing and that causes the crashing issue. So you should download and install the latest ones, both ×86 and ×64.
Fix 2: Try Windowed mode
When playing games on PC, you can generally choose between Windowed, Borderless, and Fullscreen display modes.
When your game runs in Fullscreen mode, it has full control over the screen output, meaning that what it’s showing has the highest priority. But with some many resources dedicated to the game, it may crash. So if you’re playing in Fullscreen mode, you can try to switch to Windowed mode.
1) Open your Steam client. Select the LIBRARY tab. Navigate to your game Halo: The Master Chief Collection. Right-click it and select Properties.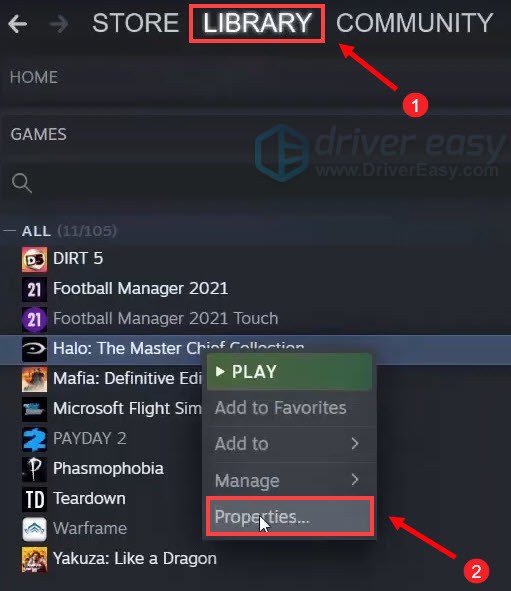
2) On the General tab, you’ll find Launch Options section.
3) In the box, type -windowed. (Remember the hyphen –.) Then click OK.
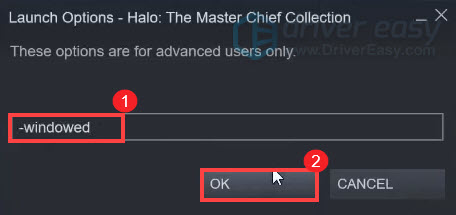
After applying the changes, try and launch your game to check if the error message still pops up. If you’re still facing the same issue, try the next fix.
Fix 3: Verify the integrity of game files
If some of your game files are corrupt or missing, you would encounter issues with running the game. To fix it, you can verify the integrity of game files.
Before verifying the integrity of game files, you need to delete the content in the MCC folder.
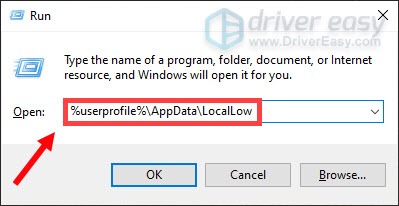
1) On your keyboard, press the Windows logo key and R at the same time to open the Run dialog box.
2) Type %userprofile%AppDataLocalLow, then press Enter on your keyboard.
3) Then open the MCC folder. Before deleting all the files in this folder, make sure you have a backup in case something happens. You can simply select all the files (Ctrl+A) and then copy them to a new folder.
4) After you’ve made a backup, delete all the files inside the MCC folder.
5) Now open your Steam client, and select the LIBRARY tab. Navigate to your game Halo: The Master Chief Collection. Right-click it and select Properties.
6) When the game’s Properties window opens, select the LOCAL FILES tab and click VERIFY INTEGRITY OF GAME FILES.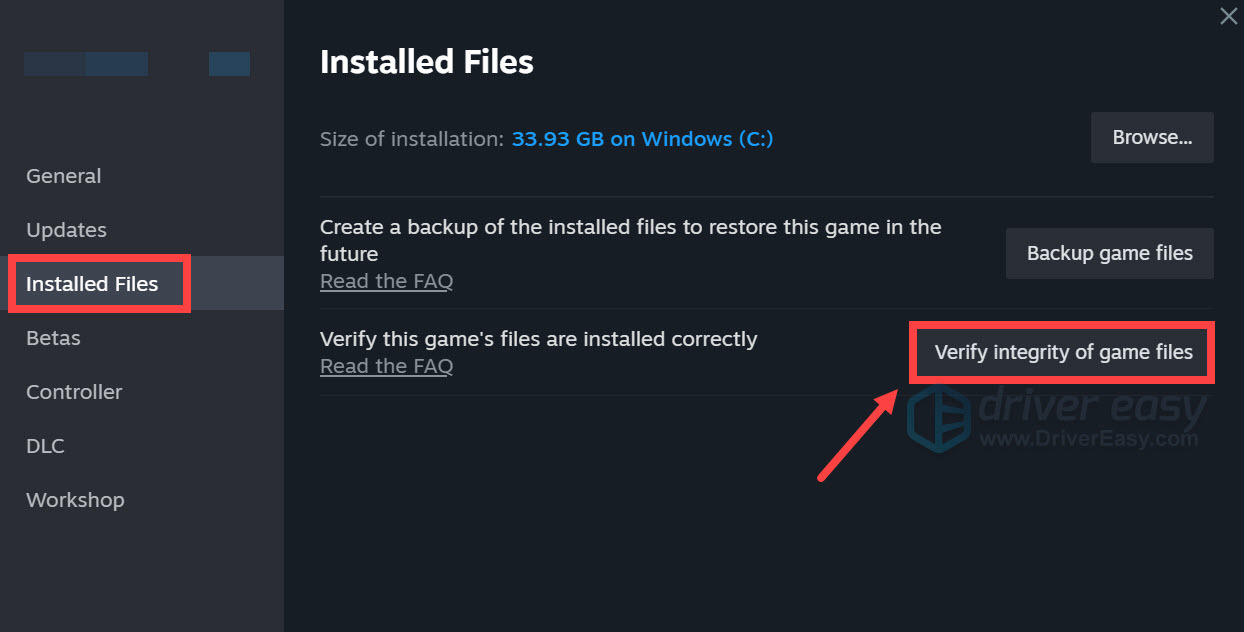
Steam will verify the game’s files – this process may take several minutes. Once it’s finished, try to play your game to check if the problem persists.
Fix 4: Update your graphics driver
Your graphics driver is an essential piece of software that lets your system communicate with the graphics card. If it is outdated, it would cause noticeable performance problems. Therefore, when you experience random crashes when playing Halo, whether, with error messages or not, you should make sure your graphics card is up-to-date.
To update your graphics driver, you can either do it manually via the Device Manager or head to the manufacturer’s driver download page (NVIDIA / AMD) to download and install the exact driver for your system. However, if you don’t have the time, or patience to update drivers manually, you can instead do it automatically with Driver Easy. It’s an automatic driver updater tool that detects any outdated drivers, and downloads and installs the latest drivers for your system.
1) Download and install Driver Easy.
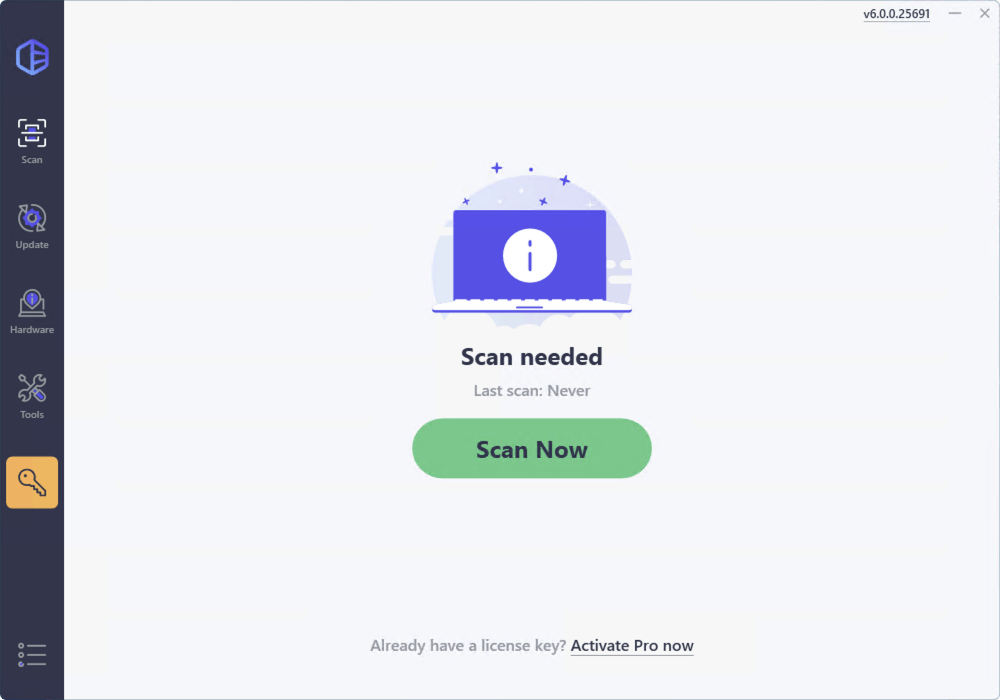
2) Run Driver Easy and click the Scan Now button. Driver Easy will then scan your computer and detect any devices with missing or outdated drivers.
3) Click the Activate & Update button next to any flagged device or click Update All to update all the outdated drivers. You can sign up for the free trial to update drivers with no upfront cost.
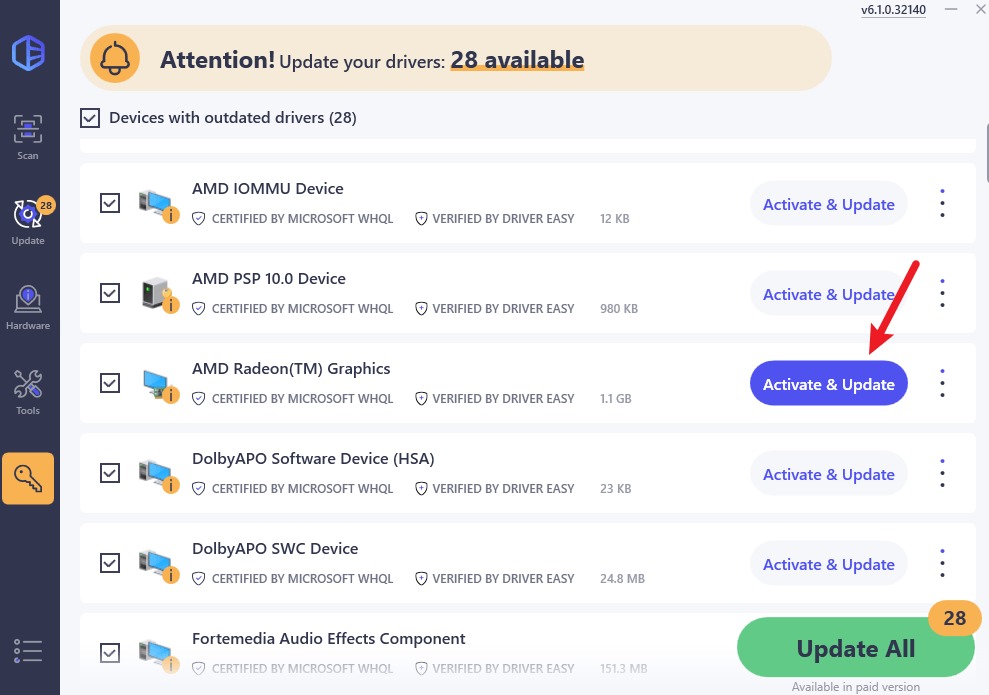
After you’ve updated your drivers, restart your computer for them to take effect. Then launch your game to check if the problem persists.
Fix 5: Run your game on a dedicated graphics card
The integrated graphics chipset is built into the processor and makes sure that your computer can use a display even without a dedicated GPU. However, more demanding tasks such as gaming require a stronger GPU, which in most cases is the dedicated one.
The biggest benefit of a dedicated GPU is performance. Not only does a dedicated graphics card have sophisticated RAM for the task of processing video, but also has dedicated RAM for the task, which is typically faster and better optimized for the task than your general system RAM.
Find out if your computer has more than one GPU
If you’re not sure how many GPUs your computer has, follow the instructions below:
1) On your keyboard, press the Windows logo key and R at the same time to open the Run dialog box.
2) Type devmgmt.msc and press Enter.

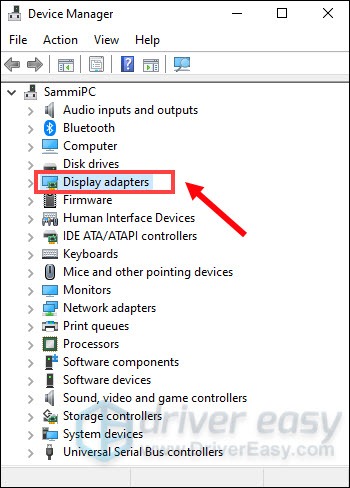
3) Double-click Display adapters to expand the list. And you can see if your computer has more than one GPU.
Run the game on a dedicated graphics card
After you’ve got the information on your graphics card, you can manually make your game run on that specific graphics card. To do this, simply click on the links below:
If you’re an NVIDIA user
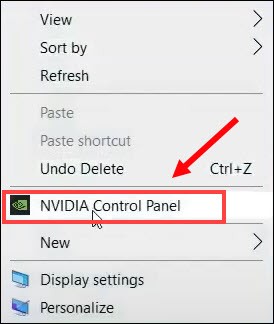
1) From your desktop, right-click on the empty space and select NVIDIA Control Panel.
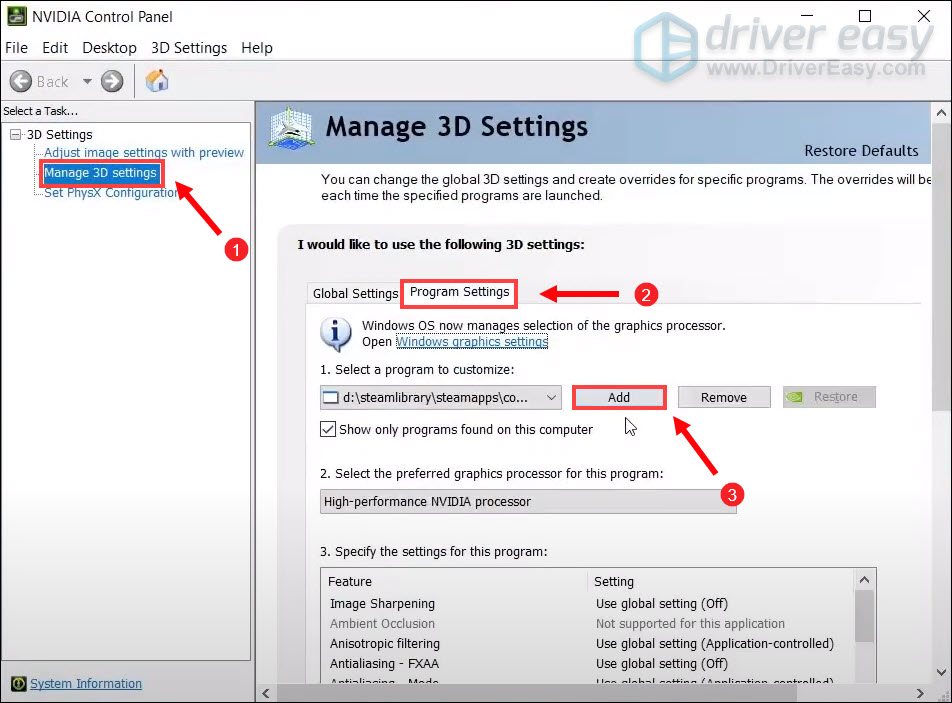
2) On the left pane, click Manage 3D settings. Then click Program Settings and Add.
3) Navigate to your game’s exe file and then click Add Selected Program.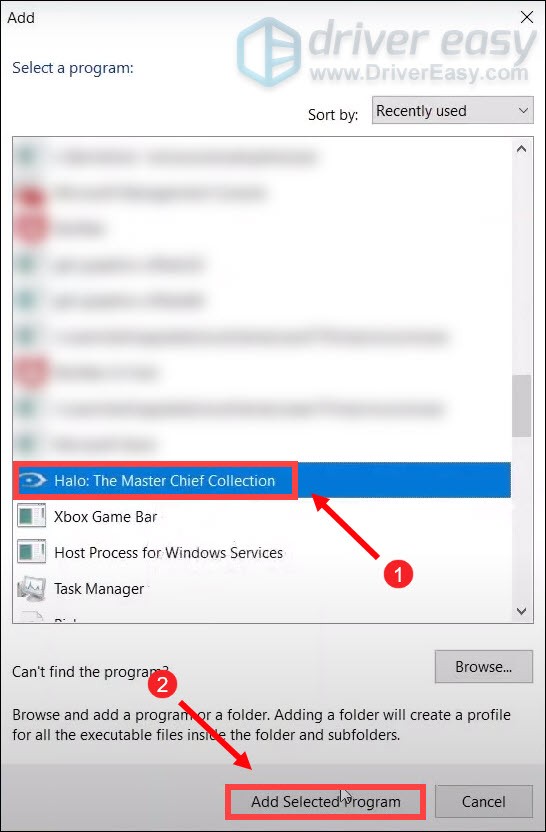
If your game isn’t on the list, then click Browse and go to the game’s installation folder.
4) Click on the drop-down menu and select High-performance NVIDIA processor.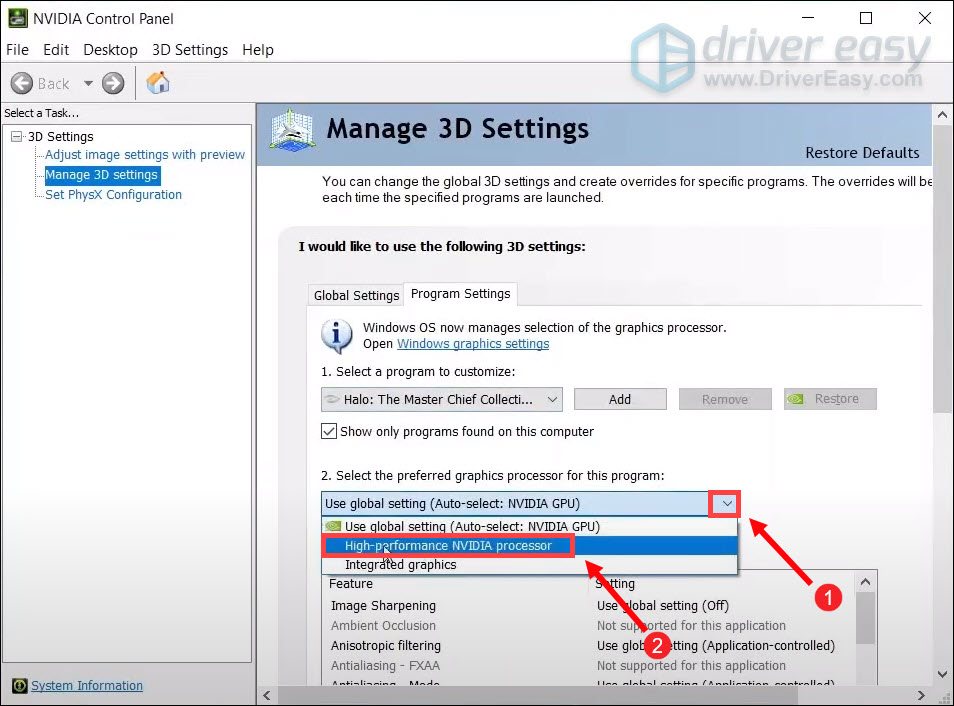
5) Click Apply.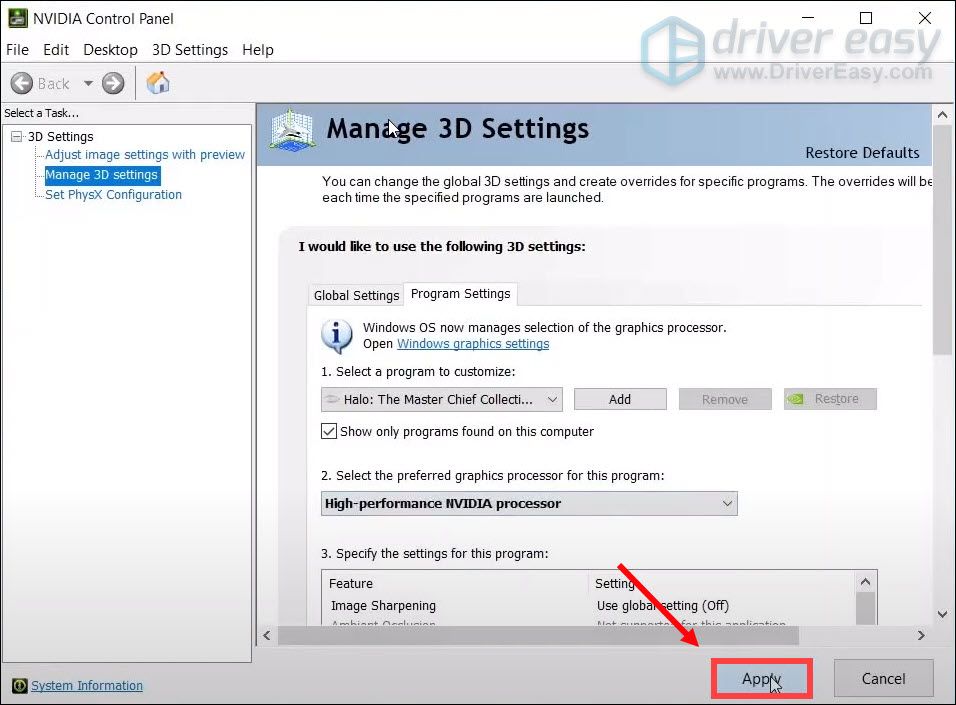
Now you can launch your game.
If you’re an AMD user
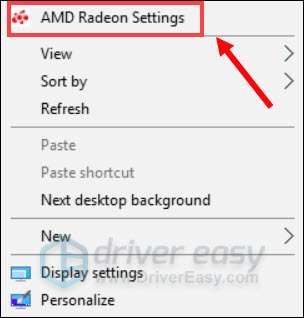
1) From your desktop, right-click on the empty space and select AMD Radeon Settings.
2) Navigate to Preferences > Additional Settings > Power Switchable Graphics Application Settings.
3) Select the game from the list of applications. If it is not in the list, click the Add Application button and select the .exe file of the game from the game’s installation directory.
4) In the column Graphics Settings, assign the High Performance profile to the game.
After you’ve applied the changes, try to launch your game to see if the error message still appears.
Fix 6: Disable overclocking and overlays
If you’re using MSI Afterburner or other GPU tweaking programs, you cannot play your game smoothly. The game engine doesn’t really support cards that are overclocked. And overclocking can be causing game instability and thus the game might crash. So to fix it, you should disable it.
Also, it’s very important to remove all those overlays, Steam, Discord, or whatever overlay you’re using. It’s usually causing some issues like crashing and thus affecting your performance.
You can disable overlays on Steam, Geforce Experience and Discord by following the instructions below:
Disable Steam overlay
1) Open your Steam client, and select the LIBRARY tab. Navigate to your game Halo: The Master Chief Collection. Right-click it and select Properties.

2) Select the GENERAL tab, uncheck the box Enable the Steam Overlay while in-game.
After applying the changes, exit Steam and run your game to see if this fixed the issue.
Disable Geforce Experience in-game overlay
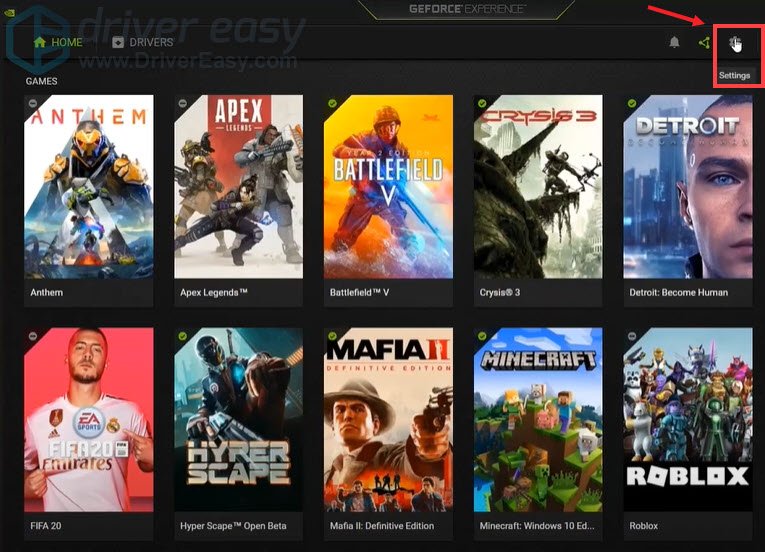
1) Click on the Settings icon.
2) Under the GENERAL tab, scroll down and switch IN-GAME OVERLAY to OFF.
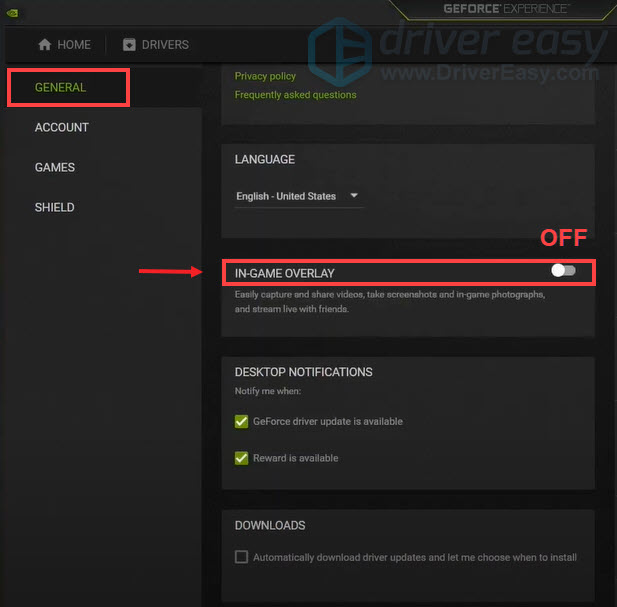
After you’ve applied the changes, remember to quit the app.
Disable Discord Overlay
If you have Discord running, you can disable overlay by following these steps:
1) Click on the Users Settings icon.
2) Click on Overlay and switch Enable in-game overlay to OFF.
After applying the changes, quit Discord.
In conclusion, there are a number of reasons behind the Fatal Error crash, including outdated drivers, corrupt or missing game files, etc. Hopefully, the methods in this post can help you get back into the game. If you have any ideas or questions, please leave us a comment below.


