Have you ever played a game and been hit with unexpected choppiness, lag spikes, and delays? That’s game stuttering, one of the most frustrating headaches in PC gaming. Sometimes it happens even if the system has high FPS. Luckily, we have solutions for it.
There are many factors related to game stuttering. One of them is your hardware condition. Overheating machines, underpowered GPUs, inadequate RAM, and CPU bottlenecks are all likely to cause stuttering during gaming. In this case, you need to update your hardware device.
Apart from that, system settings and software settings affect your gaming experience as well. And that’s where we can work to tackle game stuttering issues with high FPS.

Update GPU Driver to Fix Game Issue
3 steps to update ALL drivers
1. Download; 2. Scan; 3. Update.
6 fixes for game stuttering with high FPS:
You may not need to try them all. Just work your way down the list until you find the one that works for you.
- Some quick changes
- Update your graphics and audio drivers
- Update your in-game setting
- Lower screen resolution
- Turn off the Windows Game Bar
- Turn off unnecessary apps and background processes
- Change V-Sync state
- Adjust Power Settings
Some quick changes
Before we move on, here are some quick fixes that may help to fix the game stuttering but with high FPS issue:
- Ensure that your computer meets the minimum system requirements for the game with stutters. Pay extra attention to the processor and the GPU requirements.
- Try to install the game on your SSD instead of the HDD.
- Ensure that the stutters are not brought by low-rating external devices like mice, keyboards, wireless adapters, and sometimes PSUs (power supply units). The quickest way to decide would be to disconnect your computer from all unnecessary external peripherals and see if the stutters continue.
Fix 1 Update your graphics and audio drivers
Outdated or faulty graphics and audio drivers tend to cause a stuttering screen. Keeping your drivers up-to-date should always be your go-to option especially when you play graphics-intensive games.
There are 2 options to update your graphics and audio driver: manually and automatically.
Option 1 – Manually
Major GPU manufacturers release the latest versions of graphics drivers regularly. So you can visit their official websites like NVIDIA and AMD to download the corresponding driver for your system. Then go to Realtek and find the correct audio card driver for your device.
Then double-click your downloaded files one by one and follow the on-screen instructions to finish the installation and update.
Option 2- Automatically
If you’re uncomfortable playing with device drivers, we recommend using Driver Easy. It’s a tool that detects, downloads and installs any driver updates your computer needs.
Driver Easy will automatically recognize your system and find the correct drivers for it. You don’t need to know exactly what system your computer is running, you don’t need to risk downloading and installing the wrong driver, and you don’t need to worry about making a mistake when installing.
- Download and install Driver Easy.
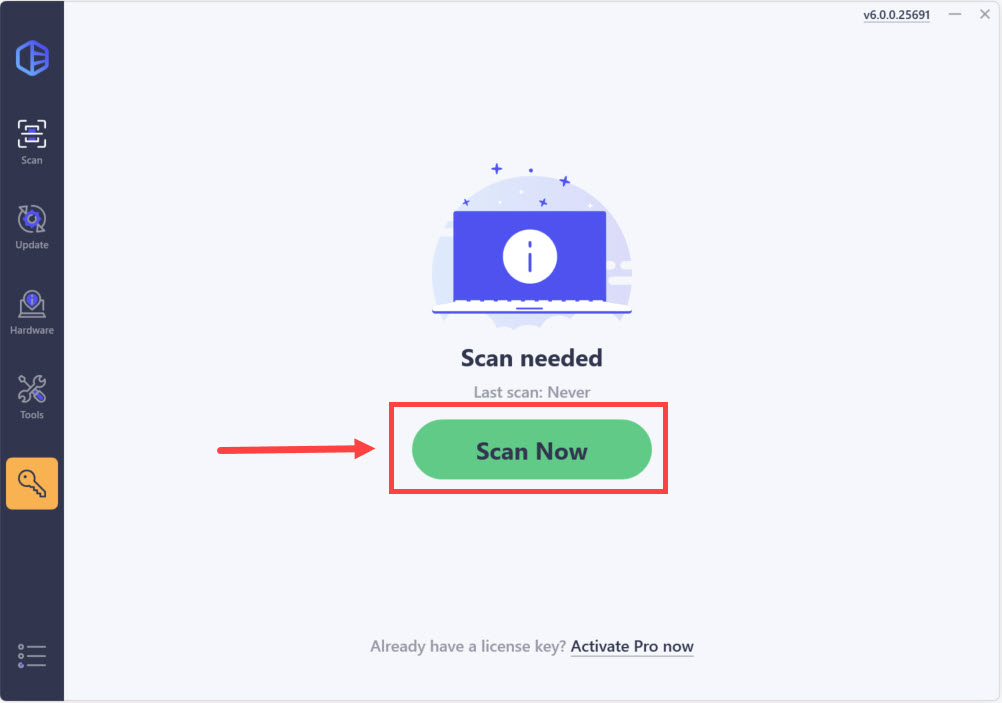
- Run Driver Easy and click the Scan Now button. Driver Easy will then scan your computer and detect any problem drivers.
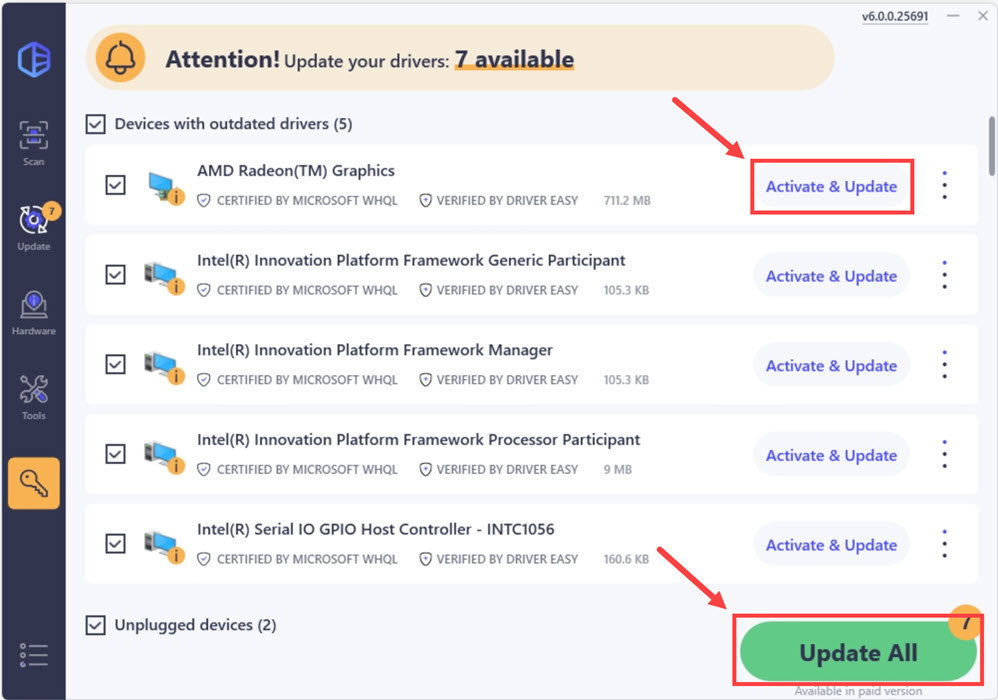
- Click Update All to automatically download and install the correct version of all the drivers that are missing or out of date on your system (this requires the Pro version – you’ll be prompted to upgrade when you click Update All or Activate & Update. If you’re not ready to subscribe for a full year, take our 7-day free trial for a spin. Experience the benefits firsthand, at your own pace, with no strings attached.).
After you have completed the update, restart the computer for the changes to take effect. Launch your game again to see if it helps.
Fix 2 Update your in-game setting
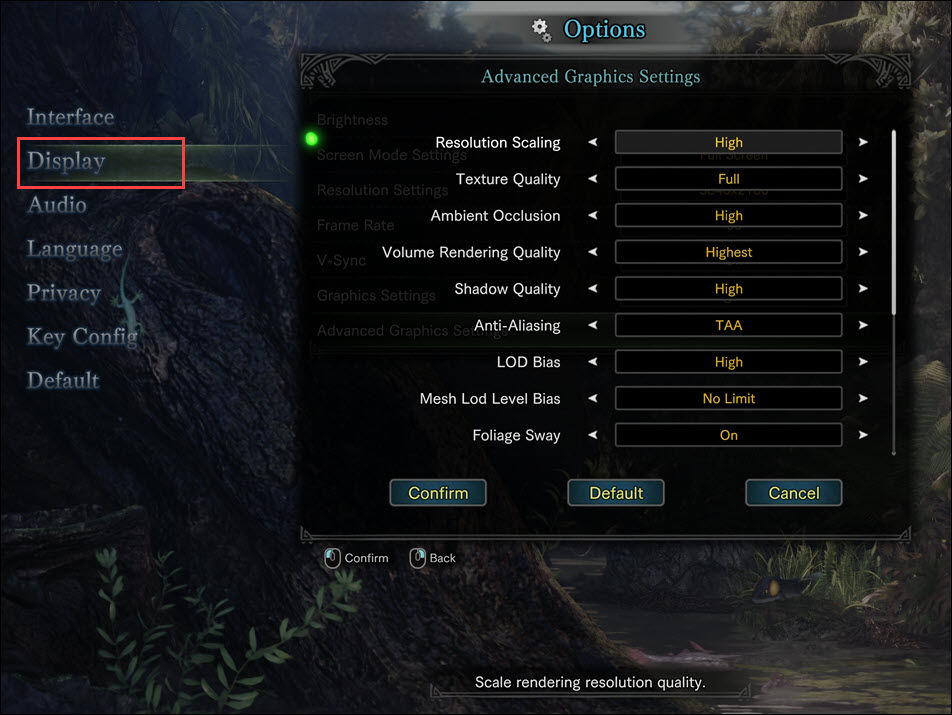
It’s always worth trying to update the graphical setting in your game to mitigate game stuttering. Just simply open your game and choose its Settings. Navigate to Graphic/Display. Here you can reduce the game’s resolution, texture filtering, texture quality, and deactivate some features like Anti-aliasing. Changes like these can ease a stuttering screen in the game, but the graphics quality may suffer. It’s sometimes a trade-off, depending on what you want the most.
After applying these changes, check your game for any improvements. If game stuttering woe persists, there are other fixes to try.
Fix 3 Lower screen resolution
If you’re running the game at a higher resolution than your monitor can handle, your GPU will be overwhelmed. In this case, lowering the screen resolution is likely an effective solution for game stuttering with high FPS. But it’s important to know that you may miss out on some details on the screen with lower resolution. To reduce system screen resolution on Windows 10:
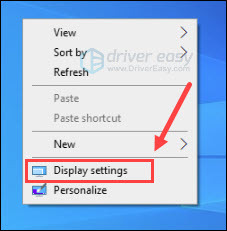
- Right-click the empty area on your desktop to invoke a menu and click Display settings.
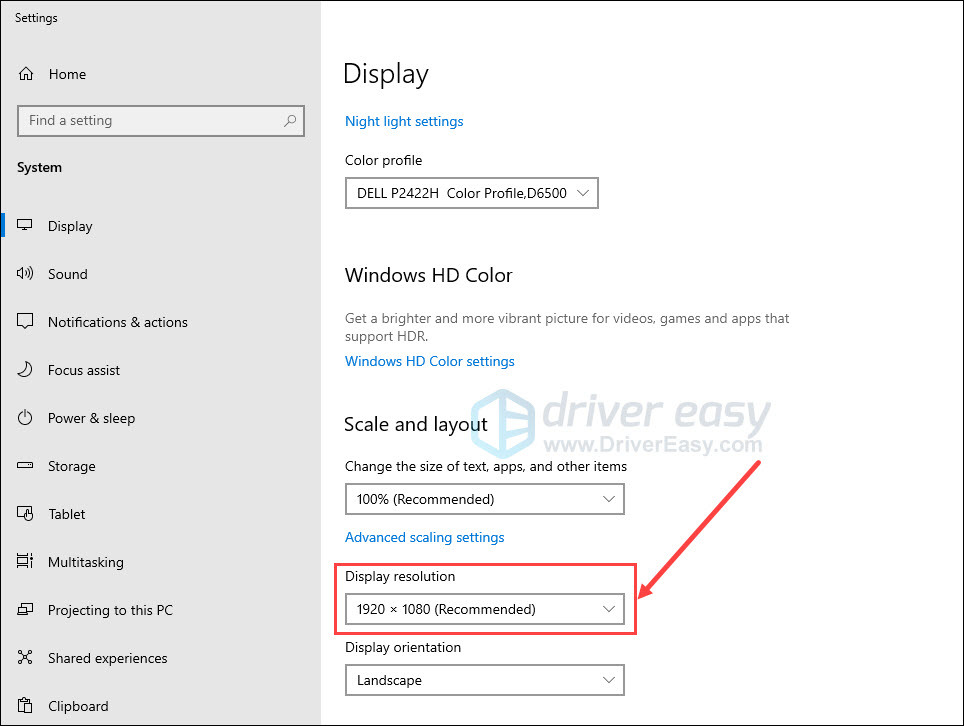
- Scroll down and click Display resolution.
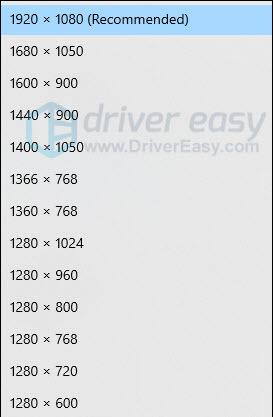
- Select a lower resolution value from the drop-down list to apply the change.
To reduce system screen resolution on Windows 11:
- Right-click the empty area on your desktop to invoke a menu and click Display settings.

- Scroll down to the Display resolution section, then select a lower resolution value from the drop-down list to apply the change.

Now start your game again. If you’re still facing the game stuttering issue, read on and try the fix below.
Fix 4 Turn off the Windows Game Bar
Windows Xbox Game Bar is a built-in app for recording game clips, chatting with Xbox friends and so on. Turning it off can provide more resources to optimize your gaming experience. But note that some games may require this app for receiving game invites.
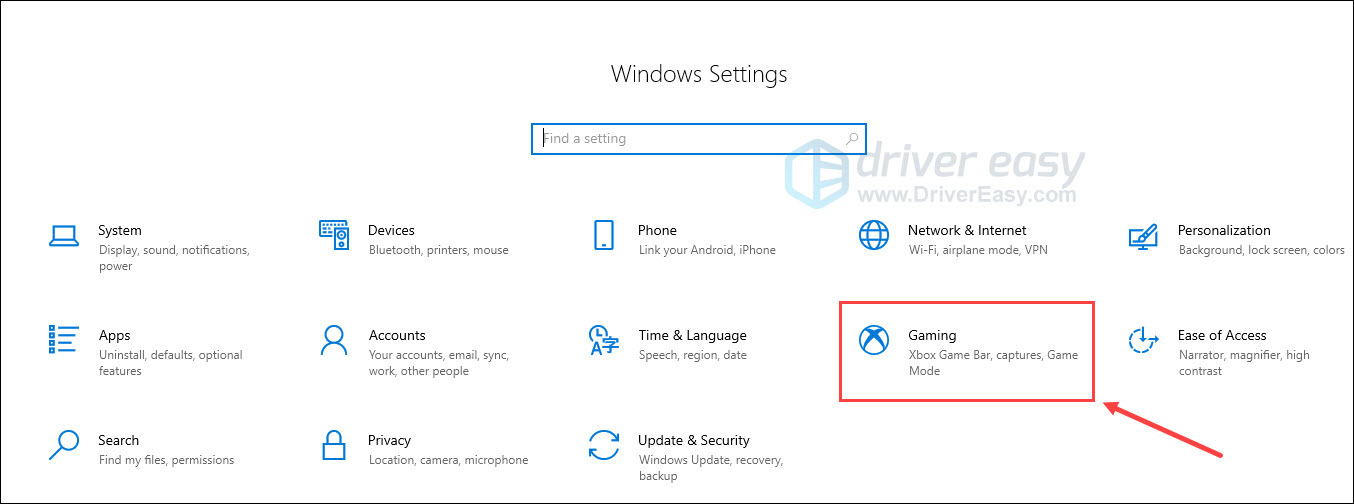
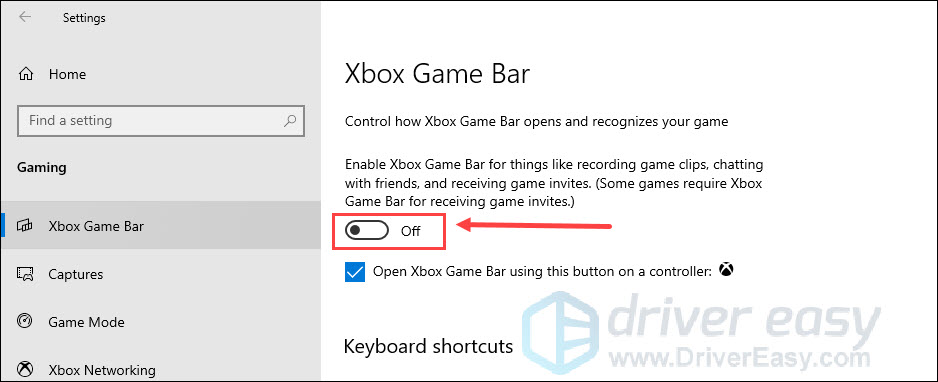
- On the keyboard, press the Window logo key and I at the same time to launch Windows Settings. Click Gaming.
- Turn off the Xbox Game Bar option.
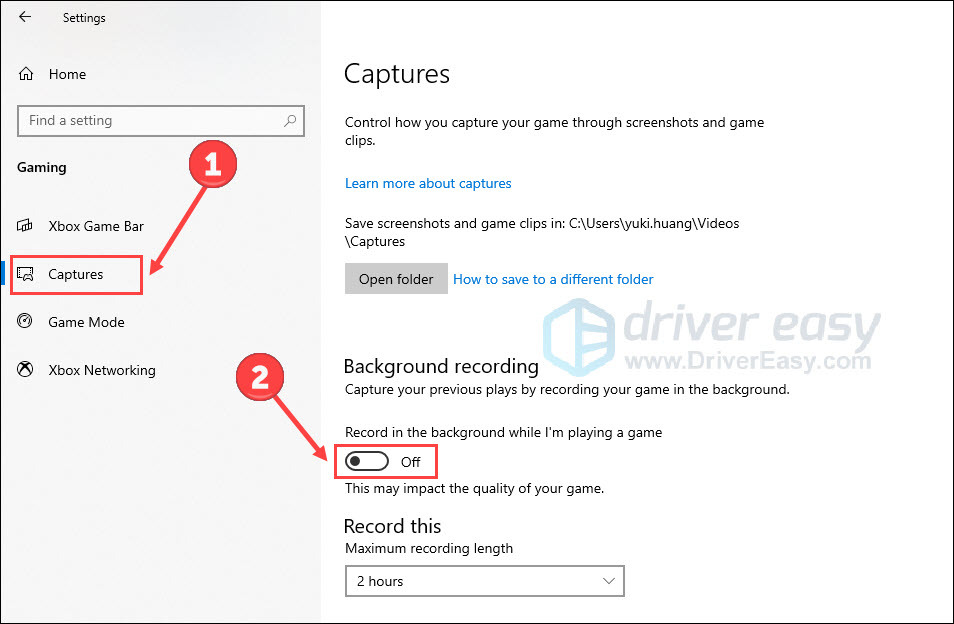
- Click the Captures tab, and turn off the Record in the background while I’m playing a game option.
If you’re using Windows 11:
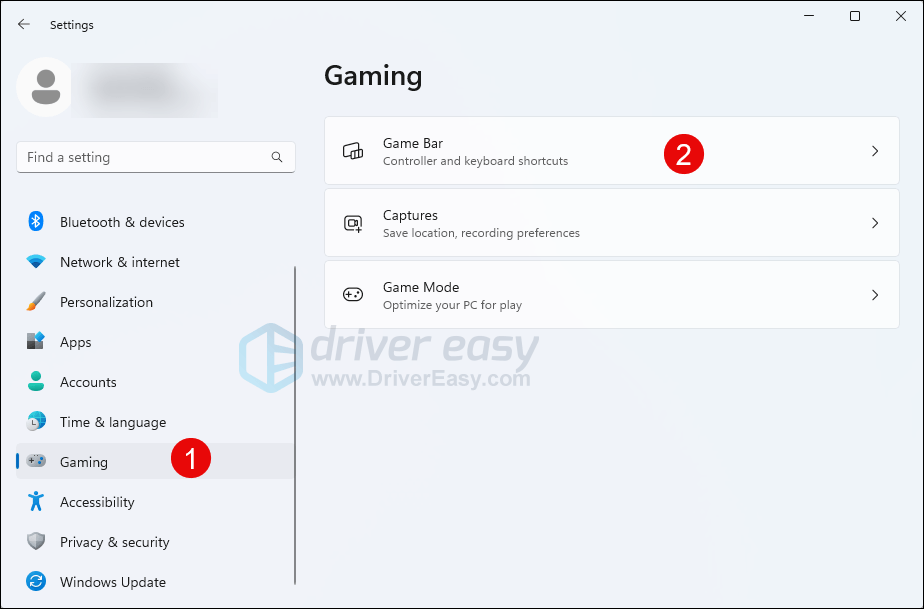
- On the keyboard, press the Window logo key and I at the same time to launch Windows Settings. Click Gaming. Then select Game Bar.
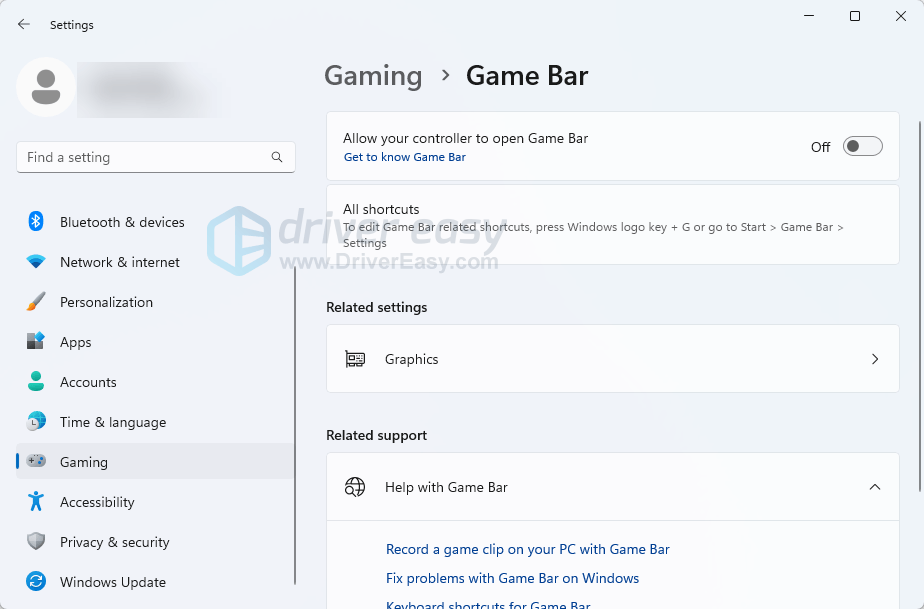
- Toggle off the option to Allow your controller to open Game Bar.
Relaunch your game and check if the stuttering continues. If it does, give a shot to the next solution.
Fix 5 Turn off unnecessary apps and background processes
Running too many programs and processes lowers your system response time. When your GPU and CPU need more time to handle the data transition, it’s usual for game stuttering to occur, even with high FPS. To have a better insight into what’s slowing down your system and end those unnecessary tasks, follow these steps:
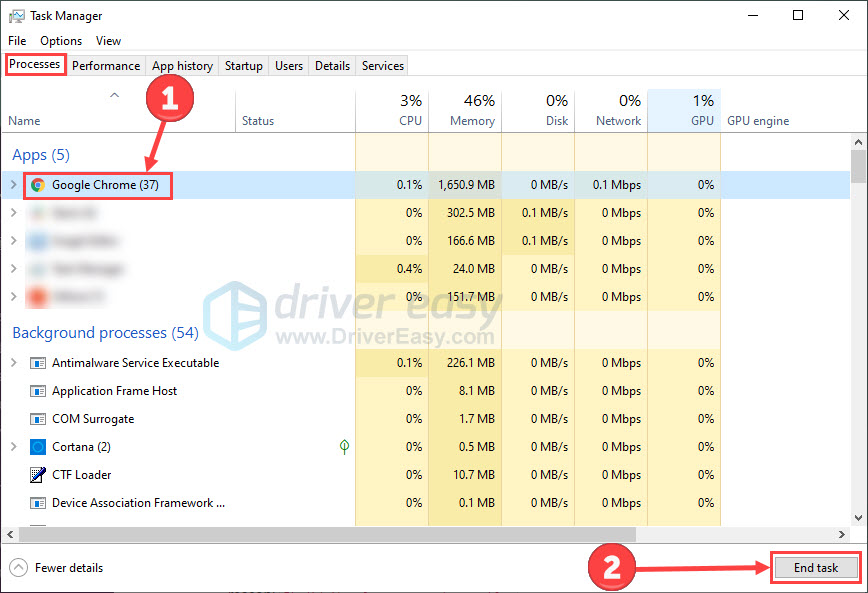
- Right-click the taskbar and select Task Manager.

- In the Processes tab, select those apps and background processes occupying the CPU and GPU most, and click End task to save resources for your game.
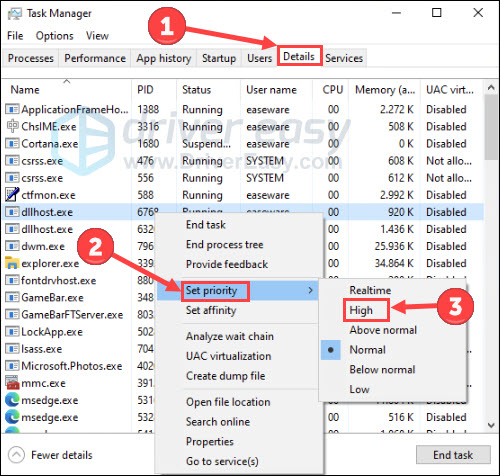
- Go to the Details tab, right-click the executable of your game and set the priority level to High.
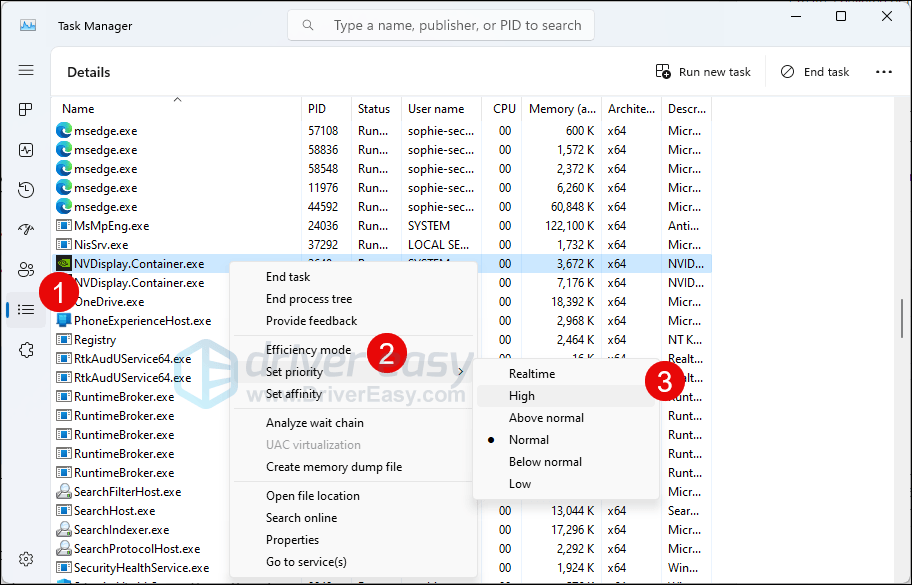
On Windows 11, the interface could be a bit different. So to end unnecessary apps and set the priority level, you can do the following:
- Right-click the Windows taskbar and select Task Manager.

- Select each resource-hogging application and click End Task to close them one by one.

- Then go to Details, right-click your game and select Set priority, and set it to High.
If you want to know more about which processes you need and don’t need, you can refer to Process Explorer for more information. Now go on and review your game to see if it works smoother. If not, go ahead and try the next method.
Fix 6 Change V-Sync state
V-Sync (Vertical Sync) is a graphics technology that synchronizes the frame rate of a game with a gaming monitor’s refresh rate. It plays a role in alleviating screen tearing and stuttering.
While some gamers report that enabling V-Sync helps a stuttering screen, others find disabling it useful. So here we provide methods to change your V-Sync state and you can modify it based on your actual situation. V-Sync works on most monitors, as long as you have a graphics card that supports the feature. The following are the tutorials for Nvidia and AMD graphics:
1 – Nvidia graphics:
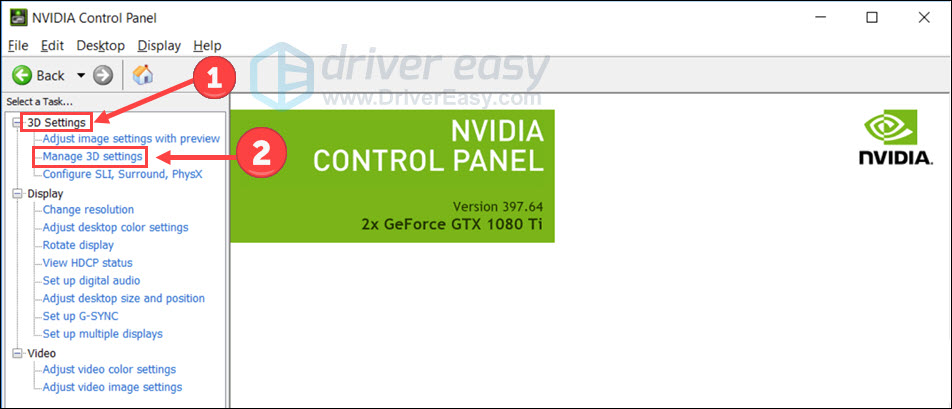
- Right-click the desktop and select NVIDIA Control Panel.
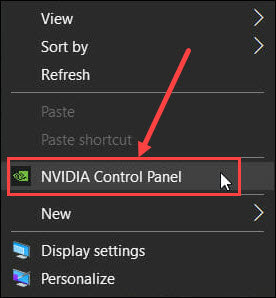
- Click 3D Settings and then Manage 3D Settings.
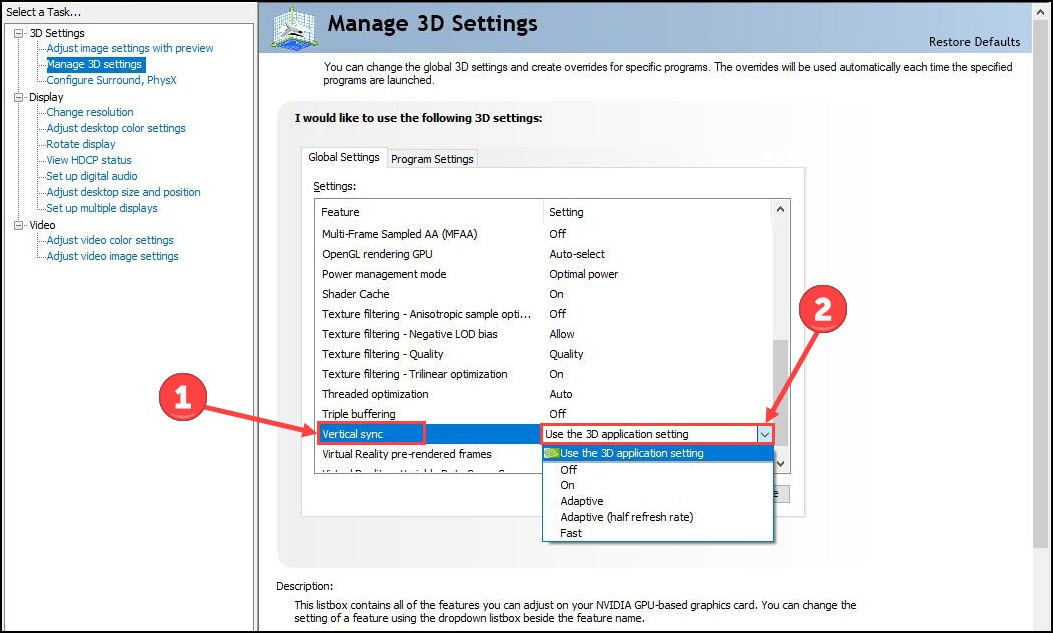
- Scroll down and click Vertical sync, and open the drop-down menu.
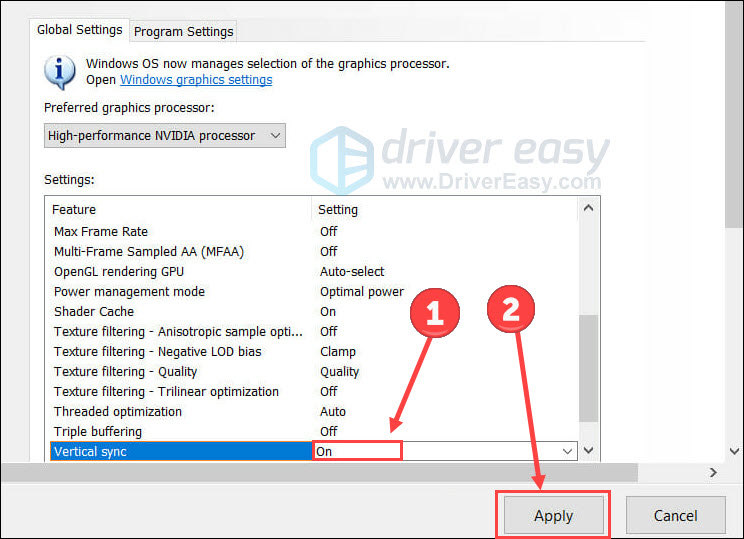
- Change the value to On/Off and click the Apply button.
2- AMD graphics:
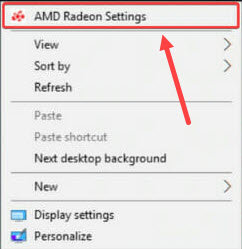
- Right-click the empty area of desktop and select AMD Radeon Settings.
- Choose the Gaming tab.
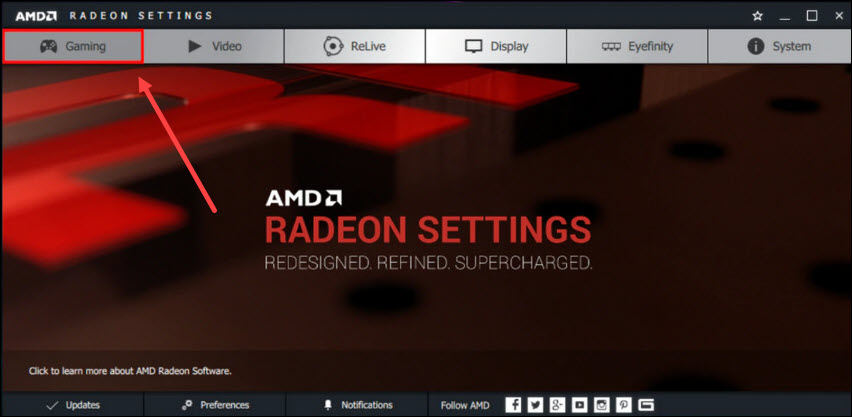
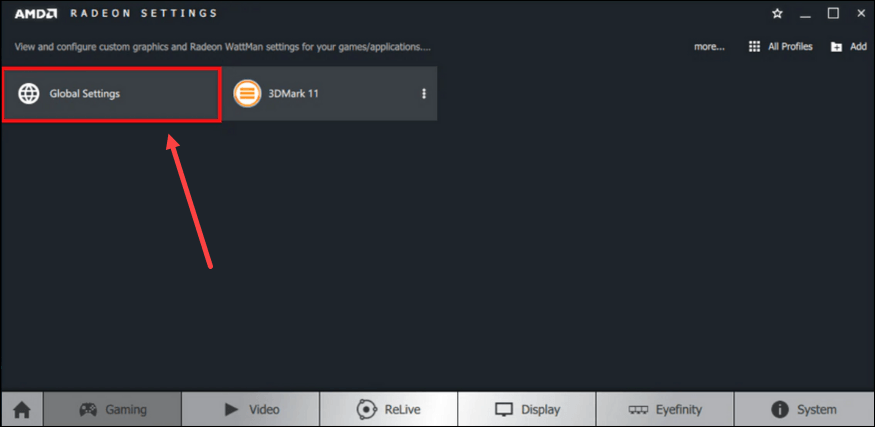
- Click Global Settings.
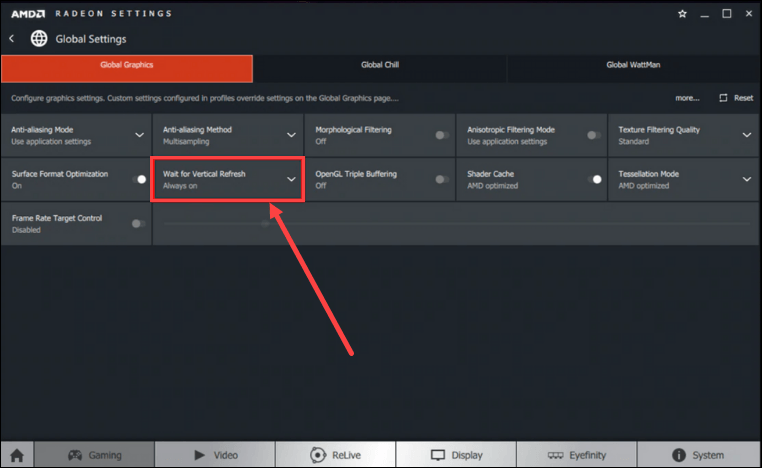
- Click Wait for Vertical Refresh and select the Always on/Always off option from the drop-down list.
If you use other graphics cards supporting this feature, try to navigate to their control panel and apply the change.
Fix 7 Adjust Power Settings
Ensure your computer is set to High Performance in the power profile. This settig prevents the system from throttling CPU or GPU performance to save energy, which can cause stuttering during gameplay.
To adjust these settings, follow the steps below:
- On your keyboard, press the Windows logo + S to open the Windows Search bar. Then search for Power Plan. Click on Edit power plan.
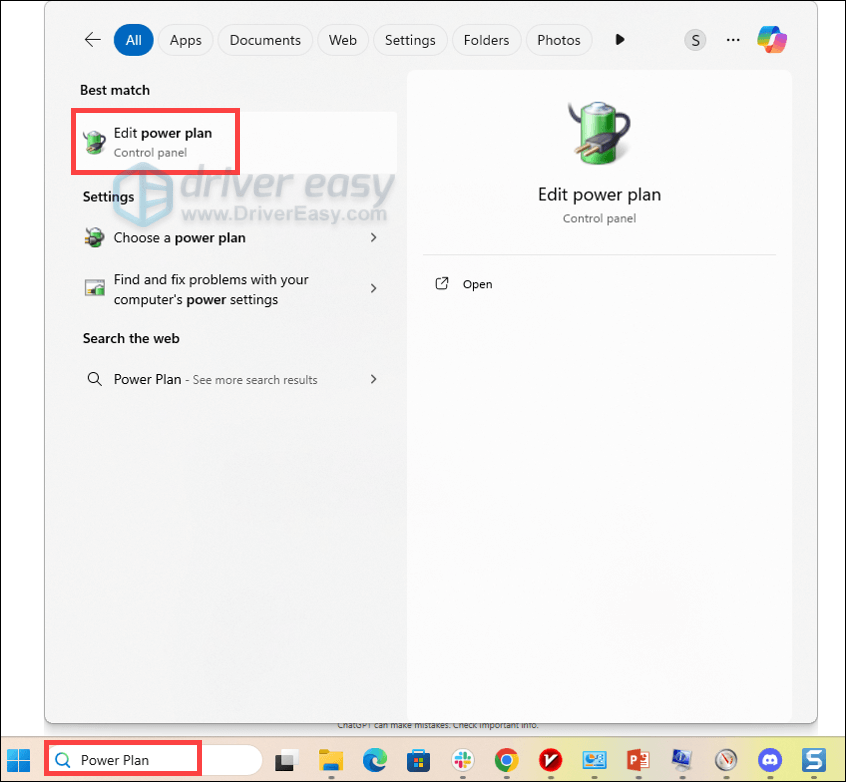
- Select the High Performance option from the list.
If it’s not available, click Change advanced power settings.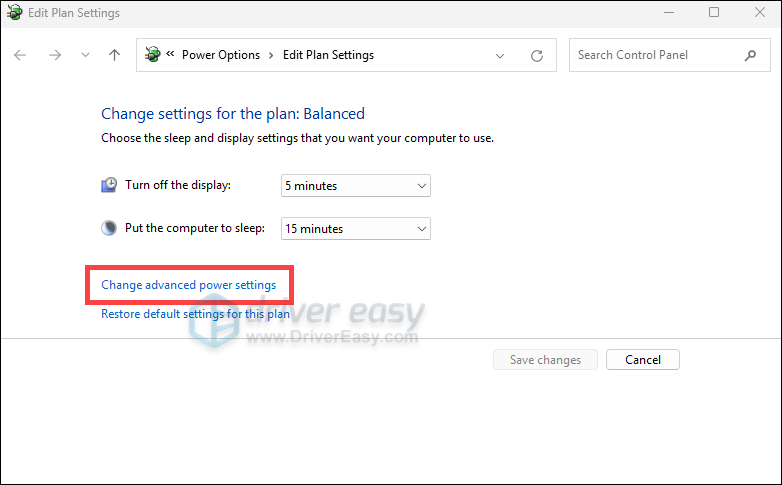
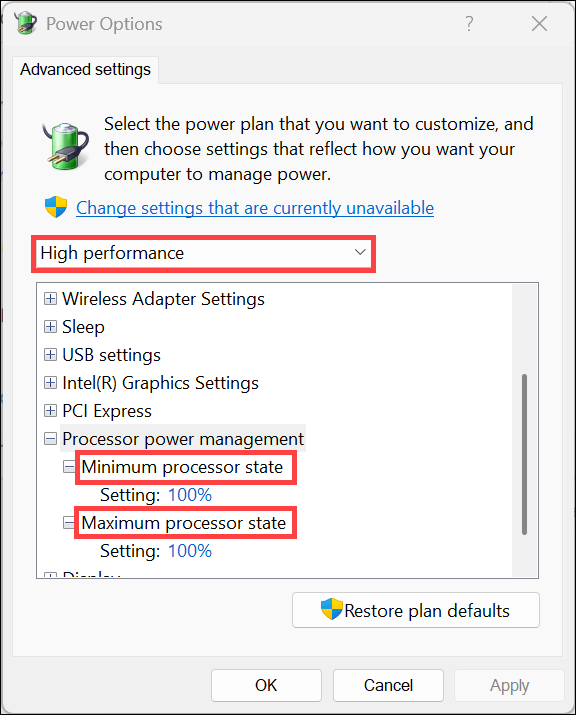
- Expand the Processor Power Management section and set the Mimimum Processor State and Maximum Processor State to 100%. Then apply the changes and restart your game.
All the fixes for game stuttering with high FPS have been listed above. Hopefully, you will get rid of this problem with them. Please feel free to leave a word below to share your solution with us.


