These days, more and more players are getting into Valheim, a new Viking survival game. But since the new patch, many players keep getting disconnected from server. This is definitely stopping you from enjoying the gameplay with your friends. But the good news is, you can troubleshoot the issue by trying the fixes listed in this post.
Try these fixes
You may not need to try them all; simply work your way down the list until you find the one that works.
- Turn off Windows Firewall
- Verify integrity of game files
- Run your game as administrator
- Update your network adapter driver
- Release and renew IP address
- Disable IPv6
- If your problem persists…
1. Turn off Windows Firewall
It’s important to have Microsoft Defender Firewall on because it helps protect you from unauthorized access. But there is a possibility that it fails to allow Valheim to launch properly. To fix it, you should turn off Windows Firewall. Here’s how you can do this:
1) On your keyboard, press the Windows logo key and I at the same time to open the Settings app.
2) Click Update & Security.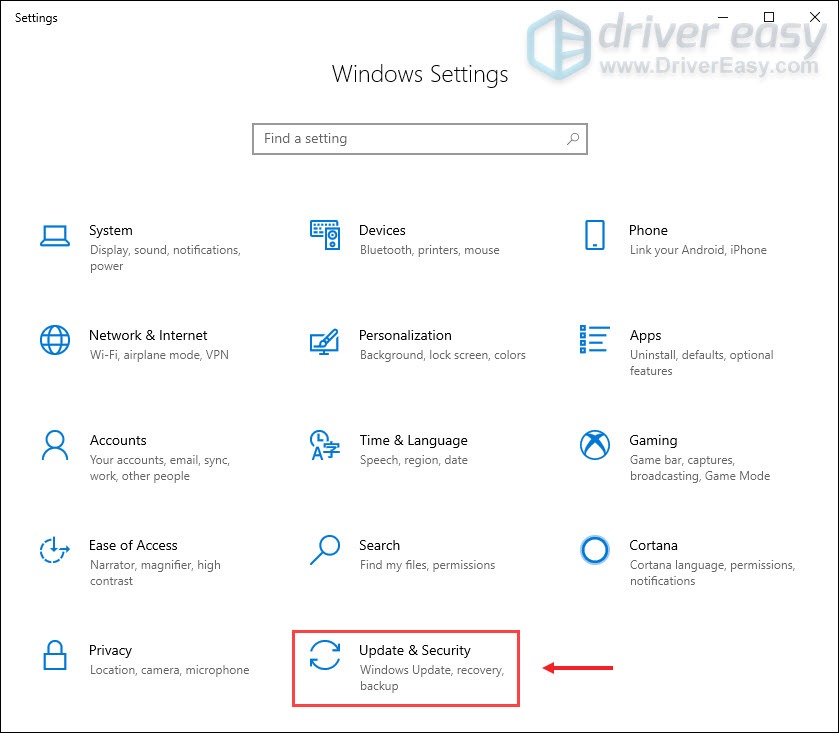
3) Click Windows Security > Firewall & network protection.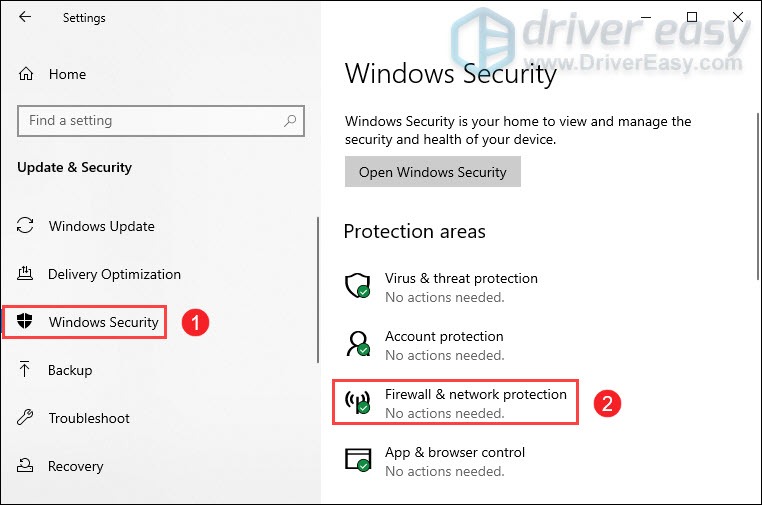
4) Click the network which is active currently.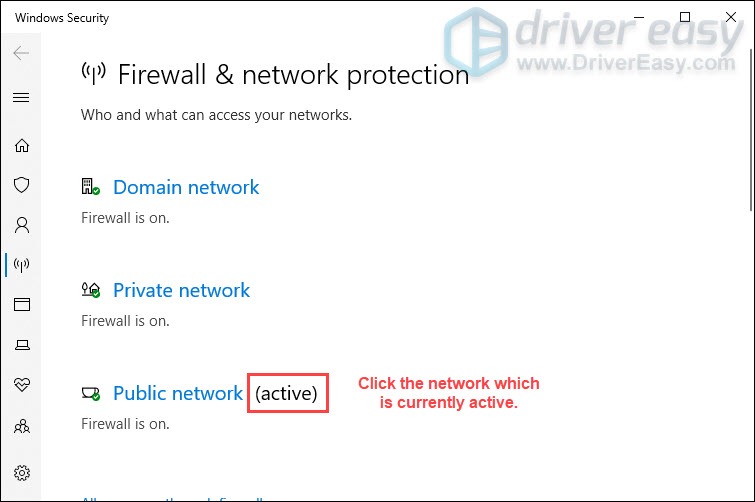
5) Scroll down and under the Windows Defender Firewall section, toggle off the button to disable it.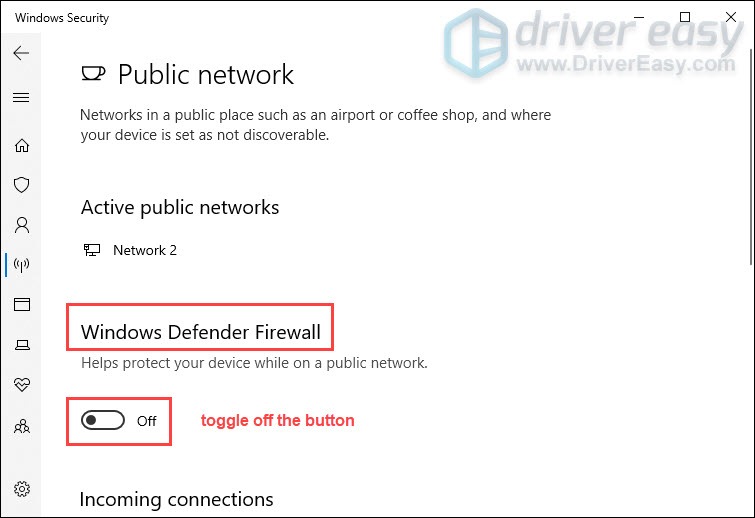
Also, if you are using any anti-virus software, remember to disable it when you’re launching Valheim.
If that didn’t do the trick, proceed to the next fix below.
2. Verify integrity of game files
If any of your game files are missing or corrupted, you might not be able to connect to a dedicated server. In this case, you need to verify the integrity of game files, which can ensure that the installation of your game is up-to-date and if necessary repair any bad or corrupted game data.
Here’s how to do this:
1) Open your Steam Client. Under the LIBRARY tab, find your game title and right-click it. Then select Properties.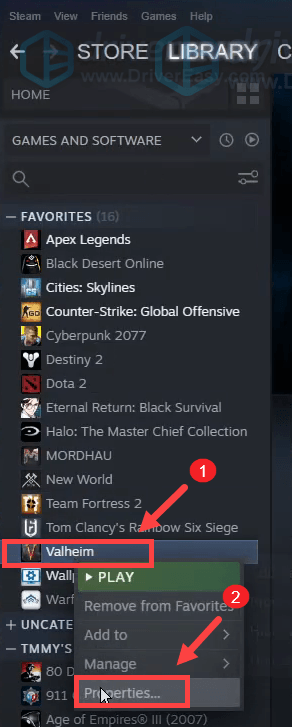
2) Select LOCAL FILES and then click on the Verify integrity of game files… tab. This will take a minute to redownload and replace any missing or corrupted game files.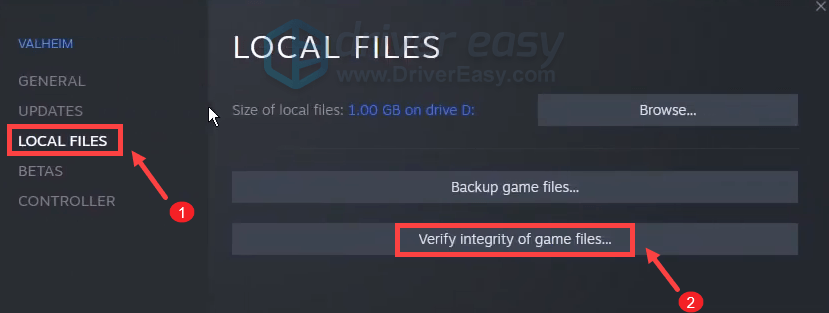
When the process is complete, play Valheim and check it helps you fix the issue. If the problem persists, try the fixes listed below.
3. Run your game as administrator
Some applications may not be able to launch properly without granting them with administrative rights. Therefore, you may be about to solve the server disconnected issue by running Valheim as an administrator with no hassle.
Here’s how you can do this:
1) On your keyboard, press the Windows logo key + R at the same time to open File Explorer.
2) Locate the valheim.exe file on your system. (Usually in C:Program FilessteamSteamsteamappscommonValheim.)
3) From there, right-click valheim.exe and select properties.
4) Under the Compatibility tab, tick Run this program as an administrator. Then click Apply > OK.
5) After you applied the changes, run Valheim and try to join your server to check if you can connect. If you’re still disconnected from server, try the next fix below.
4. Update your network adapter driver
This error message is related to network or server connectivity issues. So your outdated network adapter driver can be the culprit and you’ll run into the server disconnected issue. To fix it, you’re supposed to update your network adapter driver, especially if you can’t remember when was the last time you updated it.
You can manually update your network adapter driver by going to the manufacturer’s official website to download and install the correct network driver for your system.
OR
You can do it automatically with Driver Easy. It will automatically recognize your system and find the correct driver for it. You don’t need to know exactly what system your computer is running or risk downloading and installing the wrong driver.
Here’s how to update drivers with Driver Easy:
1) Download and install Driver Easy.
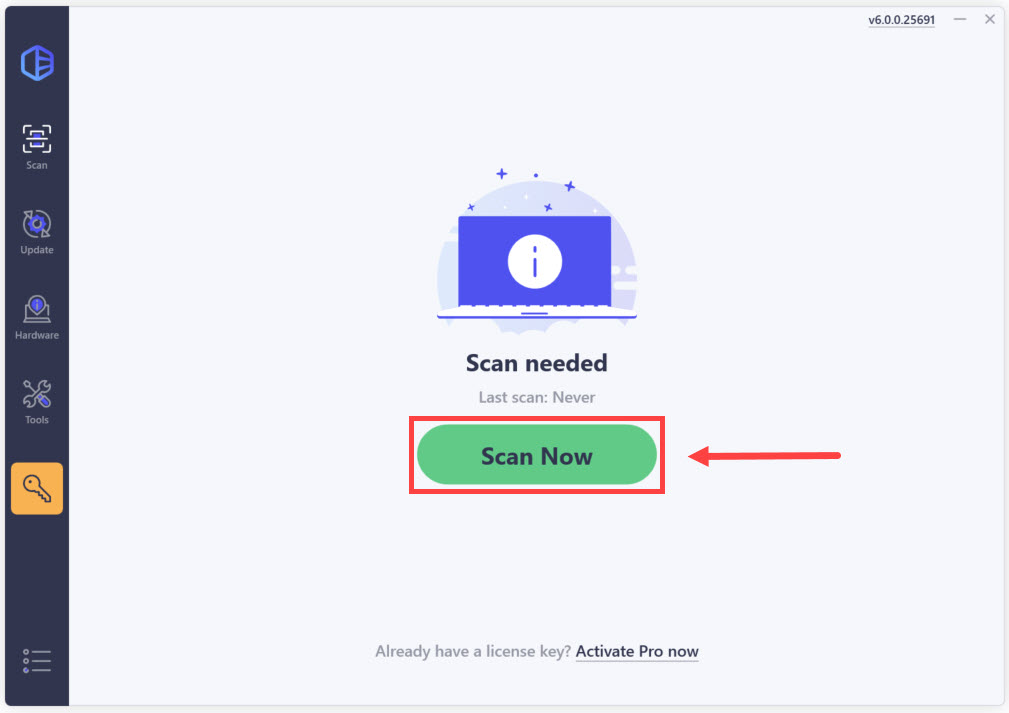
2) Run Driver Easy and click the Scan Now button. Driver Easy will then scan your computer and detect any problem drivers.
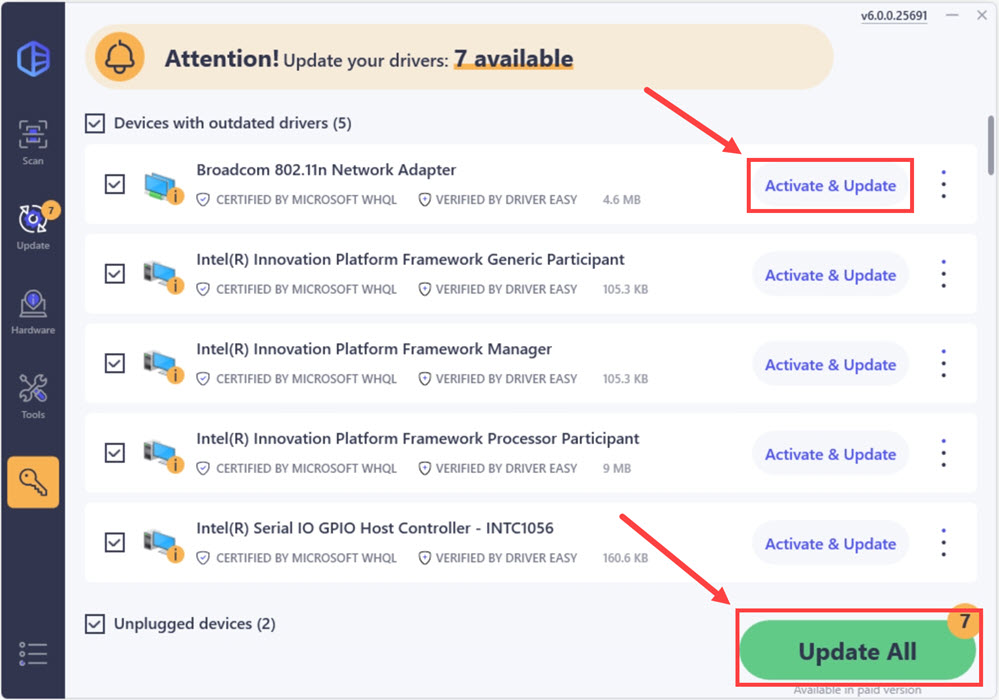
3) Click the Activate & Update button next to the flagged device to automatically download and install the correct version of this driver.
Or click Update All to automatically download and install the correct version of all the drivers that are missing or out of date on your system (You’ll need the Pro version for this – when you select Update All, you’ll get a prompt to upgrade. If you’re not ready to purchase the Pro version, Driver Easy offers a 7-day free trial that provides access to all Pro features, including high-speed downloads and easy installation. No charges will be incurred until the trial period ends.)
After updating your drivers, restart your computer and try to connect to your dedicated server to check if the problem is solved. If not, then continue trying the fixes below.
5. Release and renew IP address
If updating drivers didn’t help you fix the issue, you need to release and renew the IP address of your computer as the issue may be caused by your network connection.
1) Press the Windows logo key to open the Start menu. Type cmd. Right-click Command Prompt from the results and select Run as administrator.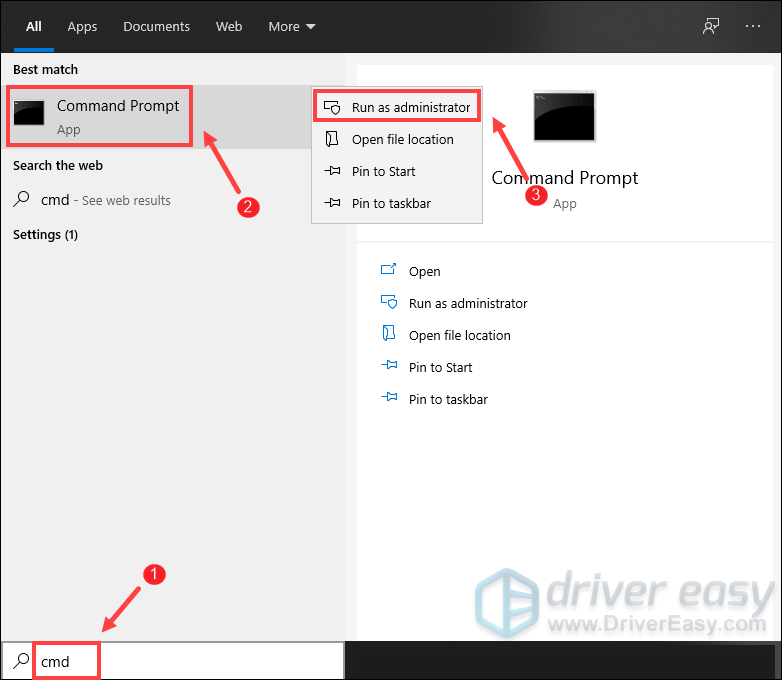
When the User Account Control prompt appears, simply click Yes.
2) In the Command Prompt window that appears, type the following command and then press Enter.
ipconfig /release
After releasing the IP configuration from the active adapter, you need to flush the DNS cache in case the cache has become corrupted. To do this, simply type the following command and then press Enter.
ipconfig /flushdns
Once done, you should be able to receive a message that the task has completed successfully.
The final step you need to take is to renew the IP configuration for the active adapters installed in the system. To do this, simply type the following command and then press Enter.
ipconfig /renew
Once done, close the Command Prompt. And then try to connect to the server your friend is hosting. If you still get the Disconnected error, try the next fix below.
6. Disable IPv6
If you’ve tried all the fixes listed above but still no luck, try disabling IPv6. Some players reported that this helped them fix the problem. Here’s how you can do this:
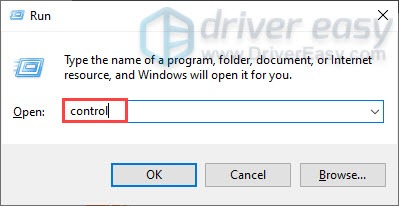
1) On your keyboard, press the Windows logo key and R at the same time to open the Run dialog box.
2) Type control and then press Enter on your keyboard to open the Control Panel.
3) Click Network and Internet. (Note: make sure you view the Control Panel by Category.)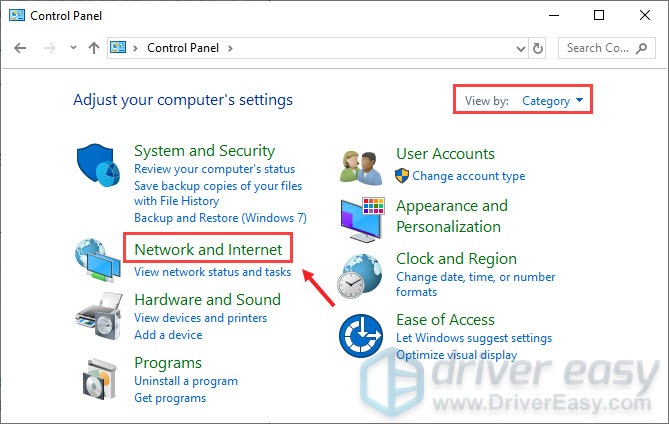
3) Click Network and Sharing Center.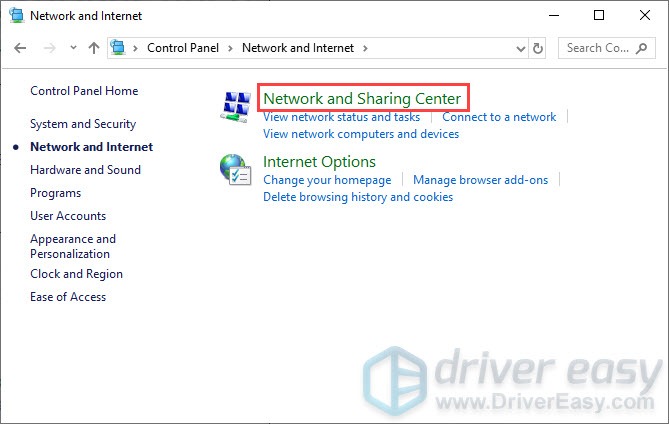
4) Click on your Connections, whether it’s Ethernet, Wifi, or others.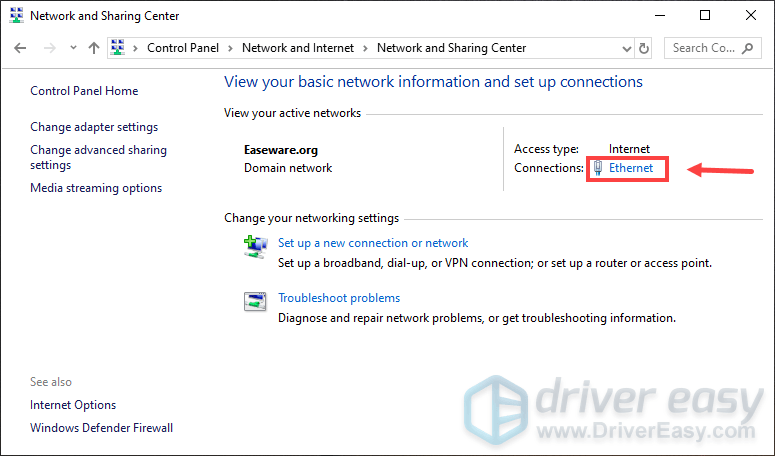
5) Click Properties.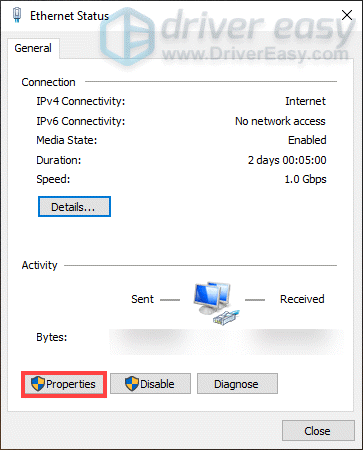
6) Find Internet Protocol Version 6 (TCP /IPv6) and untick it. Then click OK.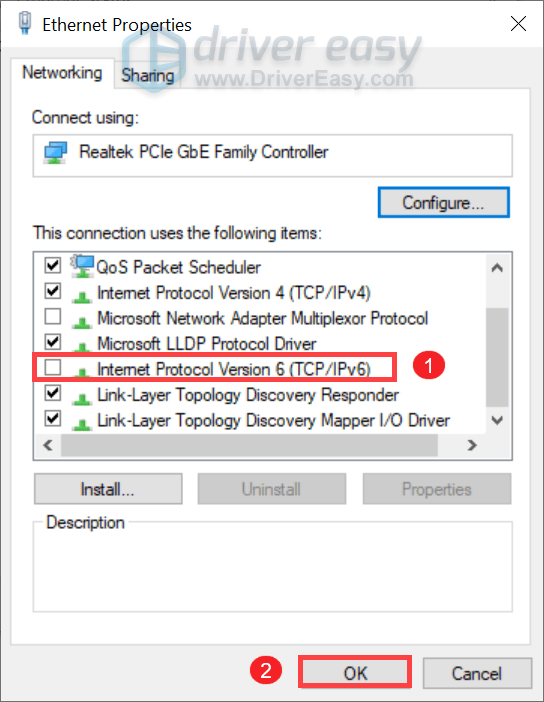
After you’ve done these, join your dedicated server and you should be able to connect.
If your problem persists…
However, in case you still can’t connect the servers, you can try using a VPN. A paid VPN provides you a better performance and helps you avoid bandwidth throttling.
(Note: Some VPN services are free but, as with most things in life, you get what you pay for. Free VPNs are never as good as paid ones; either they’re not as fast or reliable, or they can be forced to share your details with the authorities.)
Our favorite VPN is NordVPN. It’s fast and cheap, and – most importantly – it will keep your IP address hidden.
Hopefully, you can play Valheim with your friends now. If you have any ideas or questions, feel free to drop us a line in the comment section below.


