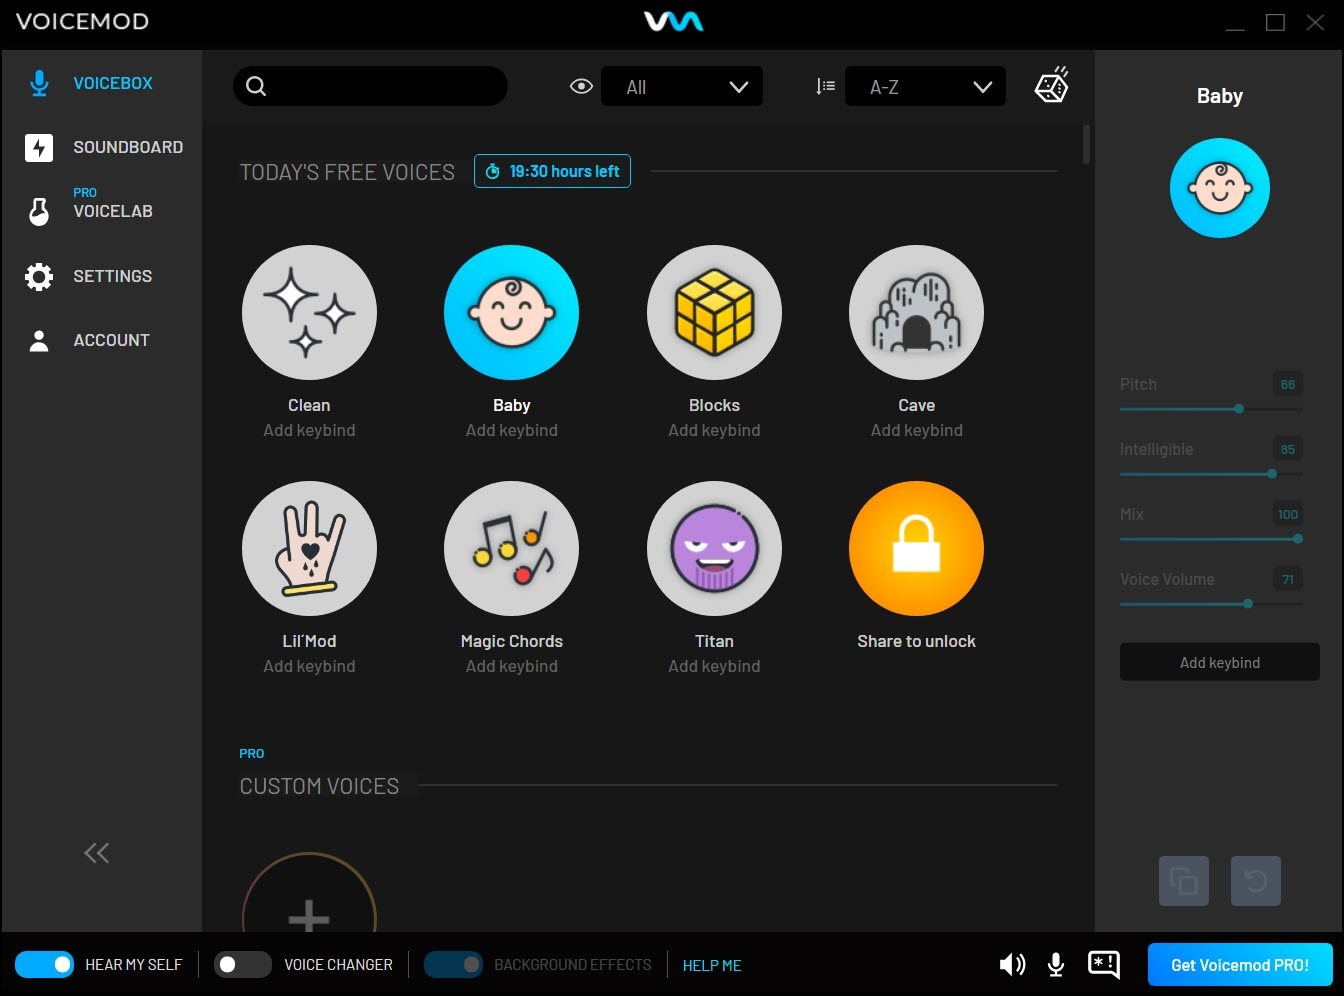
When you’re trying to trick your friends by changing your voice in Discord, Zoom or Fortnite, it’s surely a bummer to learn that your Voicemod Voice Changer isn’t working.
But don’t worry because you’ve hit the right spot. Here we’ve put together some working solutions for you, try them and fix your problem right away.
Try these fixes:
You might not need to try all the fixes. Simply work your way down until you find the one that works for you.
- Restart your PC
- Perform a clean boot
- Make sure your mic is set up properly
- Check settings of the target program
- Reinstall Voicemod drivers
- Install all Windows updates
- Overwrite current version with fresh install
Fix 1: Restart your PC
In some way, a restart of your computer could address software conflicts and fix some faulty settings. Also, some changes might need a reboot to take effect. Restart your PC should always be your first step when troubleshooting voice issues — You’d be surprised how often the “turn it off and turn it back on again” trick works.
If restarting your computer doesn’t give you luck, simply check out the next fix below.
Fix 2: Perform a clean boot
If you have installed other sound control utilities on your PC, you might experience a software or driver conflict which could prevent Voicemod from working properly. You can do a clean boot to check if you can get Voicemod working with only the necessary software and system services.
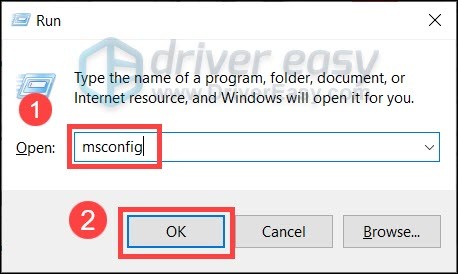
- On your keyboard, press Win+R (the Windows logo key and the r key) at the same time to invoke the Run box. Type or paste msconfig and click OK.
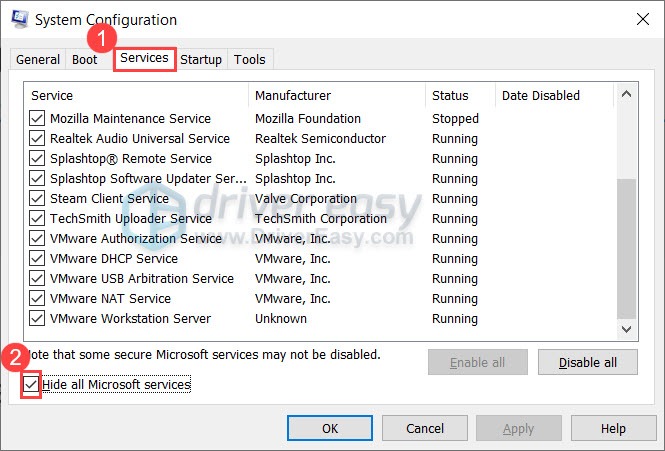
- In the pop-up window, navigate to the Services tab and check the box next to Hide all Microsoft services.
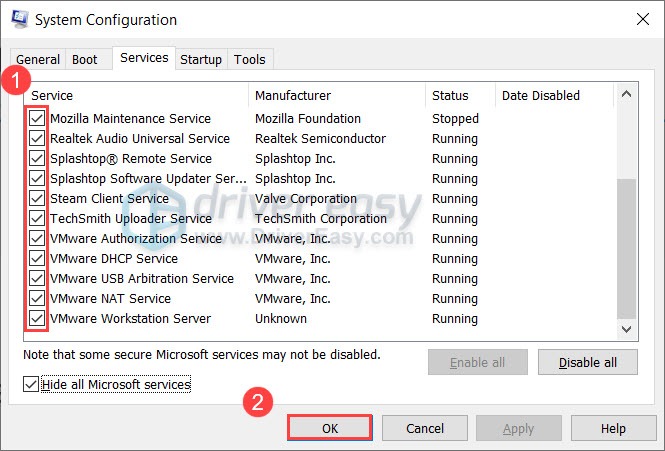
- Uncheck all the services EXCEPT those belong to your hardware manufacturers, such as Realtek, AMD, NVIDIA, Logitech and Intel. Then click OK to apply the changes.
- On your keyboard, press Ctrl, Shift and Esc at the same time to open Task Manager, then navigate to the Startup tab.
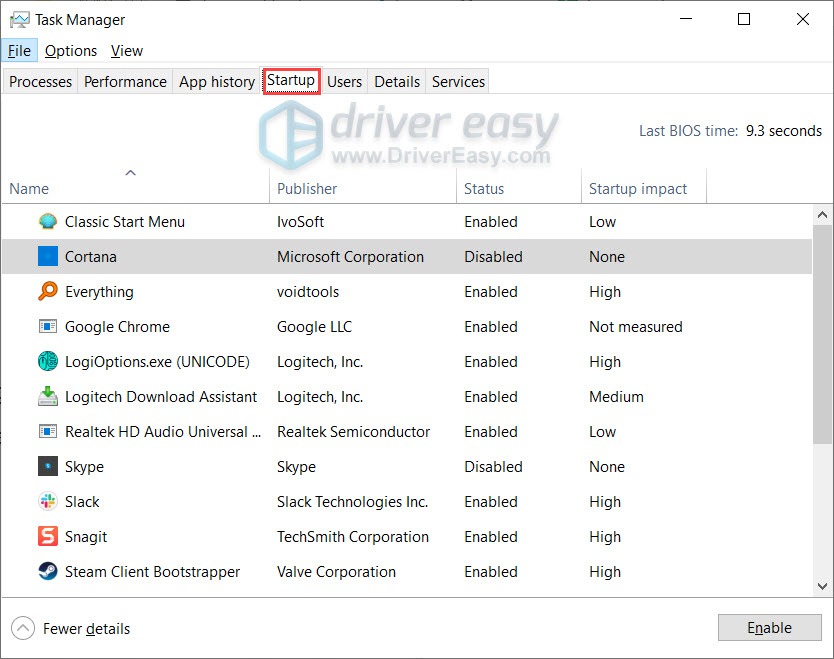
- One at a time, select any programs you suspect might be interfering, and click Disable.
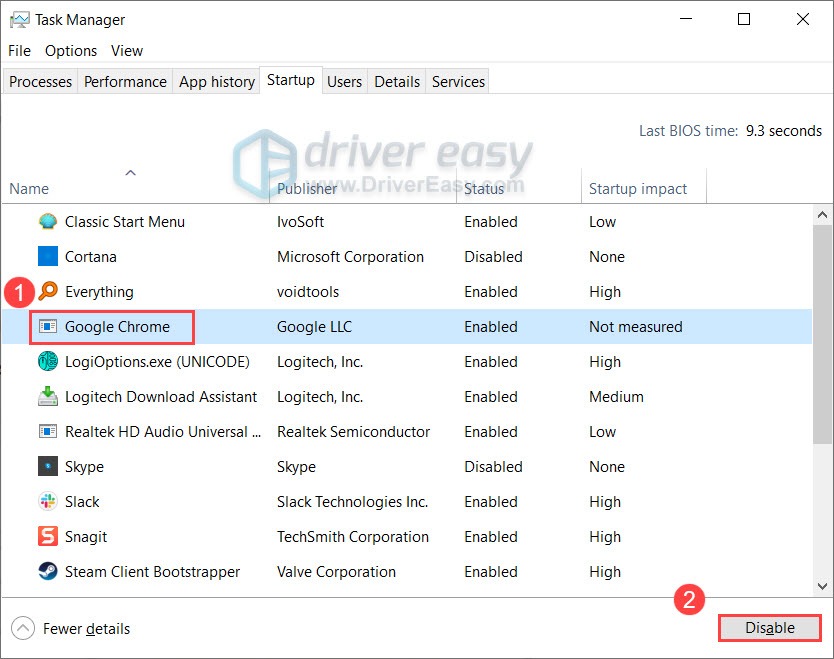
- Restart your PC.
Now check if Voicemod works correctly.
If this doesn’t give you luck, check out the next fix.
Fix 3: Make sure your mic is set up properly
Next you need to make sure your mic is set up correctly, and is working with zero problems. Faulty settings could prevent Voicemod from functioning properly.
You can follow these steps to check:
For Windows 11:
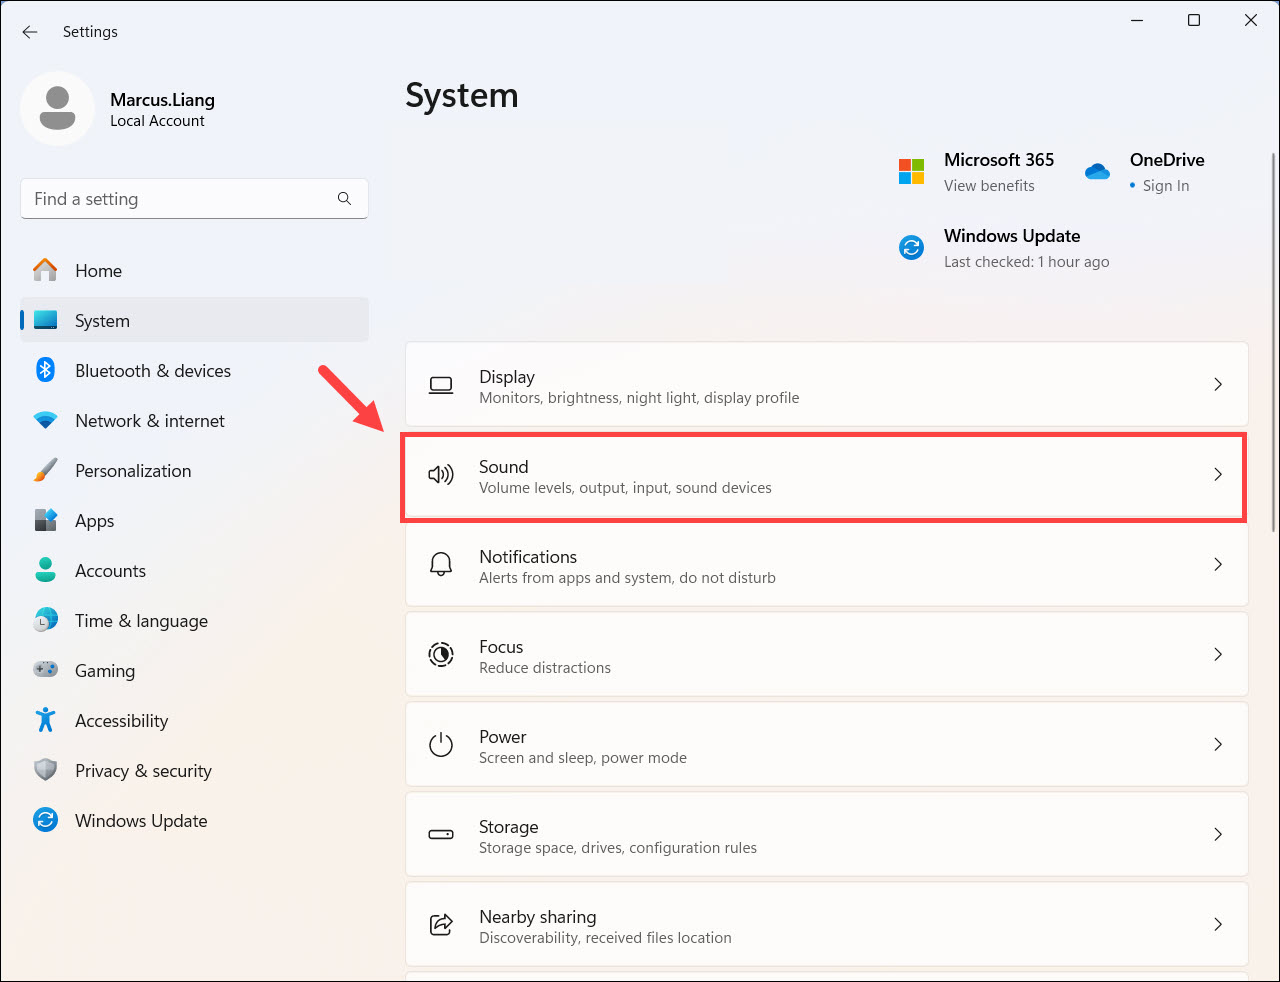
- On your press Win+I (the Windows logo key and the i key) at the same time to open the Windows Settings app. Select Sound.
- Scroll down to the Input section. First select the input device you want as default, then check if the Volume slider is set to above 50.
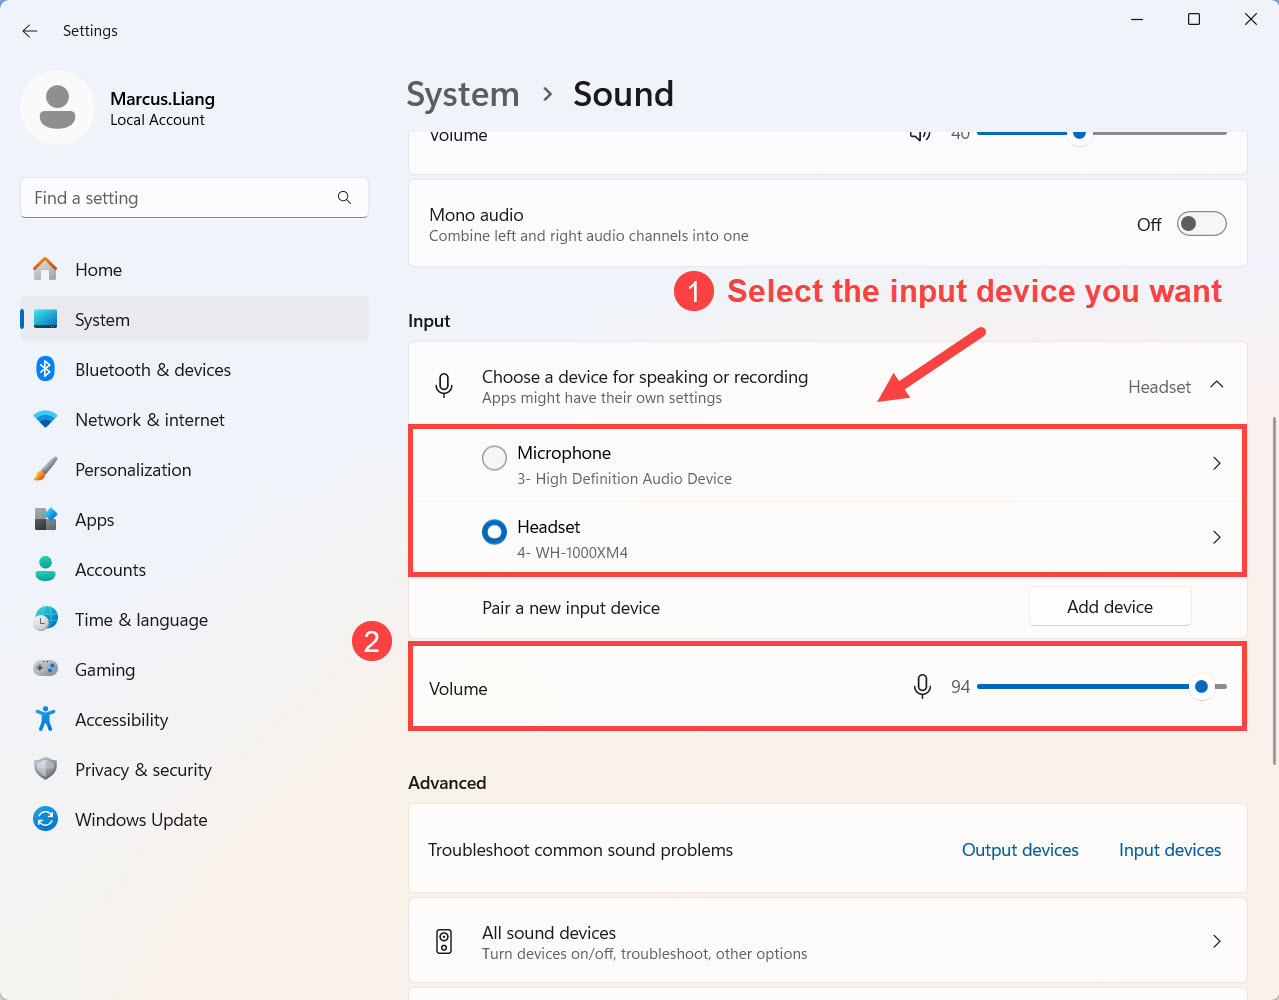
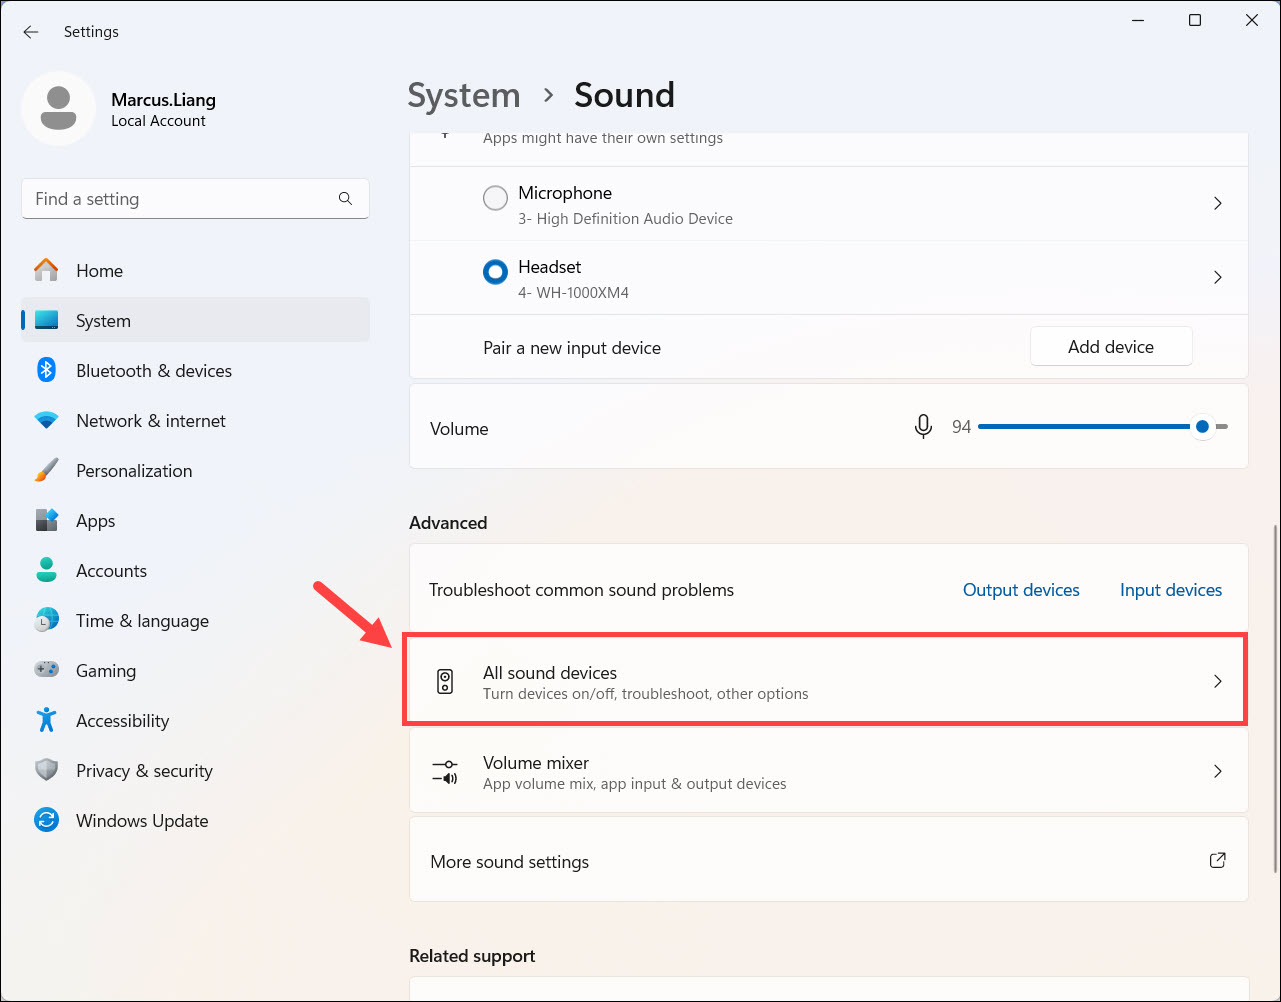
- You’ll also want to check if you have allowed Windows apps to access the input device. Scroll down to Advanced and select All sound devices.
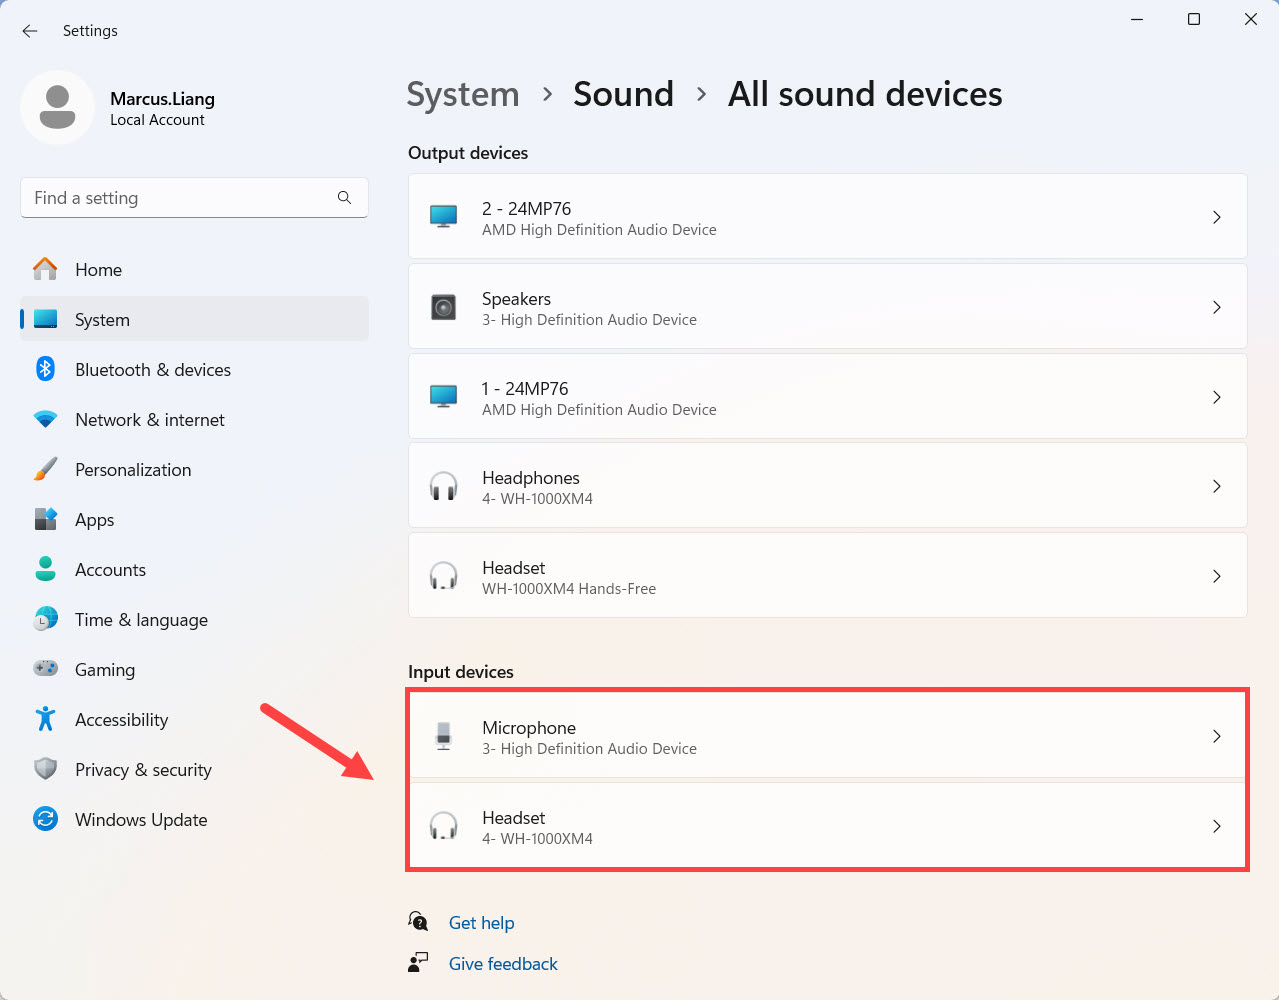
- Scroll down to Input devices. Then select the device you want as the default microphone.
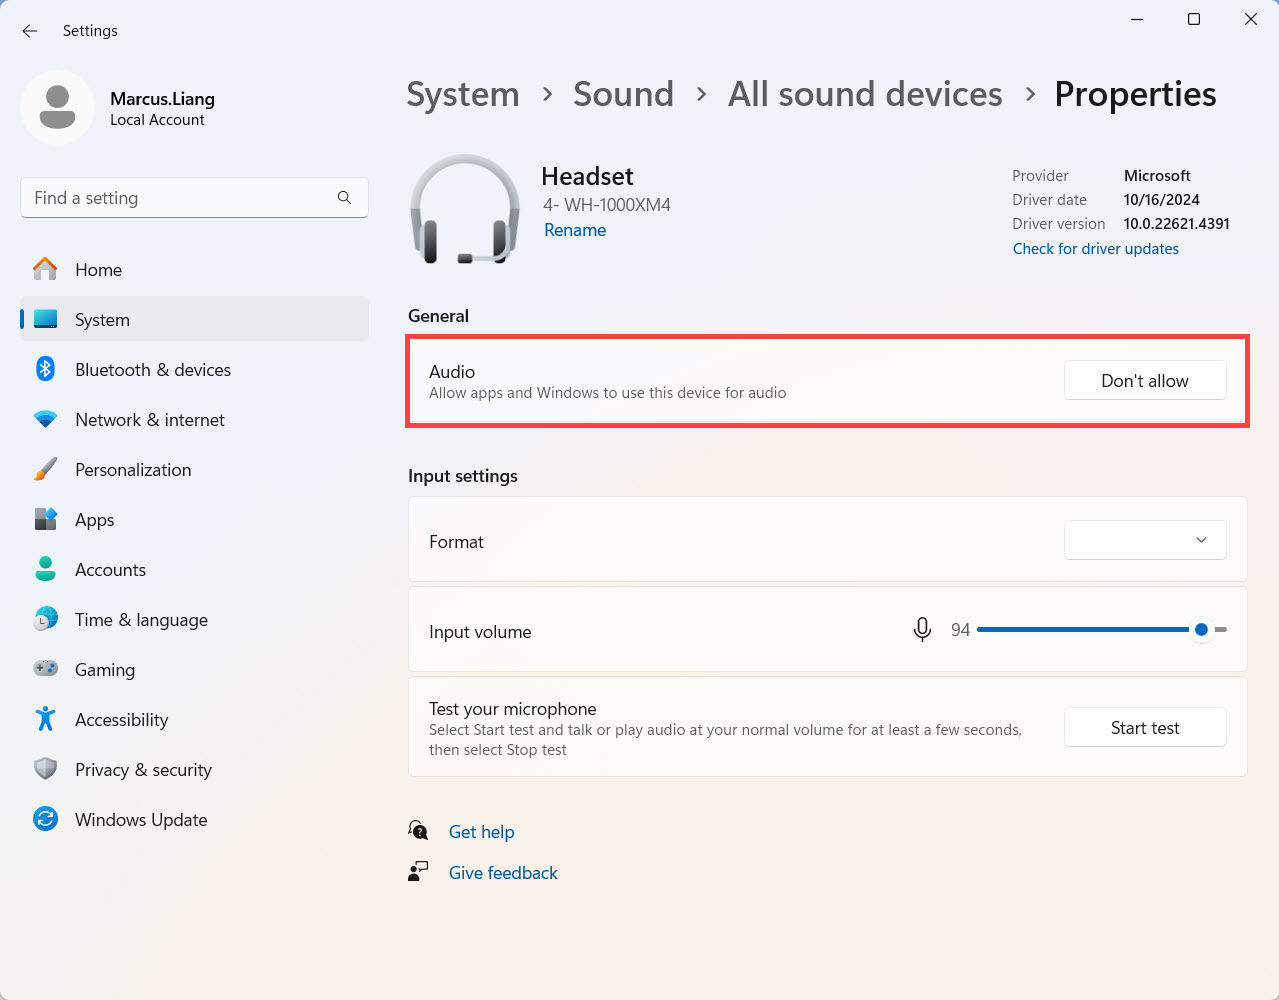
- Make sure you allow apps and Widnows to use this device for audio.
For Windows 10:
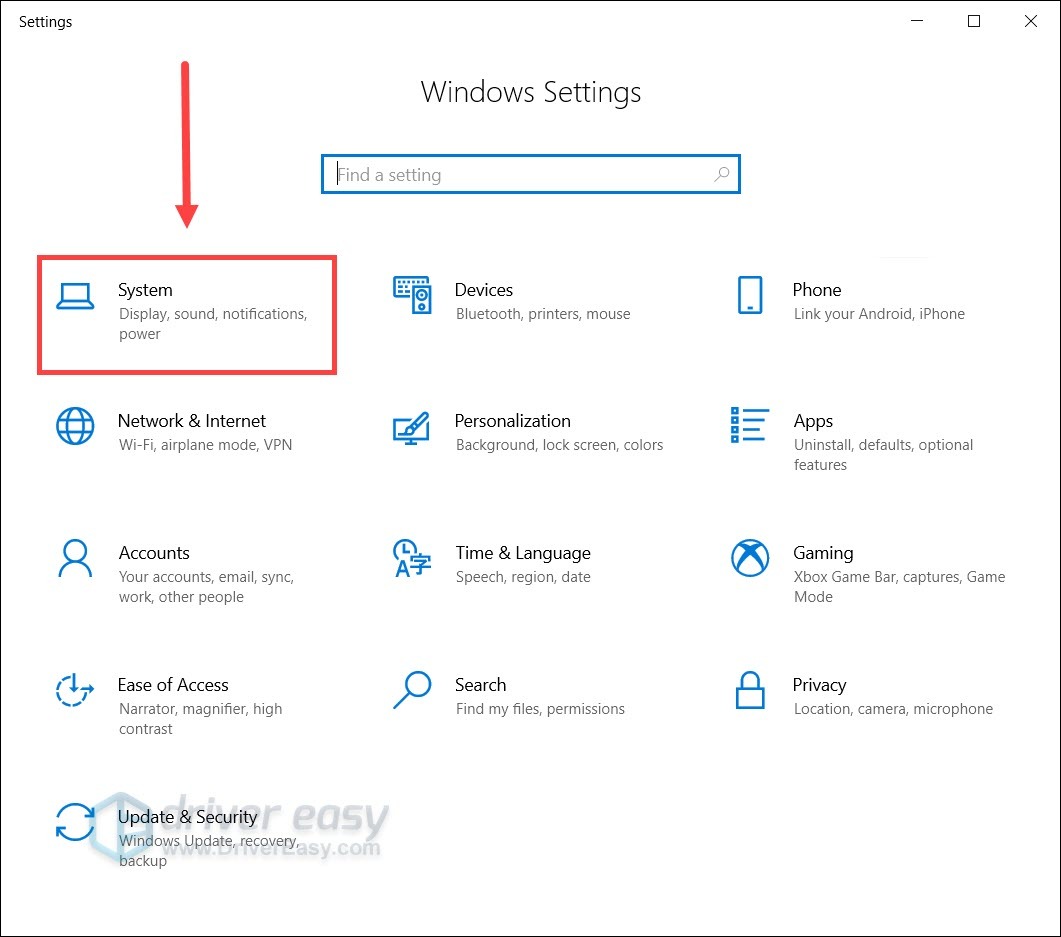
- On your keyboard, press Win+I (the Windows logo key and the i key) at the same time to open the Windows Settings app. Click System.
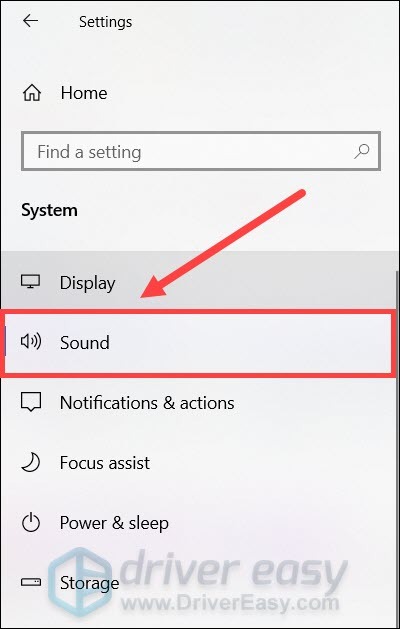
- From the left menu, click Sound.
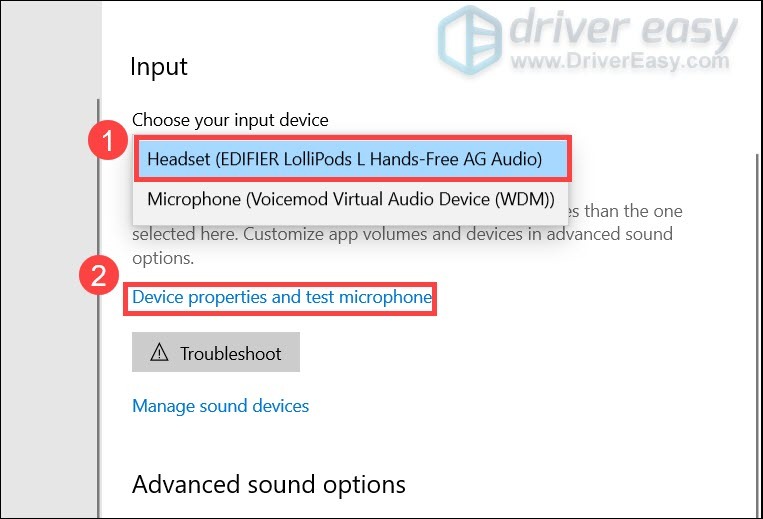
- First you need to test your microphone. Under the Input section, set your input device to the physical one (e.g. Headset) instead of the virtual Microphone of Voicemod. Then click Device properties and test microphone.
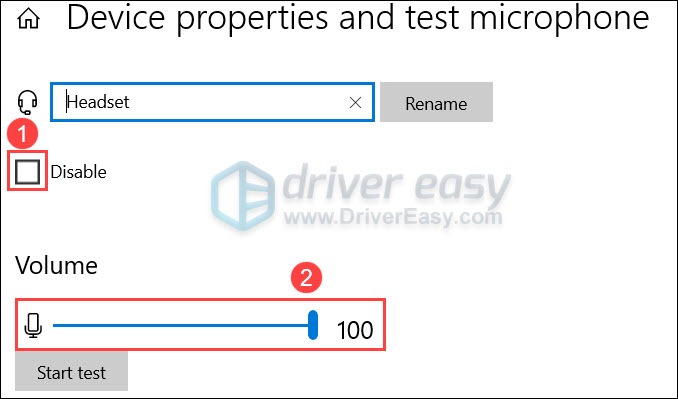
- Make sure you’ve unchecked the box next to Disable, and the slider under the Volume section is set to 100.
- Click Start test and tap or speak to your microphone. Then click Stop test. If you’re prompted The highest value we saw was xx (xx>0) percent, it means your microphone is working correctly.

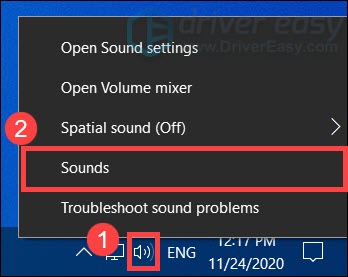
- At the bottom right corner of your screen, right-click the sound icon and select Sounds.
- Navigate to the Recording tab, double click your physical microphone to view its properties.
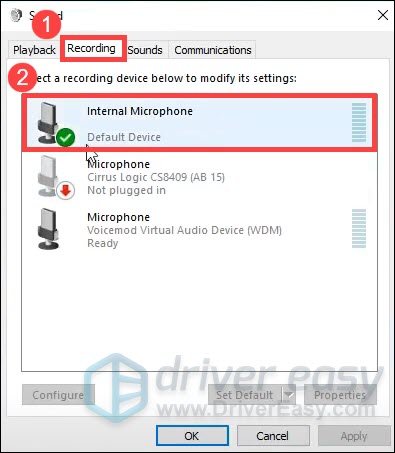
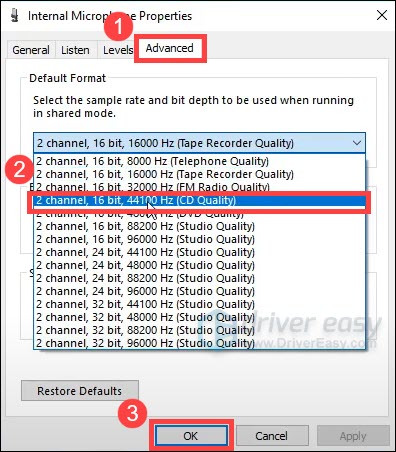
- In the pop-up window, navigate to the Advanced tab. In the Default Format section, check if you can select the sample rate. If yes, change it to 2 channel, 16 bit, 44100 Hz (CD quality). Click OK.
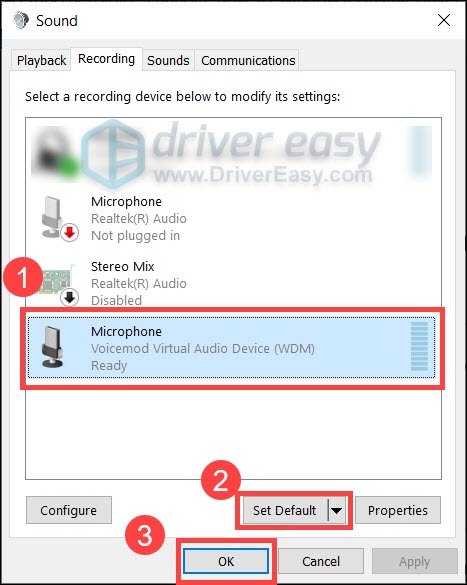
- In the window of step 7, select Microphone Voicemod Virtual Audio Device and click Set Default. Then click OK.
Now you can restart Voicemod and see if it’s working.
If the problem is still there, you can take a look at the next fix.
Fix 4: Check settings of the target program
For your Voicemod to work properly, you should also make sure the target program is configured properly. Software like Discord has its own voice settings, which you should check after installing Voicemod.
Here’s an example of Discord:
- Open Discord and open Settings.
- In the left pane, select Voice & Video. Under INPUT DEVICE, click and select Microphone (Voicemod Virtual Audio Device (WDM)).
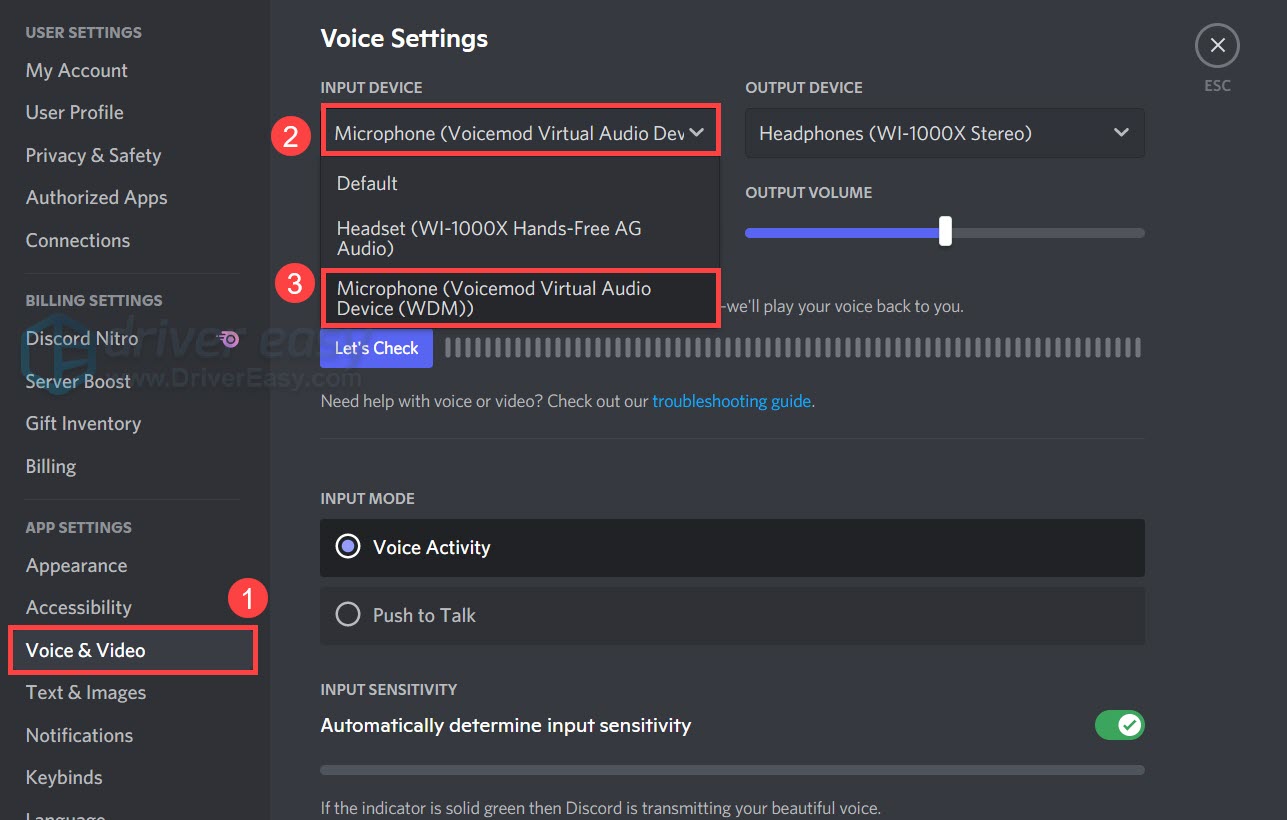
- Now you can check if Voicemod is working correctly.
If this doesn’t work for you, simply move on to the next fix.
Fix 5: Reinstall Voicemod drivers
In some cases, the problem indicates you’re using faulty or outdated drivers. To fix that, you can simply reinstall the Voicemod driver.
First you need to uninstall the Voicemod driver:
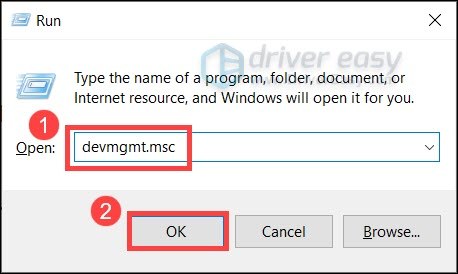
- On your keyboard, press Win+R (the Windows logo key and the r key) at the same time to invoke the Run box. Type or paste devmgmt.msc and click OK to open Device Manager.
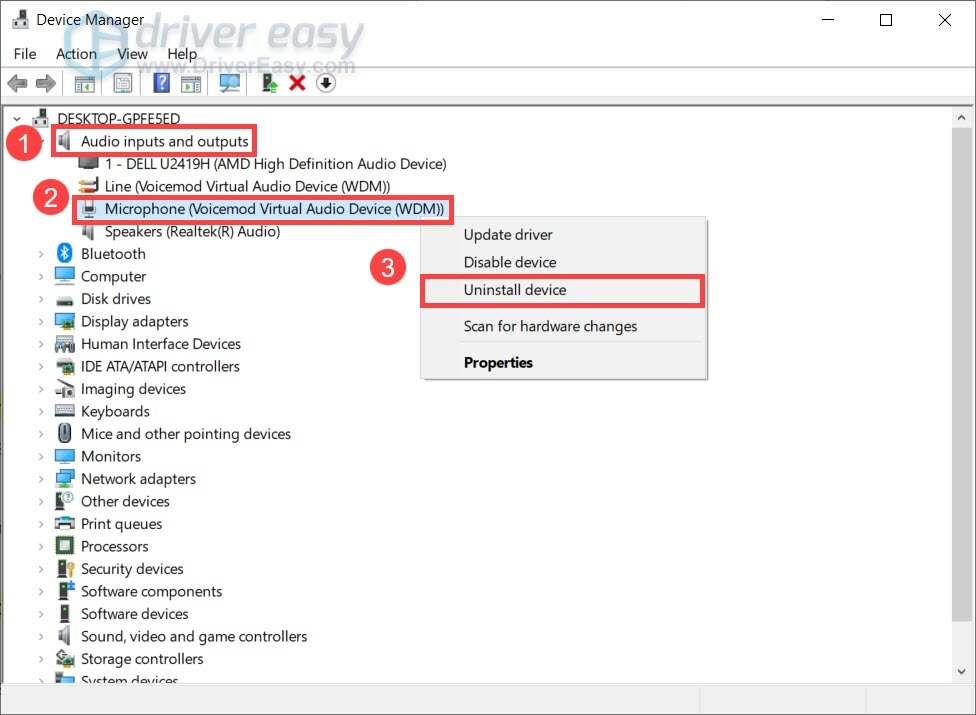
- Click to expand Audio inputs and outputs. Right-click Microphone (Voicemod Virtual Audio Device (WDM)) and select Uninstall device.
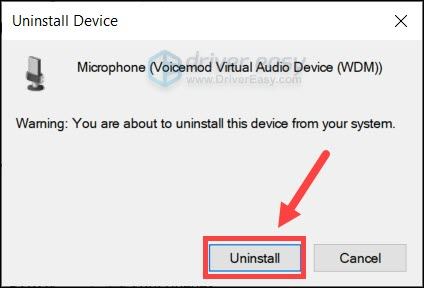
- In the pop-up window, click Uninstall.
- Restart your PC.
Next you’ll need to install the Voicemod driver. You can do that manually or automatically.
Option 1: Install the Voicemod driver manually
If you’re familiar with computer hardware, you can try to install the driver manually. To do so, simply visit the Voicemod official website, then follow the instructions to install.
Option 2: Install the Voicemod driver automatically (Recommended)
If you don’t have the time, patience or computer skills to install the Voicemod driver manually, you can, instead, do it automatically with Driver Easy. It will automatically recognize your system and find the correct drivers for your devices, and your Windows version, and it will download and install them correctly:
- Download and install Driver Easy.
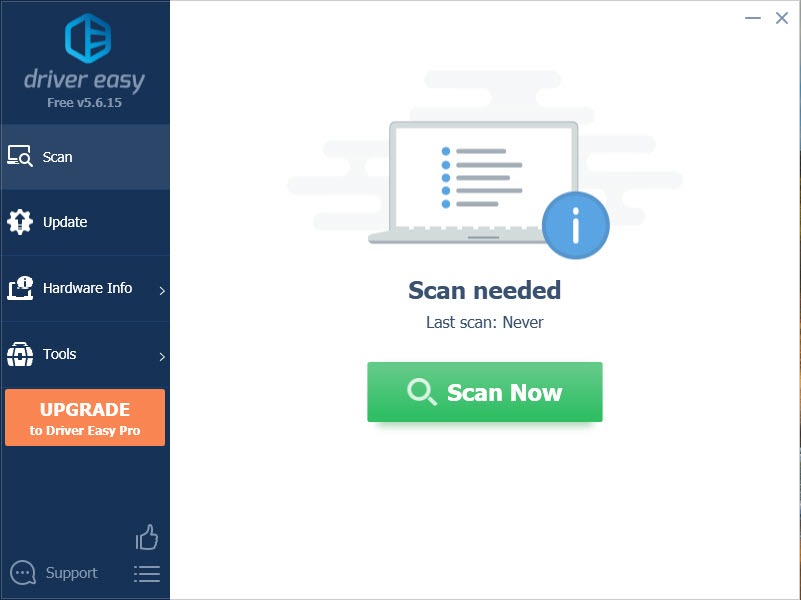
- Run Driver Easy and click the Scan Now button. Driver Easy will then scan your computer and detect any problem drivers.
- Click Update All to automatically download and install the correct version of all the drivers that are missing or out of date on your system.
(This requires the Pro version – you’ll be prompted to upgrade when you click Update All. If you don’t want to pay for the Pro version, you can still download and install all the drivers you need with the free version; you just have to download them one at a time, and manually install them, the normal Windows way.)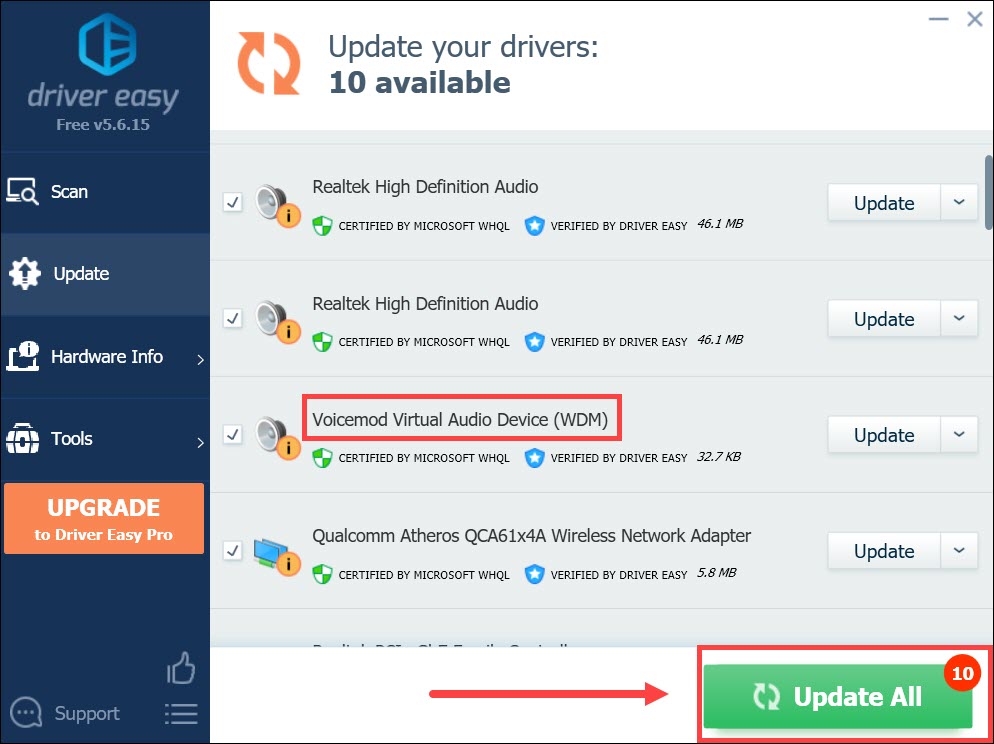
Once you’ve installed the Voicemod driver, restart your PC and see if you can change your voice with Voicemod.
Fix 6: Make sure Windows is up to date
Windows 10 includes 2 types of updates, which respectively offer security patches and a performance boost. Sometimes Windows updates fix some software or driver conflicts automatically. Given this, your voice chat issue could be easily solved by updating your system.
Here’s a quick guide for that:
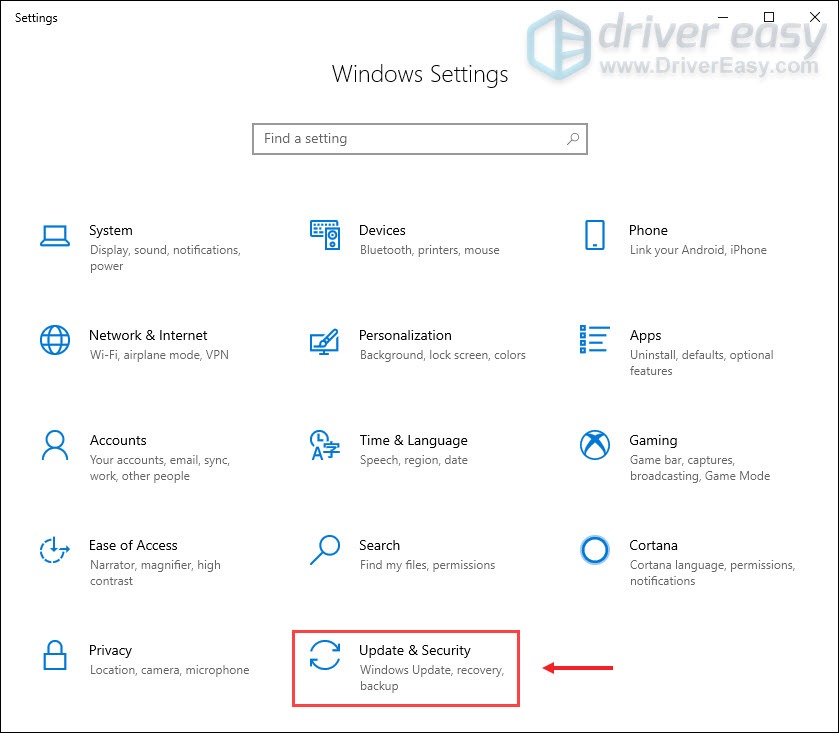
- On your keyboard, press Win+I (the Windows logo key and the i key) to open the Windows Settings app. Click Update & Security.
- Click Check for updates. Windows will then search and install the system updates automatically.
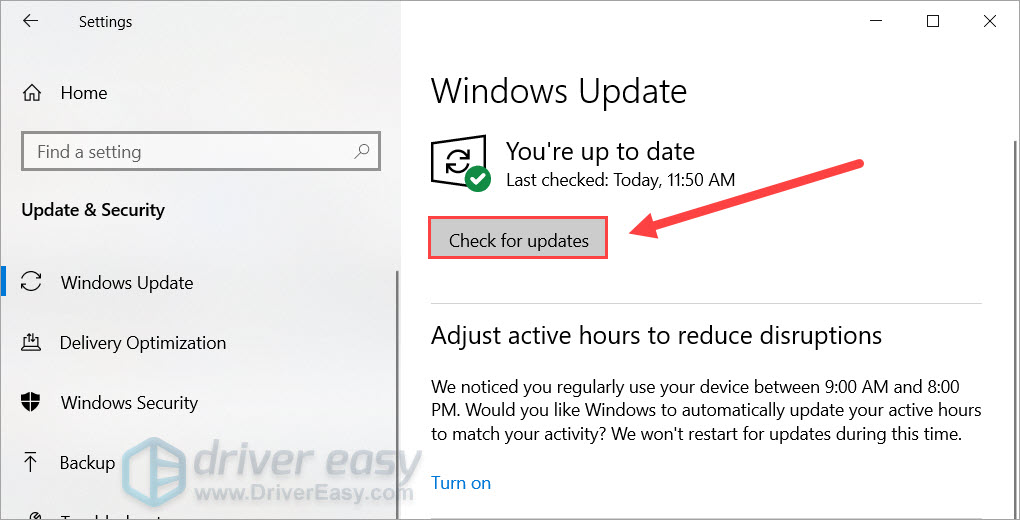
Once complete, restart your PC and check if Voicemod is working correctly.
If this fix doesn’t work for you, simply try the next one below.
Fix 7: Overwrite current version with fresh install
Some users reported that reinstalling could fix the Voicemod issue. You can try the same and see if this works. Note that this time we’re taking a different approach—instead of uninstalling, we just overwrite the current version with the latest.
To do so, simply go to the Voicemode website and download the latest installer. Next open it and follow the on-screen instructions to proceed. This will automatically overwrite the previous build.
So these are the fixes to your Voicemod not working issue. If you have any questions or ideas, feel free to leave a comment and we’ll get back to you shortly.


