


Lose your network connection? Don’t worry. If you’re on Windows 10, and you’re seeing this error saying Can’t connect to this network, you’re not alone. Many Windows users are reporting it. The good news is you can fix it. Read on to find how…
Fixes for ‘Can’t connect to this network’:
- Uninstall your network adapter driver
- Update your network adapter driver
- Disable 802.1 1n mode of your network adapter
- Reset your router
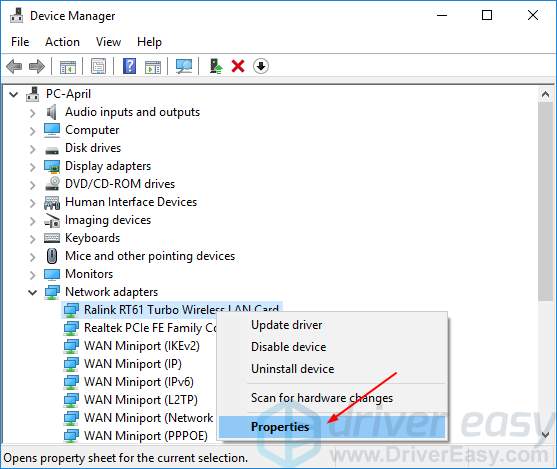
Solution 1: Uninstall your network adapter driver
When “Can’t connect to this network” error occurs on your Windows 10, it’s probably there’s something wrong with your network adapter. So as the top 1 solution, we advise you uninstall your network adapter and then let your Windows 10 reinstall the driver automatically.
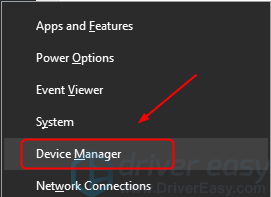
1) On your keyboard, press the Windows logo key and X key together to open quick-access menu.
2) Click Device Manager.
3) Click Network adapters, then right-click on your network adapter and select Uninstall device.
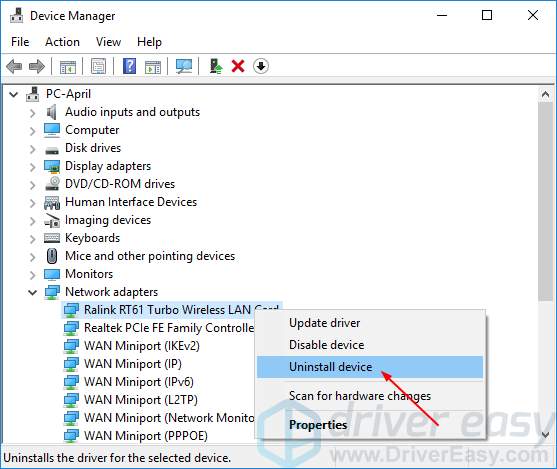
4) Tick on Delete the driver software for this device. Then click Uninstall.

5) Reboot your Window 10 and try to establish your network connection to see if it works.
Solution 2: Update your network adapter driver
This problem could be also caused by the old or incorrect network driver. If you’re not confident playing around with drivers manually, you can do it automatically with Driver Easy.
Driver Easy will automatically recognize your system and find the correct drivers for it. You don’t need to know exactly what system your computer is running, you don’t need to risk downloading and installing the wrong driver, and you don’t need to worry about making a mistake when installing.
You can update your drivers automatically with either the FREE or the Pro version of Driver Easy. But with the Pro version it takes just 2 clicks (and you get full support and a 30-day money back guarantee):
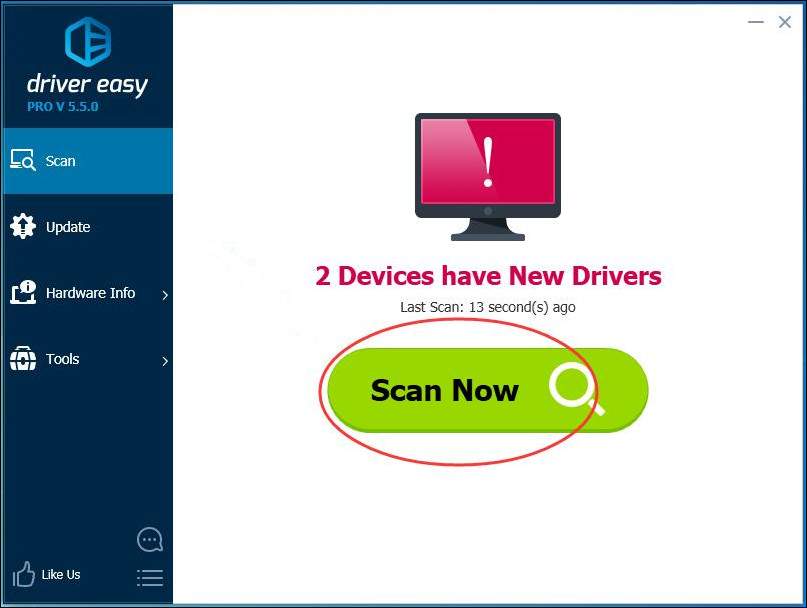
1) Download and install Driver Easy.
2) Run Driver Easy and click Scan Now button. Driver Easy will then scan your computer and detect any problem drivers.
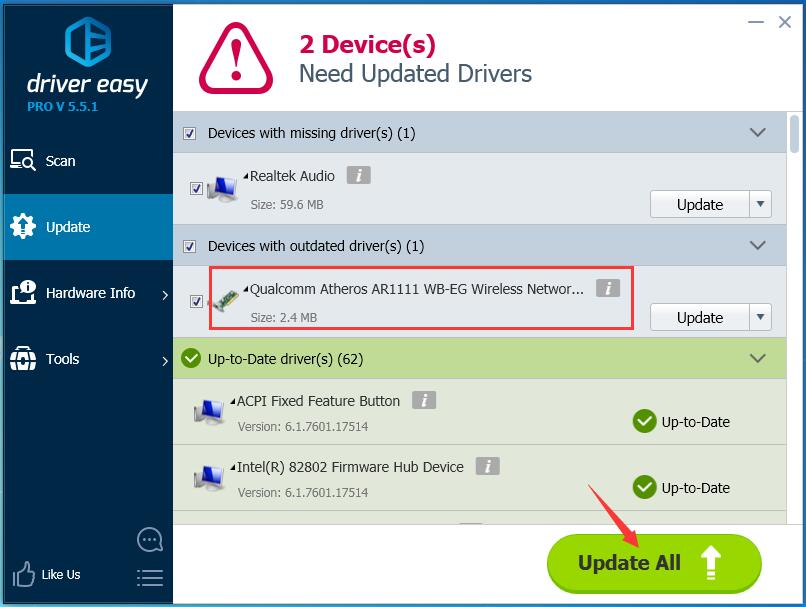
3) Click the Update button next to a flagged network adapter driver to automatically download and install the correct version of this driver (you can do this with the FREE version).
Or click Update All to automatically download and install the correct version of all the drivers that are missing or out of date on your system (this requires the Pro version – you’ll be prompted to upgrade when you click Update All).
NOTICE: It needs network connection for Driver Easy help you update all the driver with one-click. But without Internet, you still can use its Offline Scan feature to update your network adapter drivers.
4) Reboot your Window 10 and try to establish your network connection to see if it works.
Solution 3: Disable 802.1 1n mode of your network adapter
1) On your keyboard, press the Windows logo key and X key together to open quick-access menu.
2) Click Device Manager.
3) Click Network adapters, then right-click on your network adapter and select Properties.
2) Click the Advanced section, then click 802.1 1n Mode and set the Value to Disabled.
Click OK.
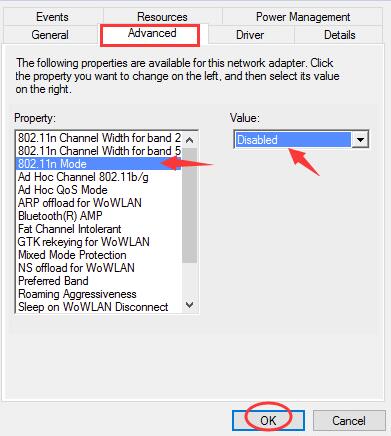
3) Try to establish your network connection to see if it works.
Solution 4: Reset your router
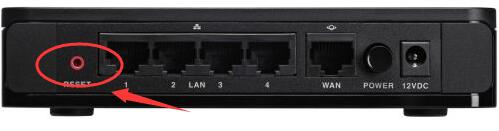
According to many users reported, reset their routers help them fix the error. Thus make sure to reset your router to try to fix the error.
You can use the reset button on your router or unplug and reconnect your router to reset it.
When it’s done, try to establish your network connection to see if it works.

Only way for me to fix is shutting down computer, having to do this hourly makes me want to smash it. None of this worked still the same. It’s fine for 1 hr then it boots me and won’t let me reconnect until I shut down pc I bet it’s windows 10 pulling nonsense
No ok
Still not working. I didnt have problems before this hotel
I really like this drivereasy solutions, they are very helpful to resolve all kind of windows issues. Thank you so much
solution 3 doesnt exist, those options are not there,
solution 1 and 2 didnt work.
solution 4 isnt a solution but a work around, can go resetting my router every 15 minutes!!!
get it right ya…
none of these worked!!! except rebooting the router… which is not a solution. its a work-around.
solution 3 doesnt exist!
Solution 1 worked on my Surface Pro 6. I only got the error with ONE specific network, while all other networks were working fine. Anyways, they all work now after trying solution 1.
Solution 1 worked for me thanks. If any Windows tech people are out there, kindly feed back to HQ that “can’t connect to network” is completely useless as a diagnostic message. The wireless adapter should automatically connect to any known network (ie those for which you have a password) and perhaps any network not in use for a week or more should be “auto forgotten” in order to prevent connection clutter.
nothings working
Solution 1 worked thank you SO MUCH.
I’ve had multiple Windows 10 computers with this problem, and never once seen the option to set 802.1 1n Mode to Disabled. I’ve only had the option to change it from Long and Short to Long Only. Also, the solution to the problem seems different every time. Maybe Windows should fucking fix it already?
I have the same problem. The wifi is working for a while, but after that is not connecting (Can’t connect to this network), just when I restart the laptop. I have uninstalled the driver, but it’s the same… I’ve tried to 3. solution, but I have not the option 802.11 n mode, just this: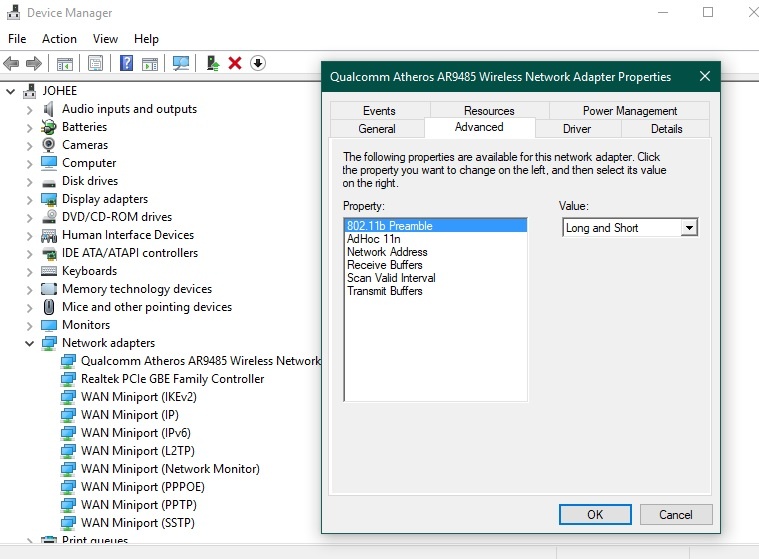
solution one worked! Quick and easy, thank you so much!
This website is constantly solving all of my windows 10 woes thank you! Number 3 worked like a charm
Solution 3 worked for me.
I know solution 3 will work for me,but that option is not available to me,is there any other way to disable 802.11n mode.
Tried other solutions but didn’t worked for me.
i have the same options i could NT find the wireless 3 to uninstall can u please help me how to solve this issue
What do you see when you select the Value: drop down when 802.11n Channel Width for 2.4GHz is selected in the Property list as shown above?
(In my Properties list, I see a ‘802.11n/ac Wireless Mode’ choice. When I select that, one of the choices in the Value: drop down is ‘Disabled’. Setting the value to Disabled allowed me to connect to the public network for which I was seeing the ‘Can’t connect to this network’ error until I made the change.)
April Cai, thanks very much for your help!!!
Solution 1 worked perfectly! Thank you very much
Just try step 3 first – it instantly solved my problem. Thank-you very much – consider yourselves bookmarked.
Can i share this post to my blog?
Hi, M. Rudianto. Sure, no problem. Great thanks for your sharing. ?