If you’re a Windows 10 user, you might encouter contant or random freezes. These freezes occur almost randomly and without much useful feedback. This is not only frustrating but also makes it a lot harder to troubleshoot. But the good news is, it can be fixed.
Try these fixes
Here are a few fixes that have helped other users resolve their ‘Windows 10 freezes randomly’ problem. You may not need to try them all; just work your way down the list until you find the one that works for you.
- Update your drivers
- Clear your computer’s temp files
- Adjust your virtual memory
- Repair your system files
- Run a memory check
- Run Disk Check
- Disable C-States in BIOS
- Switch to ChromeOS
Method 1: Update your drivers
The Windows 10 freezing problem can be caused by outdated drivers. So to fix the problem, you can try to update the drivers. If you don’t have the time, patience, or computer skills to update the drivers manually, you can do it automatically with Driver Easy.
Driver Easy will automatically recognize your system and find the correct drivers for it. You don’t need to know exactly what system your computer is running, you don’t need to risk downloading and installing the wrong driver, and you don’t need to worry about making a mistake when installing.
Here’s a step-by-step guide to automatically updating your drivers with Driver Easy:
1) Download and install Driver Easy.
2) Run Driver Easy and click Scan Now. Driver Easy will then scan your computer and detect any problem drivers.
3) Click Update All to automatically download and install the correct version of all the drivers that are missing or out of date on your system. (Note: Upon selecting the ‘Update All’ option, you will be asked to upgrade to the Pro version. A 7-day free trial, including all Pro features like high-speed download and one-click install, is available if you’re not ready for the Pro version yet. Rest assured, you won’t incur any charges until after the 7-day trial.)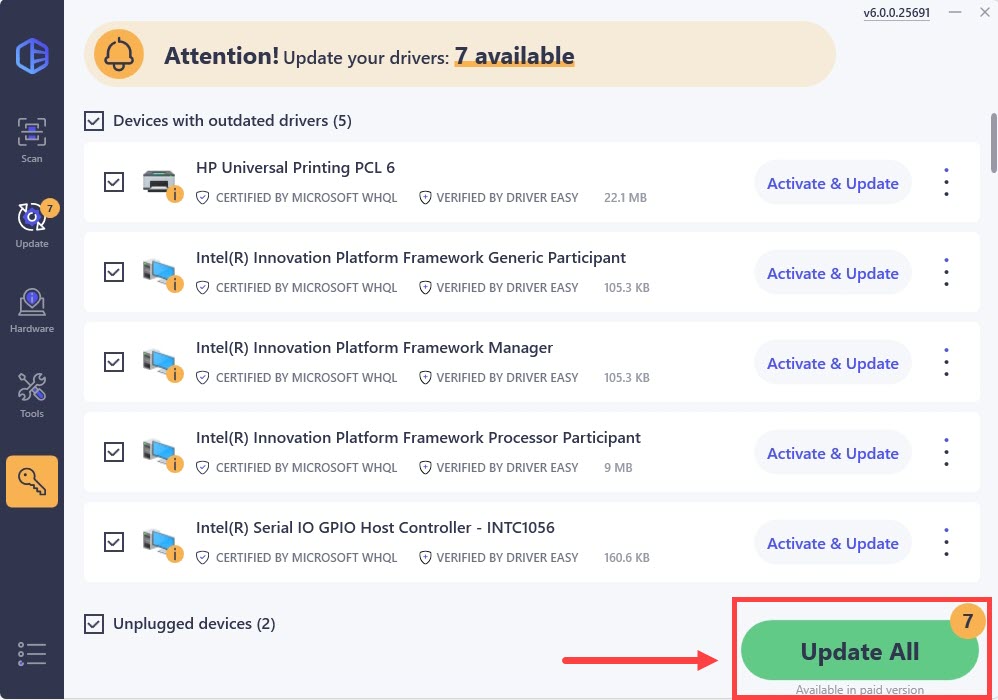
4) Check to see if your computer still freezes randomly after updating the drivers. If the problem persists, you know your drivers weren’t to blame, and you should try the next fix.
Method 2: Clear your computer’s temp files
If Windows doesn’t have enough space to store temp files, it can slow down or even freeze. So you should clear them regularly.
1) On your keyboard, press Windows key and R at the same time, then in the Run form, type temp and hit Enter. This will invoke Windows Explorer with your Temp folder open, showing you all the temp files on your computer.
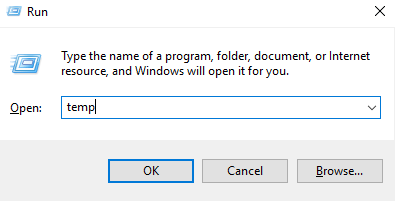
2) Select all the files in the Temp folder and delete them.
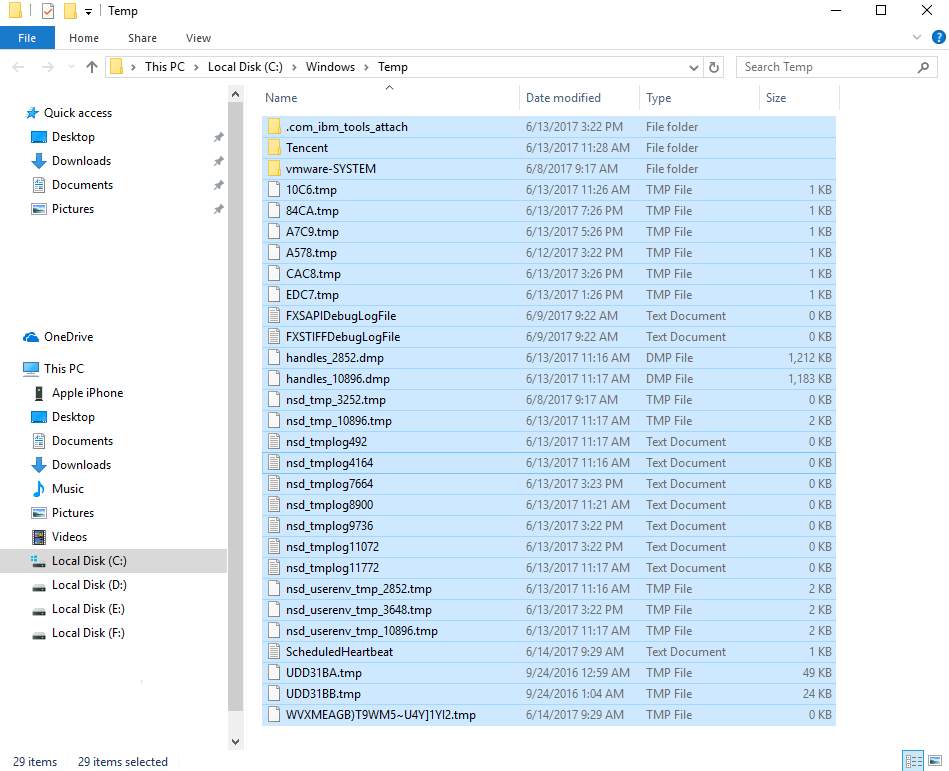
If Windows 10 is still randomly freezing after clearing your temp files, try the next fix.
Method 3: Adjust your virtual memory
Virtual memory is basically an extension of your computer’s physical memory. It is a combination of RAM and a portion of your hard drive. If your computer runs out of RAM when performing an intensive task, Windows will dip into virtual memory for temporary file storage.
1) On your keyboard, press Windows key and Pause/ Break key at the same time. Then choose Advanced System Settings on the left panel.
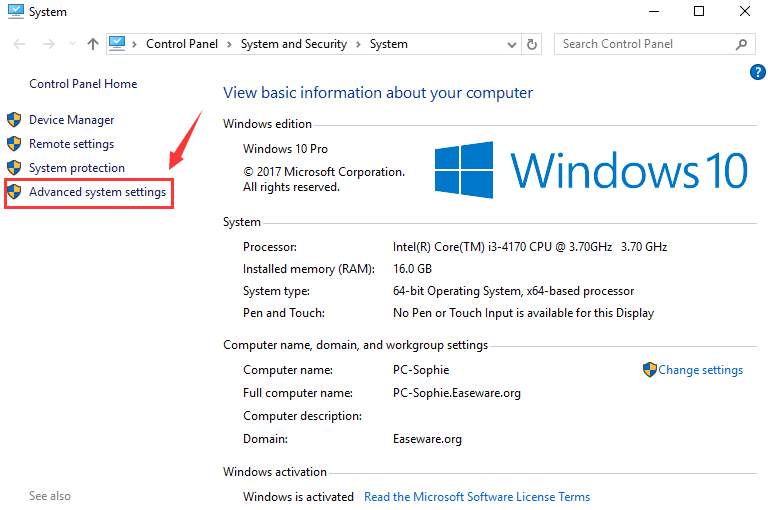
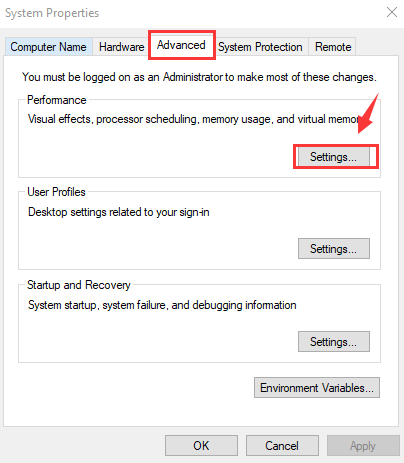
2) Go to the Advanced tab, then click Settings.
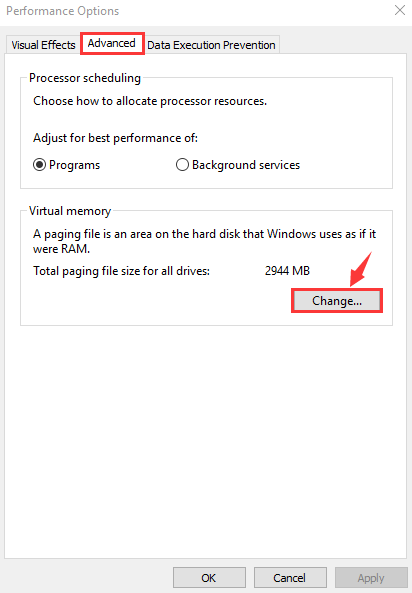
3) Go to the Advanced tab again, and choose Change… in the Virtual memory section.
4) Ensure the Automatically manage paging file size for all drives checkbox is NOT ticked.
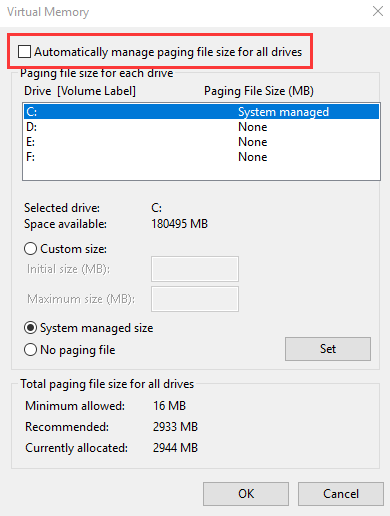
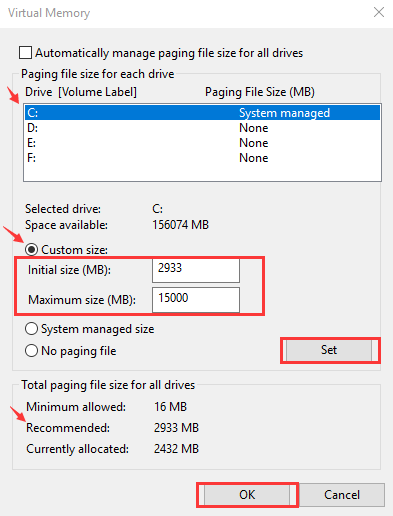
5) Select your windows drive (the hard drive or partition that has Windows installed on it – usually C:), and enter an Initial size and Maximum size for your virtual memory:
- Initial size – This value varies, depending on your computer. If you’re not sure what value to use, just enter whatever the number is in the Recommended category.
- Maximum size – Don’t set this value too high. It should be about 1.5 times the size of your physical RAM. e.g. A PC with 4 GB (4096 MB) of RAM should have no more than about 6,144 MB virtual memory (4096 MB x 1.5).
Once you’ve entered your virtual memory values, click Set, then click OK to continue.
If you’re still having problems with Windows 10 hanging after adjusting your virtual memory, try the next fix.
Method 4: Repair your system files
Corrupt, damaged, or missing system files can cause Windows to randomly freeze. To check if this is the exact cause, you can either use the Windows built-in tool to run a basic check or use an automatic tool to perform a complete diagnosis.
Microsoft makes it easy for you to get your original system files back. It has an in-built tool called System File Checker that will restore any broken or missing system files that could be causing your PC to freeze.
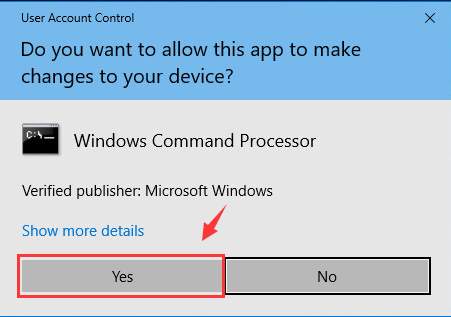
1) Press the Windows key on your keyboard, then type cmd (DON’T press Enter). Windows will display a list of programs that match your search. Right-click Command Prompt and choose Run as administrator.

If prompted to provide administrator permission, click Yes.
2) In the black Command Prompt window, type:
sfc /scannow
Then press Enter on your keyboard.
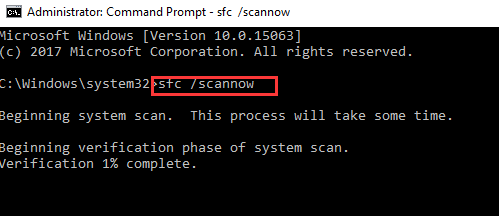
Windows will scan your system for corrupted files, and attempt to fix any it finds. The results will display in this window, so please leave it open until the operation is complete.
If the scan finds no problems, you know your system files aren’t the cause of Windows 10 randomly freezing, and you can move on to the next fix.
Method 5: Run a memory check
A faulty memory card is one of the most common causes of computer freezes. So before you invest in a new computer, check to see if your memory card is at fault. Microsoft has a built-in tool to help you do this.
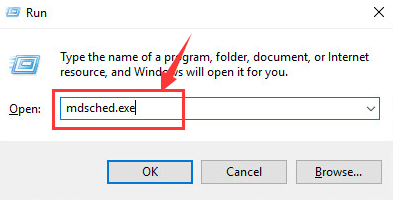
1) On your keyboard, hold the Windows logo key and press R at the same time to invoke a Run command. Type mdsched.exe in the run box and hit Enter.
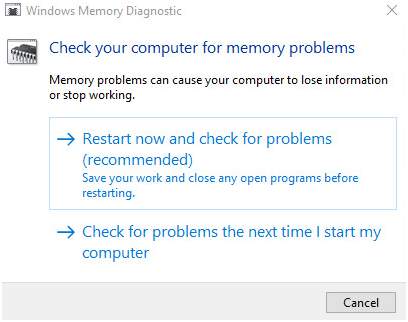
2) If you want to check for problems immediately, click Restart now and check for problems(recommended). If you want to check later, click Check for problems the next time I start my computer.
3) Windows will then restart, and you’ll see this page showing the progress of the check and the number of passes it will run on memory.
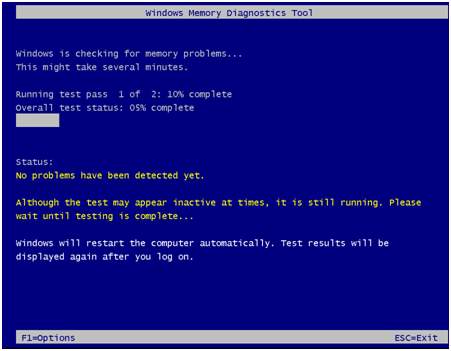
If you don’t see any errors here, your memory card probably isn’t the problem, and you should try the next fix.
Method 6: Run Disk Check
If you’ve come this far, it’s time for you to check if your hard disk is at fault. Don’t worry, this is easy to do, because Windows has a built in tool for the job…
1) Close all open programs and files.
2) Click Start > File Explorer > This PC.
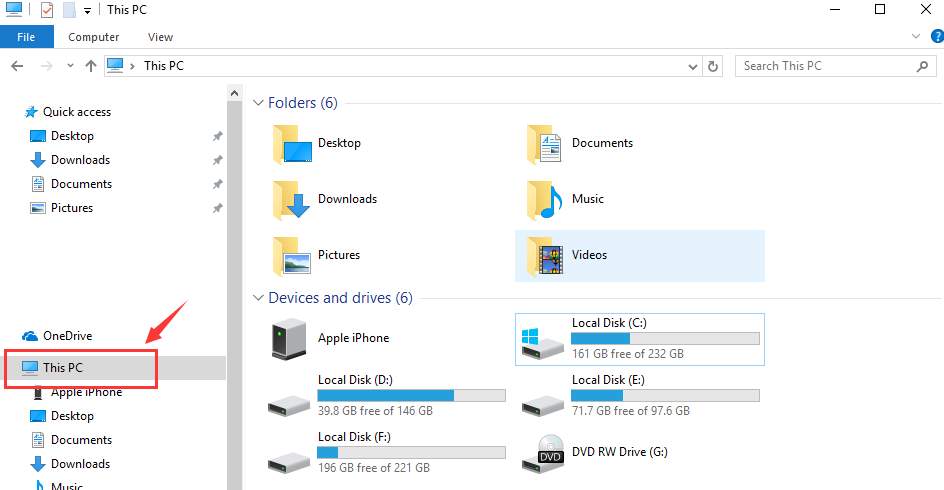
3) Locate the hard drive you’d like to check, right-click on it and choose Properties.
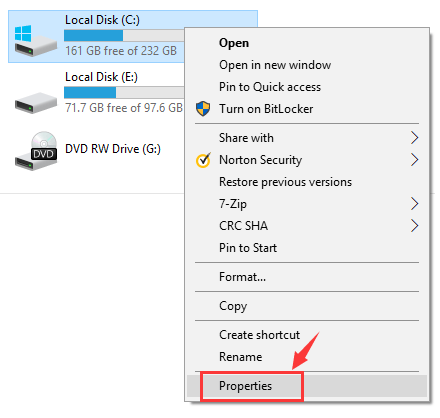
4) Go to the Tools tab and click Check.
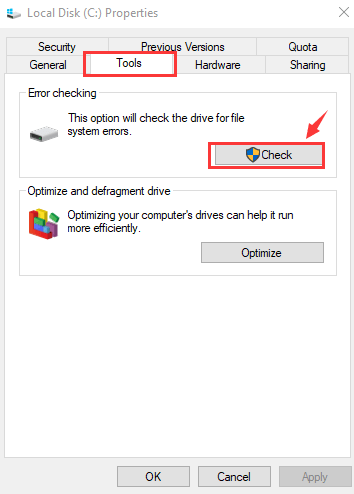
5) If your hard disk drive is problem-free, you’ll see this:
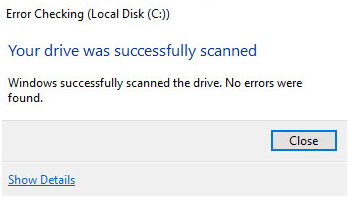
This suggests your hard disk is NOT the problem, and you can move on to the next fix below.
If you DO see errors, it’s possible they’re causing Windows to freeze, and you should consider upgrading your disk.
Method 7: Disable C-States in BIOS
“C-States” is short for “CPU States”. They’re basically power-saving options – they turn down your system’s voltage, multipliers, etc. so your computer uses as little power as possible when it’s idle. Disabling C-States (turning off the power saving options) can make your computer more stable, and reduce the chance of unexpected problems like random freezing or rebooting. To disable C-States:
1) Restart your computer, and when you see the logo screen (example below), press the Setup key defined by your manufacturer. It should be listed on the logo screen. (Different manufacturers use different keys, but it’s usually F2, F1, Esc, F12, Delete or a combination of these keys.)
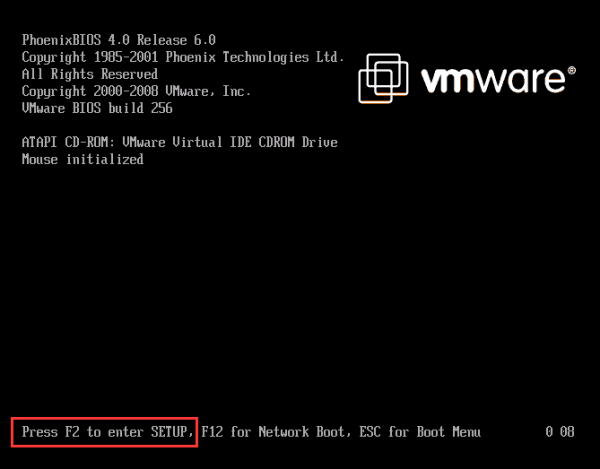
If you’re not fast enough, and the logo screen disappears before you hit the Setup key, just wait for Windows to finish starting up, then restart your computer and try again.
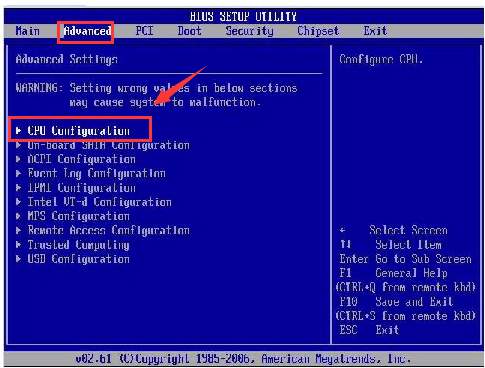
2) Once in your BIOS setup, use the arrow keys on your keyboard to navigate to the main menu. Go to Advanced tab, and choose the CPU Configuration option.
3) Both C1E Function and Intel(R) C-STATE tech should be Disabled. If they’re not, use your keyboard up and down arrows to navigate the list of options, highlight the setting you want to change, press Enter on your keyboard, then press the up or down arrow on your keyboard to change the value to Disabled.
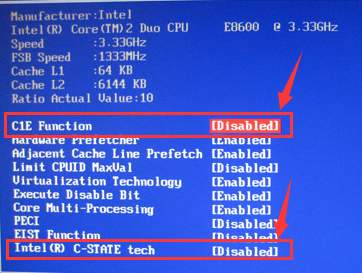
After changing these settings, save and exit the BIOS settings as per the instructions on your screen, then restart your computer again.
Method 8: Switch to ChromeOS
Windows is a very old technology. Sure, Windows 10 is relatively new, but it’s still just the latest iteration of a decades-old operating system, designed for a bygone era (pre-internet).
Now that we have the internet, fast connection speeds, free cloud storage, and endless web apps (like Gmail, Google Docs, Slack, Facebook, Dropbox and Spotify), the entire Windows way of doing things – with locally installed programs and local file storage – is totally outdated.
Why is that a problem? Because when you’re constantly installing uncontrolled third-party programs, you’re constantly opening the door to viruses and other malware. (And Windows’ insecure permission system compounds this problem.)
Plus the way Windows manages installed software and hardware has always been a problem. If your computer shuts down unexpectedly, or a program installs, uninstalls or updates incorrectly, you can get ‘registry’ corruptions. That’s why Windows PCs always slow down and become unstable over time.
Also because everything’s installed and saved locally, it doesn’t take long before you run out of disk space, and your disk gets fragmented, which makes everything even slower and more unstable.
For most people, the simplest way to solve Windows problems is to ditch Windows altogether, and switch to a faster, more reliable, more secure, easier to use and cheaper operating system…
ChromeOS feels much like Windows, but instead of installing heaps of programs to email, chat, browse the internet, write documents, do school presentations, create spreadsheets, and whatever else you normally do on a computer, you use web apps. You don’t need to install anything at all.
That means you don’t have virus and malware problems, and your computer doesn’t slow down over time, or become unstable.
And that’s just the start of the benefits…
To learn more about the benefits of ChromeOS, and to see comparison videos and demos, visit GoChromeOS.com.
Hopefully these fixes resolve your Windows 10 random freezing problem. Please let us know how you go by commenting below. (Also, if you discover any different fixes for this problem, please feel free to tell us about them in a comment below.)


