If The Finals is not launching on your computer, don’t worry, you’re definitely not alone: many gamers are experiencing the same problem. There are many reasons why The Finals fails to launch on your PC: lacking system permission, outdated display driver, corrupted system and game files, etc. And we have gathered here some of the most effective fixes that’ll help The Finals to launch again on your machine.
Try these fixes for The Finals not launching problem
You don’t have to try all the following fixes: simply work your way down the list until you find the one that does the trick to fix The Finals not launching problem for you.
- Check the system requirements for The Finals
- Run the game as administrator
- Modify Windows graphics settings
- Verify the integrity of game files
- Turn off overlay
- Install The Finals on another drive
- Disable memory-intensive programs
- Update display card driver
1. Check the system requirements for The Finals
When The Finals doesn’t launch on your computer, you should first make sure that your computer is good enough to run this game. You may have already checked the required system specs, but we don’t want you to miss the most obvious, just in case. Here are the system requirements for The Finals for your reference:
| Minimum | Recommended | |
| OS | Windows 10 or later 64-bit (latest update) | Windows 10 or later 64-bit (latest update) |
| Processor | Intel Core i5-6600K or AMD Ryzen R5 1600 | Intel Core i5-9600K or AMD Ryzen 5 3600 |
| Memory | 12 GB RAM | 16 GB RAM |
| Graphics | NVIDIA GeForce GTX 1050Ti or AMD Radeon RX 580 | NVIDIA GeForce RTX 2070 or AMD Radeon RX 5700 XT |
| DirectX | Version 12 | Version 12 |
| Storage | 18 GB available space | 18 GB available space |
If you’re not sure how to check your computer specs, you can press the Windows key and the R key on your computer at the same time, then type msinfo32 to check your system specs in detail:

If your machine is below or just at the requirements, you may need to upgrade your hardware for The Finals to launch properly.
When you’re sure that your machine meets the system requirements, but The Finals still refuses to launch, please move on to the other fixes below.
2. Run the game as administrator
When The Finals refuses to launch on your computer, you may need to make sure that all rights are granted to run Steam and the game. To see if a lack of system permissions is the culprit to The Finals’ not launching problem, you can do the following to run it as administrator:
- Right-click your Steam icon and select Properties.

- Select the Compatibility tab. Tick the box for Run this program as an administrator. Then click Apply > OK to save the changes.

- You can also try to run The Finals in compatibility mode by ticking the box for Run this program in compatibility mode for: then select Windows 8 from the dropdown list.

Now try to run The Finals (which should be opened with administrative permission) to see if it still crashes. If the problem still remains, please move on to the next fix.
3. Modify Windows graphics settings
When The Finals isn’t launching on your computer, you may also want to check the Windows graphics settings to make sure that they’re not stopping the game from launching. To do so:
- On your keyboard, press the Windows key and the I key at the same time to open Settings.
- Select Gaming, and make sure that the toggle for Game Mode is set to On. Then click the Graphics tab.

- Select The Finals or Steam from the list of apps, and select High performance.

- Then click Change default graphics settings.

- Make sure that the toggles for Hardware-accelerated GPU scheduling and Optimizations for windowed games are both set to On.

Try to run The Finals again to see if it launches well. If the problem remains still, please move on to the next fix, below.
4. Verify the integrity of game files
Corrupted or missing files will cause crashing problems that will stop The Finals from launching as well. To see if this is the case, you can verify your game files on Steam. To do so:
- Launch Steam.
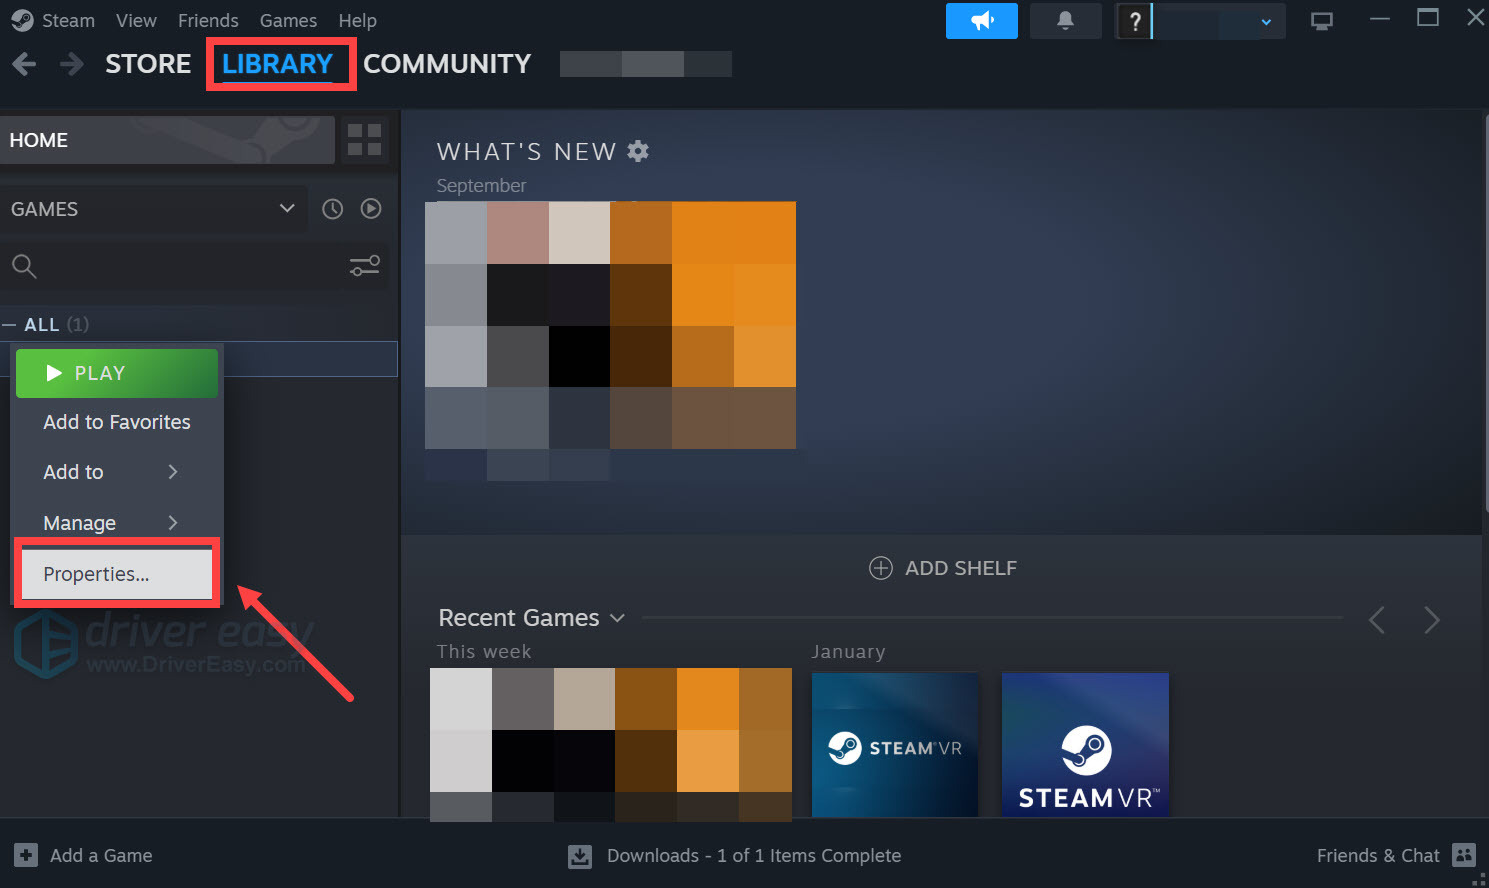
- In the LIBRARY, right-click on The Finals and select Properties from the drop-down menu.
- Select the Installed Files tab and click on the Verified integrity of game files button.
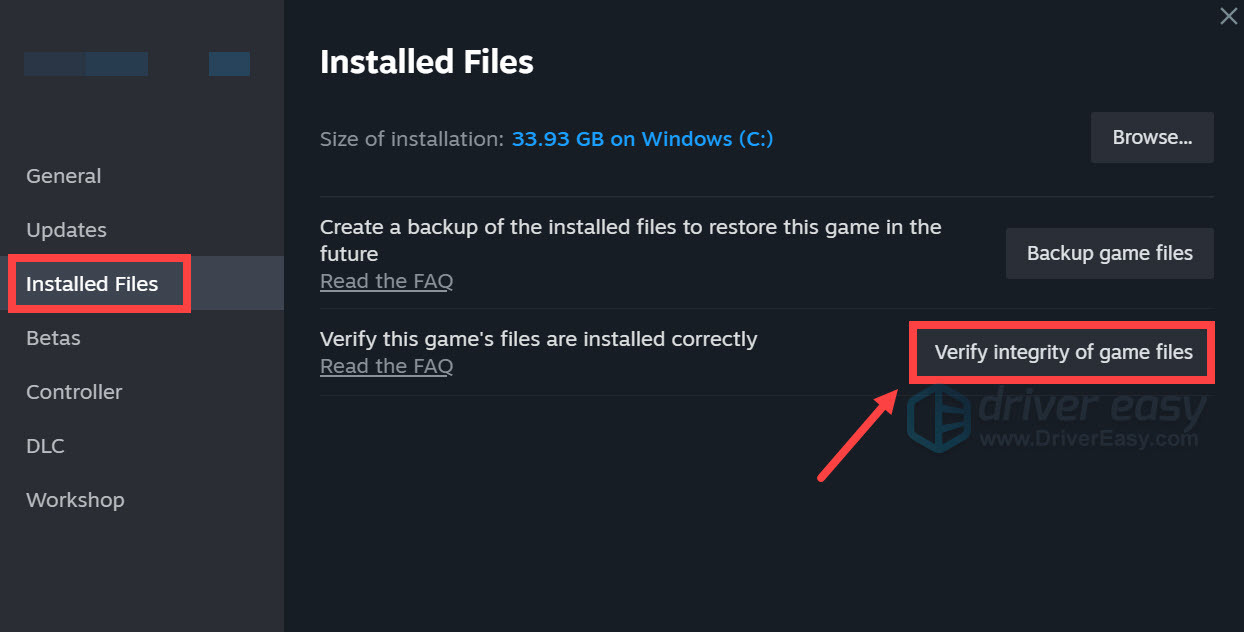
- Steam will verify the game’s files – this process may take several minutes.
Then try to run The Finals again to see if the launching problem is fixed. If the problem remains, please move on.
5. Turn off overlay
In-game overlays allow you to interact with friends and place orders in game, but this feature can also cause problems that could render launching problems with The Finals. If you’re using overlays provided by Discord, Steam or GeForce Experience, follow the instructions below to turn them off.
On Steam
- Launch Steam.
- In the LIBRARY, right-click on The Finals and select Properties from the drop-down menu.

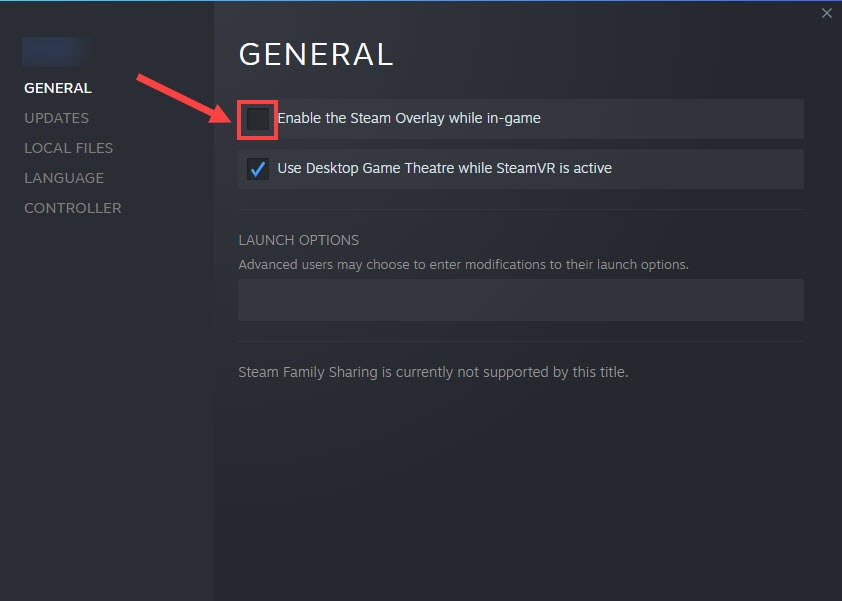
- Untick Enable the Steam Overlay while in-game.
On Discord
- Run Discord.
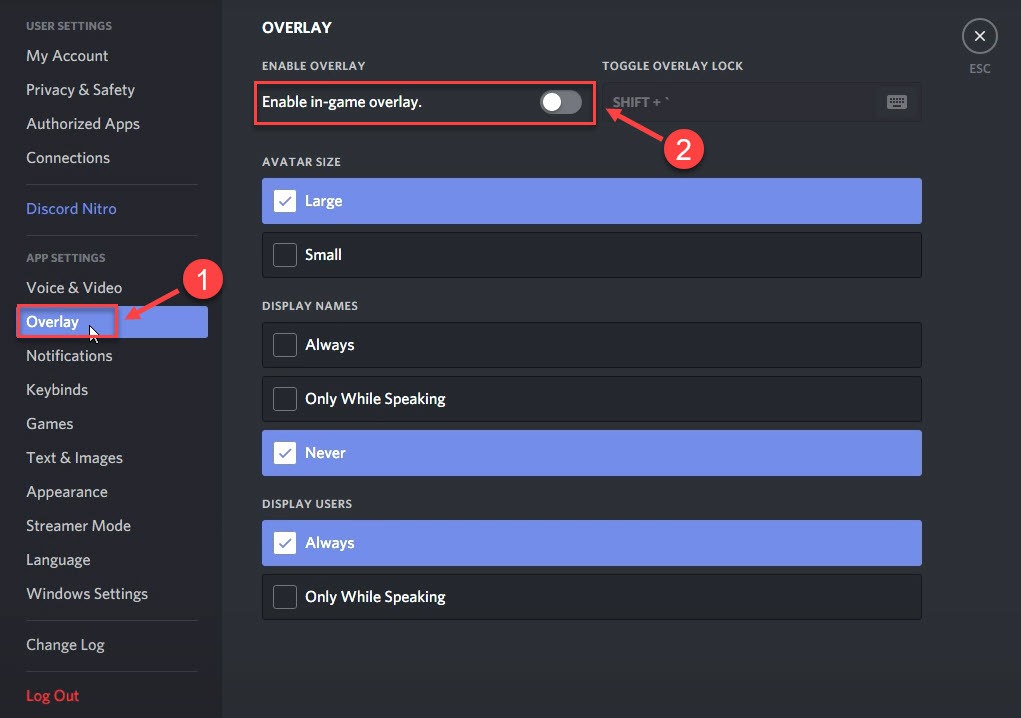
- Click the cogwheel icon at the bottom of the left pane.

- Click the Overlay tab and toggle off Enable in-game overlay.
On GeForce Experience
- Run GeForce Experience.
- Click the cogwheel icon at the upper right corner.
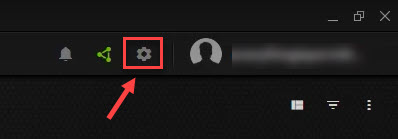
- Scroll to toggle off In-Game Overlay.
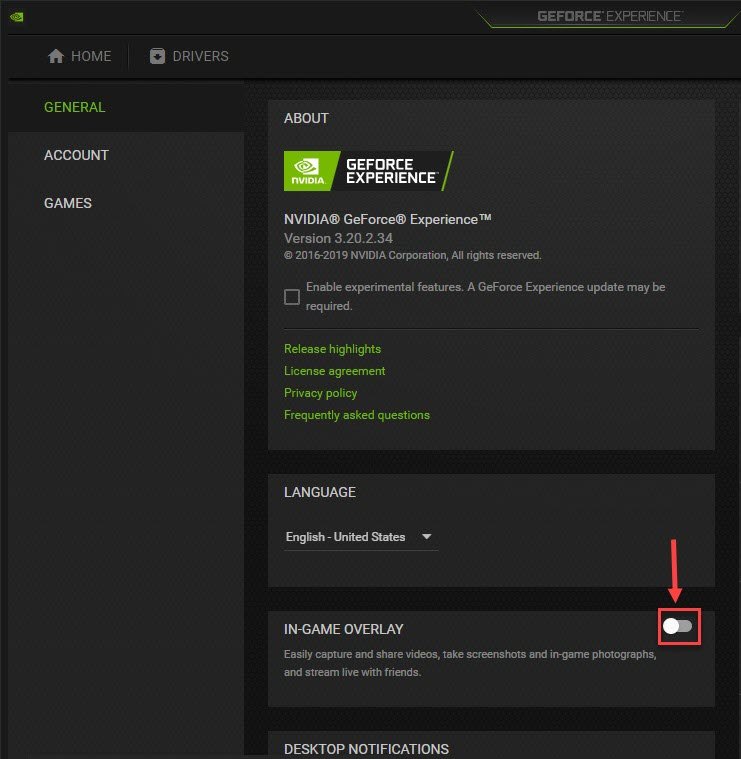
After you disable any overlays in use, restart The Finals to see if it launches properly now. If not, proceed to the next method.
6. Install The Finals on another drive
This is a fix proven to be effective by some Reddit users: reinstalling The Finals on another hard drive helps to fix the not launching problem. This is probably because reinstalling the game on a different drive is similar to resetting the game files, and therefore fixes problems like game crashing.
To install The Finals on a different drive:
- Launch Steam. Go to Settings > Storage.
- Click the dropdown icon and select Add Drive, and select a new hard drive from the list.

- Then go back to the Library, tick the box for The Finals and click Move.

- Select a different drive than the original one to move The Finals to, then click Move.

- Try to launch The Finals again to see if it works now. If the problem still remains, please move on.
7. Disable memory-intensive programs
When The Finals runs, it requires a bit of available RAM space. Even though you don’t have to have 12 GB of free memory for it to launch properly, still, the more free RAM space you have, the better. So we’d suggest you disable the memory-intensive programs running in the background if The Finals isn’t launching on your computer.
To do so:
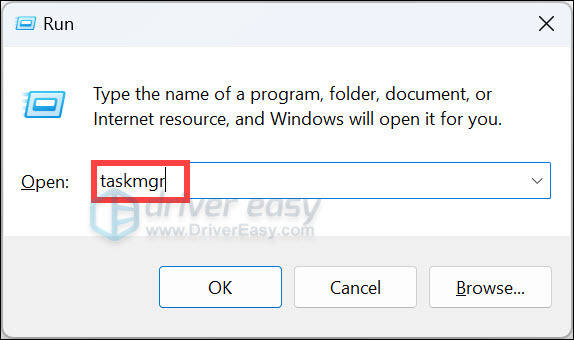
- On your keyboard, press the Windows logo + R keys simultaneously to open the Run box.
- Type taskmgr and hit Enter.
- Select Processes. Click Memory to sort the processes from occupying the most memory to the least. Then right-click on the process that occupies most of the RAM and select End task.

Then try to launch The Finals again to see if it runs well now. If the problem remains, please move on.
8. Update display card driver
An outdated or incorrect display card driver could also be the culprit to The Finals’ not launching problem, so if the above methods don’t help The Finals to launch, it’s likely that you have a corrupted or outdated graphics driver. So you should update your drivers to see if it helps.
There are mainly 2 ways you can update your graphics driver: manually or automatically.
Option 1: Update your graphics driver manually
If you’re a tech-savvy gamer, you can spend some time updating your GPU driver manually.
To do so, first visit the website of your GPU manufacturer:
Then search for your GPU model. Note that you should only download the latest driver installer that’s compatible with your operating system. Once downloaded, open the installer and follow the on-screen instructions to update.
Option 2: Update your graphics driver automatically (Recommended)
If you don’t have the time, patience or skills to update the driver manually, you can do it automatically with Driver Easy. Driver Easy will automatically recognize your system and find the correct drivers for it. You don’t need to know exactly what system your computer is running, you don’t need to be troubled by the wrong driver you would be downloading, and you don’t need to worry about making a mistake when installing. Driver Easy handles it all.
You can update your drivers automatically with either the 7 days free trial or the Pro version of Driver Easy. It takes just 2 clicks, and you get full support and a 30-day money-back guarantee with the Pro version:
- Download and install Driver Easy.
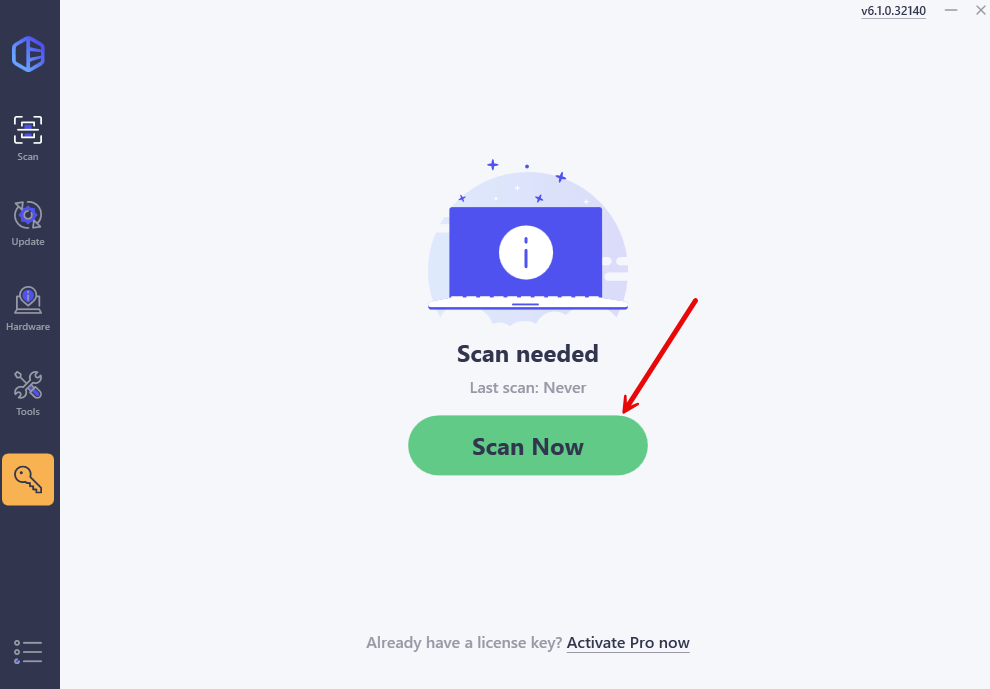
- Run Driver Easy and click the Scan Now button. Driver Easy will then scan your computer and detect any problem drivers.
- Click the Activate & Update button next to the flagged device to automatically download and install the correct version of this driver.
Or click Update All to automatically download and install the correct version of all the drivers that are missing or out of date on your system (You’ll need the Pro version for this – when you select Update All, you’ll get a prompt to upgrade. If you’re not prepared to purchase the Pro version yet, Driver Easy provides a 7-day trial at no cost, granting access to all Pro features like fast downloads and easy installation. No charges will occur until after your 7-day trial period ends.)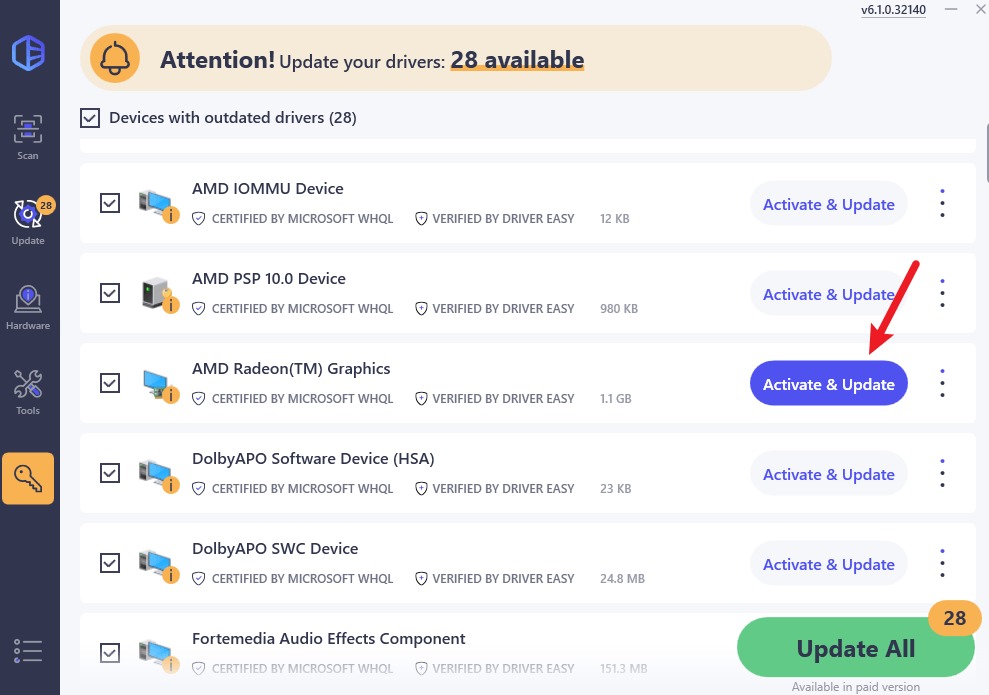
- Restart your computer for the change to take effect.
Try to launch The Finals again and see if the latest graphics driver helps to stop its not-launching problem. If this fix doesn’t work for you, try the next fix, below.
If you have other suggestions that have helped to fix the not launching problem with The Finals on your computer, please feel free to share them with us by leaving a comment below.


