An acceptable ping is around the 40ms-60ms mark or lower. For those who have played Valheim with over 150ms ping, this game can become unbearable and quick action is needed to stop it.
After loads of research and interacting with other players, we’ve put together all the effective methods to lower your ping to as low as 20ms to 70ms.
Why you’re getting high ping in Valheim
Ping is a measurement of how long it takes your computer to send and receive data to and from a server. High ping indicates that your computer and the server are taking a very long time to transmit data to one another.
There are 3 reasons why your ping is so high in Valheim:
- Internet connection speed
- Configuration of firewalls
- Server problems
Try these fixes
Whatever the cause is, you will be able to fix Valheim’s high ping by yourself in this post.
You don’t need to try them all; just work your way down the list until you find the one that works.
- Use an Ethernet connection
- Reboot your network
- Close bandwidth hogging applications
- Update your network driver
- Change the DNS server
- Turn off network optimization
- Use a gaming VPN
- Unlock the game’s upload cap
Fix 1: Use an Ethernet connection
Sometimes choosing one Internet service provider (ISP) over another can really make a difference in your gaming experience, especially when you’re playing in a league.
For most gaming requirements, broadband connections of at least 25 Mbps download speeds should be fine. But if you notice serious Internet speed drops, you can use a wired connection because they help maintain fast, direct, stable, and low latency connections.
Also, you can check out this free site called Speedtest which is run by a network performance company. It lets you test your current ping, download speed, and upload speed. If you are not receiving the speeds that your ISP promised, then you can let them know and ask them to optimize the speeds.
Fix 2: Reboot your network
One of the easiest and quickest ways to solve the network problem is to restart your network. This simple fix will re-establish your Internet connection, which can take care of a lot of minor speed issues.
- Turn off everything that is connected to the network.
- Unplug your router first and your modem second.
- Wait at least 10 seconds.
- Plug your modem back in first and your router second.
- It may take 2 to 3 minutes for your modem and router to fully boot up.
Fix 3: Close bandwidth hogging applications
Bandwidth hogging applications will slow down your network speed and trigger high ping issues in Valheim. Make sure you shut down all the resource-hungry programs before playing the game. Here’s how to do it:
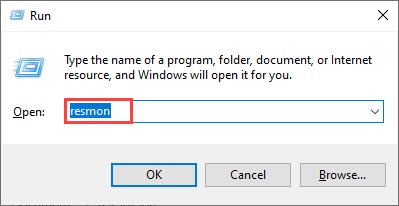
- On your keyboard, press the Windows logo key and R at the same time to invoke the Run dialog box. Type in resmon and hit Enter.
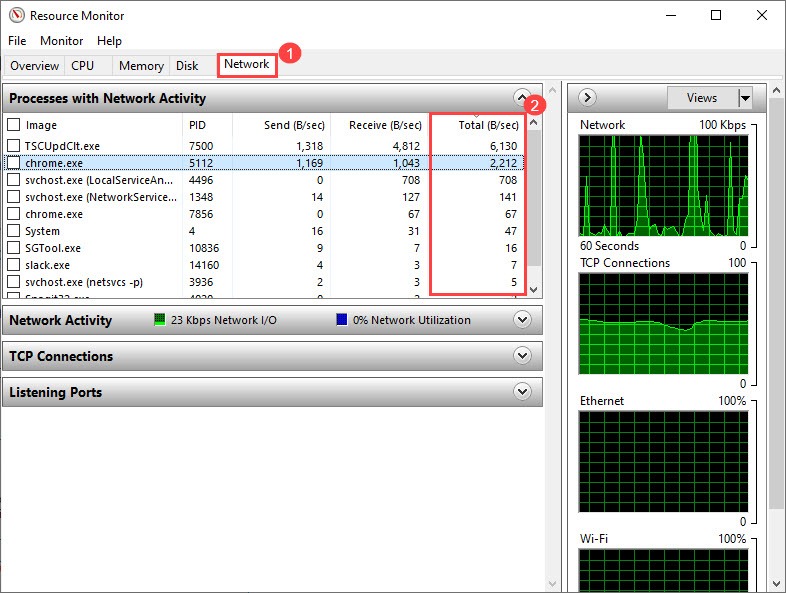
- Go to the Network tab, and take note of the Total (B/sec) column.
- Right-click on the application that’s eating up your bandwidth and select End Process.
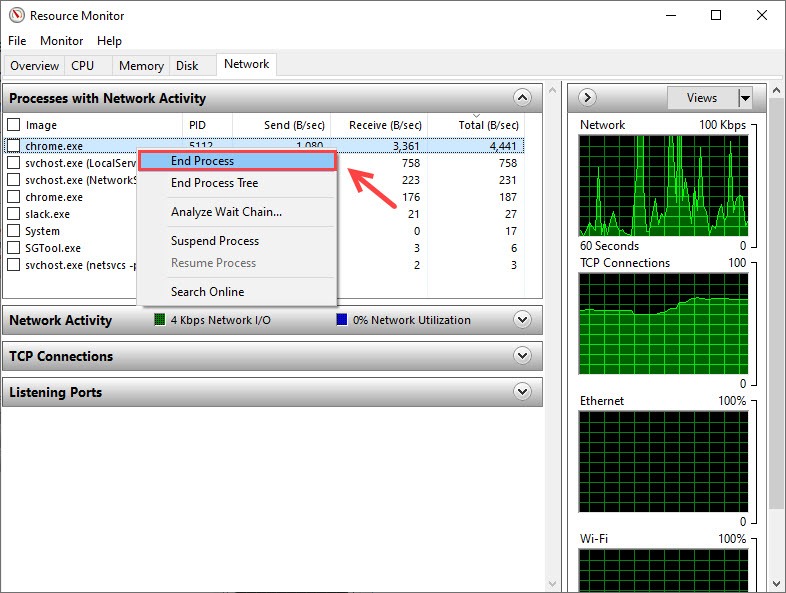
- When you’re prompted to confirm, click End process.
After closing all the unnecessary programs, check if the ping is decreased in Valheim. If you find this is not working in your case, please try the next fix below.
Fix 4: Update your network driver
Many players find their ping times drop after updating their network driver. No matter how well your computer is configured, it just isn’t going to function properly online without a proper network driver.
This is particularly essential if you’re using a high-end gaming motherboard, which might have important improvements to your network. So it’s recommended to update the network driver if you haven’t done so for a long time.
There’re 2 ways you can update your network driver: manually or automatically.
Option 1: Update your network driver manually
To update your network driver manually, it requires you to download the latest driver from your motherboard manufacturer’s official website. Make sure you know the exact driver provider and what your model is.
If you want to make this quicker, you can try updating your network driver automatically.
Option 2: Update your network driver automatically (recommended)
If you don’t have the time, patience or computer skills to update your network driver manually, you can, instead, do it automatically with Driver Easy. Driver Easy will automatically recognize your system and find the correct drivers for your exact network adapter, and your Windows version, and it will download and install them correctly:
- Download and install Driver Easy.
- Run Driver Easy, then click Scan Now. Driver Easy will then scan your computer and detect any problem drivers.

- Click the Update button next to a flagged driver to automatically download the correct version of that driver, then you can manually install it (you can do this with the FREE version).
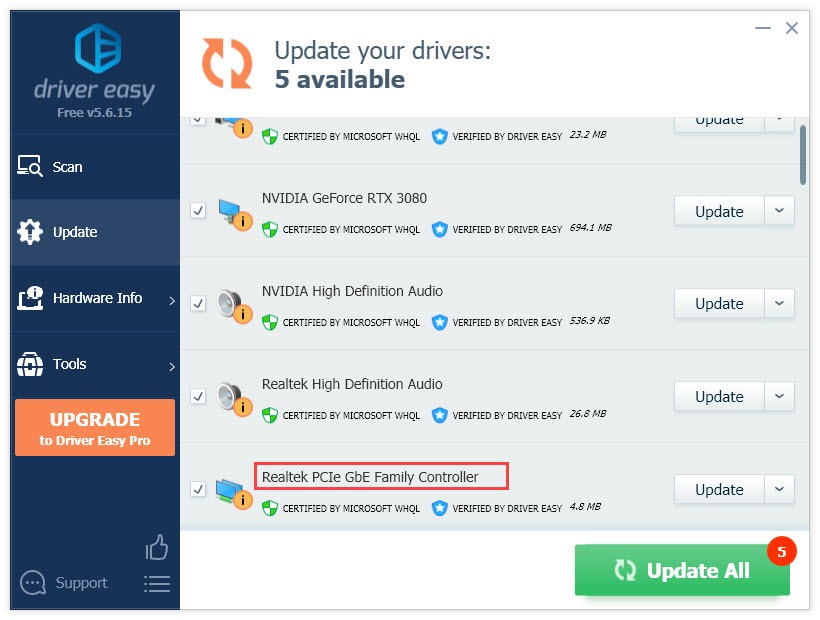
Or click Update All to automatically download and install the correct version of all the drivers that are missing or out of date on your system. (This requires the Pro version which comes with full support and a 30-day money back guarantee. You’ll be prompted to upgrade when you click Update All.)
After updating your drivers, check to see whether the high ping still remains. If it does, try out the next fix below.
Fix 5: Change the DNS server
Another reason why you’re getting high ping in Calheim is that you’re using the default DNS servers assigned by your ISP. For the most time, this won’t cause any problems, but it might cause server connection issues. Try changing the DNS server to the Goggle Public DNS addresses to see if this helps:
- On your keyboard, press the Windows logo key and S at the same time to open the Search box.
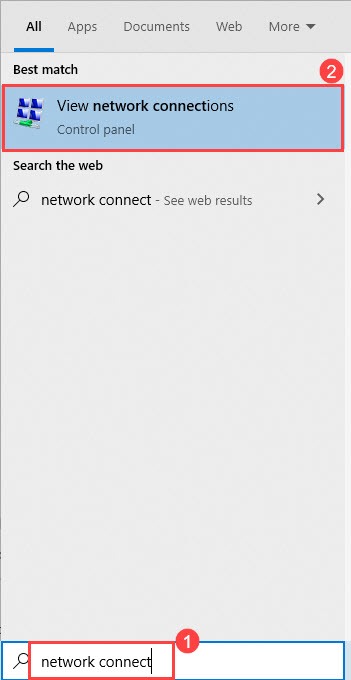
- Type network connections in the field and select View network connections.
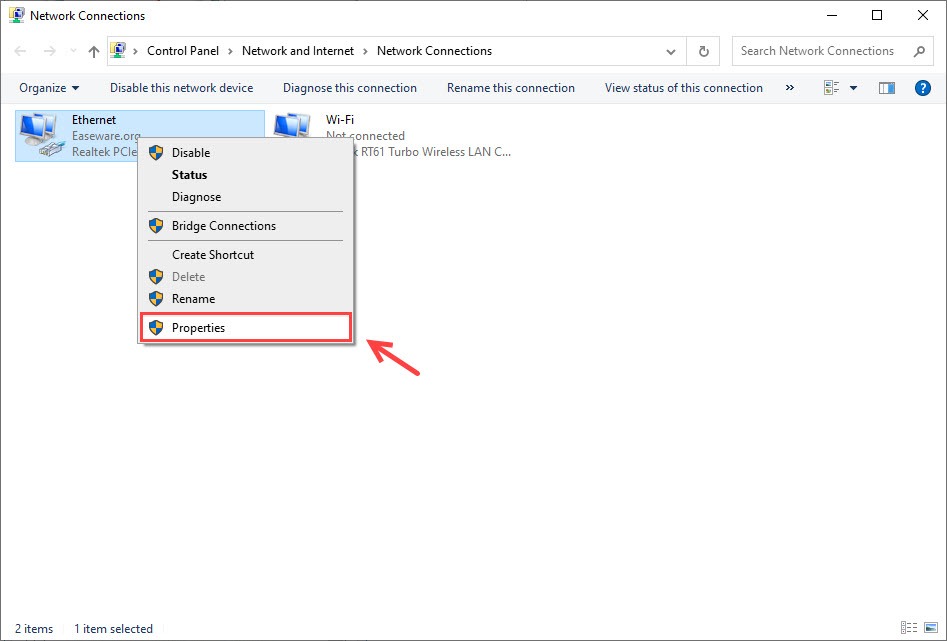
- Right-click your current network and click Properties.
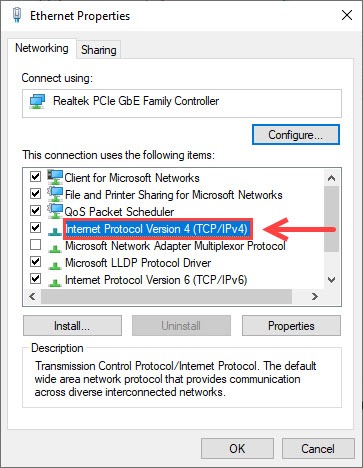
- Double-click Internet Protocol Version 4 (TCP/IPv4) to view its properties.
- Make sure you check the option Obtain an IP address automatically (the default setting).
- Select Use the following DNS server addresses, and enter the following addresses:
PreferredDNS server: 8.8.8.8
Alternative DNS server: 8.8.4.4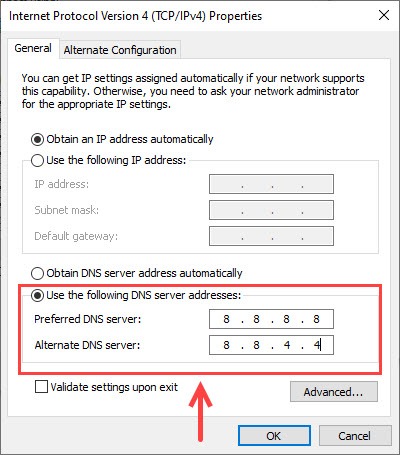
- Click OK to apply the changes.
Now play Valheim again to see if the high ping persists. If it’s still bugging you, please head to the next fix.
Fix 6: Turn off network optimization (only for Lenovo users)
Many players find there’s a fix that really works for Lenovo users. You just need to turn off network optimization, and here’s how to do it:
- Launch Lenovo Vantage (which is preinstalled in Lenovo gaming laptops).
- Locate Network Boost and turn it off.
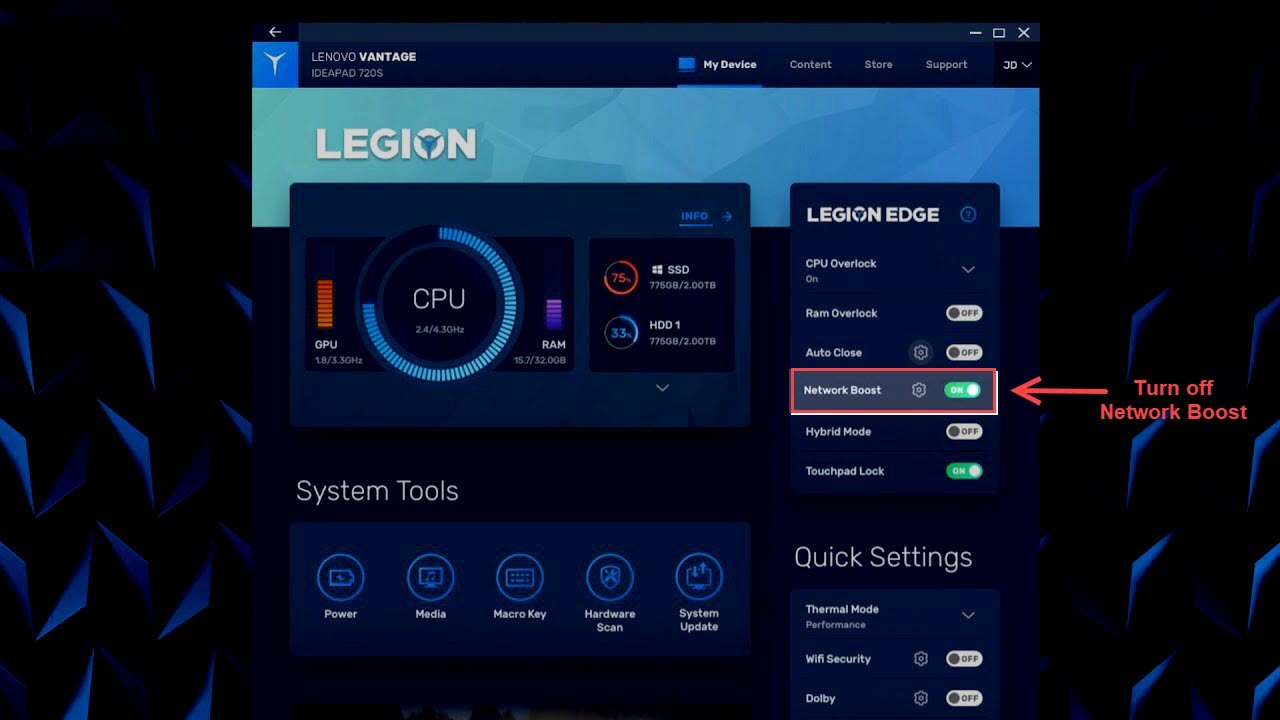
Now launch your game again to see if you get rid of Valheim high ping.
Fix 7: Use a gaming VPN
Another fix that worked for many players is using a gaming VPN. Although a VPN usually slows the internet connection, it can also help make the connection clean if that’s the problem. Because there is a chance your ISP might be throttling your connection or rerouting you through congested networks. In that case, you can try a gaming VPN.
Many users have achieved 70% ping improvement with a gaming VPN, and not so many VPNs are good for gaming. Although our recommendations are Express VPN (which comes with a 30-day money-back guarantee) and Nord VPN (which also offers 70% off coupons).
Fix 8: Unlock the game’s upload cap
Just because you’re getting bad ping doesn’t mean the trouble is with your laptop. If you can’t attribute it to one person’s connection, it’s most likely due to the game’s 60kb upload cap, especially during multiplayer because players tend to hit the cap.
Here’s how to do it:
- Download DNSPY (GitHub Link), which is a debugger and .NET assembly editor. You can use it to edit and debug assemblies even if you don’t have any source code available.
- Be sure to download the correct zip file for your operating system.

- Extract the zip file, and run DNSPY.
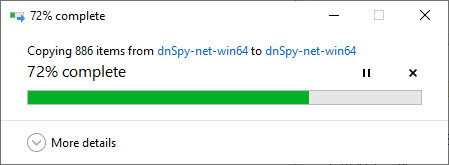
- Click File > Open, and navigate to where you installed Valheim (usually …SteamLibrarysteamappscommonValheimvalheim_DataManaged).
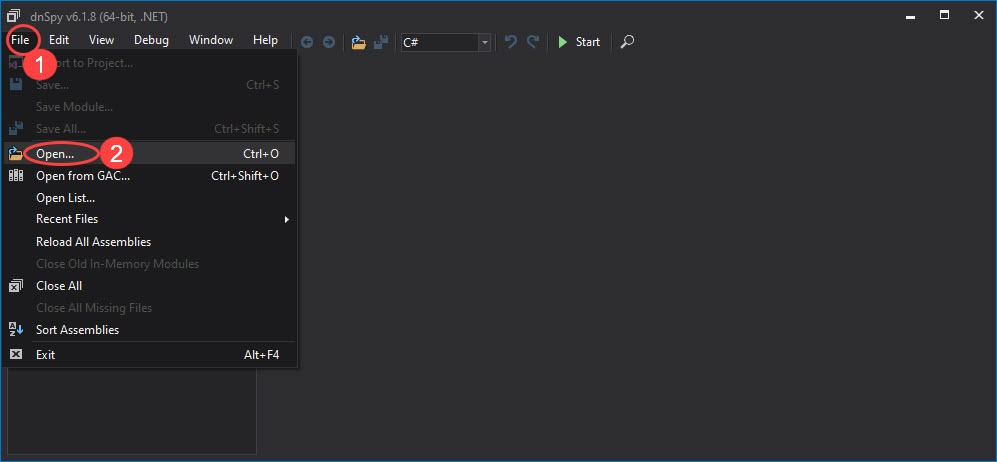
- Select assembly_valheim.dll.
- Click Open.
- In the left panel titled Assembly Explorer, find and select assembly_valheim.dll.
- Select {}
- Choose ZDOMAN
- Select m_dataPerSec, and then right-click it and select Edit Class…
- In the line private int m_dataPerSec = set it to at least 122880
- Click Compile in the bottom right corner.
- Click File > Save Assembly.
Now if you’re using a local server, you can just launch your server and have somebody join. At this point, hopefully, the Valheim high ping issue has been resolved.
But if you’re connecting to a dedicated server, you should replace the assembly_valheim.dll file that the dedicated server uses. Once the file is replaced using the new value, start/restart your server to load the new file.
While playing Valheim, press F2 to see if the ping time decreases now.
Hopefully, one of the fixes above helped fix your Valheim high ping and now you can enjoy this game without latency. If none worked for you, you can perform a clean boot or contact the Valheim support team and convey this issue to them.


